| From: Bjrogg
|
|
|
|
|
|
|
| Date: 23-Mar-24 |
|
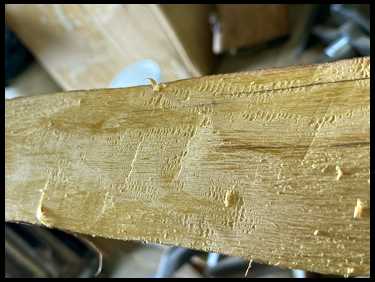
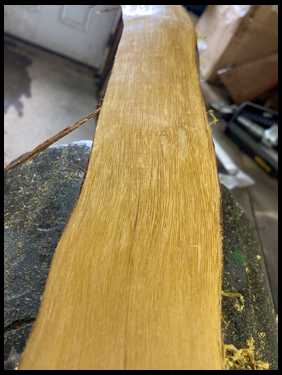
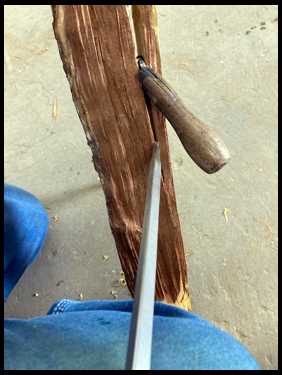
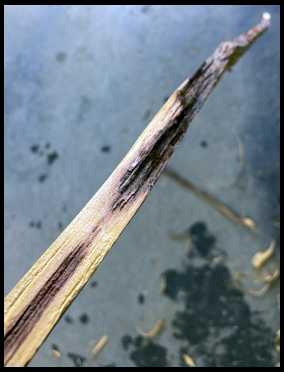
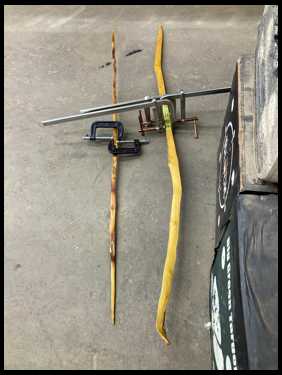
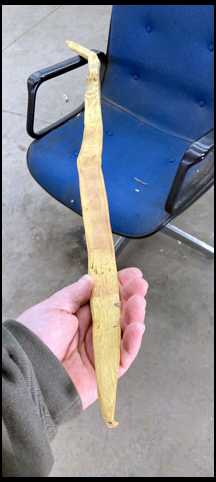
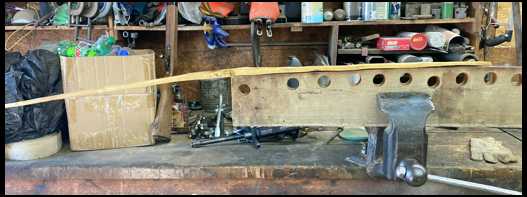
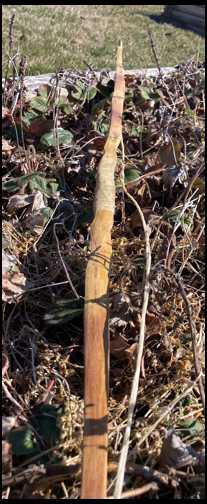
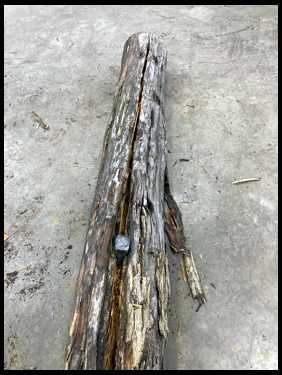
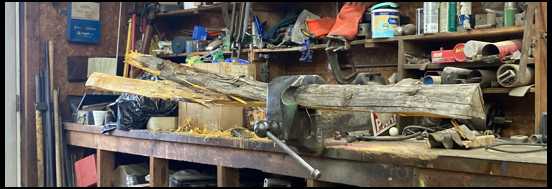
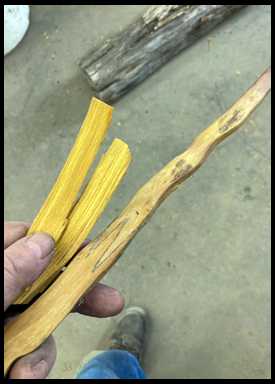
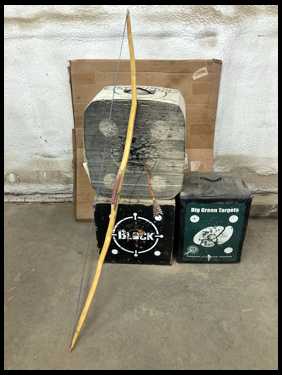
Sometimes we can learn a lot by starting small. We don’t have to ruin an expensive stave.
We can learn a lot from basically a piece of firewood.
I’m going to use this knarly piece of Osage to see what we can learn from it.
Bjrogg
|
|
| From: Bjrogg
|
|
|
|
|
|
|
| Date: 23-Mar-24 |
|
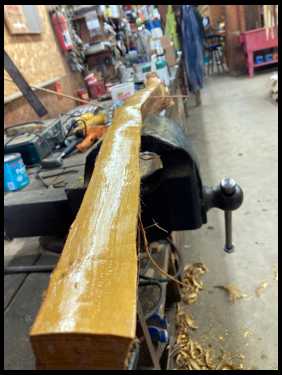
Has a limb growing out of it
Bjrogg
|
|
| From: Bjrogg
|
|
|
|
|
|
|
| Date: 23-Mar-24 |
|
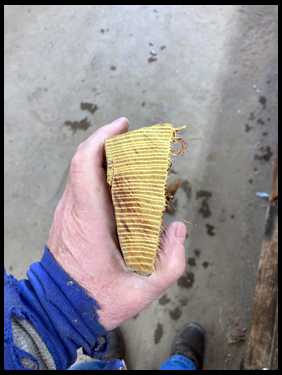
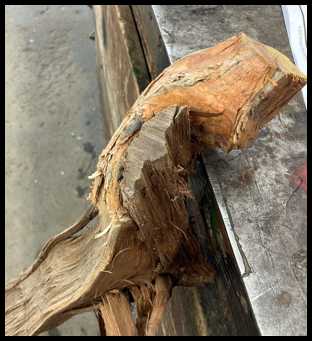
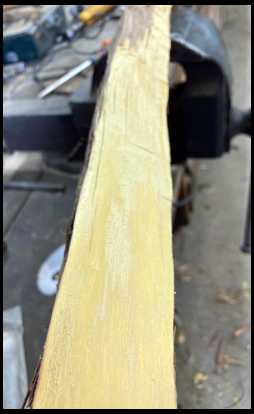
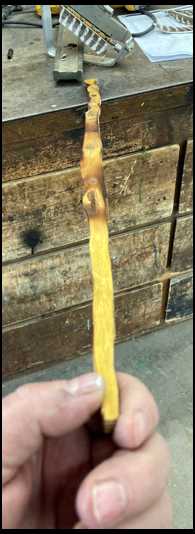
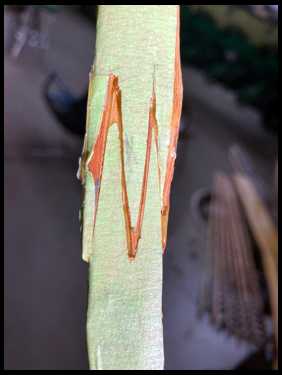
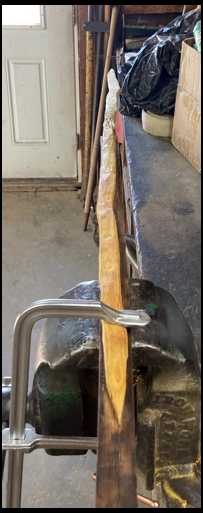
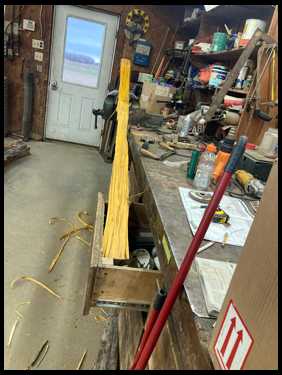
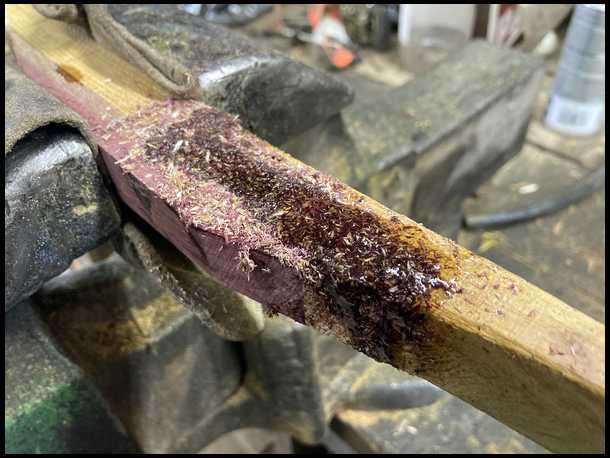
Honestly this thing is so twisted up it’s hard to tell where it’s back is to start chasing a ring.
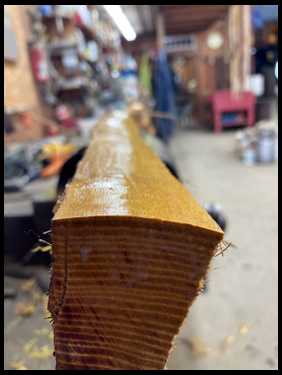
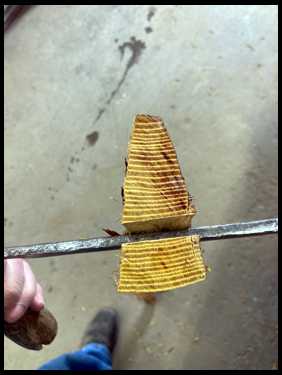
I cut a little off the end to see which way the growth rings are oriented.
Bjrogg
|
|
| From: Bjrogg
|
|
|
|
|
|
|
| Date: 23-Mar-24 |
|
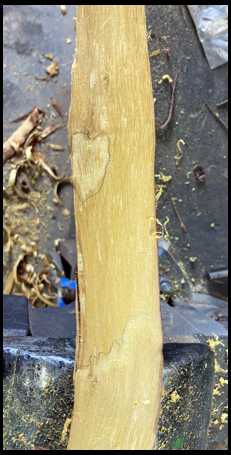
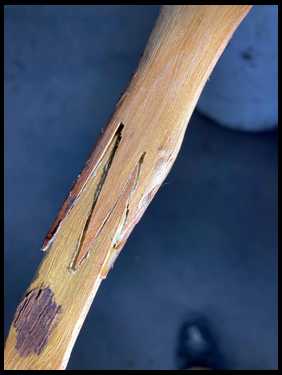
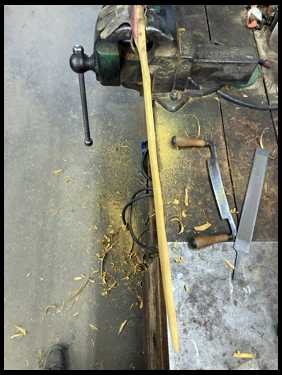
Now I can see this is my back. I need to chase a ring on this edge.
Bjrogg
|
|
| From: Bjrogg
|
|
|
|
|
|
|
| Date: 23-Mar-24 |
|
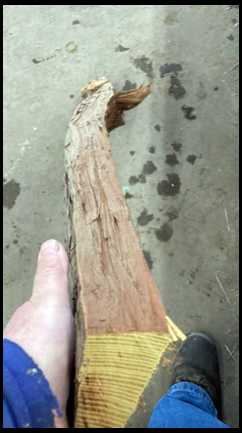
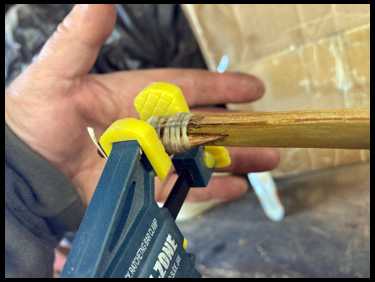
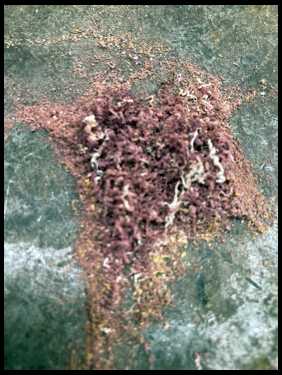
I start on the end I think has the lowest ring. I pick a ring and start chasing from that end. Always working the same ring being carefull not to get lost.
Do Not try to jump around chasing ring. You have to follow the same one.
I use my draw knife to get to the crunchy early wood just above my ring. If you are working seasoned Osage you can hear and feel when you knife edge is in the early wood. I wish you could hear this now.
Bjrogg
|
|
| From: tradslinger
|
|
|
|
|
|
|
| Date: 23-Mar-24 |
|
can't wait to see how this unfolds
|
|
| From: Bjrogg
|
|
|
|
|
|
|
| Date: 23-Mar-24 |
|
Keep watching I’m hoping this piece has a lot to teach us. Ask questions if you have them I will try to answer them if I can but I will try to keep things moving too.
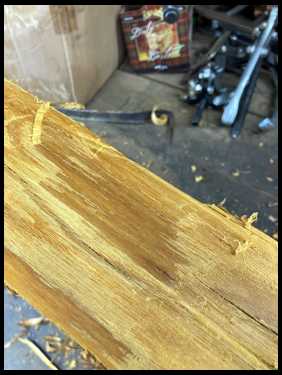
Next I use my cabinet scraper to remove the early wood. It will take off the early wood fairly easily but it won’t damage the ring I’m chasing.
Bjrogg
|
|
| From: Bjrogg
|
|
|
|
|
|
|
| Date: 23-Mar-24 |
|
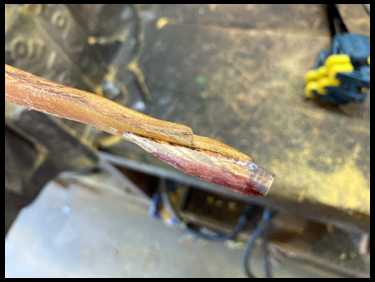
It might be hard to see on these resized pictures. I tried to some transition between rings by putting a pencil mark on it.
You can see hear the ring I’m chasing and then further down the limb two more above it that will be removed too.
Bjrogg
|
|
| From: Bjrogg
|
|
|
|
|
|
|
| Date: 23-Mar-24 |
|
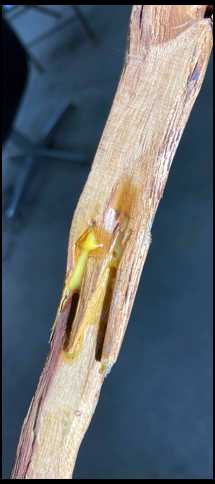
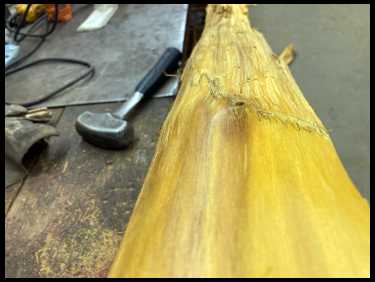
I didn’t get all of this knot from one direction. Sometimes it is easier to clean up with scrapper and then come back from opposite direction.
Bjrogg
|
|
| From: Bjrogg
|
|
|
|
|
|
|
| Date: 23-Mar-24 |
|
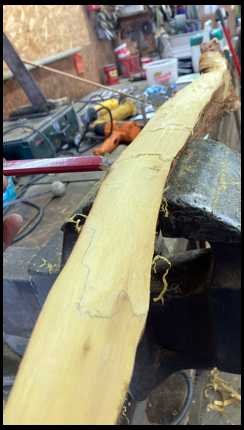
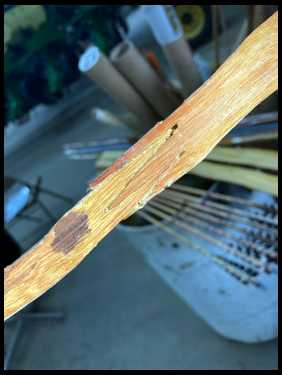
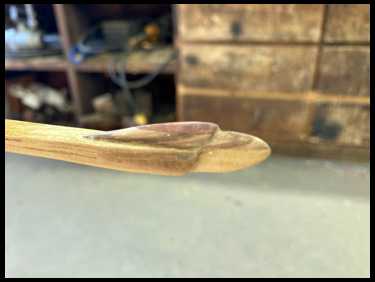
When you get to the end it should look like this.
Bjrogg
|
|
| From: Bjrogg
|
|
|
|
|
|
|
| Date: 23-Mar-24 |
|
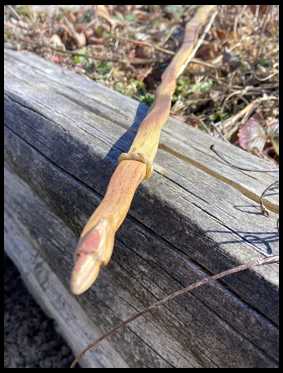
As soon as you finish make sure you seal the back to keep it from checking.
Bjrogg
|
|
| From: Bjrogg
|
|
|
|
|
|
|
| Date: 23-Mar-24 |
|
This one hasn’t finished teaching us yet. It still has plenty we can learn
It might take me a bit to resize some more pictures but I will be back
Bjrogg
PS there more than one bow in there.
|
|
| From: BowAholic
|
|
|
|
|
|
|
| Date: 23-Mar-24 |
|
this is great BJ. Thanks. Your pictures are around 400 on the long side...they can be quite a bit larger.
|
|
| From: Bjrogg
|
|
|
|
|
|
|
| Date: 23-Mar-24 |
|
I hope people can see good enough Bob.
I can’t seem to fine tune my resize settings and my pictures don’t disappear at these settings so I guess I’ll just keep them here if everyone can see.
This next lesson is one I can’t say you can ever completely master. It doesn’t always work out well. Sometimes you might ruin a good stave trying this.
However if you learn it on a piece of firewood it’s a valuable lesson at a very reasonable price.
I’ve said it before. I use mostly hand tools. Not because I want to be more primitive. Because I think they are so well suited for the job.
Honestly there is a better tool for this than my beat up old draw knife but I don’t have one. Wish I did.
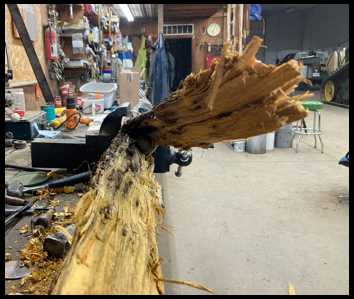
I m going to try mass reduction and split off a large section of the belly
Would recommend doing this with your favorite draw knife
Bjrogg
|
|
| From: Bjrogg
|
|
|
|
|
|
|
| Date: 23-Mar-24 |
|

Fast simple reduction. I doubt I could even walk over to my table saw in the time it took me to do this
Bjrogg
|
|
| From: Bjrogg
|
|
|
|
|
|
|
| Date: 23-Mar-24 |
|
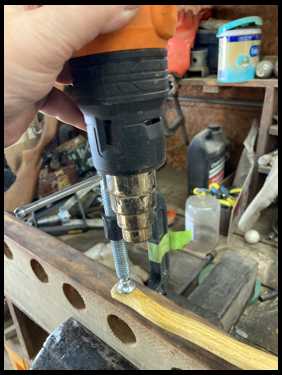
I use my screwdriver to help control my split. If it starts going to thin I try to get it in the ring I want again.
Bjrogg
|
|
| From: Bjrogg
|
|
|
|
|
|
|
| Date: 23-Mar-24 |
|
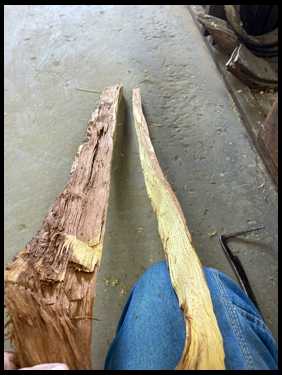
Hopefully I can get it to follow this ring or close to it to the other end.
That didn’t go to bad.
Like I said you never really completely master this. Alway have a plan b if things turn to crap. Hopefully you get two for the price of one, but make sure you get at least one.
Bjrogg
|
|
| From: Mechanic
|
|
|
|
|
|
|
| Date: 23-Mar-24 |
|
Looking good so far!
|
|
| From: Bjrogg
|
|
|
|
|
|
|
| Date: 23-Mar-24 |
|

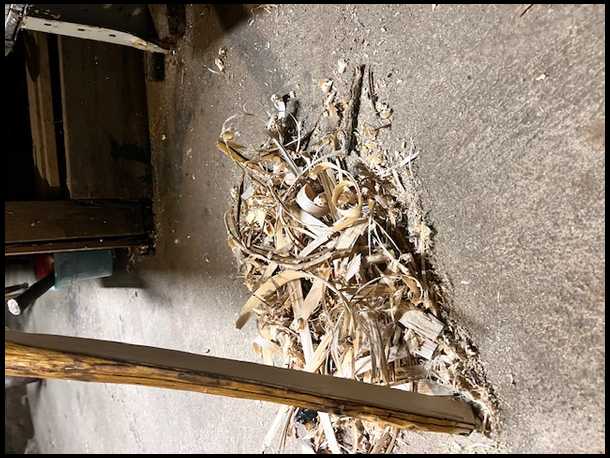
When you finish splitting don’t throw that belly split away .
It still has lots of lessons to teach.
Number chase a ring. That is a skill you can master.
Practice makes perfect
Then seal the back
Bjrogg
|
|
| From: Bjrogg
|
|
|
|
|
|
|
| Date: 23-Mar-24 |
|
I wasn’t originally planning on this but maybe there a handle splice lesson in there too.
|
|
| From: tradslinger
|
|
|
|
|
|
|
| Date: 23-Mar-24 |
|
enjoying it very much. Yes, the splitting can go south really fast when it doesn't work out. I have a Stave that I bought last year, hoping to get two maybe three bows out of it. The one bow that I spliced together, was done out of ignorance but still managed a light weight bow out of it. I need to make a light weight bow for my wife, she is short, has about a 22" draw or less and struggles with 25# (she is 65). The smaller light weight selfbows are quite the challenge for me. I have one "good eye" and it has macular degeneration in it LOL. The other eye distorts everything and makes depth perception lousy. Then there is the lack of feeling in my fingers, so, it is what it is but I ain't quitting. Chasing rings can be quite the nightmare for me, so I am very slow at best.
|
|
| From: Bjrogg
|
|
|
|
|
|
|
| Date: 23-Mar-24 |
|
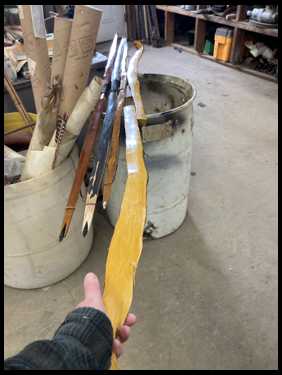
If there’s a handle splice lesson here it’s going to have to wait.
But we have a third belly split to play with in the meantime.
Chase a ring
Seal the back
The I cut off the limb and shortened to about 36” for now.
Bjrogg
|
|
| From: Bjrogg
|
|
|
|
|
|
|
| Date: 23-Mar-24 |
|
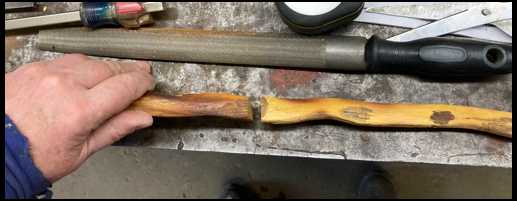
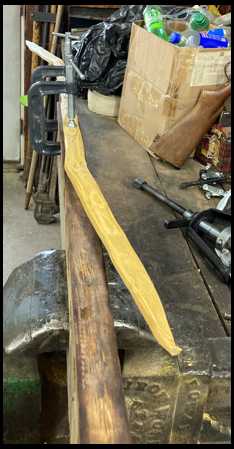
Next I used my draw knife to remove slivers and poor wood from the sides of my stave.
Bjrogg
|
|
| From: Bjrogg
|
|
|
|
|
|
|
| Date: 23-Mar-24 |
|
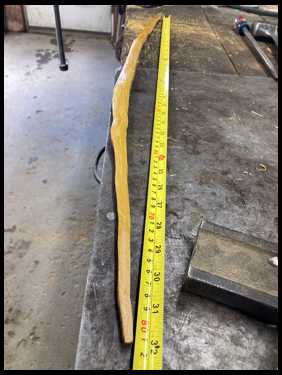
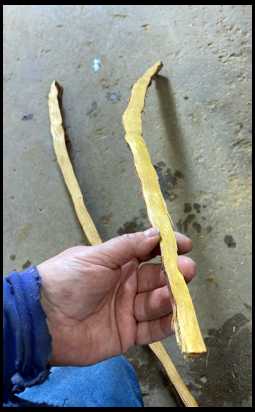
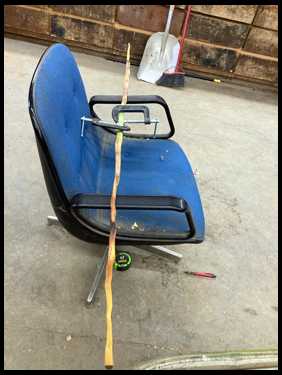
I end up having about four inches of very narrow back at one end. I cut it off and my stave is about 32” now as the crow flies.
Not exactly straight though. Time for another lesson
Bjrogg
|
|
| From: Bjrogg
|
|
|
|
|
|
|
| Date: 23-Mar-24 |
|
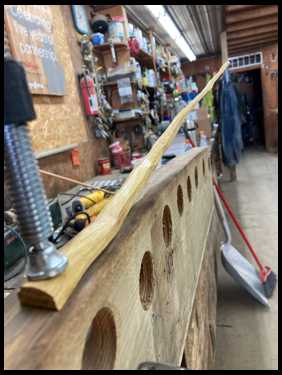
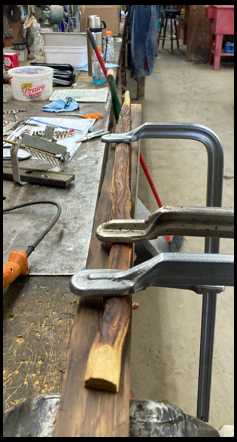
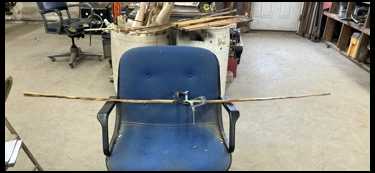
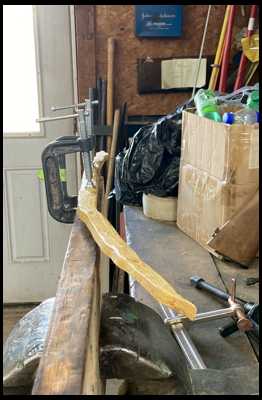
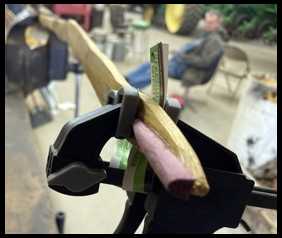
If you want to make Selfbows I very much encourage you to make a caul or form for heat corrections.
I have three or four that I use in different combinations
I clamp one end of my stave to my caul. Sometimes I start in middle of stave but not this time.
Bjrogg
|
|
| From: Bjrogg
|
|
|
|
|
|
|
| Date: 23-Mar-24 |
|
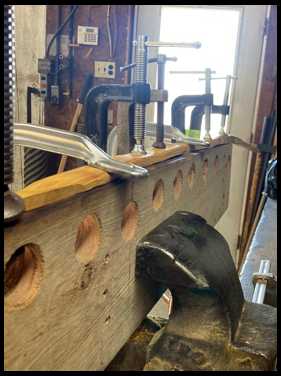
As you can see it needs a little heat so I use my heat gun to heat it up good. I use a steady pressure with my hand and I can feel when the wood plasticizes . Don’t put to much pressure on it. You should be able to feel it giving up. It will almost feel like the wood just relaxes.
Continue down the stave clamping and straightening as you go.
Caution. Make absolutely sure you have the back of the bow against the caul.
ONLY HEAT THE BELLY!!!!!!!!!
Bjrogg
|
|
| From: Bjrogg
|
|
|
|
|
|
|
| Date: 23-Mar-24 |
|

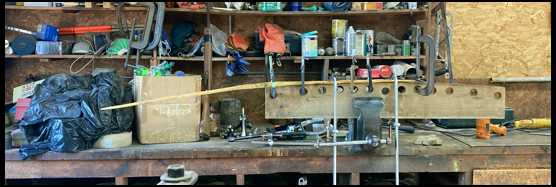
It’s really nice to have another set of hands. If you have someone to either hold heat gun or put clamps on it’s a huge advantage.
I really like the bar clamps but I do use c clamps too.
Here’s looking at stave on caul heated and clamped
Bjrogg
|
|
| From: Bjrogg
|
|
|
|
|
|
|
| Date: 23-Mar-24 |
|
Taking off the clamps
|
|
| From: Bjrogg
|
|
|
|
|
|
|
| Date: 23-Mar-24 |
|
Here it is. On average a lot straighter.
I did have the heat come around the back of the bow. I don’t like it. Happens sometimes especially on very narrow staves.
Another lesson. It sometimes is better to leave yourself an extra ring to chase after your heat corrections. Heat is good for compression but bad for tension.
Bjrogg
|
|
| From: Bjrogg
|
|
|
|
|
|
|
| Date: 23-Mar-24 |
|
I think that concludes our lessons for today.
If you have any questions I will try to answer them.
Hope you give this a try
Bjrogg
|
|
| From: tradslinger
|
|
|
|
|
|
|
| Date: 23-Mar-24 |
|
nice job Brian, you answered a lot of questions that many will have that have never done this. People tend to be afraid to try things that they can't see or understand the whys and hows in the first place. You obviously are a lot quicker than me. love your caul, I need to make a better and for real one than what I have been using.
|
|
| From: Don T. Lewis
|
|
|
|
|
|
|
| Date: 23-Mar-24 |
|
Good thread! Thanks for sharing all these lessons with us. I like that heat gun trick. I’m going to get a heat gun now:)
|
|
| From: Bjrogg
|
|
|
|
|
|
|
| Date: 23-Mar-24 |
|
Thanks Jerry.
It honestly isn’t the easiest place to show what I am trying to show.
I’m trying to really condense things down but show options and problems.
I struggled with chasing a ring at first to. I have much better luck with cured Osage. It’s a lot harder to feel the difference between early and late wood when it’s still wet.
You need good lighting, but honestly you need to be able to hear and feel it too.
I really do wish I had an edit button on here. I just reread everything and see several times spell check got me
Bjrogg
|
|
| From: Bjrogg
|
|
|
|
|
|
|
| Date: 23-Mar-24 |
|
Thanks Don. Osage is really nice for heat correction. It really holds the shape you form it to well.
I don’t like the smell like hop Hornbeam though. That smells so good. I’ve often wondered about smoking some meat with it.
I actually seem to have developed a bit of an allergy to Osage. The smoke and dust causes my sinuses to bleed.
I wear a mask when sanding it.
Even the dust that sticks to my moist areas. Around my nose and mouth get a rash.
Real bummer but I still play with the stuff. It’s just that good.
Bjrogg
|
|
| From: tradslinger
|
|
|
|
|
|
|
| Date: 23-Mar-24 |
|
spell check can really cause issues but it is also a life saver for someone like me that has spelling issues from past strokes. The way that you are laying it out and trying to convey what and why you are doing plus the why nots has to really help someone trying to do this or to understand that even though it has to be done right, it isn't as hard as it appears. Yes, with heat and steam, many things can be overcome. Excellent presentation Brian.
|
|
| From: Bjrogg
|
|
|
|
|
|
|
| Date: 23-Mar-24 |
|
Thanks Jerry. I’m not done with our lessons yet. Just today’s.
There’s still a fourth belly split. I’m not sure but I think I see another lesson plan in there. Just going to have to prepare my presentation.
Bjrogg
|
|
| From: Bjrogg
|
|
|
|
|
|
|
| Date: 23-Mar-24 |
|
One other thing I am really trying to do.
GET YOU TO PICK UP A PIECE OF FIREWOOD AND TRY IT.lol
Bjrogg
|
|
| From: Don T. Lewis
|
|
|
|
|
|
|
| Date: 23-Mar-24 |
|
Oh NO! Some of us have more to learn than others. One thing I learned building selfbows so far. Is Hickory wood shavings make good fire starter. So it’s never a total loss;)
|
|
| From: Don T. Lewis
|
|
|
|
|
|
|
| Date: 23-Mar-24 |
|
Brian, when you start to tiller the limbs. Do you start at the fades and work towards the tips? Or vice versa?
|
|
| From: Bjrogg
|
|
|
|
|
|
|
| Date: 23-Mar-24 |
|
Don I do the opposite.
I know bowyers that I very much admire who do fantastic tillering that start at the fades.
One reason I start at tips is because if I start out taking to much out of fades I’m limited to what I can get for weight.
If I was good enough to do it that way. I would.
The way I do it I start to thin outers. I still leave them a little wide but I remove wood from the belly until I can get outers moving.
When I get the outers moving to my liking I get the mid limb moving.
This makes the outers appear stiff again so I continue to the outers at the same time.
I keep doing this working my way towards the handle.
I go over the outers and even mid limb extra times this way, but I find I can get the most out of my stave this way.
That’s how I do my rough tillering.
Once I get it braced I try to get any spots that need attention first.
Bjrogg
|
|
| From: Slick
|
|
|
|
|
|
|
| Date: 23-Mar-24 |
|
Brian thanks for taking us along!
|
|
| From: Don T. Lewis
|
|
|
|
|
|
|
| Date: 23-Mar-24 |
|
Thanks Brian. Sounds like you can do it from either way. Maybe your way will work better for me. I’m willing to give it a try. At the very least. I should learn a few things doing it that way. And if not I still have some good fire starter;)
|
|
| From: Jeff Durnell
|
|
|
|
|
|
|
| Date: 23-Mar-24 |
|
I was following along thinking, that's exactly how I do it, until I saw the wood charred. When I'm making heat corrections to osage, the wood never darkens. And I also heat the back. I heat all the way around, equally... nice even, slow, gentle, heat. Allow it time to penetrate from all sides, toward/into the center. Apparently I heat the wood from farther away and/or with move movement of the heat gun than some folks do. My wood turns to rubber eventually but never changes color. Probably takes me longer to do it, but I'm ok with that.
I'm not going to use a drawknife to split wood. I have plenty of tools designed for that.
|
|
|
|
|
|
| From: Bjrogg
|
|
|
|
|
|
|
| Date: 23-Mar-24 |
|
Yes I probably did rush and over do the heat correction a bit Jeff.
Especially for such a small narrow stave.
I guess I started building Hop Hornbeam bows and I always used a lot of heat on them.
Osage is much easier to move than hop.
I do usually char the belly some though if it will be removed tillering. I do try to keep it off the back though and often plan on chasing a ring after heat correction.
I probably should hold my gun further away and take more time especially with Osage.
Would be interesting to watch your process.
Jeff one of the spell check edits I’d like to make is about using draw knife to make belly split. I wish I had the proper tools for it but I don’t yet.
My post was supposed to read I WOULDN’T recommend using your favorite draw knife. Or really any draw knife at all. I’m afraid this old draw knife was beat up long before I got my hands on it though.
Bjrogg
|
|
| From: Don T. Lewis
|
|
|
|
|
|
|
| Date: 23-Mar-24 |
|
Well No two bowyers make a bow exactly the same way would be my guess.But we sure can learn things from each other. It’s like some guys like their burger cooked well and charred. Yet others like theirs medium rare. And Sometimes we have to improvise if we don’t happen to have the proper tool in our work shop. I’ve heard of guys making an entire bow using just a hatchet. And build a fire to make heat adjustments where necessary. I guess there is more the one way to skin a cat;) criticism should always be welcome too. That’s how we get better.
|
|
| From: Bjrogg
|
|
|
|
|
|
|
| Date: 23-Mar-24 |
|
I agree 100 % Don.
I very much respect Jeff’s critique and honesty believe his method is probably best. Especially if you are already close to bow dimensions and don’t have another ring to spare or wood to remove tillering.
Bjrogg
|
|
| From: Bjrogg
|
|
|
|
|
|
|
| Date: 23-Mar-24 |
|
Oh by the way.
I did chase a ring on that fourth belly split and cleaned it up a bit.
Im going to do some heat correction on it tomorrow if I can a then prepare another lesson.
Remember my main point here is you can practice all these skills by using scraps and firewood.
Bjrogg
|
|
| From: Don T. Lewis
|
|
|
|
|
|
|
| Date: 23-Mar-24 |
|
I will be following Brian. Who would have thought you could learn something from a piece of fire wood. I’m going to have a real hard time this year throwing fire wood in the fire pit!;)
|
|
| From: wooddamon1
|
|
|

|
|
|
|
| Date: 24-Mar-24 |
|
I don't have any Osage firewood besides shavings and smaller split stuff, but I have a few mulberry and ash staves from 2 of my arborist buddies that I let drop off wood for the shabin stove. Got em on the lookout for good woods like elm too but no luck so far.
Following along for the lessons, BJ. Great thread!
|
|
| From: B.T.
|
|
|
|
|
|
|
| Date: 24-Mar-24 |
|
I’m finally understanding some things about building selfbows. Very cool!
|
|
| From: zonic
|
|
|
|
|
|
|
| Date: 24-Mar-24 |
|
Added to FAVORITES!
|
|
| From: zonic
|
|
|
|
|
|
|
| Date: 24-Mar-24 |
|
Thanks!
|
|
|
|
| From: BowAholic
|
|
|
|
|
|
|
| Date: 24-Mar-24 |
|
BJ...I have a homemade froe if you need it?
|
|
| From: Stan
|
|
|
|
|
|
|
| Date: 24-Mar-24 |
|
Great thread Brian.. Refreshing.. When I got the itch to start I resorted to hammer handles, broom sticks etc. Started small..
|
|
| From: bentstick54
|
|
|
|
|
|
|
| Date: 24-Mar-24 |
|
Great thread Brian. I always enjoy reading your post and follow alongs. As far as heat corrections I lean more towards Jeff’s method of not charring. I’ve only worked with Osage though. I get my bow to a slight floor tiller stage, clamp to my caul, then slowly heat the belly in 4” to 6” areas, straighten that section, clamping it in place, then moving to the next section. Since I started using canola oil on the belly it seems to help carry the heat into the wood faster and helps keep the surface from scorching. Bob, have you got a picture of your free?
|
|
| From: Bjrogg
|
|
|
|
|
|
|
| Date: 24-Mar-24 |
|
Thanks everyone for the nice comments.
I really do hope this encourages people to give these lessons a try. There are lots of things we can practice with scrape wood.
Bob you don’t need to send me your froe but if you want to text me a couple pictures and any tips for making and using I would appreciate that.
I learn a lot playing with scrap steel to.
I really should build a forge. I really need another hobby.lol
Bjrogg
|
|
| From: bentstick54
|
|
|
|
|
|
|
| Date: 24-Mar-24 |
|
Bob, sorry, spell check changed my request from froe to free.
|
|
| From: cobra
|
|
|
|
|
|
|
| Date: 24-Mar-24 |
|
Great thread. Makes me feel like maybe I could do something like this. Excellent instruction.
|
|
| From: BowAholic
|
|
|
|
|
|
|
| Date: 24-Mar-24 |
|
BJ, I sent you a PM link...using a small leaf spring...very easy and no forge needed.
|
|
|
|
| From: Bjrogg
|
|
|
|
|
|
|
| Date: 24-Mar-24 |
|
Glad to hear some of you are thinking about firewood lessons.
Thanks Bob I will have to check it out when I get a chance
Don a friend is certainly a great tool. I’m not sure if that was spell check but a good friend is a valuable tool.
Well my original lesson plan was to simply tiller out a 32” bows from our third belly split.
When I chased ring on the fourth belly split it really looked like these two guys wanted to get together again.
I changed the lesson plan.
Going an attempt a handle splice.
I’m really don’t exactly have this mastered yet but what the heck. It’s only a piece of firewood.
I have only done this once and it worked great. It’s been awhile see if I can remember how.
Bjrogg
|
|
| From: Bjrogg
|
|
|
|
|
|
|
| Date: 24-Mar-24 |
|
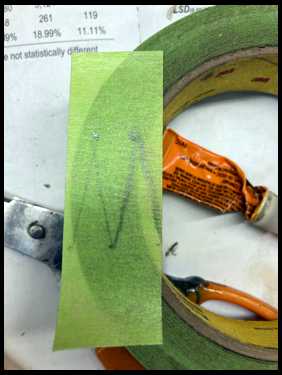
I don’t remember exactly how I did it last time but I think this should work.
My stave is slightly narrower than this green tape. I mark it out like this.
Bjrogg
|
|
| From: Bjrogg
|
|
|
|
|
|
|
| Date: 24-Mar-24 |
|
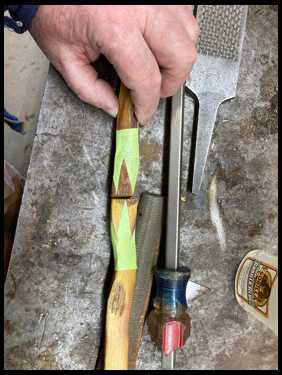
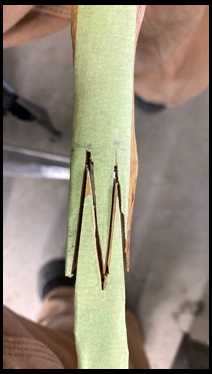
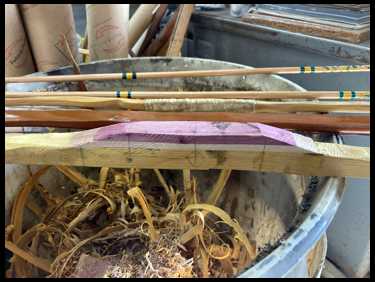
Then I cut it into two pieces and place one on each of my staves.
Something like this.
Bjrogg
|
|
| From: Bjrogg
|
|
|
|
|
|
|
| Date: 24-Mar-24 |
|
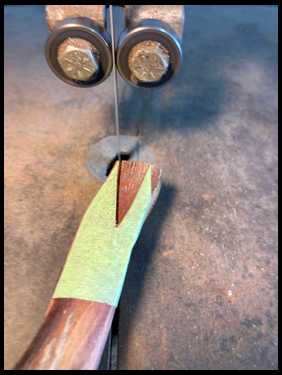
Then I cut it on the bandsaw. Trying to keep everything plum.
Cut the triangles and leave the tape
Bjrogg
|
|
| From: Bjrogg
|
|
|
|
|
|
|
| Date: 24-Mar-24 |
|
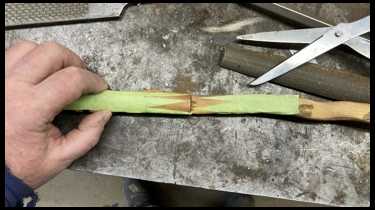
Well there good news and there’s bad news. Which do you want to hear first?
I guess I’ll say the good news.
Good news is it was just a piece of firewood.lol
My joint fit nice but I must have gotten the piece of tape on a little crooked. Then I tried to take the tape off and straighten it out but I couldn’t get it to fit properly.
So I guess that shows I should practice my splices more on some scrap wood before I use my expensive billets that I have a bunch of work into.
Sorry I didn’t get everything right but maybe we can learn from my mistakes
Bjrogg
|
|
| From: tradslinger
|
|
|
|
|
|
|
| Date: 24-Mar-24 |
|
sometimes it is what it is. just plain and simple. My bandsaw lacks a lot in terms of precision.
|
|
| From: Bjrogg
|
|
|
|
|
|
|
| Date: 24-Mar-24 |
|
Honestly I do really need to practice my splicing skills more Jerry.
If you master this skill you open yourself up to a whole new world of possibilities and bow wood.
Im not a master of the bandsaw. But it is a little tricky trying to cut everything. It’s not like you have a nice square flat piece. Especially this size.
If you master this skill you can easily add deflex or really experiment with different unbraced profiles.
Bjrogg
PS if anyone has any tips please share them. I like learning too
|
|
| From: Mindful
|
|
|
|
|
|
|
| Date: 24-Mar-24 |
|
Bjrogg….A truly amazing lesson……thanks so much for sharing.
|
|
| From: tradslinger
|
|
|
|
|
|
|
| Date: 24-Mar-24 |
|
My splicing was basically a side by side splice with dowels added. I didn't know what I was doing and if I had used Osage dowels it would have looked a lot better. it worked great but was not for looks. My splice was actually similar to how Centaur 2 piece bows are made except it was glued together. My bandsaw doesn't seem to cut very true at all. I am very impressed with the splices that I have since seen. The learning only really quits when you either quit making bows or you die. Always more to learn. I hope to finally get a decent piece of hickory to work into a bow. I can't get down to cut anymore, so my wife helps me. I use a lot of big crayons for where I want to scrape, mainly because of my poor eyesight so I can see what I have or haven't done yet. Plus, it keeps me at a slower pace because I don't keep scraping until after I have checked everything out and then re applied my crayon on the areas to be scraped. Eyesight and feel of fingers are so important and both of mine are lousy.
|
|
| From: Bjrogg
|
|
|
|
|
|
|
| Date: 24-Mar-24 |
|

I almost started tillering but I just thought to myself.
Self you need to splice those two together.
Insanity is doing the same thing and expecting a different result.
Well that pretty well explains everything
Here we go again
I cut the two staves of square and started over.
This time I was a little fussier and I used a little longer piece of tape. Also flattened back just a little on my grinder so it set more flat.
Cut off
Bjrogg
|
|
| From: Bjrogg
|
|
|
|
|
|
|
| Date: 24-Mar-24 |
|
Marked my tape, cut it and carefully lined everything up on my stave end.
Bjrogg
|
|
| From: Bjrogg
|
|
|
|
|
|
|
| Date: 24-Mar-24 |
|
After bandsaw fit pretty good
|
|
| From: Bjrogg
|
|
|
|
|
|
|
| Date: 24-Mar-24 |
|
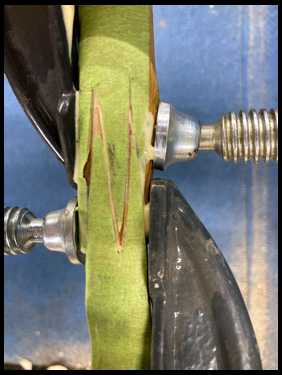
I used my leatherman file to get it a little better and then glued and clamped it
Bjrogg
|
|
| From: Bjrogg
|
|
|
|
|
|
|
| Date: 24-Mar-24 |
|
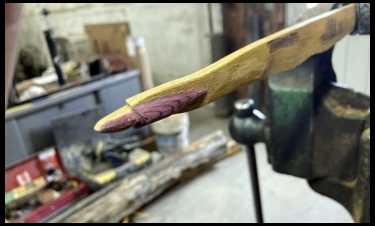
I think I got a good splice. And my unbraced and front profile look pretty nice.
Bjrogg
|
|
| From: Bjrogg
|
|
|
|
|
|
|
| Date: 24-Mar-24 |
|
Front profile
Bjrogg
|
|
|
|
| From: Bjrogg
|
|
|
|
|
|
|
| Date: 25-Mar-24 |
|
That’s Jerry. Sometimes it just takes a little insanity.
It looks like it paid off.
This morning I removed clamps.
Bjrogg
|
|
| From: Bjrogg
|
|
|
|
|
|
|
| Date: 25-Mar-24 |
|
Then I scratched the tape off with my fingernail.
Bjrogg
|
|
| From: Bjrogg
|
|
|
|
|
|
|
| Date: 25-Mar-24 |
|
In the sun
Bjrogg
|
|
| From: Bjrogg
|
|
|
|
|
|
|
| Date: 25-Mar-24 |
|
The belly side.
Another thing I would like to edit. I think I said I ground back flat.
That was incorrect
Before I cut with bandsaw I ground the BELLY SIDE flat so it would set better on bandsaw
Bjrogg
|
|
| From: Bjrogg
|
|
|
|
|
|
|
| Date: 25-Mar-24 |
|
That’s probably going to be my lesson for today, but I would like to give a brief summary.
It might be a little confusing to many just what exactly I have done with this piece of wood.
I chased four rings.
I made three belly splits successfully giving me four staves.
I heat corrected the two smaller staves
I removed slivers and poor wood
I made one unsuccessful handle splice attempt.
I learned from my mistake and made a second attempt with success.
We still have an enormous amount we can learn with what we have made.
Our inventory
(2) matching billets with rings chased and backs sealed
(1) set of every narrow, glued together billets with a ring chased and back sealed.
Not bad for a piece of scrap wood
Bjrogg
|
|
| From: Don T. Lewis
|
|
|
|
|
|
|
| Date: 25-Mar-24 |
|
Amazing what you can do with a piece of fire wood Brian. That was spell check. I wanted to say A Froe is a handy tool. But I guess a friend can be like a handy tool. One that’s willing to give you a hand or share their knowledge with you. Sure comes in handy. That splice came out really nice. thanks for sharing another bowers trick with us.
|
|
| From: tradslinger
|
|
|
|
|
|
|
| Date: 25-Mar-24 |
|
sometimes just seeing how something is attacked, even though it may not be perfect, allows one to grasp the intended desired outcome. Yes, one may have to adapt or adjust slightly, all according to what they are working with but the principal is still basically the same. So, sometimes the scary or confusing stuff becomes not so bad after all. Thanks Brian
|
|
| From: Bjrogg
|
|
|
|
|
|
|
| Date: 27-Mar-24 |
|
Well I took the clamps off today.
I did splice the two original billets. Honestly I still need some practice doing this. It would probably help if I had a little bigger stuff to work with.
I’m going to build up handle eventually.
Bjrogg
|
|
| From: Bjrogg
|
|
|
|
|
|
|
| Date: 27-Mar-24 |
|
Today I reduced the limbs closer to bow dimensions.
I know a lot will ask measurements but I just let the draw knife lay it out. I just remove wood I don’t trust and see what I have left.
Then I let the draw knife follow the edge grain until I think it looks about the right width to my eye.
Then I put one limb on my caul.
Bjrogg
|
|
| From: Bjrogg
|
|
|
|
|
|
|
| Date: 27-Mar-24 |
|

I took Jeff’s advice and worked a larger area with my heat gun. It turned color just a little but certainly not charred. It felt like it was working. See what it looks like in the morning
Bjrogg
|
|
| From: Harry
|
|
|
|
|
|
|
| Date: 27-Mar-24 |
|
Looks great so far!! Hope it stays when you unclamp it? Keep the posts coming...
|
|
| From: bentstick54
|
|
|
|
|
|
|
| Date: 27-Mar-24 |
|
That firewood is looking pretty good BJ.
|
|
| From: Bjrogg
|
|
|
|
|
|
|
| Date: 27-Mar-24 |
|
We will find out in the morning Harry
It is looking like it might have a little potential yet Brian.
It’s certainly not done teaching yet.
Bjrogg
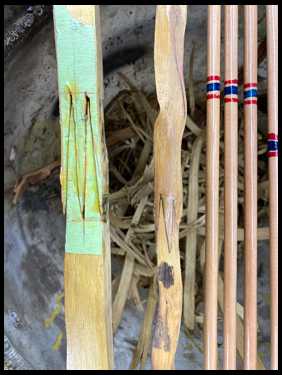
Here’s the two splices
|
|
| From: Harry
|
|
|
|
|
|
|
| Date: 27-Mar-24 |
|
Splicing billets is just like making up a bowstring for me,I have to relearn all the tricks every time I do it? Yours look like you have it figured out!! Good luck on the straightening.
|
|
| From: wooddamon1
|
|
|
|
|
|
|
| Date: 28-Mar-24 |
|
Did I miss what glue you're using, BJ? Looking good so far.
|
|
| From: Bjrogg
|
|
|
|
|
|
|
| Date: 28-Mar-24 |
|
Yeah that whole making strings can get a little confusing.
I have a regular routine that works for me, but if you don’t it’s easy to mess up.
I feel more confident in my strings now than my splice. I think it’s probably strong enough but it’s not that pretty. I probably should have steamed it first. I could have gotten it to fit better.
My intention with this thread isn’t so much to teach everyone exactly how to do it. Just to inspire others to try it on some scrap. Something you aren’t afraid to ruin.
Damon I used Tight Bond 2. Probably better choices available, but it’s what I have.
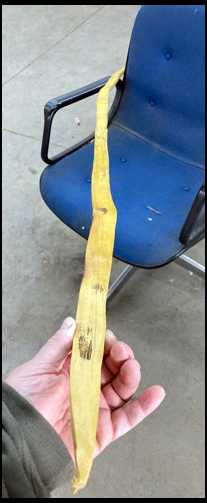
I took first limb off my caul. It didn’t stay 100%, but probably about 97.
It might need a little tweaking yet but I like where it’s going.
Back of stave here.
Bjrogg
|
|
| From: Bjrogg
|
|
|
|
|
|
|
| Date: 28-Mar-24 |
|
Here’s the belly side.
Bjrogg
|
|
| From: Bjrogg
|
|
|
|
|
|
|
| Date: 28-Mar-24 |
|
Now to get the other limb.
I hope to get at it today but I have work to do to. Hopefully I can sneak it in by multi tasking. But heat correction and multi tasking don’t go very well together.
Bjrogg
|
|
| From: wooddamon1
|
|
|
|
|
|
|
| Date: 28-Mar-24 |
|
Thanks, BJ. I plan on trying a splice here soon.
|
|
| From: Bjrogg
|
|
|
|
|
|
|
| Date: 28-Mar-24 |
|
Honestly Damon there’s guys that have much more experience with handle splicing than me.
I know I said this is mainly to demonstrate how much a piece of scrap can teach us.
But if others have tips they’d like to share with us that’s great. This is how I learned a lot. Just playing around with scrap. Making little bows.
We haven’t gotten to tillering yet but you can really learn a lot about it making these short little bows.
Bjrogg.
|
|
| From: Don T. Lewis
|
|
|
|
|
|
|
| Date: 28-Mar-24 |
|
Can that splice be done with a hand saw?
|
|
| From: Don T. Lewis
|
|
|
|
|
|
|
| Date: 28-Mar-24 |
|
Can that splice be done with a hand saw?
|
|
| From: Don T. Lewis
|
|
|
|
|
|
|
| Date: 28-Mar-24 |
|
Can that splice be done with a hand saw?
|
|
| From: Bjrogg
|
|
|
|
|
|
|
| Date: 28-Mar-24 |
|
Yes Don it can. Honestly I think I might have done better if I had used my hand saw. I might practice with it sometime.
Bjrogg
|
|
| From: Bjrogg
|
|
|
|
|
|
|
| Date: 28-Mar-24 |
|
Well I did manage to get some more done. Put second limb on caul. I put splice area off the end of the caul. I didn’t want to stress it or heat it.
Bjrogg
|
|
| From: Bjrogg
|
|
|
|
|
|
|
| Date: 28-Mar-24 |
|
I do like Jeff’s method for heating Osage. I think the biggest difference is before I would concentrate on one area and then move to the next like heat treating hop hornbeam.
I heated a larger area and never stayed on one spot for more than a six count.
Bjrogg
|
|
| From: Bjrogg
|
|
|
|
|
|
|
| Date: 28-Mar-24 |
|
Pretty close to where I want it I think.
Bjrogg
|
|
| From: Bjrogg
|
|
|
|
|
|
|
| Date: 28-Mar-24 |
|
You know it’s going to hold it’s shape good when take all the clamps off and it’s sticking to the caul.
Bjrogg
|
|
| From: Bjrogg
|
|
|
|
|
|
|
| Date: 28-Mar-24 |
|
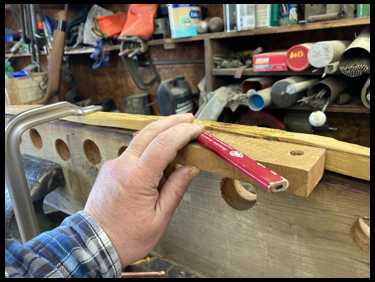
I lightly but firmly clamp on my stave on my caul belly up.
Then I place the right thickness piece of wood alongside my handle area and use my pencil to make a nice straight line on both sides of stave.
Bjrogg
|
|
| From: Bjrogg
|
|
|
|
|
|
|
| Date: 28-Mar-24 |
|
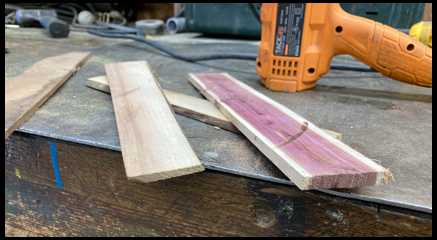
Then I use my file to make nice clean flat glue line.
When I build up handles I don’t glue on a block.
I glue on thin laminates
For this I use stuff I saw from tree branches on my table w
Here’s some black walnut sapwood and red cedar.
Bjrogg
|
|
| From: Bjrogg
|
|
|
|
|
|
|
| Date: 28-Mar-24 |
|
I size all the surfaces liberally with tb2 and clamp them every inch I can.
Bjrogg
|
|
| From: Bjrogg
|
|
|
|
|
|
|
| Date: 28-Mar-24 |
|
Now it can set for at least 24 hours.
Maybe a good time for spring break
Bjrogg
|
|
| From: Zbone
|
|
|
|
|
|
|
| Date: 28-Mar-24 |
|
That splice looks similar or the same as illustrated in Jay Massey's book "THE BOWYER'S CRAFT"
|
|
| From: wooddamon1
|
|
|
|
|
|
|
| Date: 29-Mar-24 |
|
That's gonna be a pretty handle.
Firewood? Looks like some of the stuff I started with ;)
I'd have to stain that bad boy with a sunburst "flame" pattern. Looking forward to seeing what you get outta that stick, BJ.
|
|
| From: Bjrogg
|
|
|
|
|
|
|
| Date: 29-Mar-24 |
|
Yes zbone this is a very common woodworking technique. I’m sure it was used way before the bandsaw.
There are special tools that make these joints for dresser drawers. It’s the same concept. Gives you a lot more glue line.
I’m sure if you do a little research you can find better build alongs to help you in more depth.
Definitely a skill I’m going to practice more. Very useful.
Yes Damon. If I don’t screw something up here yet that firewood is looking like it might have more potential than I originally expected.
I put the tape on it and it’s just shy of 62” tip to tip. Hopefully I don’t need to shorten it anymore
I’m going to have to keep the handle stiff. I don’t think the glue joint will hold if it flexes. I have a little bit of thickness in my handle so hopefully building it up a little more will keep it stiff.
Hoping to get around 37lbs at 26”
Who knows maybe we will sinew back it.
Don’t forget about kindling though
Bjrogg
|
|
| From: Bjrogg
|
|
|
|
|
|
|
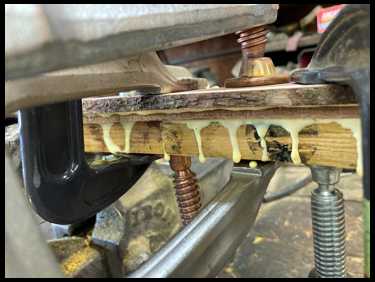
| Date: 29-Mar-24 |
|
I like working on two bows at a time especially when I’m doing the same steps with them.
While firewood was on the caul cooling
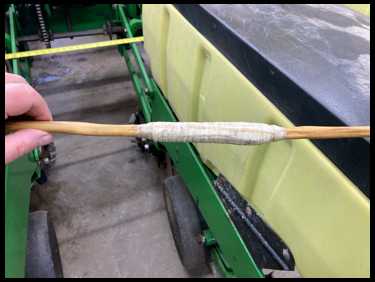
I started to build up the handle on kindling. It’s was noticeably thinner through splice than at fades. My glue joint will fail if it flex’s
It’s such an uneven surface and already so thin I don’t want to file it flat.
I take three really nice Osage shavings from my draw knife.
I dry fit them on the belly side of splice. Probably should have done back side to.
Then I sized all the glue surfaces liberally, fit them on the belly again. And then tightly wrap the whole sloppy mess with artificial sinew. I would have preferred the real stuff but this was messy enough.
Hopefully it holds
Bjrogg
|
|
| From: Bjrogg
|
|
|
|
|
|
|
| Date: 29-Mar-24 |
|
Then last night before I went home I glued on some tip overlays. I made them from exotic wood scraps gifted by another lw’r
I roughly shape overlay leaving areas where string lays large yet.
I used gorilla glue and it needs to be clamped. First I wrap it tightly with artificial sinew.
Then I put a small bar clamp on to squeeze it tight
This holds everything good. It can be very tricky clamping these small rounded surfaces
Bjrogg
|
|
| From: Bjrogg
|
|
|
|
|
|
|
| Date: 29-Mar-24 |
|
Clamp
|
|
| From: Bjrogg
|
|
|
|
|
|
|
| Date: 29-Mar-24 |
|
This morning I removed clamps and wrap
|
|
| From: Bjrogg
|
|
|
|
|
|
|
| Date: 29-Mar-24 |
|
Then I used my bastard file to shape everything.
Cleaned it up a little more with Emory cloth and a razor blade for a scraper.
Bjrogg
|
|
| From: Bjrogg
|
|
|
|
|
|
|
| Date: 29-Mar-24 |
|
Kindling tips
|
|
|
|
| From: Bjrogg
|
|
|
|
|
|
|
| Date: 29-Mar-24 |
|
I’m not sure what I’m going to get from my kindling. But I’m sure having fun and she’s gonna look good no matter how she performs.
Bjrogg
|
|
|
|
| From: Bjrogg
|
|
|
|
|
|
|
| Date: 29-Mar-24 |
|
It doesn’t take much wood removal on kindling to effect the tiller. I got her to brace but it’s not a very pretty tiller yet.
Figured I’d take a couple pictures before something breaks.lol
Nasty hinge just a couple inches out of handle. Right where limb went around a knot.
I see what I can get but it’s just kindling
Bjrogg
|
|
| From: Bjrogg
|
|
|
|
|
|
|
| Date: 29-Mar-24 |
|
Test
|
|
| From: Bjrogg
|
|
|
|
|
|
|
| Date: 29-Mar-24 |
|
Kindling
|
|
| From: Bjrogg
|
|
|
|
|
|
|
| Date: 29-Mar-24 |
|
Unbraced
|
|
| From: Bjrogg
|
|
|
|
|
|
|
| Date: 29-Mar-24 |
|
Braced not that pretty of tiller.
Bending to much left limb a couple inches from handle
Bjrogg
|
|
| From: Bjrogg
|
|
|
|
|
|
|
| Date: 01-Apr-24 |
|
I did get a chance to take clamps off firewood today.
Narrowed up the built up area to the same as the stave.
Marked out area handle will be .
I will leave handle shaped like this until I’m almost done tillering. It clamps in vice so much better this way.
Bjrogg
|
|
| From: Bjrogg
|
|
|
|
|
|
|
| Date: 02-Apr-24 |
|
I’m sorry but I got sidetracked again
I had some real work I had to get done and then I had a Osage log calling my name.
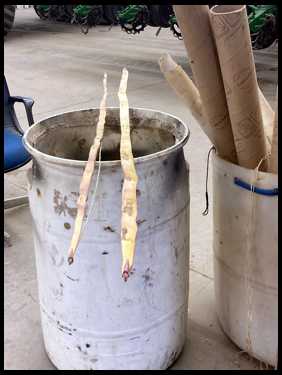
The young buck and I got it split into five staves last week and I have been trying to get bark, sapwood and a ring chased on back
Thought I would share a couple pictures of the process
Bjrogg
Splitting log
|
|
| From: Bjrogg
|
|
|
|
|
|
|
| Date: 02-Apr-24 |
|
Stave number three here.
I start on one end. I go down to this ring on my right side edge.
There are still a couple rings above it on the left side.
Bjrogg
|
|
| From: Bjrogg
|
|
|
|
|
|
|
| Date: 02-Apr-24 |
|
I work my way sideways across the stave until I get all the way across on the same ring.
Once I get to this point it’s a lot less confusing
Bjrogg
|
|
| From: Bjrogg
|
|
|
|
|
|
|
| Date: 02-Apr-24 |
|
I split some of the bark and sapwood off with my wedges.
This save a lot of work with my draw knife
Bjrogg
|
|
| From: Bjrogg
|
|
|
|
|
|
|
| Date: 02-Apr-24 |
|
Time to take it out of vice and finish splitting sapwood off with it standing on its end
Bjrogg
|
|
| From: Bjrogg
|
|
|
|
|
|
|
| Date: 02-Apr-24 |
|
Got this one coming my way
Bjrogg
|
|
| From: bentstick54
|
|
|
|
|
|
|
| Date: 02-Apr-24 |
|
It’s amazing what a guy can find inside an old nasty looking Osage log. If a guy is willing to dig deep enough you can find some nice yellow wood inside.
Firewood is looking like it might just want to be a bow. I’m enjoying following along.
|
|
| From: Bjrogg
|
|
|
|
|
|
|
| Date: 02-Apr-24 |
|
It really is Brian. Sometimes you can stare at a stave trying to find the bow in it. It just doesn’t want to show itself until you dig a little deeper.
Sometimes you can see the bow right away but when you dig a little deeper you find nothing but problems.
You just never really know until you take that bark off and dig
Bjrogg
|
|
| From: Bjrogg
|
|
|
|
|
|
|
| Date: 02-Apr-24 |
|
I did a little bit of tillering on firewood.
I call this vice tillering.
With limb clamped in my vice I reduced my tips and get my outers bending a little.
Then I tapper the thickness of my limbs towards my handle .
I keep checking my bend by pulling on limb tip and watching my bend
Bjrogg
|
|
| From: Bjrogg
|
|
|
|
|
|
|
| Date: 02-Apr-24 |
|

Pulling tip
|
|
| From: BowAholic
|
|
|
|
|
|
|
| Date: 02-Apr-24 |
|
you are a bow making machine... :) I love it! thanks...
|
|
| From: Lastmohecken
|
|
|
|
|
|
|
| Date: 02-Apr-24 |
|
That's pretty darned impressive! Looking forward to seeing more.
|
|
| From: Bjrogg
|
|
|
|
|
|
|
| Date: 03-Apr-24 |
|
Sometimes I just can’t help myself Bob.
Glad you are approving lastmohecken
I had to take my wife to doctors appointment in city today but before left shop last night I made a little custom wood filler.
I saved some dust from filling my red cedar
Bjrogg
|
|
| From: Bjrogg
|
|
|
|
|
|
|
| Date: 03-Apr-24 |
|
The one billet handle was ever so slightly narrow. I’m probably going to end up narrowing my handle up more than this eventually anyway, but just in case I decided to fill it in.
I have done this before with thin super glue but all I have at the moment is gorilla glue and it’s not very thin. Hope this works. Good place to experiment.
First I liberally fill area with glue . Getting every gap full.
Then I sprinkle my dust over the glue.
I let it absorb it for a bit and then I push the dust into the spaces with my fingers. I pack it in as good as I can. Then I put more glue on , dust and repeat process.
Then I put glue on and leave it overnight.
Bjrogg
|
|
| From: Bjrogg
|
|
|
|
|
|
|
| Date: 03-Apr-24 |
|

This afternoon I was able to file my temporary block shaped handle and it seems to have worked well.
Bjrogg
|
|
| From: Bjrogg
|
|
|
|
|
|
|
| Date: 03-Apr-24 |
|
Then I worked on my tips.
I used red cedar to go with the handle.
Might be slightly softer than I prefer for overlay but once again. A good place to experiment.
Bjrogg
|
|
| From: Bjrogg
|
|
|
|
|
|
|
| Date: 03-Apr-24 |
|
Firewood tips
|
|
| From: RonG
|
|
|
|
|
|
|
| Date: 03-Apr-24 |
|
Brian, as usual your presentations are fantastic, memorable, educational, valuable and I really appreciate the time and effort you put into this.
Thank you.
|
|
| From: Bjrogg
|
|
|
|
|
|
|
| Date: 04-Apr-24 |
|
Thank you Ron, that means a lot to me.
Last night I made a string for firewood. My tips didn’t line up. Normally I leave them a little wider and then narrow them up to line up with handle. On this one I’m just using what it’s giving me.
I put it back on my caul and did a little tweaking.
Here’s kindling and firewood as they are now. I don’t want to flex firewood for awhile now after heat corrections.
Bjrogg
|
|
| From: Bjrogg
|
|
|
|
|
|
|
| Date: 04-Apr-24 |
|
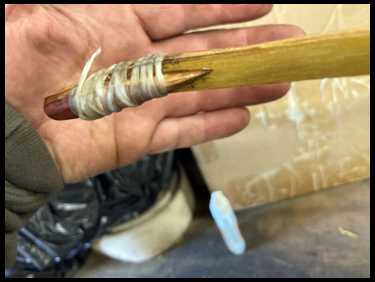
I decided to play around with kindling again. I didn’t trust the handle splice yet. I could feel it flexing and I knew that the dovetail joint wouldn’t take much of it. Sure enough I broke it.
I removed the artificial sinew and found the dovetails failed but the Osage drawknife shavings held up.
I decided to glue up the dovetail joint again. I cleaned it up a little. Then I put thin super glue in joint and put it together. All without removing the Osage from the belly. Not recommending this, but it’s a good place to experiment.
After the super glue dried I filed it flat and then dry fit two Osage shavings
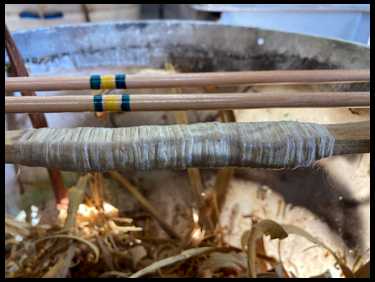
Then I liberally sized each glue surface and put it on the back for my splice.
Then I very tightly wrapped the whole sloppy mess with artificial sinew
|
|
| From: Bjrogg
|
|
|
|
|
|
|
| Date: 04-Apr-24 |
|
I’m not going to play with it for at least 24 hours. I want the tb2 to cure good and it seems to dry slower under my wax covered artificial sinew.
I’m pretty confident this will work but only time and drawing it will tell.
Bjrogg
|
|
| From: Bjrogg
|
|
|
|
|
|
|
| Date: 05-Apr-24 |
|
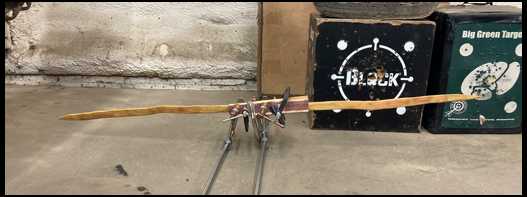
I put firewood on my tree.
The right limb has three kinks in it. I’m almost tempted to put it back on my caul and see if I could get them out. It sure helped my left limb.
Bjrogg
|
|
| From: Bjrogg
|
|
|
|
|
|
|
| Date: 05-Apr-24 |
|
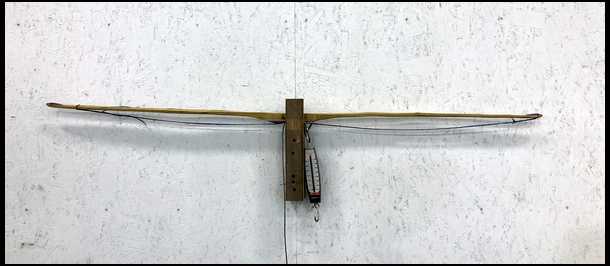
Got firewood on tree.
I like the left limb
Honestly the right one looks kinda ugly. Some of it is from the three deflex kinks. I might be bending a little more than I’d like there to.
Not sure hard to tell looking at these kinky ones. My fingers tell me it’s good but my eyes are screaming hinge.
30 lbs at 25”
Bjrogg
|
|
| From: Bjrogg
|
|
|
|
|
|
|
| Date: 05-Apr-24 |
|

Cycled an arrow through her. Way too heavy spine .
Certainly not the best performance bow I’ve ever made, but it’s acceptable
Bjrogg
|
|
| From: Bjrogg
|
|
|
|
|
|
|
| Date: 05-Apr-24 |
|
Firewoods first shot
Bjrogg
|
|
| From: Bjrogg
|
|
|
|
|
|
|
| Date: 06-Apr-24 |
|
Got my brother to take a couple pictures
Firewood first.
Bjrogg
|
|
| From: Bjrogg
|
|
|
|
|
|
|
| Date: 06-Apr-24 |
|

Then I played with kindling just a little
The top limb outer is maybe a little stiff yet, but it’s very narrow and wiggly.
I could probably fuss with it a little more but it’s probably going to be good enough for kindling
Unbraced profile
Bjrogg
|
|
| From: Bjrogg
|
|
|
|
|
|
|
| Date: 06-Apr-24 |
|
Braced profile of kindling
Bjrogg
|
|
| From: Bjrogg
|
|
|
|
|
|
|
| Date: 06-Apr-24 |
|
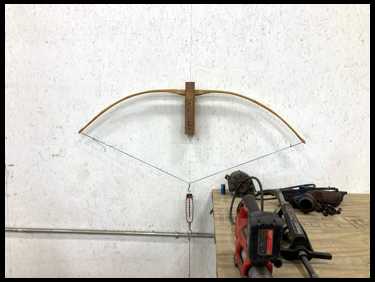
Full draw kindling
|
|
|
|
| From: wooddamon1
|
|
|
|
|
|
|
| Date: 07-Apr-24 |
|
Pretty sweet, BJ.
|
|
| From: tradslinger
|
|
|
|
|
|
|
| Date: 07-Apr-24 |
|
The art of saving, sometimes means trying stuff that some might frown upon but then, you have nothing to lose and a lot to learn. Some fixes may not be pretty but be the best fix ever, at least for you and that's what counts. Most of us give up too quickly but I tend to save things to try things out on. Boredom can lead to experiments that actually teach you new things and or ways in how to do thing. I really liked how you did the floor tillering in a vice, I hadn't thought about that. For me, I would be able to see the bend a lot better that way. Awesome follow along Sir
|
|
If you have already registered, please sign in now
For new registrations Click Here
|
|
|
|


