| From: Bjrogg
|
|
|
|
|
|
|
| Date: 08-Dec-20 |
|
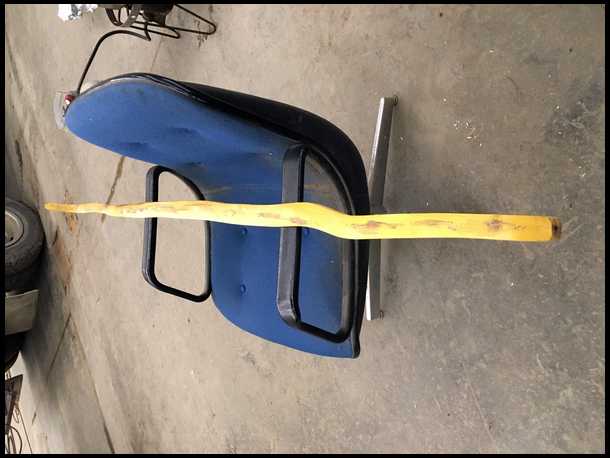
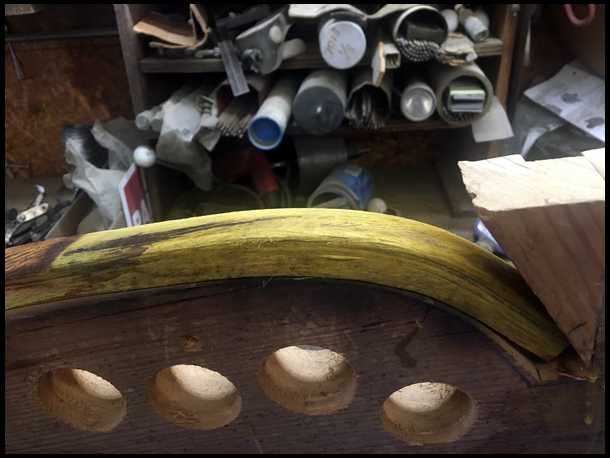
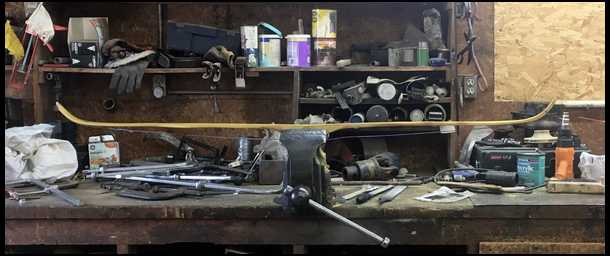
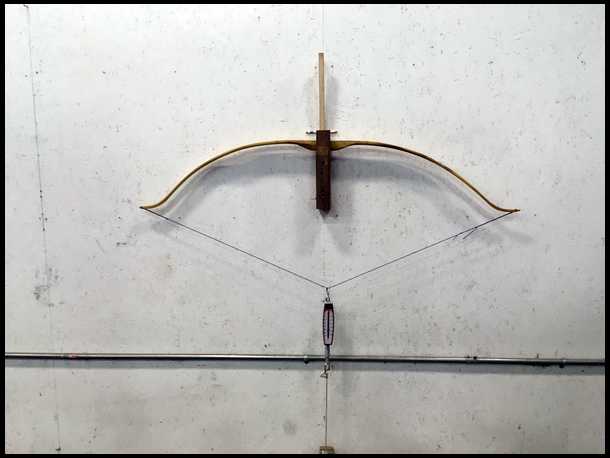
This thread we will attempt to steam in some static recurves, remove some twist and hopefully get our tips to line up with the handle a little better.
I don’t think I can get it all perfect in one attempt, but I will work on getting those three closer.
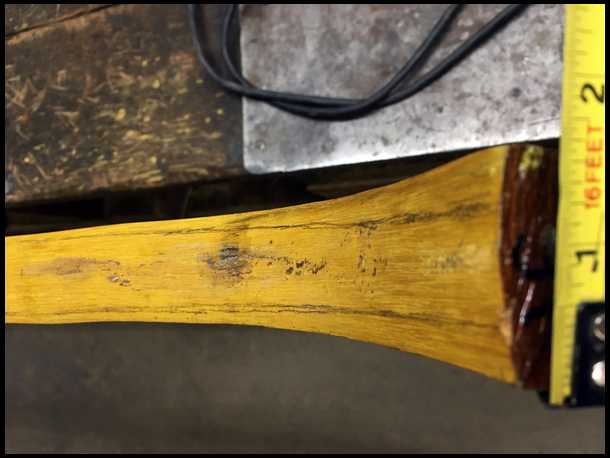
This stave is a bit snaky and it has a dogleg out of the handle. It will be a bit of a challenge to get everything to line up. Hopefully we can pull it off.
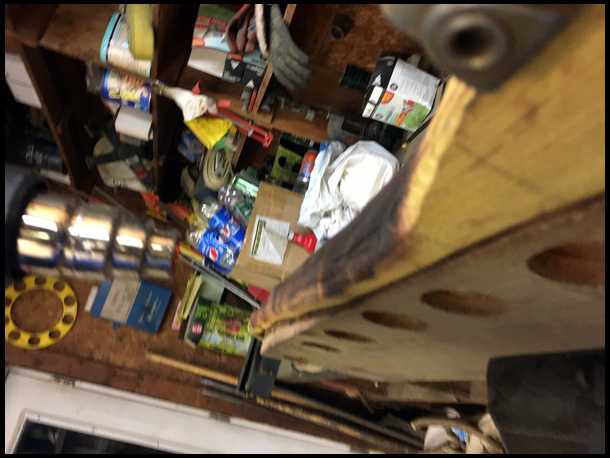
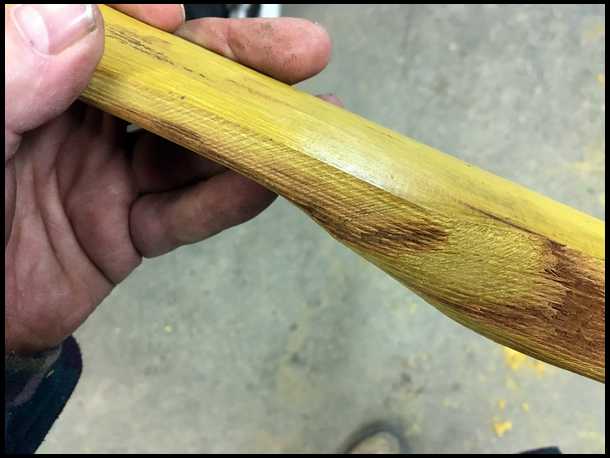
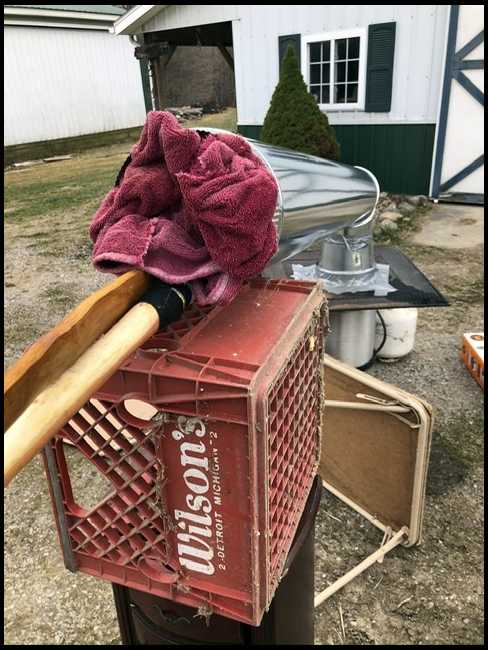
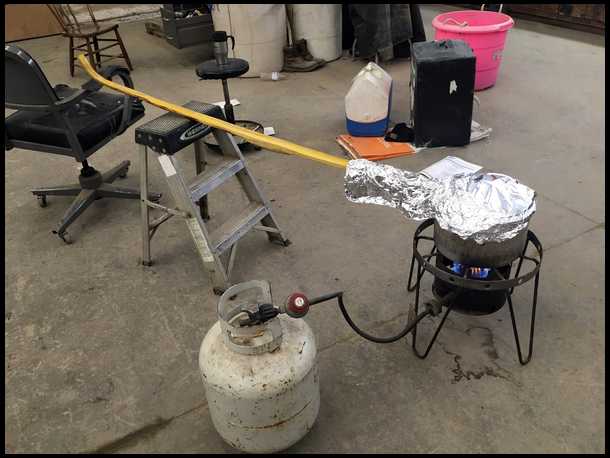
I steam my static tips. I use a old aluminum kettle. I cut a notch in the lid so it allows me to slid my bow it in.
I do a dry setup first and get everything so it will be just right when I fill it with water and light the gas burner. Bjrogg
|
|
| From: Bjrogg
|
|
|
|
|
|
|
| Date: 08-Dec-20 |
|
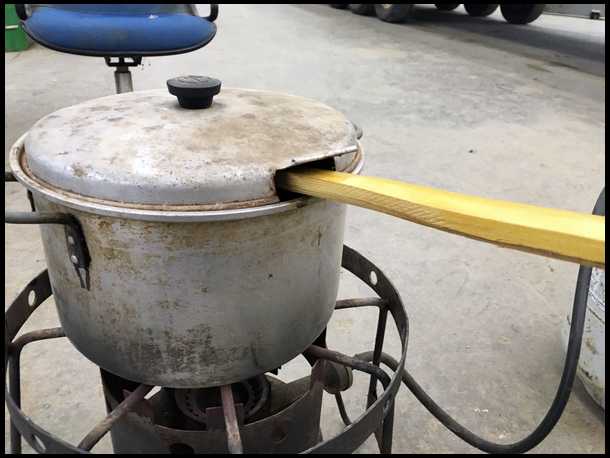
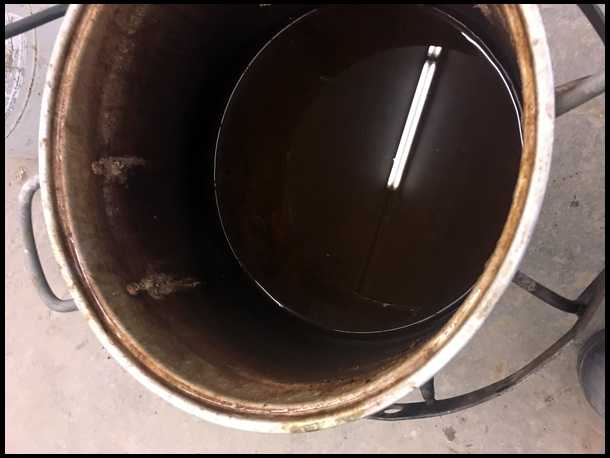
I fill the kettle about two thirds full and light the gas burner. I slide my limb in with the back of the bow facing up.
Then I carefully wrap aluminum foil over lid and partially up the limb.
Bjrogg
|
|
| From: Bjrogg
|
|
|
|
|
|
|
| Date: 08-Dec-20 |
|
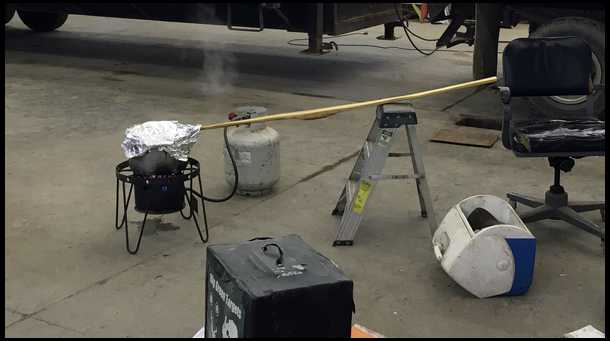
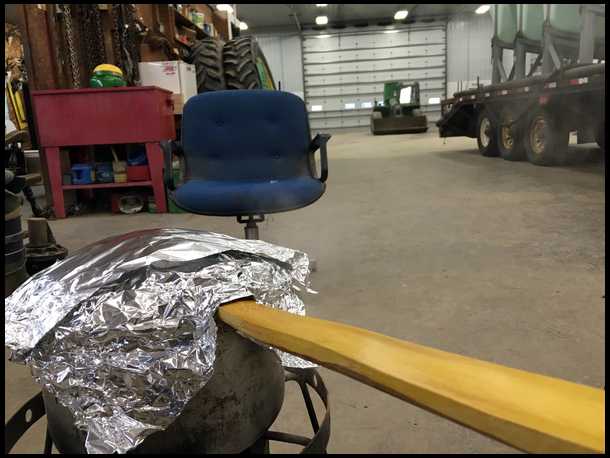
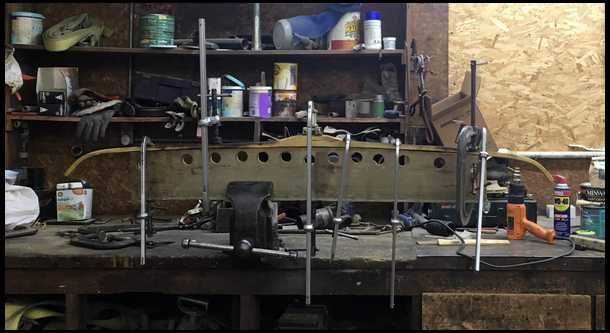
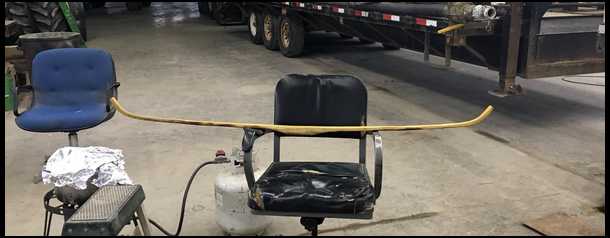
I turn the flame up and watch for it to start steaming. Then I look at the clock. I usually let it steam for a good hour. Here’s my setup just starting to steam. Not sur you can see the steam but it comes out by the limb
Bjrogg
|
|
| From: Bjrogg
|
|
|
|
|
|
|
| Date: 08-Dec-20 |
|
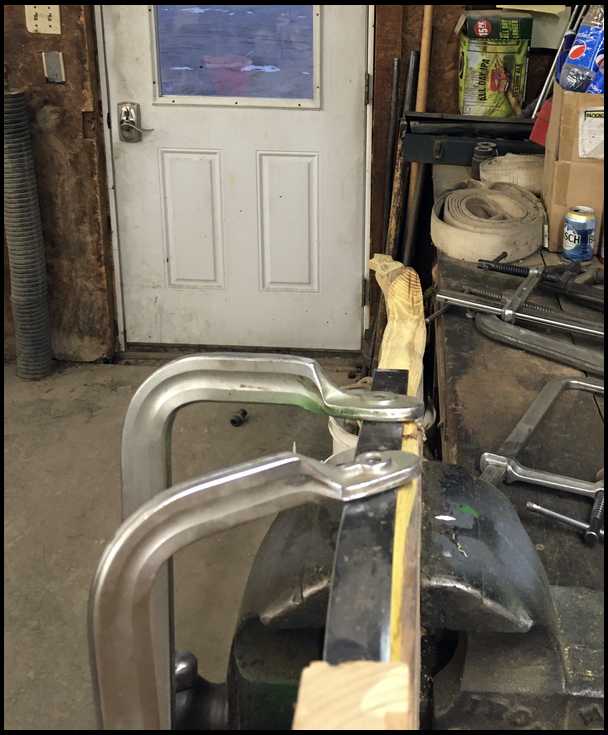
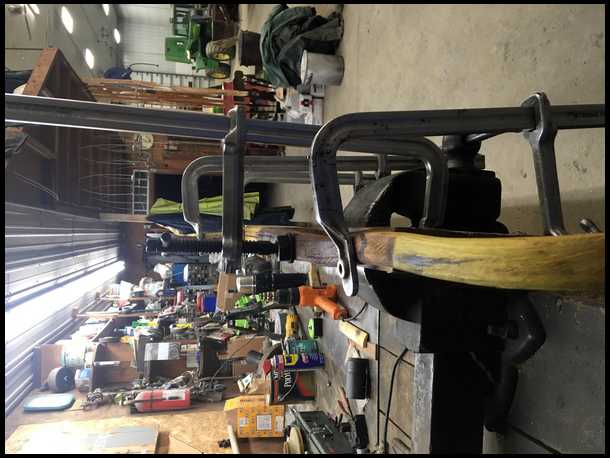
Now I get everything else ready. You may want to do that before you light the burner.
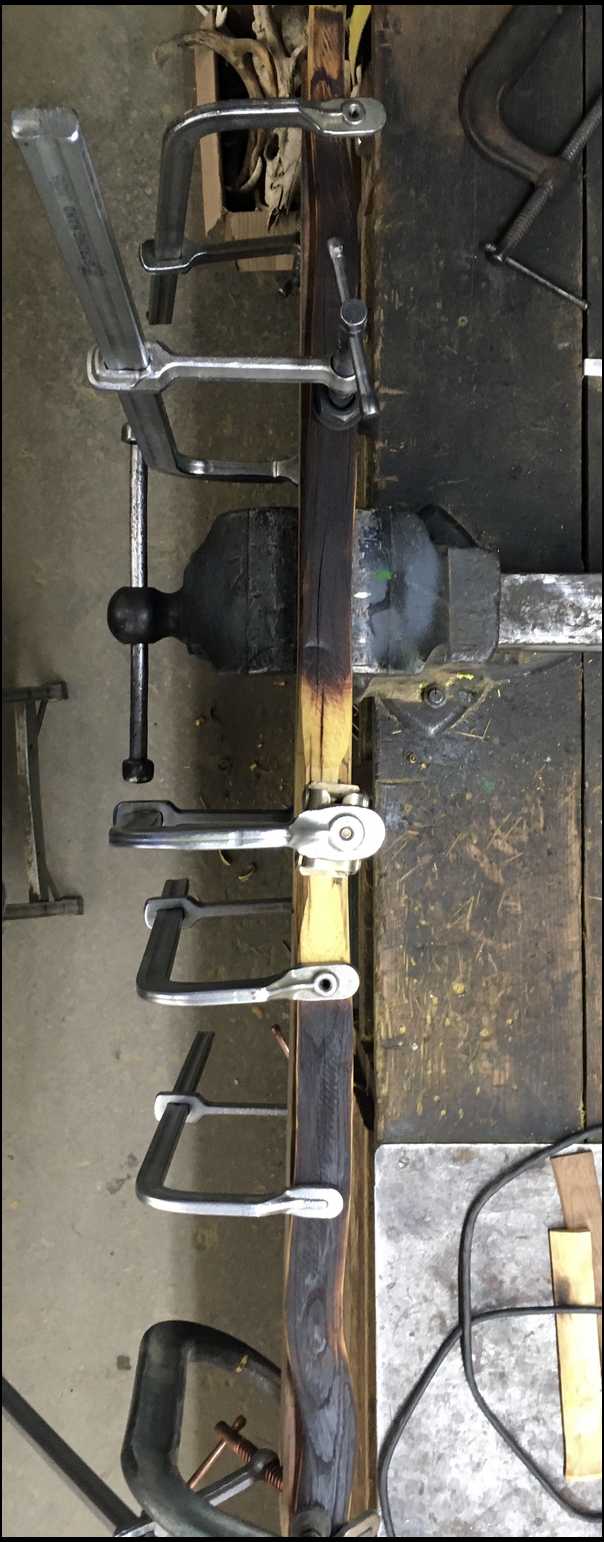
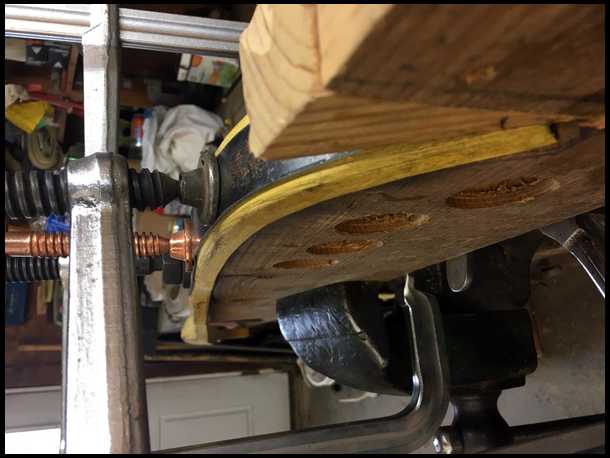
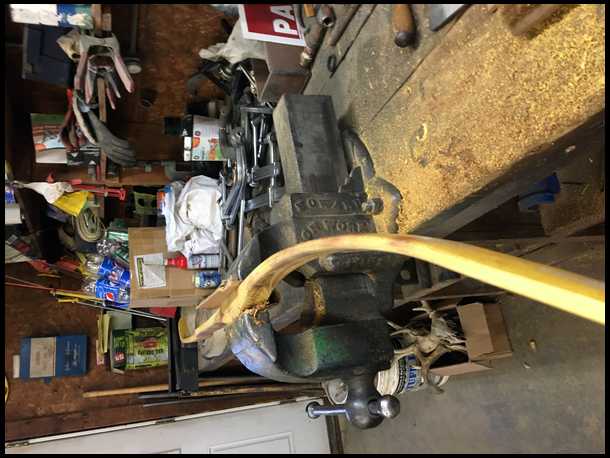
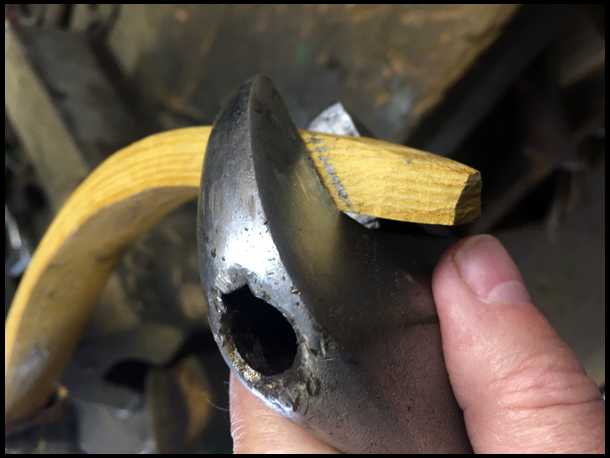
I have a half caul. It has a recurve tip and about a inch of reflex through the limb. I will do each tip one at a time. This way I can do different length bows with this one caul. The shape of the end of my caul will hold my tip without a clamp. I pop it off several times until I finally put a long bolt through it.
I clamp my caul in my vice at a angle. That way the other end of my stave doesn’t hit the ceiling when I put it in my caul.
|
|
| From: Bjrogg
|
|
|
|
|
|
|
| Date: 08-Dec-20 |
|

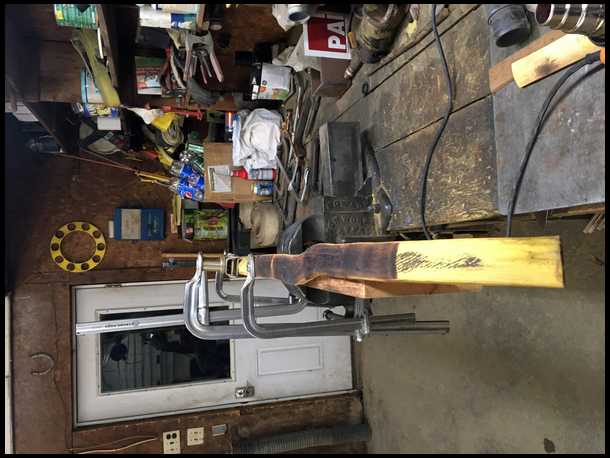
I get all the clamps I own ready. I like the bar clamps best. I turn their screws all the way loose.
I get my thin steel backer strip ready and a could wood pads.
I will show you what the steel backer strip is for a little later.
Bjrogg
|
|
| From: Bjrogg
|
|
|
|
|
|
|
| Date: 08-Dec-20 |
|
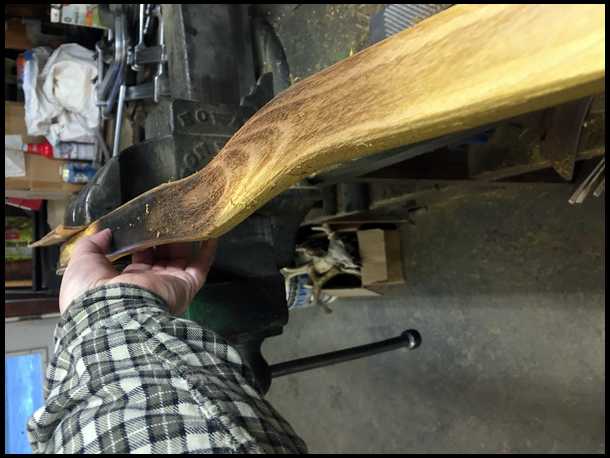
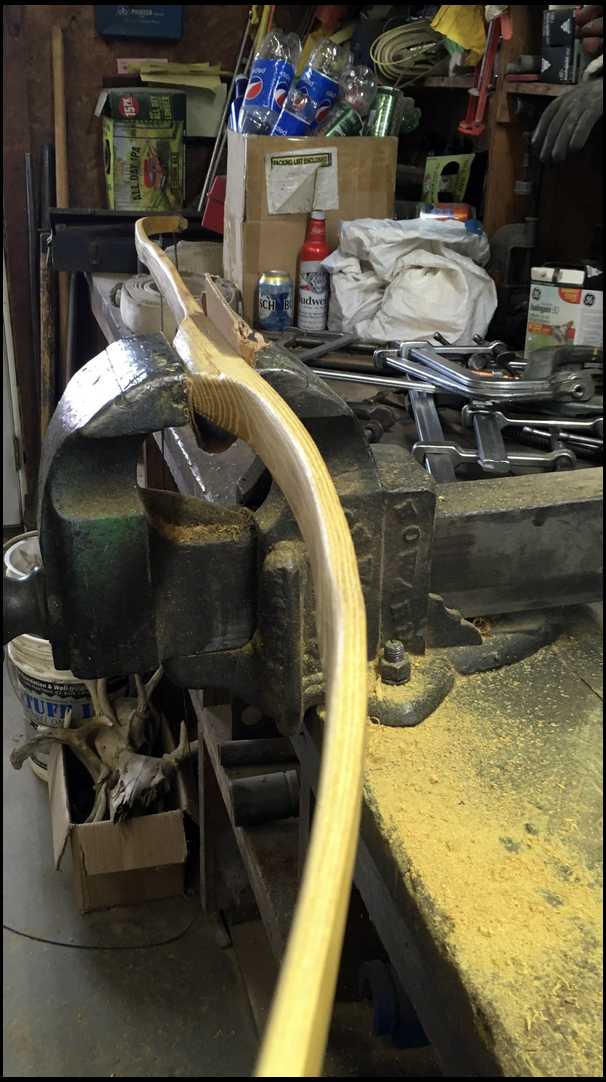
After about a hour I get ready to take my staves tip out of the steam. I usually get it at a nice folly boil about fifteen minutes before I remove it.
You can multi task a bit while your tips are steaming, but make sure that you don’t run out of water. Yeah been there done that. Burned the tips right off.
It’s really nice if you have a extra set of hands at this time to help put clamps on while you hold in place. This has to happen quickly before the stave cools to much to bend.
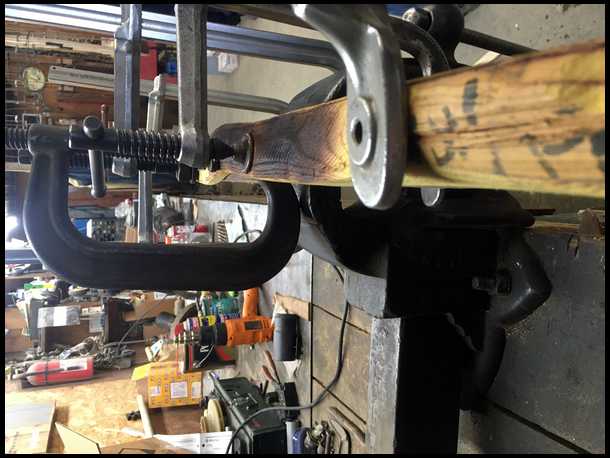
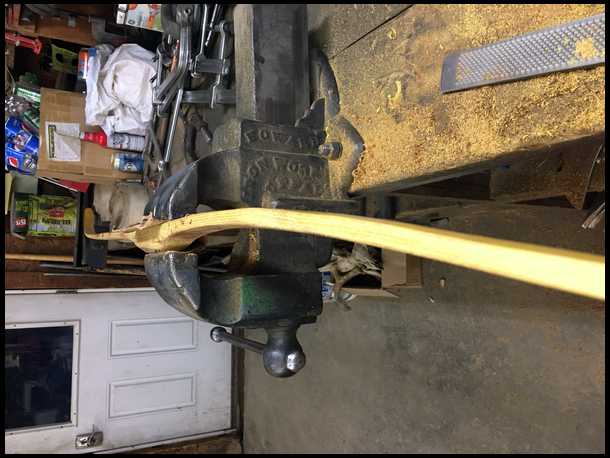
I put on leather gloves, pull the stave out of the kettle and quickly put it on my caul belly side up. At the same time I slide the metal backer in between belly and end of my caul. This helps prevent splinters from lifting on the belly side of recurves.
Then slowly bend it to fit the shape of the caul. If it doesn’t want to go don’t force it. Put it back in the steam.
Now clamp it close to the caul starting at the tips.
Bjrogg
|
|
| From: Bjrogg
|
|
|
|
|
|
|
| Date: 08-Dec-20 |
|
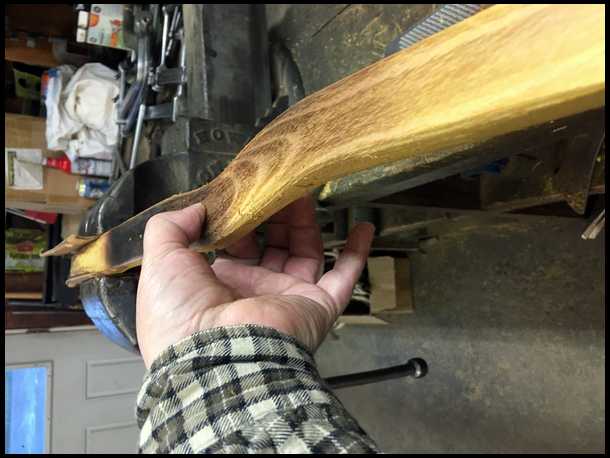
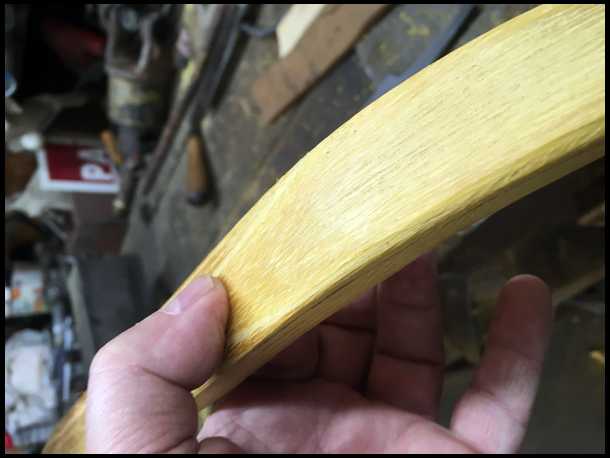
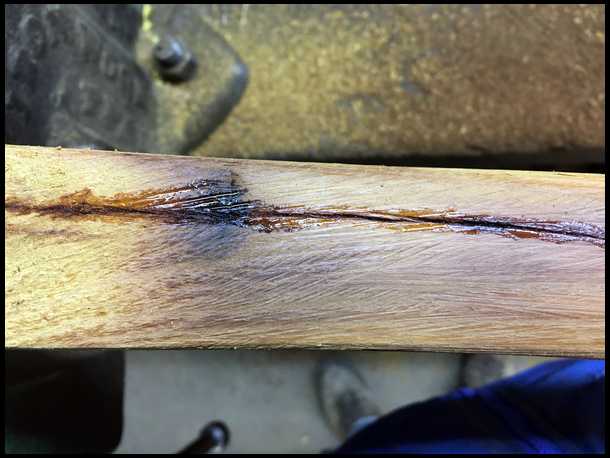
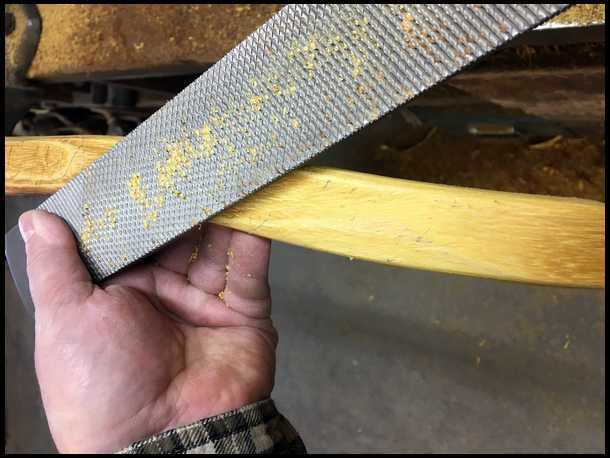
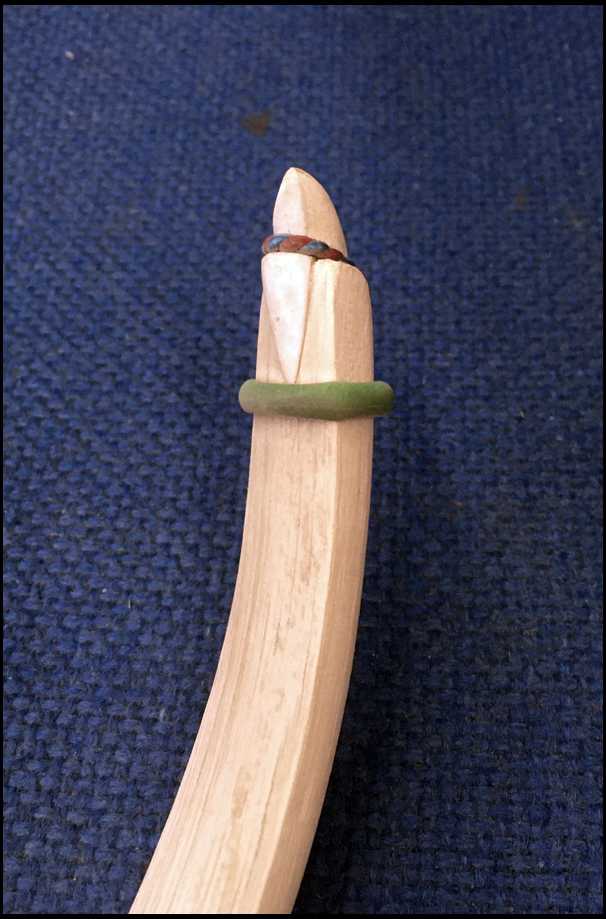
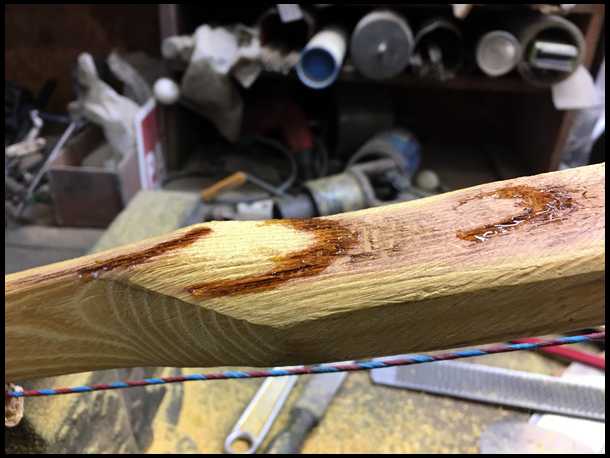
Here’s the backer
|
|
| From: Bjrogg
|
|
|
|
|
|
|
| Date: 08-Dec-20 |
|
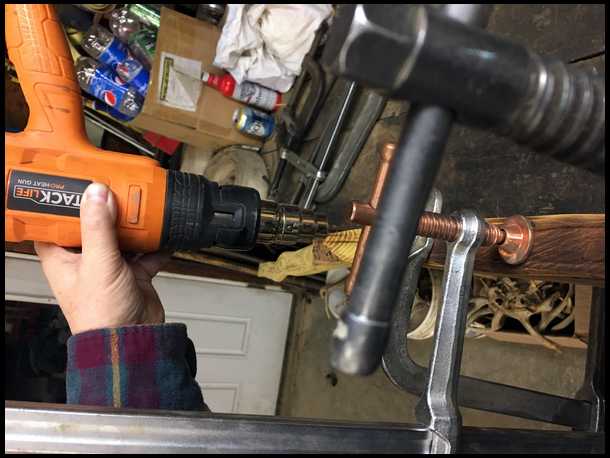
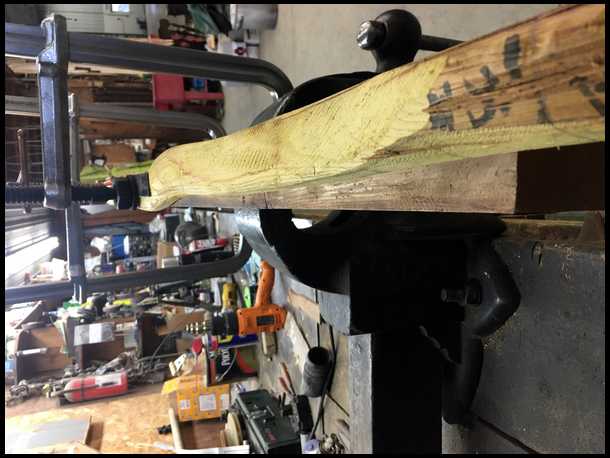
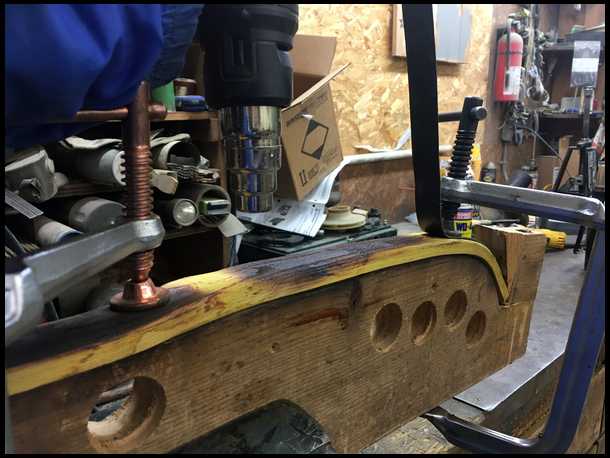
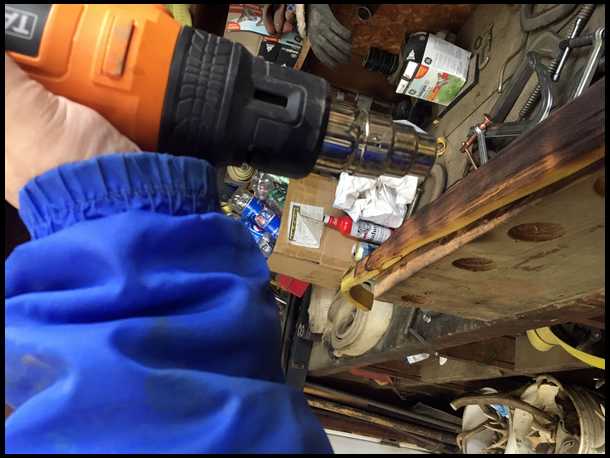
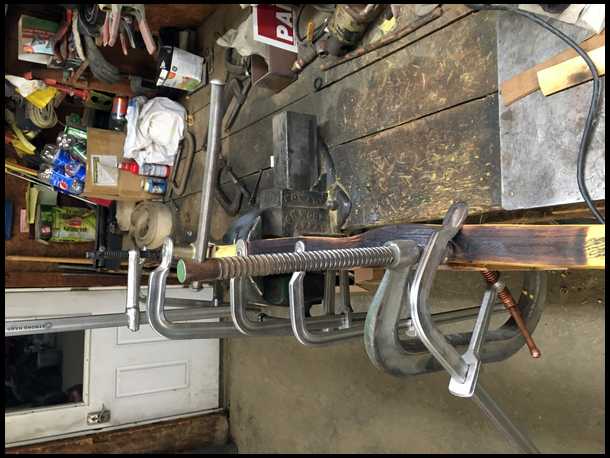
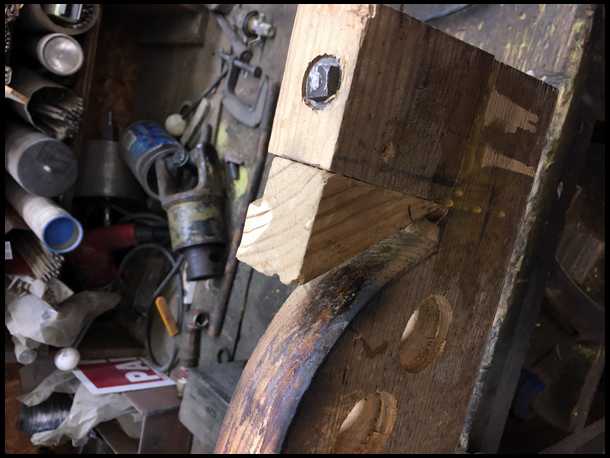
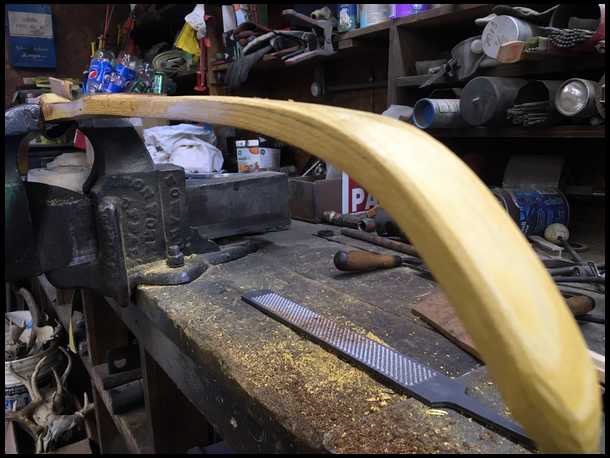
Next I work my way from the tips towards the handle with my heat gun clamping the stave as I go.
Bjrogg
|
|
| From: Bjrogg
|
|
|
|
|
|
|
| Date: 08-Dec-20 |
|

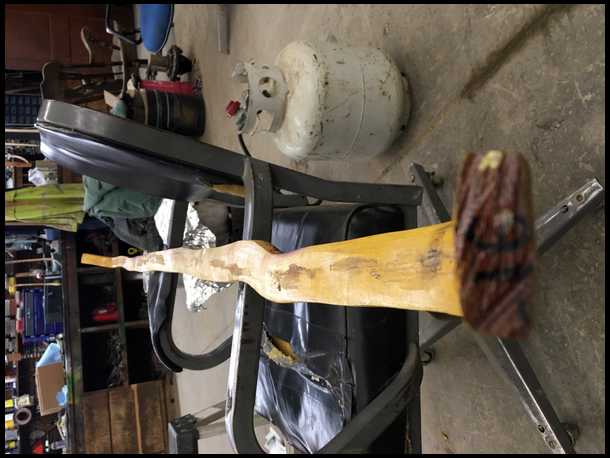
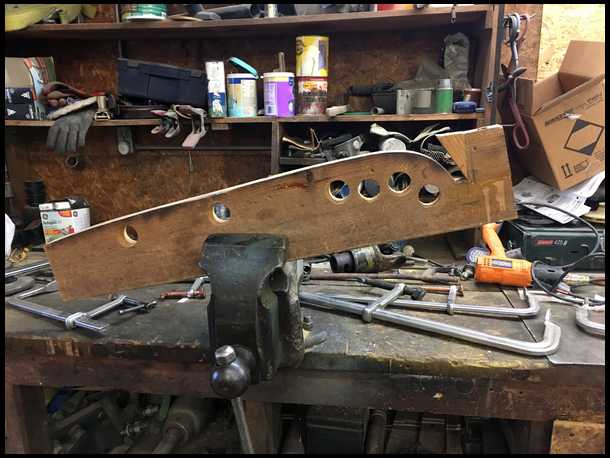
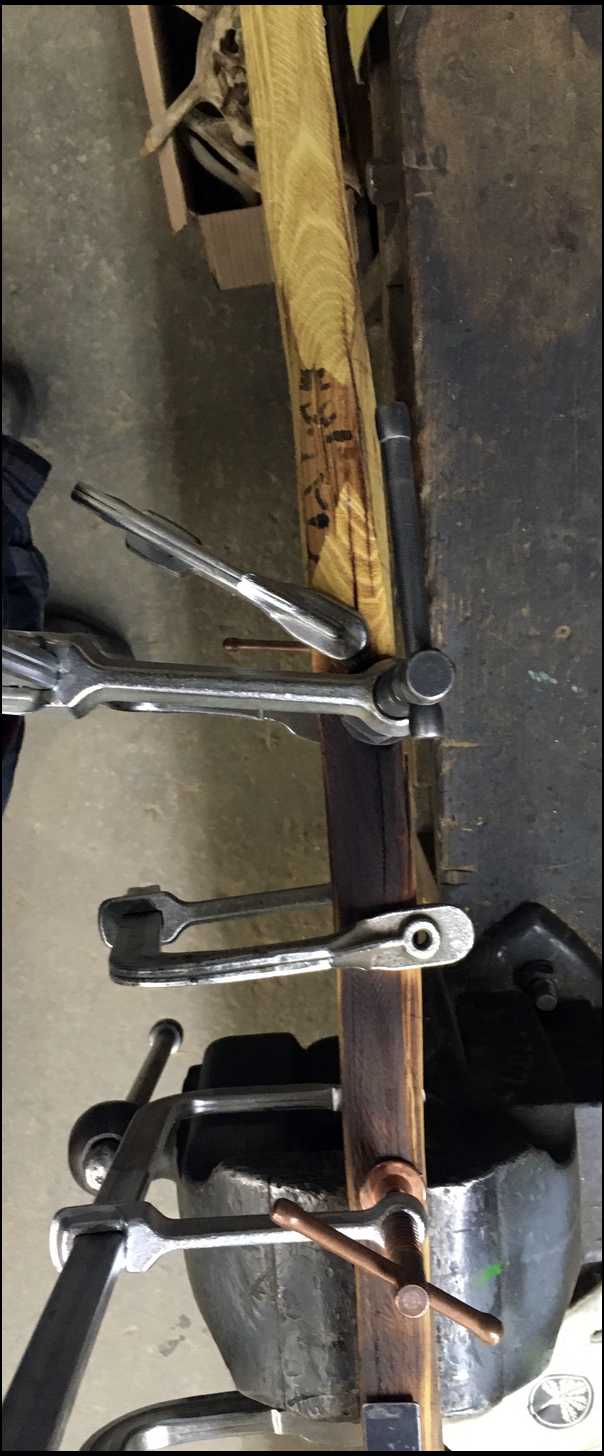
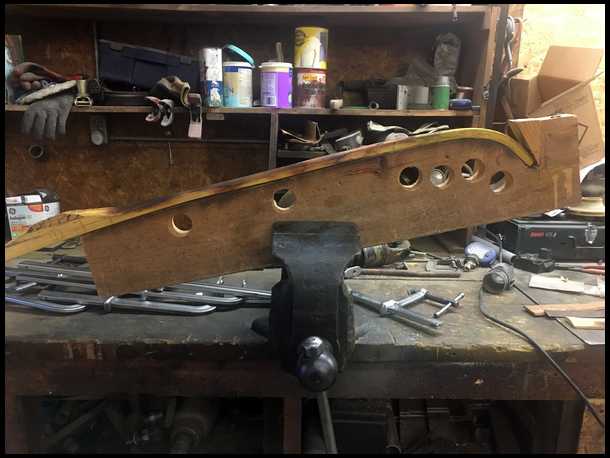
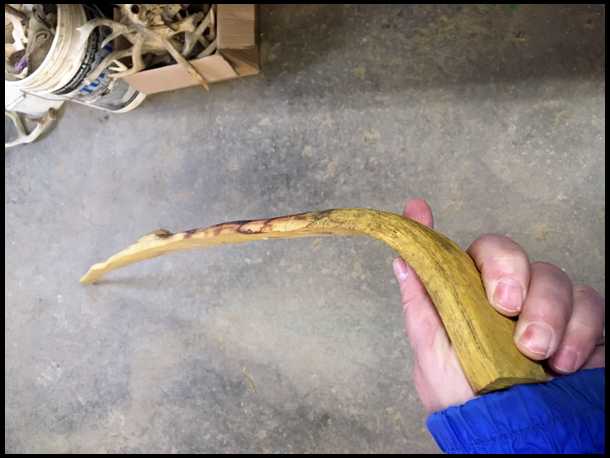
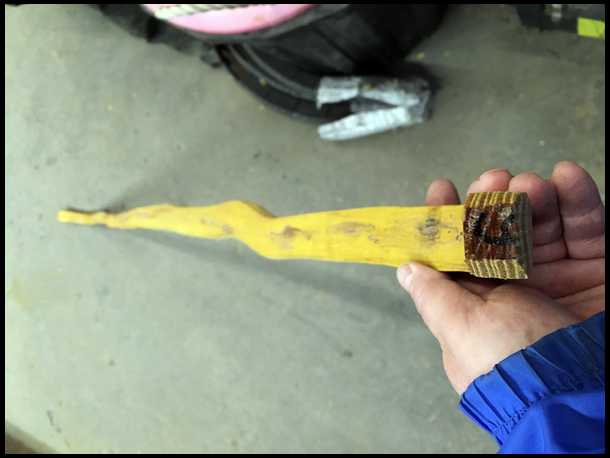
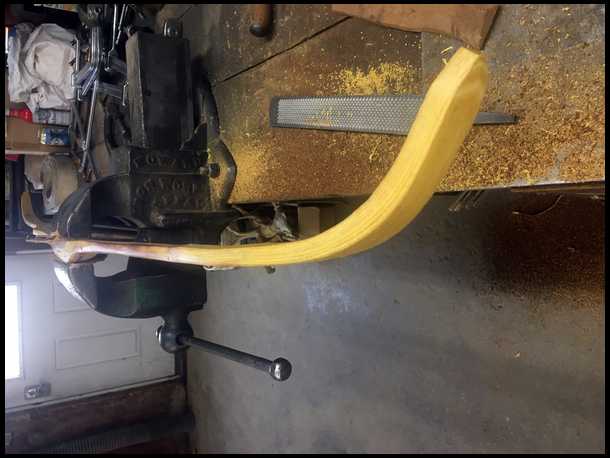
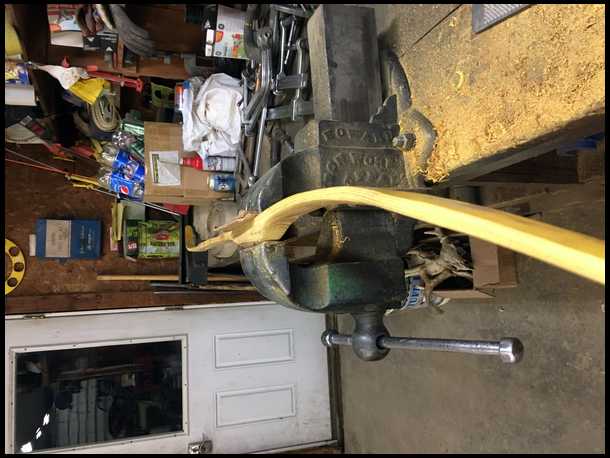
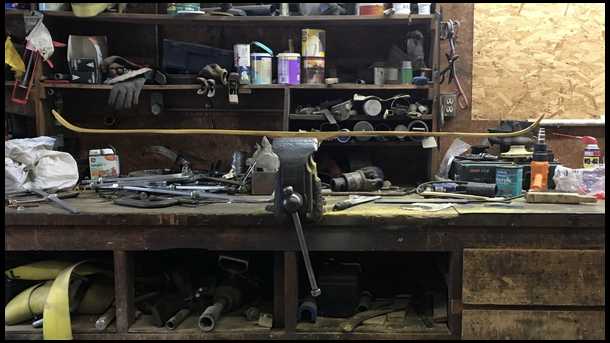
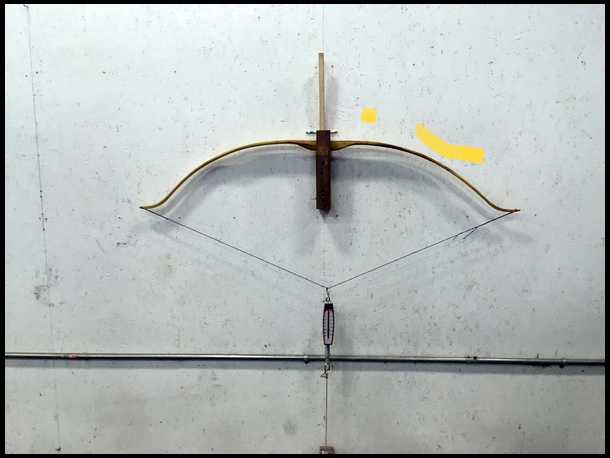
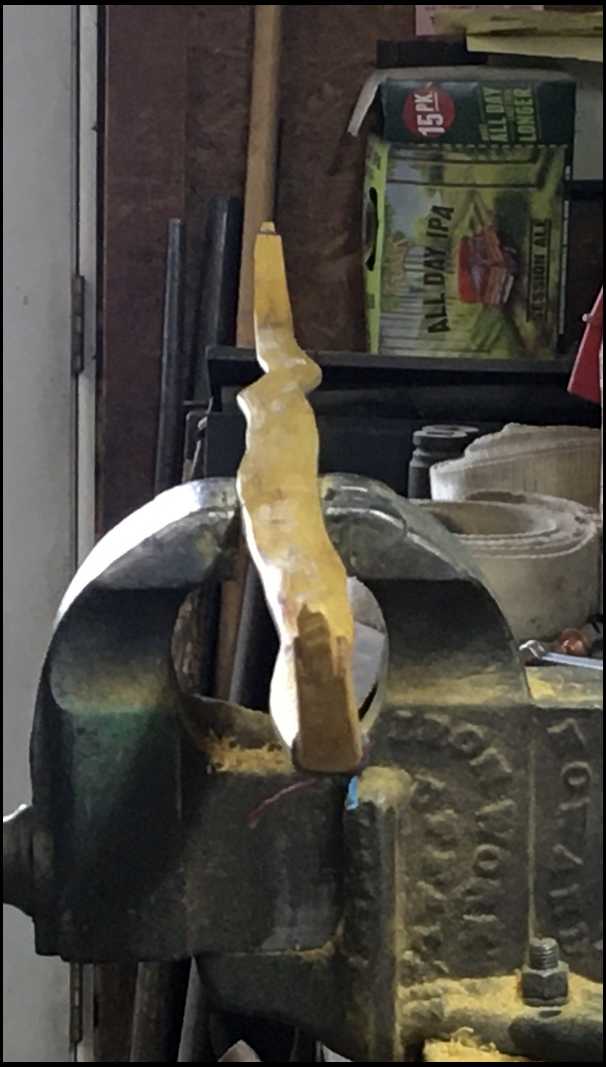
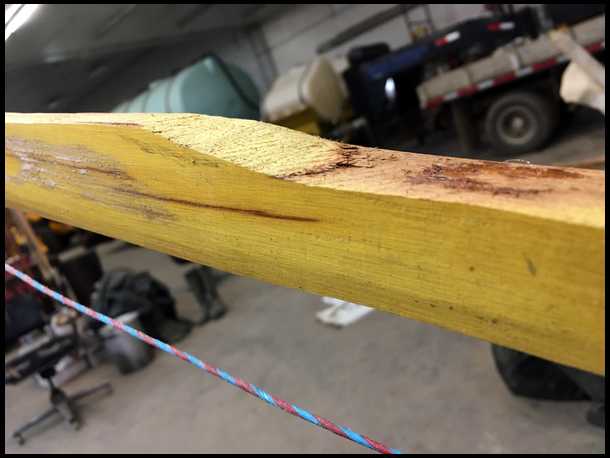
You can see the dog leg by right out of the handle in this picture to. I will try to get some of it out and also remove the twist. Bjrogg
|
|
| From: Bjrogg
|
|
|
|
|
|
|
| Date: 08-Dec-20 |
|
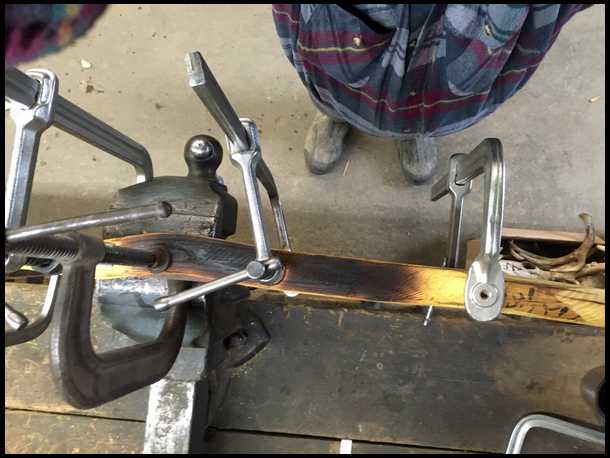
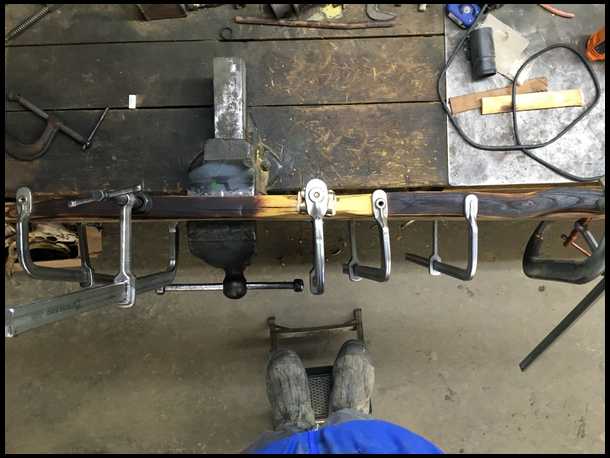
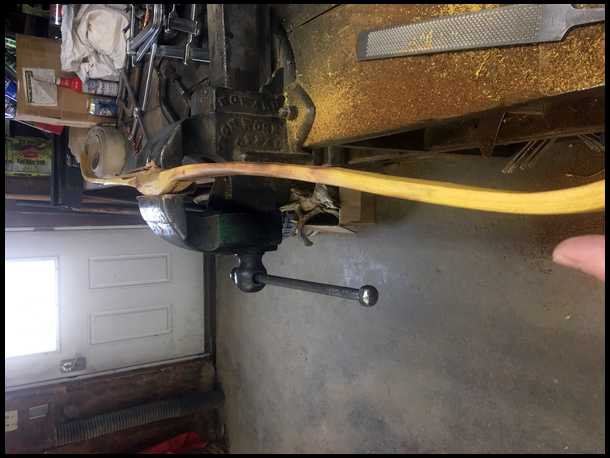
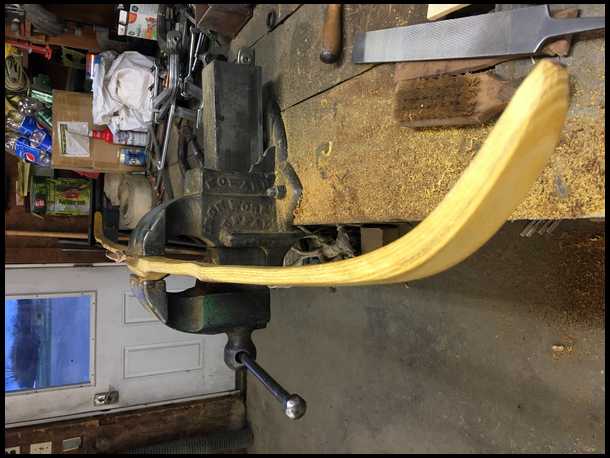
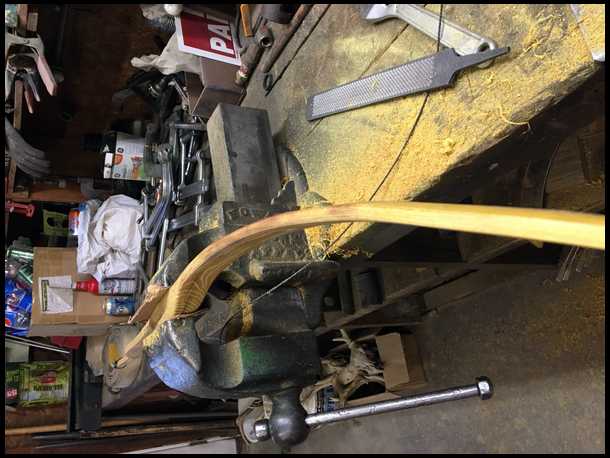
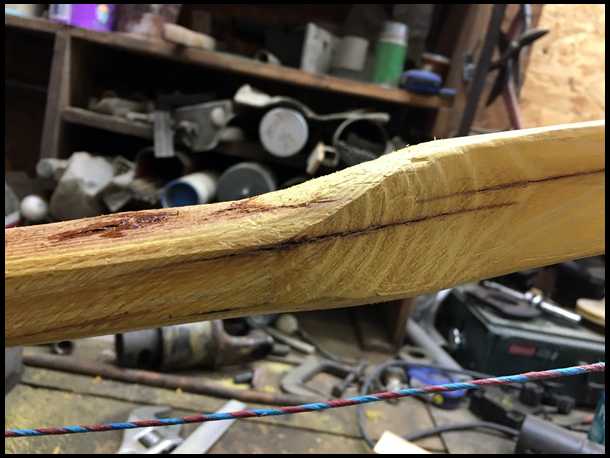
Here I have worked my way down the limb with the heat gun. I think I got a quite a bit of the dog leg out. Bjrogg
|
|
| From: Bjrogg
|
|
|
|
|
|
|
| Date: 08-Dec-20 |
|
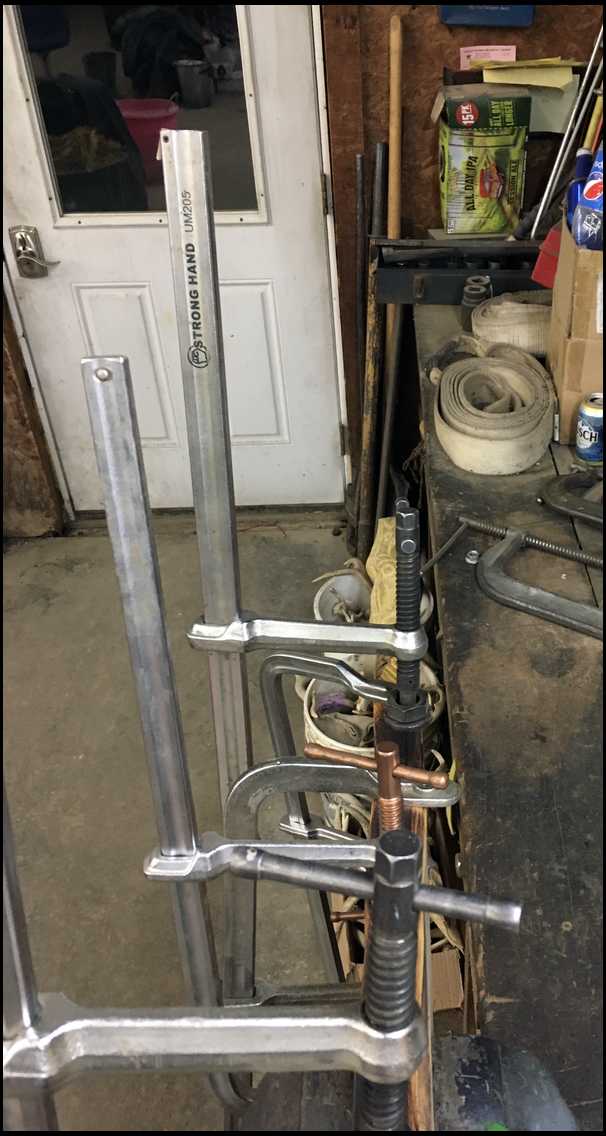
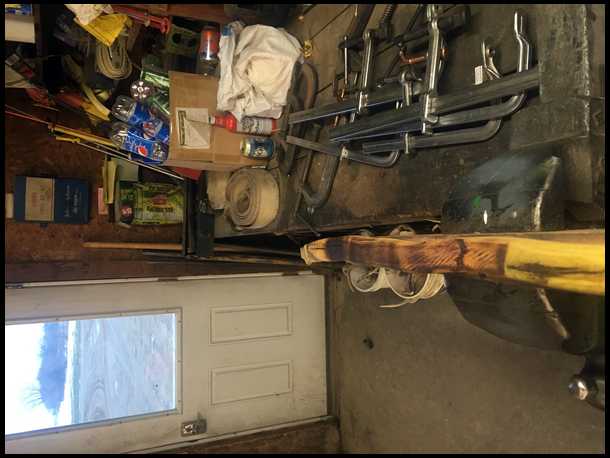
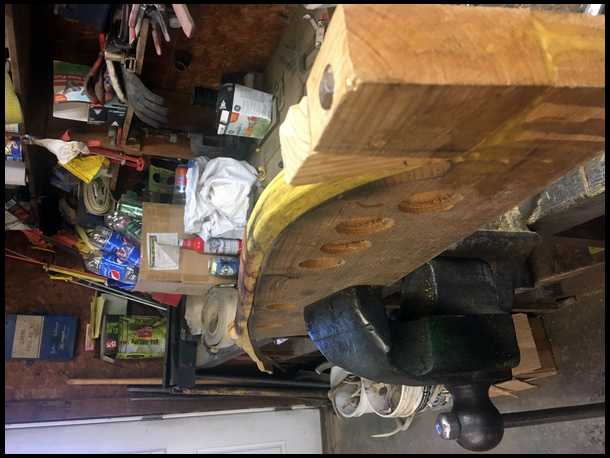
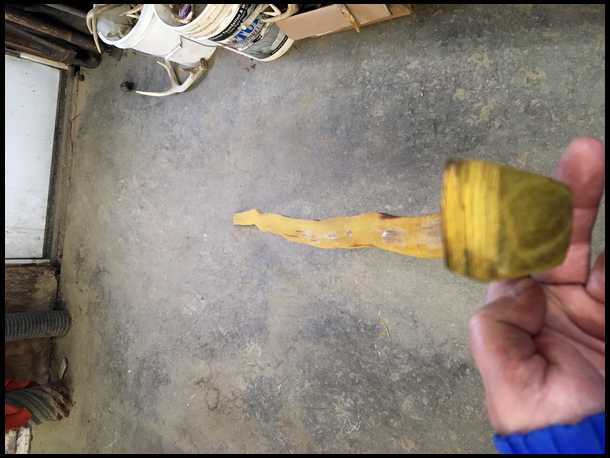
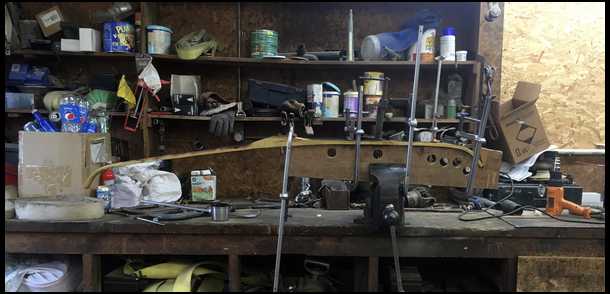
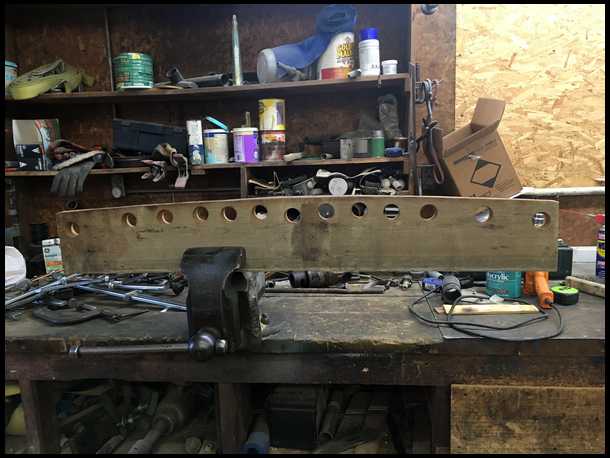
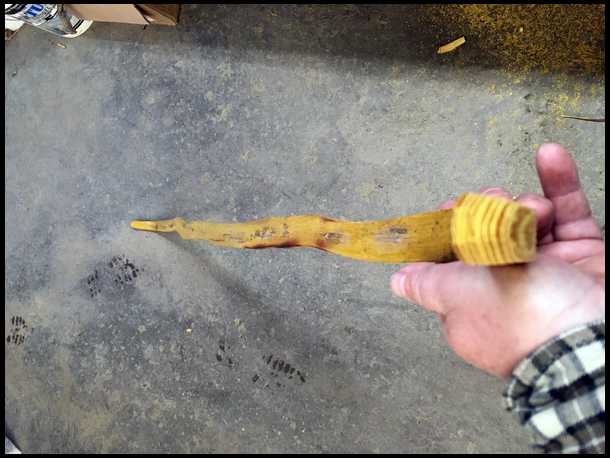
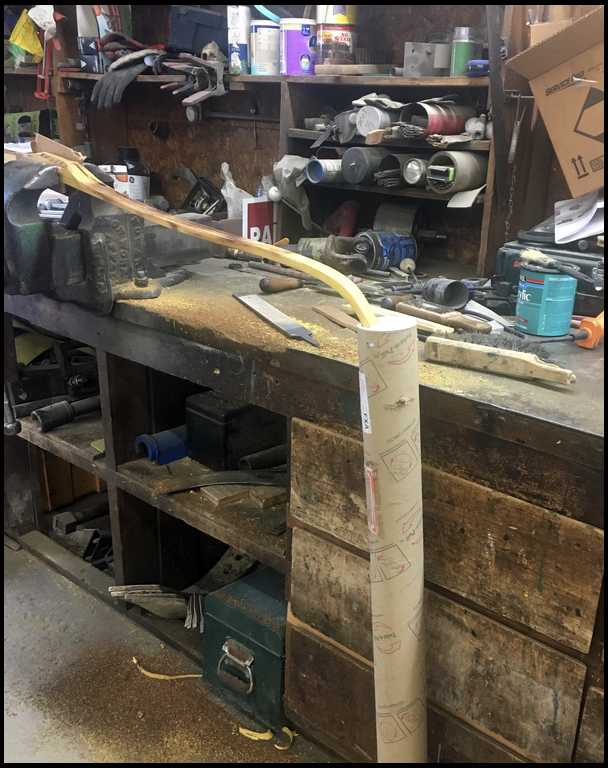
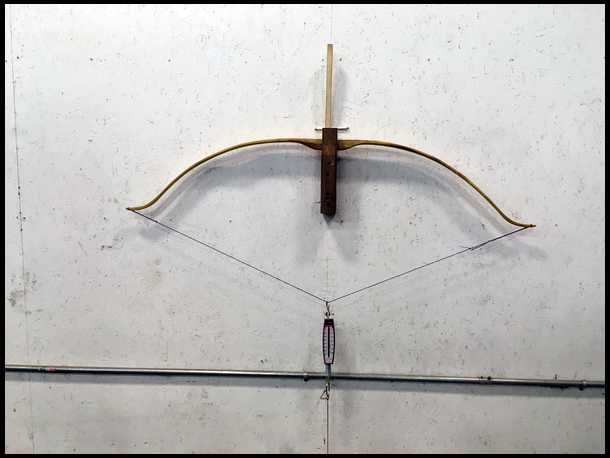
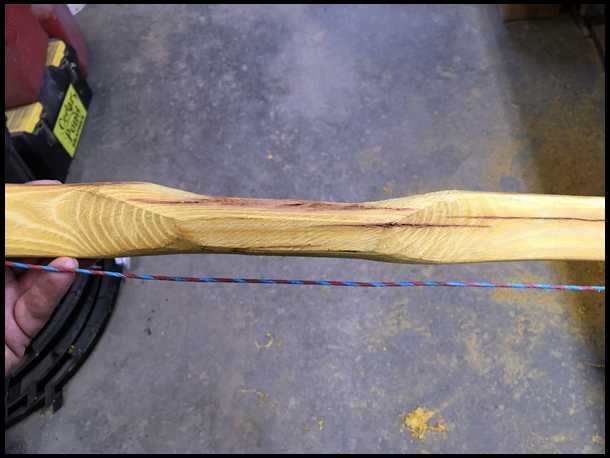
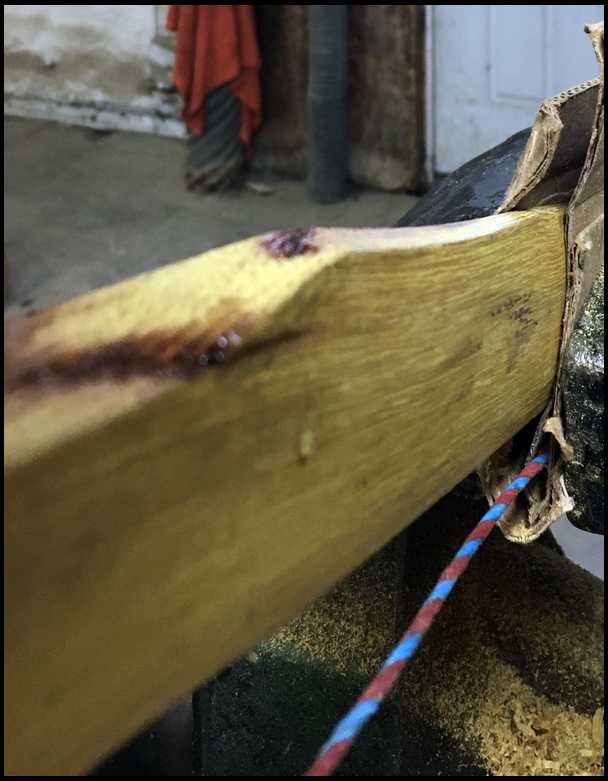
Here’s what it looks like from above
Bjrogg
|
|
| From: Bjrogg
|
|
|
|
|
|
|
| Date: 08-Dec-20 |
|
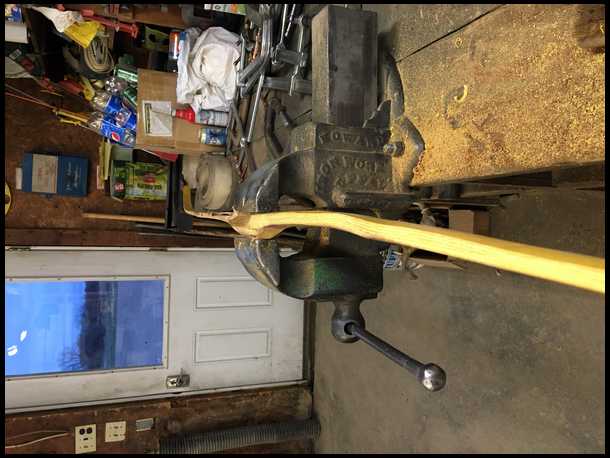
That’s it for now. I will leave it on the caul at least until morning. Then I will look things over a hopefully bend the other tip.
Maybe tomorrow.
I’m curious what it will look like when it comes off.
Bjrogg
|
|
| From: altitude sick
|
|
|
|
|
|
|
| Date: 08-Dec-20 |
|
I learned the hard way about the need for a metal backer. Many splinters.
Brian, What kind of clamps are those.
|
|
| From: Wayne Hess
|
|
|
|
|
|
|
| Date: 08-Dec-20 |
|
A lot of time put to work , interesting, dose the wood ever come back some to it original shape, understand heat, steam bending rocking chairs, but they are tied in with other pieces of chair. Bow is one piece, looking forward to finish.
|
|
| From: Bjrogg
|
|
|
|
|
|
|
| Date: 08-Dec-20 |
|
Yup the metal backer really helps. Sometimes I still get a few lifted splinters yet. Especially with hop hornbeam . Another thing that helps is to round the corners. Shape belly almost in a D.
Bjrogg
|
|
| From: Bjrogg
|
|
|
|
|
|
|
| Date: 08-Dec-20 |
|
Osage bends with heat pretty nice and holds it’s shape really well Wayne. Hop Hornbeam usually gives up some right off the caul. Then some more when you start pulling it back the other way drawing the bow.
I like Osage for this. It often sticks to my caul even after I remove all the clamps.
Bjrogg
|
|
| From: Wayne Hess
|
|
|
|
|
|
|
| Date: 08-Dec-20 |
|
Thanks Bjrogg , I Like Osage better, A Golden Bow
|
|
| From: Bjrogg
|
|
|
|
|
|
|
| Date: 08-Dec-20 |
|
Yup there’s a good reason they say Osage is King it is a very nice bow wood.
Guess I was up pretty early this morning. Time for bed. See you all in the morning and maybe We’ll get to see what that stave looks like after I take the clamps off
Bjrogg
|
|
| From: BowAholic
|
|
|
|
|
|
|
| Date: 08-Dec-20 |
|
Is steam better than actually boiling the wood?
|
|
| From: Bassman
|

|
|
|
|
|
|
| Date: 08-Dec-20 |
|
Nice. Looking forward to the finished product.
|
|
| From: Bjrogg
|
|
|
|
|
|
|
| Date: 09-Dec-20 |
|
Bob I think boiling water is probably better for those stubborn woods. It’s all boiling water but I don’t submerge my stave in the boiling water. I keep it a few inches above it. However it does seem to help getting a good rolling boiling for the last 15 minutes and then the rolling boil probably does reach the stave. I never tried submerging stave in water.
Bjrogg
|
|
| From: Bjrogg
|
|
|
|
|
|
|
| Date: 09-Dec-20 |
|
Me to Bassman.
|
|
| From: altitude sick
|
|
|
|
|
|
|
| Date: 09-Dec-20 |
|
Take this with a grain of salt because I’m just starting out. I’ve read On steaming you want the steam moving over the wood not trapped around it. You need good flow and steady steam escaping. I guess It heats the wood better.
|
|
| From: Bjrogg
|
|
|
|
|
|
|
| Date: 09-Dec-20 |
|
I don’t have a true steam box. One that you would put the whole stave in and then plumb the steam into in. I have read about making them and they always have a place for steam to exit box opposite side that steam is plumbed into it.
Honestly I’m not sure if what I do is steaming, boiling or a combination of the two. I know it works much better than dry heat for static recurves for me.
Bjrogg
|
|
| From: Bjrogg
|
|
|
|
|
|
|
| Date: 09-Dec-20 |
|
Oh also Jay the clamps are called bar clamps. We have about eight in our shop. We use them for holding pieces in place when welding. Four of them we got from five star welding company. They were kinda pricey but they are very well made . Four I picked up at tractor supply and they are not quite as nice. I really like them. They are pretty fast putting on and you have a pretty good working range Of adjustment. Also because you side up and down the bar you don’t have the screw sticking out there 8” and getting bent. They are very handy
Bjrogg
|
|
| From: BR
|
|
|
|
|
|
|
| Date: 09-Dec-20 |
|
BJ the main question I have is, how does a man that builds bows and farms, keep such a daggone clean shop?
|
|
| From: Bjrogg
|
|
|
|
|
|
|
| Date: 09-Dec-20 |
|
lol I’m of so sure it’s that clean. That’s why I crop my pictures.
Seriously we put addition on several years ago. It is a very nice shop. I don’t think it is overly clean, but we try not to let it get to bad. It can quickly become overwhelming if it does.
We have a lot of overhead storage for parts. That helps a lot.
Bjrogg
|
|
| From: BowAholic
|
|
|
|
|
|
|
| Date: 09-Dec-20 |
|
thanks BJ...I have always wondered about boiling. It seems like When a 'kid' at MoJam, that went by Little Tree, made his 120° recurved osage bows, he boiled the ends before bending. They were really cool and could be hung from a peg by the curve...even strung. It was a very short static curve in just the last 6" of the limb. Thanks again for the tutorials...you're doing a great job.
|
|
| From: altitude sick
|
|
|
|
|
|
|
| Date: 09-Dec-20 |
|
Here is my red neck steam rig. Stove pipe and a turkey fryer. I learned that a rag in the end to keep the steam in was incorrect. I modified this. And added a pipe cap with about 10, 1/4” holes to allow the steam to flow out. The pipe is lower at one end to allow the condensation to drain back down.
|
|
| From: Bjrogg
|
|
|
|
|
|
|
| Date: 09-Dec-20 |
|
Thanks Bob. I like short recurves to. I’m still learning. Hope I always am. To me I think I can do the same thing I did with longer ones and not have as much tip weight.
I really don’t even go to 90 degrees. For my short draw this shape fits good. I never measured it. Guessing around 60? If the string doesn’t lift off before full draw it’s just extra weight the way I think. They certainly can look cool though .
|
|
| From: D.Lewis aka tonto59
|
|
|
|
|
|
|
| Date: 09-Dec-20 |
|
It truly is amazing what you can do with a little heat. Thanks for taking the time to do this for us Brian. Good thread!
|
|
| From: Bjrogg
|
|
|
|
|
|
|
| Date: 09-Dec-20 |
|
Jay I’ve seen everything from wood box full length steam injected to a kettle with a piece of aluminum foil over it. Mine is kinda somewhere in between.
I think even more important than how you steam is how well you are organized the second you take it out of the steam. I can’t emphasize that enough. Every second counts. My setup is right next to my caul and clamps. I’m pretty lucky that usually my brother is in shop and can quick give me a extra set of hands. We’ve done this enough together now that he pretty much knows where I want a clamp.
Also I like my half caul. I don’t have to put the whole stave on at once. It gives me more time to it have as much to do. Bjrogg
|
|
| From: Bjrogg
|
|
|
|
|
|
|
| Date: 09-Dec-20 |
|
It is Don
And here’s what it looks like after I remove clamps
|
|
| From: Bjrogg
|
|
|
|
|
|
|
| Date: 09-Dec-20 |
|
Still a little dog leg out of the handle. I have a trick for that in the future.
|
|
| From: Bjrogg
|
|
|
|
|
|
|
| Date: 09-Dec-20 |
|
One more picture. This is my limb profile it might change slightly yet but pretty close to what I’m looking for
|
|
| From: Bjrogg
|
|
|
|
|
|
|
| Date: 09-Dec-20 |
|
The first curve turned out sweet. No lifted grain. It is very easy to have a splinter lift doing this. We are bending wood the wrong way. Maybe even chasing a ring on the tip belly would help. Never tried it though. The metal backer does but you still have to have it organized.
|
|
| From: Bjrogg
|
|
|
|
|
|
|
| Date: 09-Dec-20 |
|
I check my kettle and refill it with water. Don’t forget to check . You don’t want to run out. Especially if you are trying to multitask.
|
|
| From: Bjrogg
|
|
|
|
|
|
|
| Date: 09-Dec-20 |
|
I look it over before I put it back in the steam
|
|
| From: Bjrogg
|
|
|
|
|
|
|
| Date: 09-Dec-20 |
|
Still a little dog leg but the tips are getting closer to lining up
|
|
| From: Bjrogg
|
|
|
|
|
|
|
| Date: 09-Dec-20 |
|
Then I put the second tip in the steam. Back side up. And check the clock Bjrogg
|
|
| From: wooddamon1
|
|
|

|
|
|
|
| Date: 09-Dec-20 |
|
Good stuff, thanks for doing these threads!
|
|
| From: RonG
|
|
|
|
|
|
|
| Date: 09-Dec-20 |
|
Brian Thanks for the lesson, I have a couple of absolutely beautiful Osage billets that I am going to do next year and this post fits in perfectly.
I am getting more confident after watching you.
|
|
| From: Arvin
|
|
|
|
|
|
|
| Date: 09-Dec-20 |
|
Still watching and learning. Thanks
|
|
| From: Bjrogg
|
|
|
|
|
|
|
| Date: 09-Dec-20 |
|
Thanks Damon.
Where the learning never stops hey Arvin. I am to. Sometimes doing something like this makes you think out every move.
Ron I might have to do a splicing the handle one for you. So far I have only done one. It does give you lots of interesting options for profile designs to.
Bjrogg
|
|
| From: Bjrogg
|
|
|
|
|
|
|
| Date: 09-Dec-20 |
|
Well I goofed up and went to the wrong thread and posted this so now I will try to put it where it belongs.
Once again I get everything ready. My clamps have their screws loose just like me.lol my backer is straightened and ready.
I slide the stave tip out of the steam and into the end of my caul. I slide the backer in at the same time.
This one is a little thick and wide. It takes a little more effort to bend it. I can hear the end of my caul try to pop off. Glad I ran a bolt through it.
The tip lines up nice on the caul. Bjrogg
|
|
| From: Bjrogg
|
|
|
|
|
|
|
| Date: 09-Dec-20 |
|
The rest of the limb wonders off the caul. I will try to bring it back with the heat gun.
I won’t take the snaky stuff out. I might even make it snakier. My main objective is to get three points to line up . Two tips and center of handle.
|
|
| From: Bjrogg
|
|
|
|
|
|
|
| Date: 09-Dec-20 |
|
I heat the snake first and bring it over to the edge of the caul. This takes a quite a bit of heat. I put constant pressure on it until I feel it hit that magic temperature and just become almost like red hot metal. It bends to where I want it and I clamp it down. Then I heat past it working towards the handle. It needs to go back the other way. Bjrogg
|
|
| From: Bjrogg
|
|
|
|
|
|
|
| Date: 09-Dec-20 |
|
Now I leave it set at least until it is completely cool. I’m guessing I need one more heat correction trick but it has to set up on the caul here first.
|
|
| From: Bjrogg
|
|
|
|
|
|
|
| Date: 09-Dec-20 |
|
Here’s the profile at this point
Bjrogg
|
|
| From: altitude sick
|
|
|
|
|
|
|
| Date: 09-Dec-20 |
|
Man I had no idea you applied that much direct dry heat.
|
|
| From: PEARL DRUMS
|
|
|
|
|
|
|
| Date: 09-Dec-20 |
|
You're doing it ALL wrong :)
|
|
| From: Bjrogg
|
|
|
|
|
|
|
| Date: 09-Dec-20 |
|
I know Pearl but I sure have everybody going.lol.
You can save the peanut section routine for the tiller.
Jay when it’s thinner it doesn’t take nearly as much heat.
Bjrogg
|
|
| From: Arvin
|
|
|
|
|
|
|
| Date: 09-Dec-20 |
|
Brian you won’t have to mess with all that limb straighten when you get that stave. Arvin
|
|
| From: Bjrogg
|
|
|
|
|
|
|
| Date: 09-Dec-20 |
|
Yup Arvin I think I’d have a little trouble keeping the string on those skinny working recurves you did with this stave.
Bjrogg
|
|
| From: Bjrogg
|
|
|
|
|
|
|
| Date: 09-Dec-20 |
|
This could become quite a adventure Tyler. For some people it becomes all consuming.
I’m lucky my wife is ok with it.
Bjrogg
|
|
| From: Bjrogg
|
|
|
|
|
|
|
| Date: 09-Dec-20 |
|
I was hoping to try my other trick here tonight but when I took clamps off the area under my backer lifted away from my caul. I decided to leave one clamp on and bend my backer away from the stave allowing me to heat this area. So far it only had a little steam that was escaping my kettle for heat . With some woods I wouldn’t expect the stave to stay tight to the caul but Osage bends and then hold that shape really well.
Bjrogg
|
|
| From: Bjrogg
|
|
|
|
|
|
|
| Date: 09-Dec-20 |
|
Well I took off the clamps after a couple hours and the limb stayed tight to the caul.
I decided to try my next trick in my bag.
I have another half caul. This one doesn’t have tips. Just the center and mid limbs. It has a slight reflex through the limbs. I use it for straightening middle section of stave.
I start out by clamping handle area down really solid. I offset my caul in the vice so I have good access to the handle area. Then I start heating from handle toward first tip.
|
|
|
|
| From: Bjrogg
|
|
|
|
|
|
|
| Date: 09-Dec-20 |
|
This limb runs off the caul from the handle I heat it and work towards the tip clamping as I go.
|
|
| From: Bjrogg
|
|
|
|
|
|
|
| Date: 09-Dec-20 |
|
Then the second limb
|
|
| From: Bjrogg
|
|
|
|
|
|
|
| Date: 09-Dec-20 |
|
Same routine
|
|
| From: Bjrogg
|
|
|
|
|
|
|
| Date: 09-Dec-20 |
|
Views from above
|
|
|
|
| From: Bjrogg
|
|
|
|
|
|
|
| Date: 09-Dec-20 |
|
Here’s my caul and my profile. I’m hoping I have it pretty close now.
I have stuff I need to do for the next couple days so I wanted to get this done and let the stave re acclimate. Hopefully in a few day I can start to fine tune my tips a little more and start tillering. Until then I will probably just leave it on the caul.
Also those wind checks really opened up on the belly side . I if I’m done heating I will probably use some thin super glues in them. I doubt they would make a problem but if I get a chance to get some glue I’ll probably soak those wind checks from the belly side.
Bjrogg
|
|
| From: BowAholic
|
|
|
|
|
|
|
| Date: 09-Dec-20 |
|
it sure looking good...I'm going to have to make me a caul like that... thanks!
|
|
| From: Bjrogg
|
|
|
|
|
|
|
| Date: 09-Dec-20 |
|
Bob I really like these two caul. They are pretty versatile.
Hopefully this stave is close now. It is a pretty challenging one.
Bjrogg
|
|
| From: altitude sick
|
|
|
|
|
|
|
| Date: 10-Dec-20 |
|
Brian, you definitely did not pick the easiest stave to make a recurve
|
|
| From: Bjrogg
|
|
|
|
|
|
|
| Date: 10-Dec-20 |
|
Glad you noticed Jay. Yes this one will be a bit of a challenge. I think we can make it work though. Still that possibility I end up looking like a idiot though.
Bjrogg
PS I use this same technique for most of my static recurves. It is pretty adaptable. And can usually fix most of my alignment problems
|
|
| From: RonG
|
|
|
|
|
|
|
| Date: 10-Dec-20 |
|
Brian I did a hop hornbeam last year from two billets and I cut them to have a bit of backset in the limbs.
|
|
| From: Bjrogg
|
|
|
|
|
|
|
| Date: 10-Dec-20 |
|
There are some good build alongside on PA I used for my first spliced handle.
Did you use a z or w type splice? Gives more glue line. I’m guessing you did.
Yes lots of options for profile layouts with spliced billets. You can also deflex the handle and then reflex the limbs.
Bjrogg
|
|
| From: Bjrogg
|
|
|
|
|
|
|
| Date: 10-Dec-20 |
|
This is what I mean by z or w splice.
|
|
| From: Bjrogg
|
|
|
|
|
|
|
| Date: 10-Dec-20 |
|
Well got done with my jobs and snuck back to the shop.
I had a few requests for pictures and measurements of my caul.
I’ll see if I can find time to sketch a blueprint with measurements it for now just a few pictures hopefully will help.
I use two cauls.
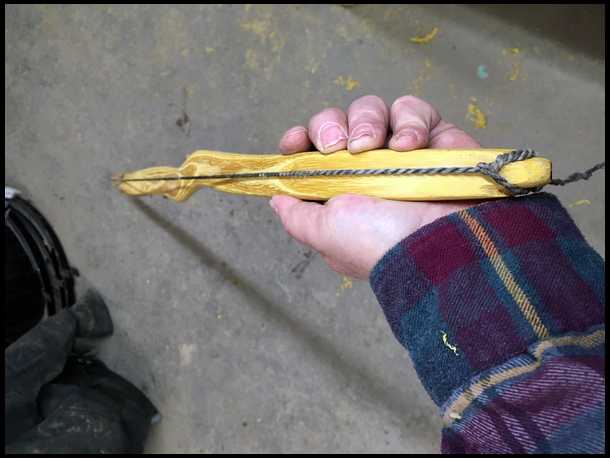
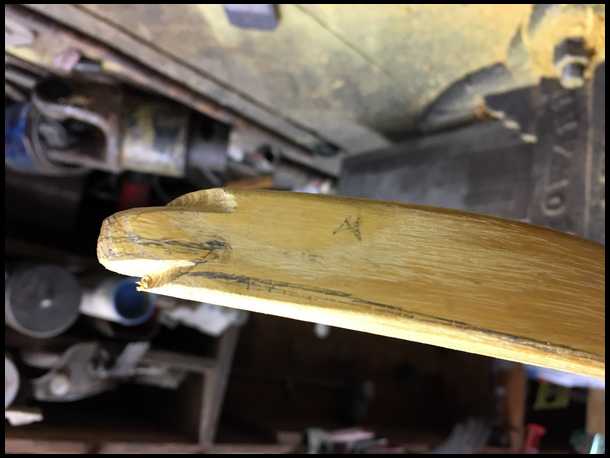
The first one is the half with the tips. I found this general shape tip I like.
The notch allows stave to side in while still straight and out after curved. It holds both the tip and my backer thought the second I start bending in the recurves. It’s better than a second set of hands. Time is so important. Every second counts and this is so fast. No clamping. Just start bending.
As I have started a couple times already, my block did pop off a couple times and now has a bolt holding it together.
I like this system
Bjrogg
|
|
|
|
|
|
| From: Bjrogg
|
|
|
|
|
|
|
| Date: 10-Dec-20 |
|
This bolt hold the block from popping off.
|
|
| From: Bjrogg
|
|
|
|
|
|
|
| Date: 10-Dec-20 |
|
My second caul is the middle section of bow. It has a slight reflex through both limbs. I built it for straight limb bows, but I found it works nice for alignment of my static recurves to.
The handle area is centered and part of each limb go to each end.
|
|
| From: Bjrogg
|
|
|
|
|
|
|
| Date: 10-Dec-20 |
|

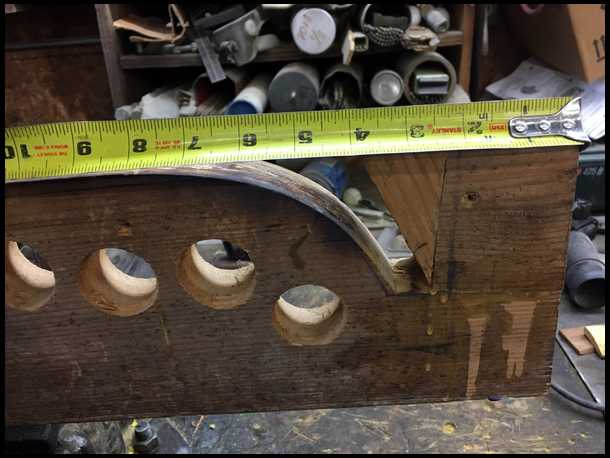
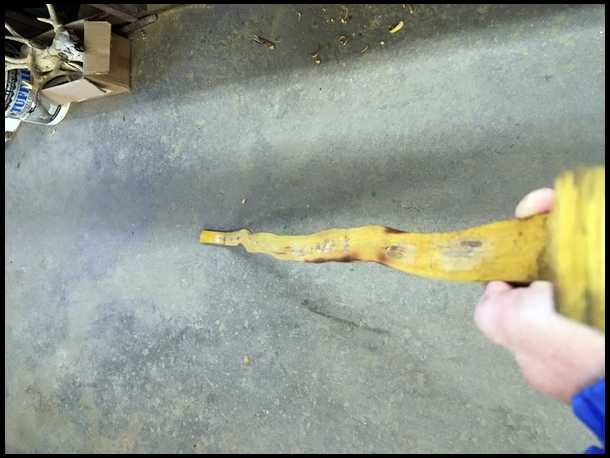
It’s 48” long
|
|
| From: Bjrogg
|
|
|
|
|
|
|
| Date: 10-Dec-20 |
|
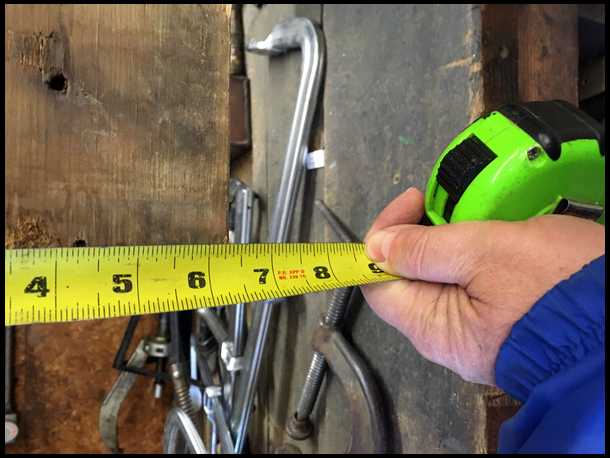
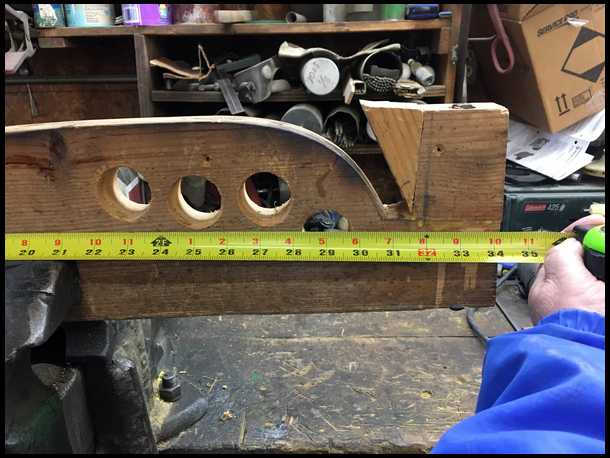
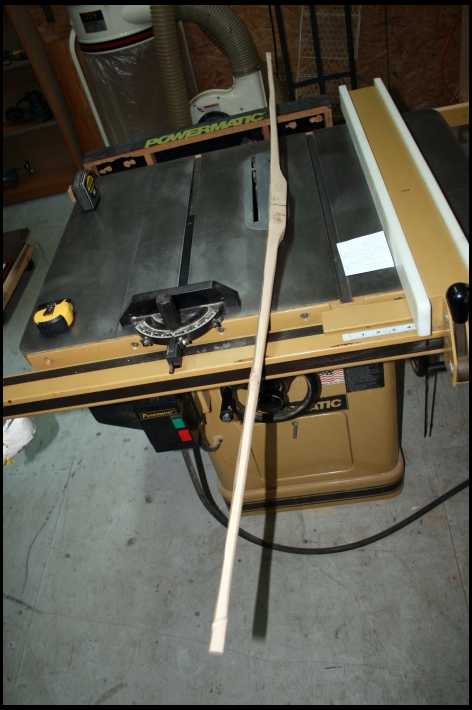
It’s about 6.25” on the ends and 7.25” in the center. So it has 1” of reflex in 2’of limb
|
|
| From: Bjrogg
|
|
|
|
|
|
|
| Date: 10-Dec-20 |
|
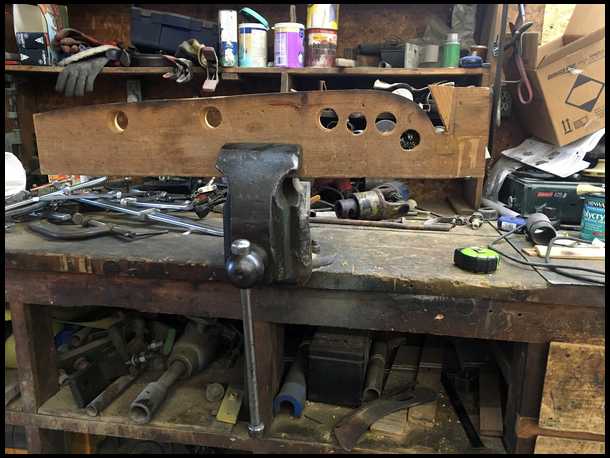
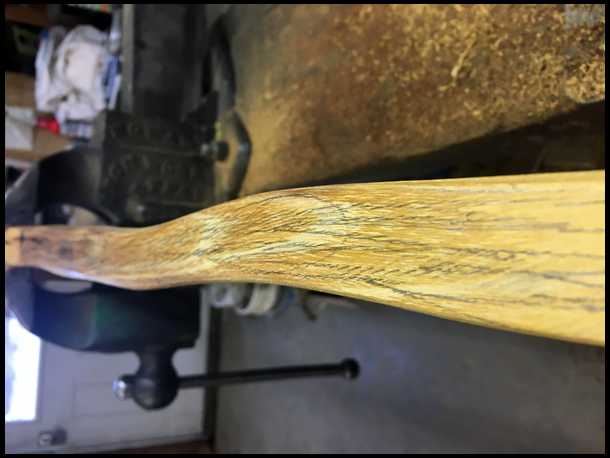
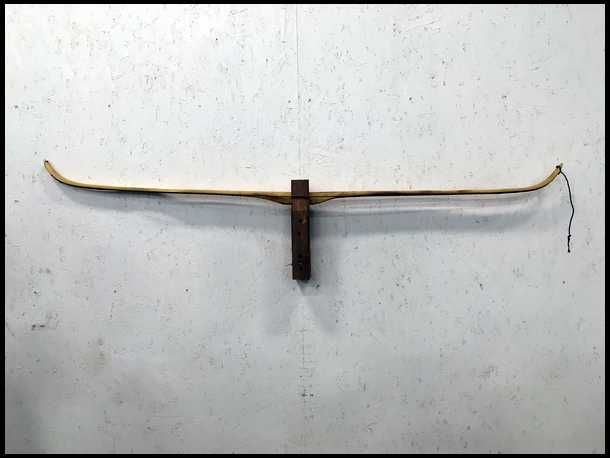
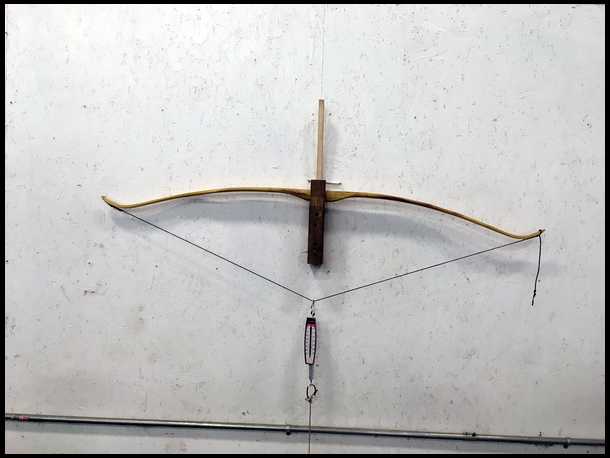
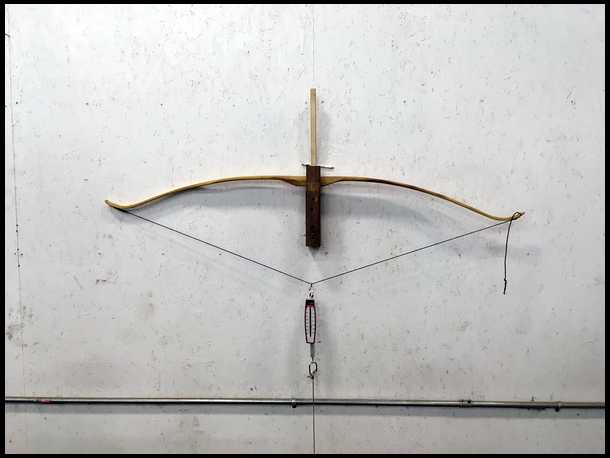
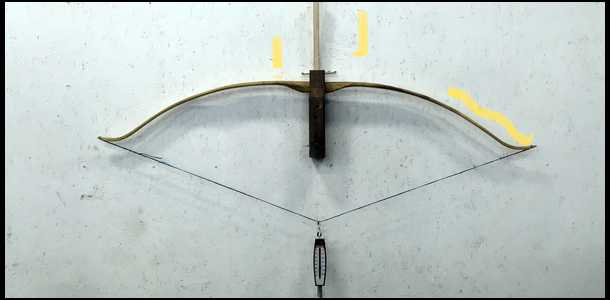
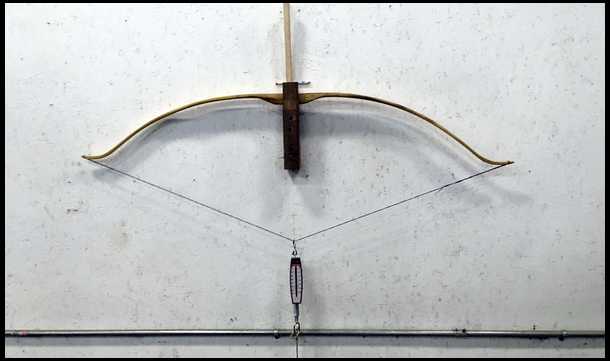
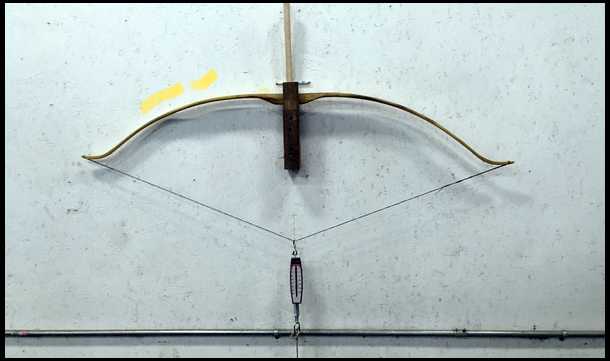
Well you may have noticed that the stave is no longer on the caul.
I wonder what it looks like?
Let’s look see from end to end. Kinda looks like the tips and the handle might just line up.
Bjrogg
|
|
|
|
| From: Bjrogg
|
|
|
|
|
|
|
| Date: 10-Dec-20 |
|
And the side profile.
Hopefully I can keep this unbraced profile through the entire build and for years to come. How much I can keep of it will effect the performance of this bow.
Everything is ready now. All we have to do is take off everything that isn’t a bow, and make sure we leave everything that is.
Everything from now on is what really makes a bow.
I think I will just continue this thread. It gets confusing switching them and I’m still going to be refining my tips and alignment as we continue.
I can’t start tillering yet. I need to let this stave equalize it’s moisture before I begin.
I promise I will get back to it as soon as I can. It will be on this thread
Bjrogg
|
|
| From: Jeff Durnell
|

|
|
|
|
|
|
| Date: 10-Dec-20 |
|
That looks better. One or both of the curves is misaligned a little, but that should be a relatively easy fix.
|
|
| From: Bjrogg
|
|
|
|
|
|
|
| Date: 10-Dec-20 |
|
Agreed Jeff. Yes I have been saying alignment of three points, but with recurves it’s really 5 or maybe even more. They do complicate things just a bit. I will try to make it as simple as I know how with a not so simple stave. I still have a few tricks to help with that I will probably end up using.
Bjrogg
|
|
| From: Bjrogg
|
|
|
|
|
|
|
| Date: 10-Dec-20 |
|
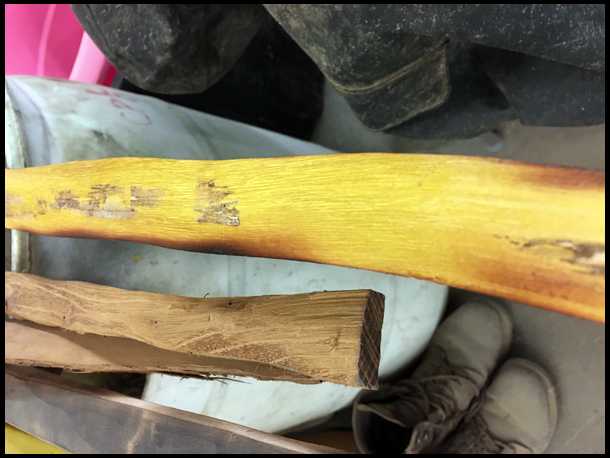
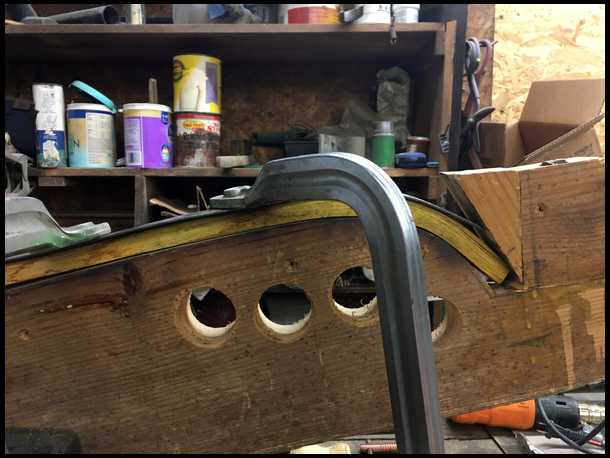
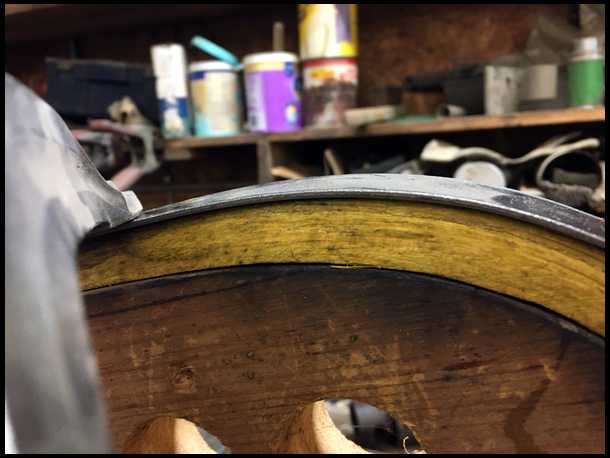
One thing I didn’t mention that I can’t stress enough.
NEVER HEAT THE BACK OF THE STAVE!!
Heat is good for compression on the belly side of bow.
Heat is very detrimental to tension. Never apply direct heat to back.
Here my stave is narrower than my caul. Some of the heat reflected off the caul and scorched the edge of my back. I think I can get away this much but I try to avoid it. I use a necked down tip on my heat gun. I think Some people put vegetable oil on the back before put on caul.
If you have to much you might still be able to chase another ring. I know people who just plan on it.
|
|
| From: Jeff Durnell
|
|
|
|
|
|
|
| Date: 10-Dec-20 |
|
Yep, recurves or lots of reflex make alignment a greater, multifaceted consideration.
|
|
| From: BowAholic
|
|
|
|
|
|
|
| Date: 12-Dec-20 |
|
thanks again...just bringing this back to page one.
|
|
| From: Bjrogg
|
|
|
|
|
|
|
| Date: 12-Dec-20 |
|

Here I am. Got my obligations done and snuck out to the shop.
Put a string from end to end. Seems like it might be pretty close now. I might have to tweak something yet but I think I can start to narrow the tips a bit more now.
Bjrogg
|
|
| From: Bjrogg
|
|
|
|
|
|
|
| Date: 12-Dec-20 |
|
So of you may have noticed and some may even wish I did. But I don’t measure much with a tape measure.
So far the only measurements I have given where laying out the handle.
Normally I might not pick up a tape measure the rest of the build.
I take a few here hopefully they might help someone.
I do take thousands of measurements with my fingers.
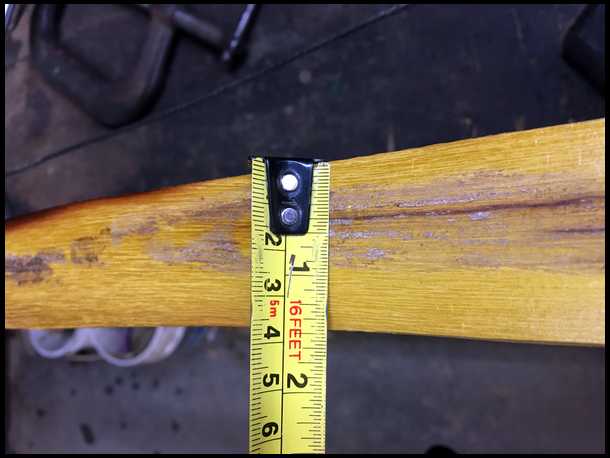
The narrower limb is about 1 1/2” Wide and a little over half in thick.
|
|
| From: Bjrogg
|
|
|
|
|
|
|
| Date: 12-Dec-20 |
|
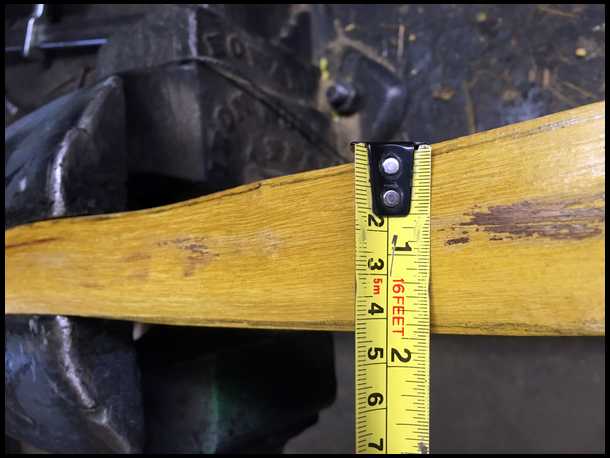
The wider limb is just shy of 1 3/4” Wide and a little over 1/2” thick.
|
|
| From: ron w
|
|
|
|
|
|
|
| Date: 12-Dec-20 |
|
Really cool stuff
|
|
| From: George Tsoukalas
|
|
|
|
|
|
|
| Date: 12-Dec-20 |
|
Great build along, BJ. I love our steamer. Jawge
|
|
| From: Bjrogg
|
|
|
|
|
|
|
| Date: 12-Dec-20 |
|
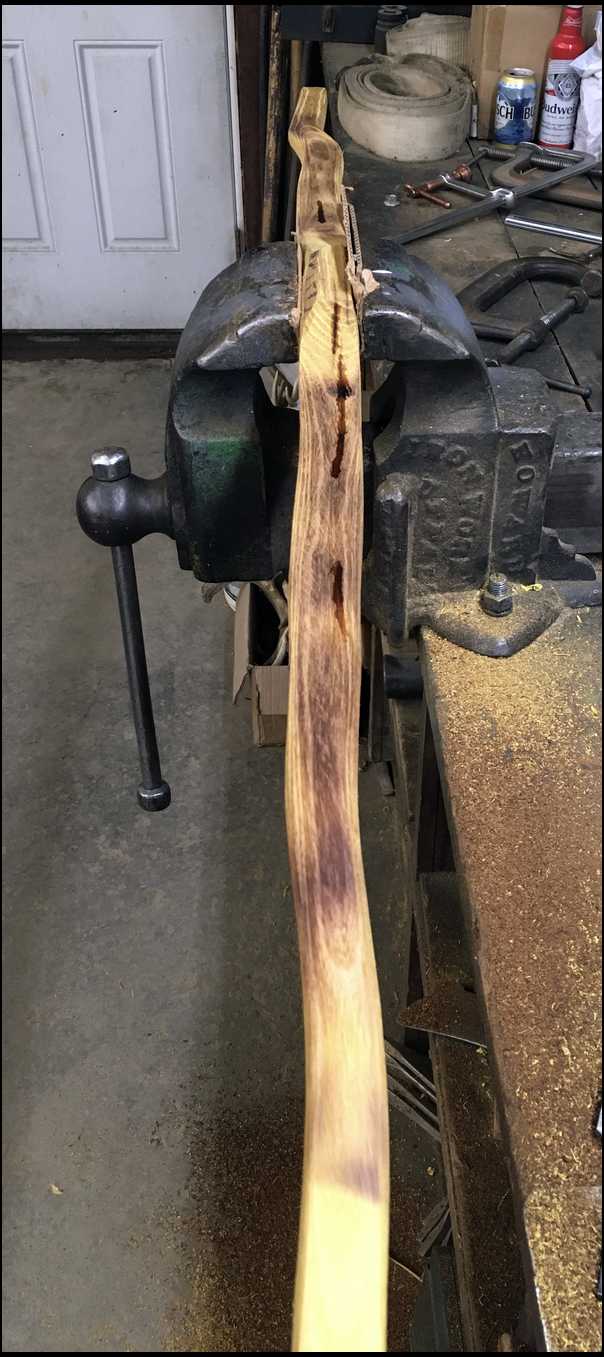
So far I like the way the wider tip is tracking. I put a couple marks about a half inch apart.
|
|
| From: Bjrogg
|
|
|
|
|
|
|
| Date: 12-Dec-20 |
|
Then I use my fingers as a guide starting at the handle moving towards the tips. As get closer to the tips I tapper my mark to meat the two marks I made previously.
I do very carefully use my draw knife to narrow up just shy of my mark. This is probably one of the last times I will use it.
I can’t chance tearing out any grain now.
Here’s looking down what was wide limb after narrowing a bit. I will narrow them much more later, but until I get closer to putting a string on this is narrow enough. If I leave them wide now it gives me more options later. Bjrogg
|
|
| From: Bjrogg
|
|
|
|
|
|
|
| Date: 12-Dec-20 |
|

Looking at the narrow limb it seems like it might track slight to the side so I think I’ll just remove a little wood from one side.
|
|
| From: Bjrogg
|
|
|
|
|
|
|
| Date: 12-Dec-20 |
|
Then I use my draw knife for probably the last time on this stave and carefully shave off Osage till I get almost to the mark.
Then clean up with rasp.
Here’s narrow limb.
|
|
| From: Bjrogg
|
|
|
|
|
|
|
| Date: 12-Dec-20 |
|
I’m going to leave the tips wide yet, but I do want to thin them some. These tips will be static meaning the won’t bend. They need to be thick enough not to bend. But my fingers tell me they can be thinner than they are. I will refine them later and try to shave off as much weight as I can.
I use them for a guide to thin the tips. It’s still pretty thick probably just a little under half inch.
|
|
| From: Bjrogg
|
|
|
|
|
|
|
| Date: 12-Dec-20 |
|
Then I start thinning my tips with my rasp.
From here out I do all my measurements with my fingers and my eyes.
I use them like a calipers. When my bow is done what I should feel. From the handle limbs should very gradually get thinner until just before the static tips. Then slightly thicker where I don’t want my static tips to bend.
|
|
|
|
| From: Bjrogg
|
|
|
|
|
|
|
| Date: 12-Dec-20 |
|
I like starting at my outer limbs beginning to shape that taper in thickness. As I work my way towards the handle I keep going back over the outer limb helping to rough out this taper.
|
|
| From: Bjrogg
|
|
|
|
|
|
|
| Date: 12-Dec-20 |
|
I’m starting to just barely get that tapper. I’m not going any further on this limb until it gets a little more time to equalize it moisture and I can start bending it.
It’s still thick but we are getting closer to what is a bow. We really don’t want to remove any of it.
I’m probably going to call it a night and get super now. Maybe I can work on it tomorrow.
Bjrogg
|
|
| From: Bjrogg
|
|
|
|
|
|
|
| Date: 12-Dec-20 |
|
I quick did the other limb to. It’s a little narrow outer third but I think can still get any weight I need to from it. It really almost has a natural pyramid profile. All be it a little curvy one.
|
|
| From: Bjrogg
|
|
|
|
|
|
|
| Date: 12-Dec-20 |
|
I also put thin super glue In those wind checks soaking it in from the belly side. I probably wouldn’t have to, but I can’t think of any good reason not to.
|
|
|
|
| From: BowAholic
|
|
|
|
|
|
|
| Date: 12-Dec-20 |
|
it's looking like a bow!
|
|
| From: Bjrogg
|
|
|
|
|
|
|
| Date: 12-Dec-20 |
|
Thanks Jay. It should make a interesting bow if I don’t screw something up.
Yup Bob it’s starting to look like a bow. But that’s about the only resemblance to one it has yet. Still need to figure out how much isn’t a bow yet. But I need to be able to bend it before I figure that out.
Bjrogg
|
|
| From: Bjrogg
|
|
|
|
|
|
|
| Date: 13-Dec-20 |
|
Bob is right. It is starting to Look like a bow. Now we need to make it Bend like a bow.
This is the side profile of our narrow limb right now. It is starting to get that taper but we need to watch how it’s bending now to determine where to remove wood.
Most bowyers might start floor tillering now and that’s fine.
I like to “Vice “ tiller.
This will probably look like a lot of the same pictures to many of you but there are gradual differences in them.
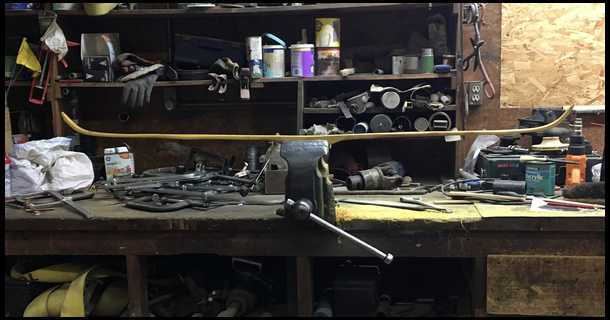
Here is unstrung profile Bjrogg
|
|
| From: Bjrogg
|
|
|
|
|
|
|
| Date: 13-Dec-20 |
|
I have a good solid vice and with my handle securely clamped I draw my tips back and also inward like the string would be pulling it.
This first picture is exactly what I expected. It’s still very heavy and all of the bending is being done in a area about 7” from the handle.
I hope you can see this. It’s a bit hard to do this and take pictures of it at the same time. Being able to see where limb is bending and where it isn’t is crucial to this very important part of making a bow.
I don’t just look where it is bending. I look even more for places it isn’t. That’s where I want to remove wood. By it not bending it is telling me it’s not a bow and it should be removed.
Bjrogg
|
|
| From: Bjrogg
|
|
|
|
|
|
|
| Date: 13-Dec-20 |
|
Its telling me it still needs wood removed from the outers to the mid limb. Especially the outer limbs.
Working on the outer limb as they get thinner can be difficult to hold them solid. This trick I’m going to show you is worth every penny you paid to read this thread.lol
Seriously this works great. I use this old packing tube as almost a tail stock to hold my tip. It works really well for recurves. I can put more down pressure and and get more aggressive and controlled strokes with my rasp and scraper
|
|
| From: Bjrogg
|
|
|
|
|
|
|
| Date: 13-Dec-20 |
|
I put pencil marks on the outer half of limb and rasp them off with the coarse side of my Ferris’s rasp. Then I flip over my rasp and clean it up with the file side.
|
|
| From: Bjrogg
|
|
|
|
|
|
|
| Date: 13-Dec-20 |
|
After I remove this I observe the bend. Doesn’t look much different but it’s starting to bend mid limb.
|
|
| From: Bjrogg
|
|
|
|
|
|
|
| Date: 13-Dec-20 |
|
I’m going to have to bug out here right now.
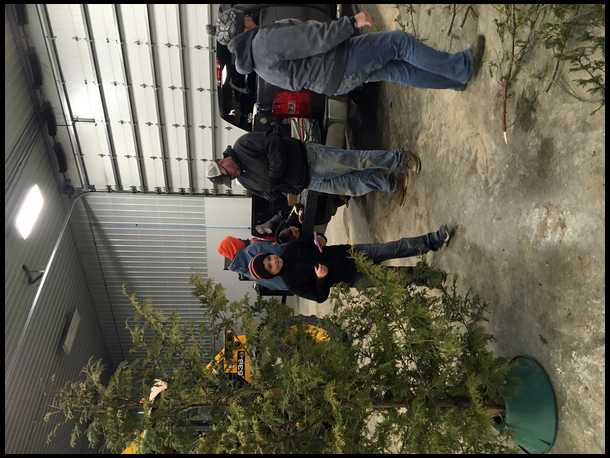
The grandkids are here. We get a wild cedar Christmas Tree and it’s time for the search to begin
|
|
|
|
| From: George Tsoukalas
|
|
|
|
|
|
|
| Date: 13-Dec-20 |
|
Looks like it is coming along nicely. Jawge
|
|
| From: Bjrogg
|
|
|
|
|
|
|
| Date: 13-Dec-20 |
|
Me to Jay. It really is a big help.
Got our Cedar Christmas Tree. Some assembly required
|
|
|
|
| From: Bjrogg
|
|
|
|
|
|
|
| Date: 13-Dec-20 |
|
This is more like arraigning really big flowers than putting up a Christmas Tree. I love the end result though.
Bjrogg
|
|
|
|
| From: Bjrogg
|
|
|
|
|
|
|
| Date: 13-Dec-20 |
|
I continue observing the bend and marking areas I don’t think are bending as much.
I also use my finger tips on the back of bow to feel the thickness between the rasp and my fingers. Often I can feel the thicker areas that aren’t bending.
Like I said before. I take thousands of measurements with my fingers. They are quick and accurate. It is truly amazing what they can tell you if you believe them and listen to them.
|
|
| From: Bjrogg
|
|
|
|
|
|
|
| Date: 13-Dec-20 |
|
Besides the fact that it’s bending further now. Can you see the difference in the shape of the bend? I’m kinda liking where this one is for now. I think I might start on the wider limb next. We aren’t done tillering this one yet but I want to get the other limb to this same point.
|
|
| From: Bjrogg
|
|
|
|
|
|
|
| Date: 13-Dec-20 |
|
The wider limb is just as I would have expected to. Very heavy and only bending in one spot close to the handle.
Here unbraced profile
|
|
| From: Bjrogg
|
|
|
|
|
|
|
| Date: 13-Dec-20 |
|
Bending
|
|
| From: Jeff Durnell
|
|
|
|
|
|
|
| Date: 13-Dec-20 |
|
Look closer. Those limbs were bending where you said they weren't. Maybe not enough to suit you, but bending. Looks like it to me anyway.
I do like you and use my fingers and thumb as a natural micrometer to check thickness and taper. Works well.
|
|
| From: Arvin
|
|
|
|
|
|
|
| Date: 13-Dec-20 |
|
That makes three of us Jeff.
|
|
| From: Bjrogg
|
|
|
|
|
|
|
| Date: 13-Dec-20 |
|
I’m not meaning to say they aren’t bending at all. Your right Jeff. And your also right I want more.
I don’t forget where I put them either Arvin.
I narrowed up the tips a little bit with my rasp. I didn’t measure. Just what my eye liked for now. Still a little wide but getting closer
|
|
| From: Bjrogg
|
|
|
|
|
|
|
| Date: 13-Dec-20 |
|
This is just the vice tillering as I call it. Many would do floor. It isn’t going to be perfect. I want to get as close as I can though.
One thing I really like about tillering in vice is that I can look at the bend whenever I like.
I quite often use my rasp with stave clamped so I’m able to still check bend.
I also can feel the wood thickness again.
|
|
| From: Bjrogg
|
|
|
|
|
|
|
| Date: 13-Dec-20 |
|
I basically repeated everything else I did on the other side. We will get more exploring tillering when we get a string. Getting pretty close to that time.
I’m going to post the pictures of the bend as I worked this limb from profile to where I am now.
Look at the difference in the shape of the bend.
|
|
| From: Bjrogg
|
|
|
|
|
|
|
| Date: 13-Dec-20 |
|
First bend stiff mid and outer limbs
|
|
| From: Bjrogg
|
|
|
|
|
|
|
| Date: 13-Dec-20 |
|
2nd bend still stiff mid and outer.
|
|
| From: Bjrogg
|
|
|
|
|
|
|
| Date: 13-Dec-20 |
|
3rd Mid is starting to come
|
|
| From: Bjrogg
|
|
|
|
|
|
|
| Date: 13-Dec-20 |
|
Where I am now. Still probably stiff out of fades and outer limbs but I want to leave them that way for now. I got a nice bend starting over most of the limb. I’m sure I am still very heavy. This is it for tonight . Gotta clean up and head back home.
We’re getting close to putting a string on it.
Bjrogg
|
|
|
|
| From: Pa Steve
|
|
|
|
|
|
|
| Date: 13-Dec-20 |
|
That's coming along very nicely BJ. Picking up some useful pointers I will try on my next build. I do like the "vice tiller" method. Really helps me (at least) see the bend more clearly than floor tillering. How much over target weight before going to the tillering string? Oh, your Christmas tree is pretty cool, too.
|
|
| From: Bjrogg
|
|
|
|
|
|
|
| Date: 13-Dec-20 |
|
Thanks Steve. I do think I can see the bend better than floor tillering and the thing I like best is it’s so easy to look at the bend. I don’t even have to take the stave out of the vice. It’s so easy that I do it way more often.
I’m thinking I’m still really heavy yet but I could be wrong. This is the first bow of the season and I’m kinda out of shape so maybe it isn’t as heavy as I think. I usually use this method until I can make a string and get to low brace. Not sure I’m quite there but I think I’m getting close.
I’ve been putting up a Cedar Christmas Tree almost every year since 1984. I really like them. They smell good and they aren’t nearly as messy as pine or spruce. You do have to be a little more creative putting them up though
Bjrogg
|
|
| From: Iwander
|
|
|
|
|
|
|
| Date: 14-Dec-20 |
|
I'm really looking forward to seeing that strung up at full draw.
|
|
| From: Bjrogg
|
|
|
|
|
|
|
| Date: 14-Dec-20 |
|
Me to Steve. I’m hoping to get a string on her today. I’m not sure how my day will go. It’s supposed to get good and cold here for the next couple days. Freeze the ground up. I’m going to have a bunch of work I need to do on the frozen ground so I might get sidetracked for a bit.
I promise I won’t forget about it though.
Thanks for watching. I’m hoping this thread might help someone who would like to make a selfbow. That’s my whole incentive and reward. I have been given help getting to where I am and would like nothing more than to pass that on to others.
Thanks for your replies. It keeps me motivated to continue this thread knowing someone is watching.
Bjrogg
|
|
| From: Gifford
|
|
|
|
|
|
|
| Date: 14-Dec-20 |
|
Bjrogg - been watching all your threads on bow building, all have been well done and I can say I wish they had the internet forums when I started fooling around with bent sticks. Would have saved me quite a bit angst. Thanks for posting the threads, especially this one.
|
|
| From: Bjrogg
|
|
|
|
|
|
|
| Date: 14-Dec-20 |
|
Sir. I’m just so glad that guys like you who worked so hard to learn these skills kept them alive and allowed me to be able to learn them and hopefully pass them on.
Bjrogg
PS I know their are a lot of really special bowyers in Missouri
|
|
| From: Bjrogg
|
|
|
|
|
|
|
| Date: 14-Dec-20 |
|

I do like to use floor tillering to compare both limbs to each other.
Had my brother snap a picture.
I’m sure it is still very heavy. Either that or I am very out of shape. Could be a combination of the two.
It’s really just starting to bend. But it is bending. Another thing to remember is that unbraced profile. It started out with a little reflex through the limb. The reflex will make it look like it isn’t bending as much as it is.
Bjrogg
|
|
| From: Bjrogg
|
|
|
|
|
|
|
| Date: 14-Dec-20 |
|
Have know idea where that picture came from. It isn’t even mine.lol
Try again
|
|
| From: altitude sick
|
|
|
|
|
|
|
| Date: 14-Dec-20 |
|
Looks like a new yoga workout. Hey Brian what about stopping there and calling it a WarBow
|
|
| From: Jeff Durnell
|
|
|
|
|
|
|
| Date: 14-Dec-20 |
|
Yep, she's bending alright. Looks good.
|
|
| From: Bjrogg
|
|
|
|
|
|
|
| Date: 14-Dec-20 |
|
Yup jay it’s a good work out for sure.
Probably not tillered good enough yet and not exactly the right shape. The lbs are probably right though.
One thing if you guys have made straight limb bow and this is your first recurve. Bracing these bows take considerably More Wheaties . The first one I did I came way under weight because was going by the feel of the brace. It will have more early string tension. However as the string comes lifts off and the string angle changes the bow acts more like a longer bow. This makes it stack less and you don’t gain as many lbs as you approach full draw. So you want to start out with a higher draw weight right as you begin your draw.
I think I’m going to put some temporary notch’s in now.
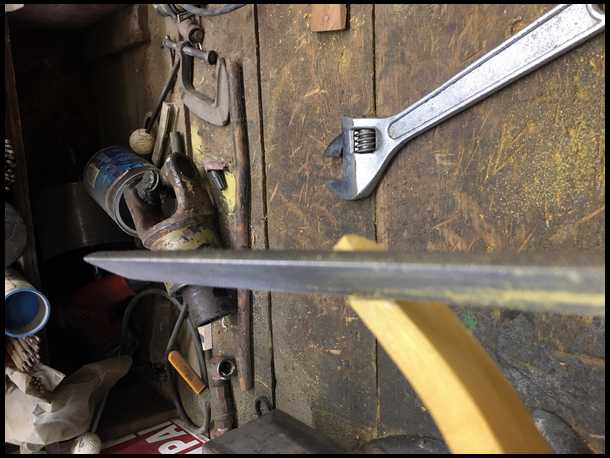
Here’s another trick worth the cost of this thread. I can’t claim it but it works really good. Just use a crescent wrench to mark your tips.
Bjrogg
|
|
| From: Bjrogg
|
|
|
|
|
|
|
| Date: 14-Dec-20 |
|
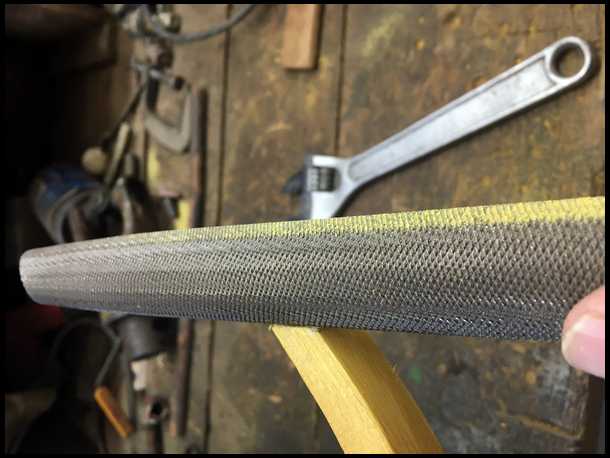
Thanks Jeff. Always nice to have another set of eyes. It needs work but I like where we are.
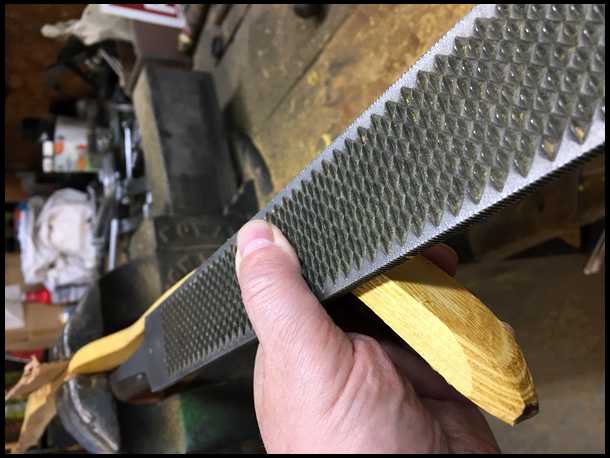
My tips have evolved with time. I started out very wide and used a chainsaw file. Eventually I got narrower and stumbled across this method.
I now use a bastard file. I start out with the straight edge forward. Halfmoon side facing back.
|
|
| From: Bjrogg
|
|
|
|
|
|
|
| Date: 14-Dec-20 |
|

I start in to about this far.
|
|
| From: Bjrogg
|
|
|
|
|
|
|
| Date: 14-Dec-20 |
|
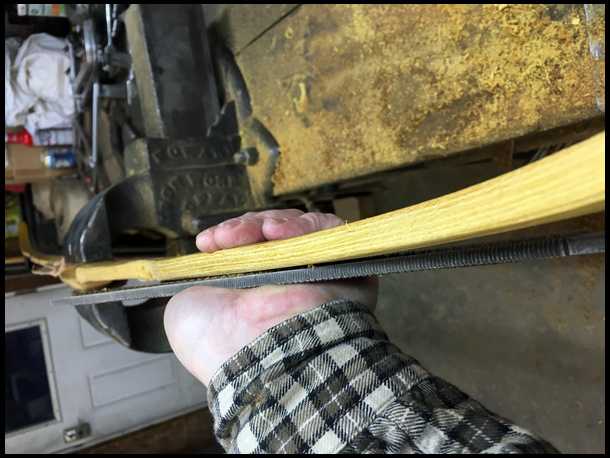
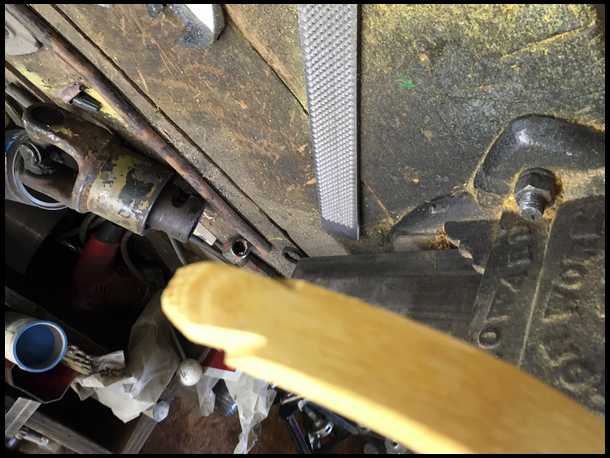
Then I flip the bastard file over and half moon is forward.
|
|
| From: Bjrogg
|
|
|
|
|
|
|
| Date: 14-Dec-20 |
|
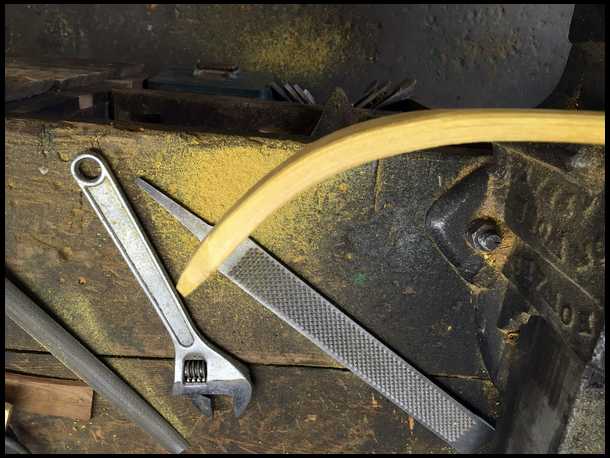
These are just temporary but I will use the same tool to finish. For now I will leave notch like this. It’s still wide. I will wait to narrow up later in the build. It gives me more options later.
|
|
| From: Bjrogg
|
|
|
|
|
|
|
| Date: 14-Dec-20 |
|
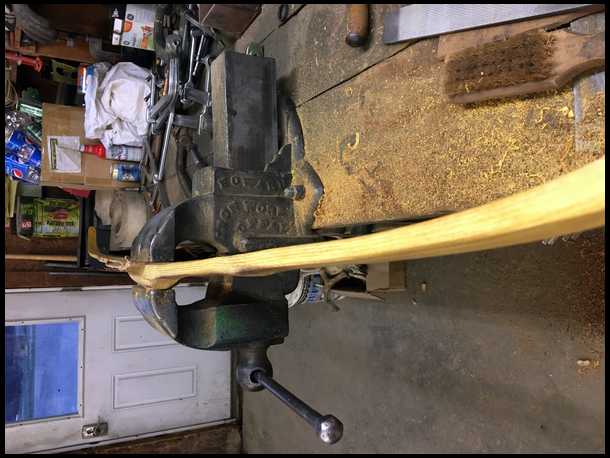
I leave tips wide but I know from experience I can thin them more. I don’t go quite as thin as the end of the working part of limb. For now this feels good
|
|
| From: Bjrogg
|
|
|
|
|
|
|
| Date: 14-Dec-20 |
|
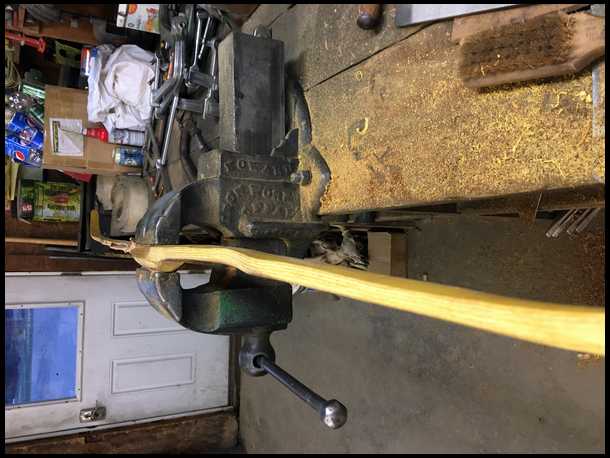
Eventually my tip should look similar to this
|
|
| From: B arthur
|
|
|
|
|
|
|
| Date: 14-Dec-20 |
|
Thanks Brian. I'm loving the detailed instructions
|
|
| From: altitude sick
|
|
|
|
|
|
|
| Date: 14-Dec-20 |
|
Man Brian I love the crescent wrench idea. Even if it wasn’t nt yours, I haven’t seen it and it looks so easy.
|
|
| From: Bjrogg
|
|
|
|
|
|
|
| Date: 14-Dec-20 |
|
I’m glad you like them Brad. Some of this stuff is hard to explain. It even has its own vocabulary.
Yup lots of little tricks and that’s certainly a good one.
Normally I would probably continue vice tillering until Low brace. For a better view I decided to use a long string and put the stave on my tillering three.
First picture in braced. We want to hold this profile as much as we can. If we start losing this shape in a area we call that set. We want to avoid that. If we do start to get it we need to avoid removing wood in that area and take wood elsewhere reliving the stress in the area taking set.
Here’s unbraced
|
|
| From: Bjrogg
|
|
|
|
|
|
|
| Date: 14-Dec-20 |
|
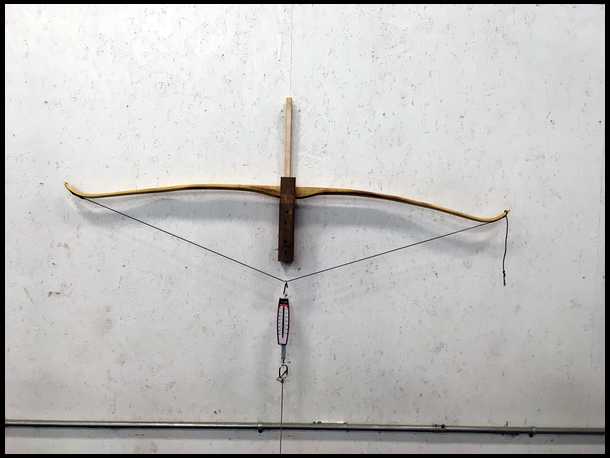
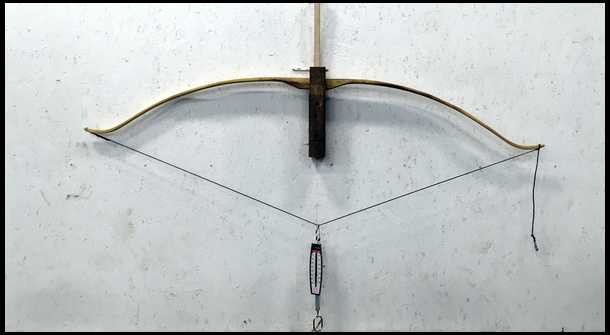
I have a Fish scale In line . I pull the limb a couple dozen time to limber up the wood and see if bend is ok. then I pull to my intended final draw weight. In this case I’m going to 50 lbs.
This is the bend first tim on the tree at 50lbs
|
|
| From: Bjrogg
|
|
|
|
|
|
|
| Date: 14-Dec-20 |
|
Even my brother can see it’s still really heavy. We’re not even to brace height and we’re at 50lbs on the long string.
The left limb looks a little stiffer than the right. It’s not bending as much as I want from about mid limb to the tip. I put a pencil mark there.
Its also very stiff out of the fades. This is a tricky area. You want to go slow here. If you get to thin here it will determine your draw weight. It’s also a very bad place to take set.
I like the shape of the right limb better. It is a little stiff outer third to tips I put a pencil mark there
Also first couple inches out of fades.
|
|
| From: Bjrogg
|
|
|
|
|
|
|
| Date: 14-Dec-20 |
|
I rasp off the pencil marks with the aggressive side of my ferries rasp. Then I clean it up with my file side. Then I put pencil mark over entire length of limb and scrape it of with my scraper. This is what it looks like now vice tillered
|
|
| From: Bjrogg
|
|
|
|
|
|
|
| Date: 14-Dec-20 |
|
I do the same to the process to the other limb.
Then I put it on tree for second time and after limbering up the limbs a bit I pull it to 50lbs
|
|
| From: Bjrogg
|
|
|
|
|
|
|
| Date: 14-Dec-20 |
|
It bends a little more but still very heavy and not bending as much as I want mid limb and out both limbs.
Also stiff in fades
I make my pencil marks and repeat the process.
This is the third time on tree at 50 lbs
|
|
| From: Bjrogg
|
|
|
|
|
|
|
| Date: 14-Dec-20 |
|
I’m starting to like the shape of the bend a lot better.
Still a lot stiff in the outer third of left limb. I put some pencil marks there. I rasp them off then clean up with scraper.
Then because I Like the shape of the bend and I’m still very heavy I mark the entire limb both right and left.
I rasp off the pencil marks then scrape clean. I put pencil mark entire length again and scrape them off. This is vice tiller now
|
|
| From: Bentstick54
|
|
|
|
|
|
|
| Date: 14-Dec-20 |
|
Thank you so much for doing this. I have made some straight limb Osage bows with decent results, but have always be afraid to take it to the next level. Am learning a lot by following along. I’m one of those that learn by seeing and doing so the photos are fantastic.
|
|
| From: Bjrogg
|
|
|
|
|
|
|
| Date: 14-Dec-20 |
|
And this is what it looks like on the tree.
Starting to look pretty nice. I think I’m getting to where I might be able to make a short string now.
I like getting to low brace as soon as I can. It tends to pull the tips in a little more with the shorter string.
Here’s where I am now at 50lbs
Bjrogg
|
|
| From: Bjrogg
|
|
|
|
|
|
|
| Date: 14-Dec-20 |
|
Here’s my unbraced profile now. I don’t see anything obvious. Seems like it is holding it’s shape pretty good so far.
|
|
| From: Bjrogg
|
|
|
|
|
|
|
| Date: 14-Dec-20 |
|
Thanks Brian. I’m the same way. Only thing better than watching someone else do it is doing it myself after watching someone else do it.
I’m so glad it might help someone doing this. I think it takes me longer to post everything than it does to actually make the bow. It’s encouraging to know that people appreciate it.
This is probably all the further I’m going to get tonight. I’m thinking my next step is going to be narrowing up my tips a little more and making my real string.
Bjrogg
|
|
| From: altitude sick
|
|
|
|
|
|
|
| Date: 14-Dec-20 |
|
It’s looking great. Especially for the crooked would you started with.
|
|
| From: Arvin
|
|
|
|
|
|
|
| Date: 14-Dec-20 |
|
Patience gets me every time! I should have waited and learned Before I ventured out into that static so fast!!! Shame on me. I am watching Brian . Arvin
|
|
| From: Bjrogg
|
|
|
|
|
|
|
| Date: 14-Dec-20 |
|
Thanks Jay. It is starting to look nice.
From here on some people would say we just need to lose some weight.
I think it was Badger that said. Never think of it as just losing some weight. Think of it as perfecting the tiller.
From here till the end that will be our goal. We will continue to pull to 50 lbs until we get to our draw length, hopefully perfecting the tiller as we go.
Bjrogg
|
|
| From: Bjrogg
|
|
|
|
|
|
|
| Date: 14-Dec-20 |
|
That’s the great thing about this hey Arvin. There’s always another piece of wood to practice on. You did good.
We still got the hard part ahead of Us. It gets to be less and less wood that isn’t a bow. And harder to tell what is.
Bjrogg
|
|
| From: Bassman
|
|
|
|
|
|
|
| Date: 15-Dec-20 |
|
Well done Brian. Great end result,and that is what counts. That should make a good shooting bow. Your step by step shows all the work that goes into a well built self bow. Should inspire guys who have always longed to get into self bow building.
|
|
| From: Jeff Durnell
|
|
|
|
|
|
|
| Date: 15-Dec-20 |
|
End result? Don't jump the gun on us, Bassman. My favorite part is yet to come. In harmony and quivering with excitement at full draw!
Hey Brian, is it symmetrical? Which limb is the top?
|
|
| From: Bjrogg
|
|
|
|
|
|
|
| Date: 15-Dec-20 |
|
Thanks Bassman it Jeff is correct.
We have reach the really tricky part.
The wood that isn’t a bow is thinner and harder to spot.
The wood that is a bow is closer to the surface and easier to accidentally remove.
We can’t get away with mistakes from here on out.
This is time consuming and many may want to rush this part.
I will try to keep it moving forward but work and just plain the nature of the process might make this seem a little slow.
I do like the direction we are going though. I think We can get to low brace. We can make a real string but before I do I would like to narrow tips a little more so my string loops aren’t so big.
I shorten up the B-55 tillering string. I remember why I don’t like this string. Especially with the full length Flemish twist. It stretches a lot. I struggle to get it braced and then the string stretches and ends up tight against the handle.
I think I can see what I need though.
This tip I will narrow up a bit on the left side.
|
|
| From: Bjrogg
|
|
|
|
|
|
|
| Date: 15-Dec-20 |
|

The other tip I mark here.
|
|
| From: altitude sick
|
|
|
|
|
|
|
| Date: 15-Dec-20 |
|
Just getting the tips and handle lined up on that stave was a feat.
|
|
| From: Bjrogg
|
|
|
|
|
|
|
| Date: 15-Dec-20 |
|
I rasp them down to the line and redo my tips with the bastard file.
I’m not going to narrow to much yet just enough so I don’t have to make such a big loop.
|
|
|
|
| From: Bjrogg
|
|
|
|
|
|
|
| Date: 15-Dec-20 |
|
Now I make a string. Probably my least favorite part. My poor old arthritic thumbs hate this job, but it has to be done. Bows not much of a bow with out a string.
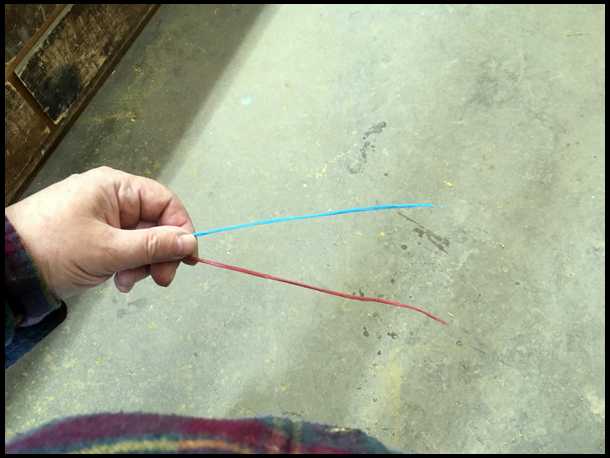
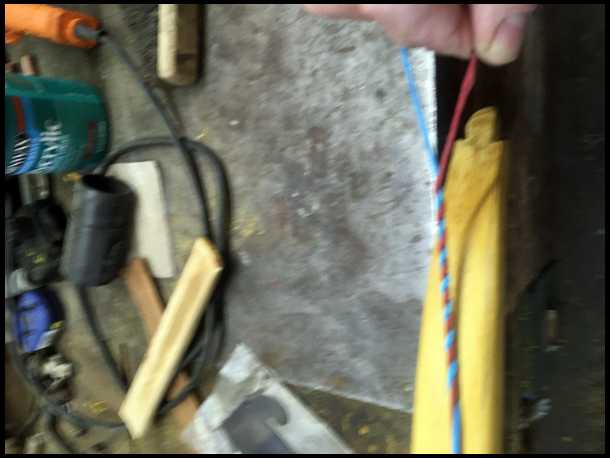
I use D-97 string. I make two bundles with 5 strands each. One blue and one red.
I make them about 16” longer than the stave. I rub wax into each bundle as I make them.
Then I start about 7” from end of each bundle.
I always hold the string same direction as I twist. This can get confusing but if I hold the string in my left hand pointing towards my right. I can use my right hand to twist each individual bundle clockwise. Then twist the bundles together counterclockwise. I do this about this far. Starting about seven inch from the end moving towards the end. This will end up being our loop. The further you go here the bigger your loop.
|
|
| From: Bjrogg
|
|
|
|
|
|
|
| Date: 15-Dec-20 |
|
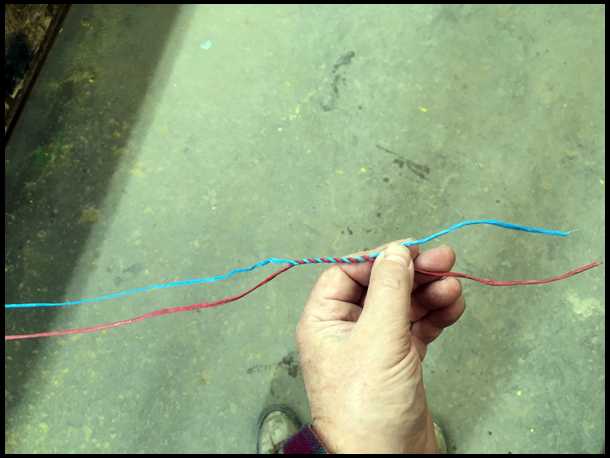
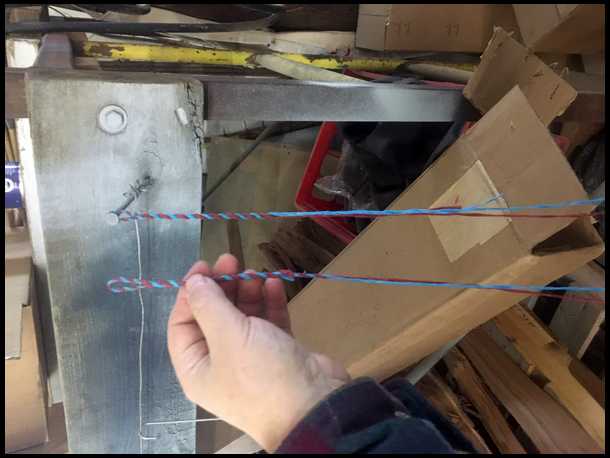
Here’s the twist of the loop
|
|
| From: Bjrogg
|
|
|
|
|
|
|
| Date: 15-Dec-20 |
|
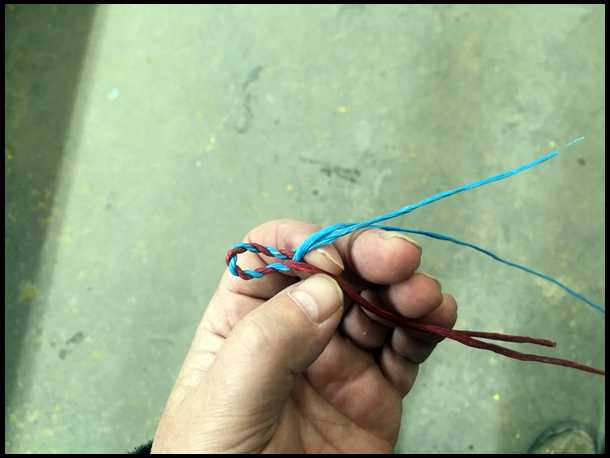
Ow I take the long end of string and fold it over the twisted loop section and rub the tag ends together with the long string. Again I hold string in left hand. Twist individual bundles clockwise With right hand and then Twist both bundles together counterclockwise .
|
|
| From: Bjrogg
|
|
|
|
|
|
|
| Date: 15-Dec-20 |
|

After I get it started I put the loop on a nail and counter twist my way about 5” or so
|
|
| From: woodinhand
|
|
|
|
|
|
|
| Date: 15-Dec-20 |
|
Have you seen the tillering strings del cat uses, with a washer in them so you can have infinite adjustment?
|
|
| From: Bjrogg
|
|
|
|
|
|
|
| Date: 15-Dec-20 |
|
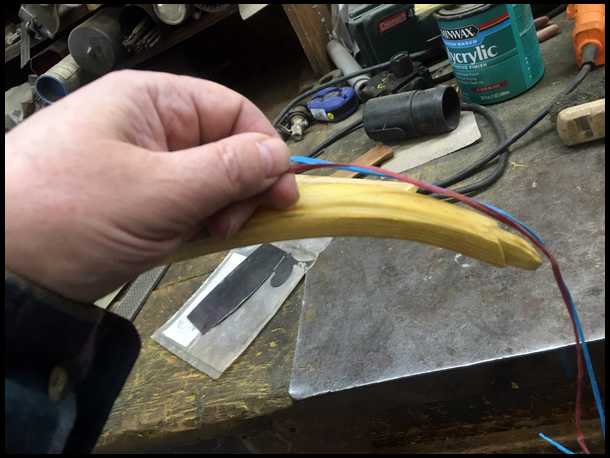
Then I put my loop on tip of stave. I run it along the belly of stave and start second loop about this far from tip.
|
|
| From: Bjrogg
|
|
|
|
|
|
|
| Date: 15-Dec-20 |
|
This will be our second loop
|
|
| From: Bjrogg
|
|
|
|
|
|
|
| Date: 15-Dec-20 |
|
Then I told string over loop again and rub tag end together.
Again I hold the same. Loop in left hand . Twisting individual bundles clockwise my right and then twisting the bundles counterclockwise together.
After I get started I put loop on my nail
As you go you have to untwist the string between the loops. I usually make about five twists then put my hand between the bundles and move it from one end to the other removing the twists. If you start twisting the wrong way you untwist your other loop . That why I always hold and twist the same. Here’s both loops
|
|
| From: Bjrogg
|
|
|
|
|
|
|
| Date: 15-Dec-20 |
|
Yes Carl that is a very good method to. I normally just vice tiller until I get to this point but I wouldn’t recommend that until you get very comfortable with it. I would suggest going to long string like we did here until then.
Here we are at first brace. It’s a low one but the string is behaving pretty well.
|
|
| From: Bjrogg
|
|
|
|
|
|
|
| Date: 15-Dec-20 |
|
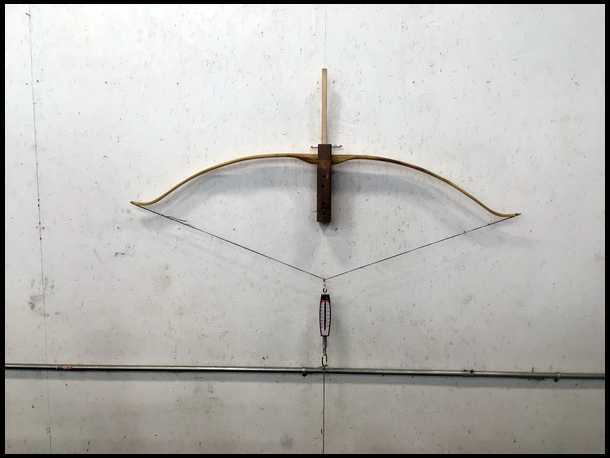
Here’s what it looks like on the tree now @50 lbs.
We are at 20” now with a low brace.
I’m afraid I’m going to have to get back to work now. Might have to study this bend and figure out what isn’t a bow while I’m gone.
Try to get back soon
Bjrogg
|
|
| From: Bjrogg
|
|
|
|
|
|
|
| Date: 15-Dec-20 |
|
Here unbraced profile right off the tree. Thinking it’s still ok.
Jeff I forgot to tell you. I still have the option to change. But I’m thinking the left limb is probably going to be the bottom. It’s the one that has the most snake in it but it seems like the best wood.
|
|
| From: wooddamon1
|
|
|
|
|
|
|
| Date: 15-Dec-20 |
|
Still following along, looking good! Learning a lot thanks!
|
|
| From: Bfulldraw
|
|
|
|
|
|
|
| Date: 15-Dec-20 |
|
I'm asking this to learn, not to criticize. It looks to me like the left limb is a little stronger than the right. Does it look that way to you? Or is this just my inexperience?
|
|
| From: Bjrogg
|
|
|
|
|
|
|
| Date: 15-Dec-20 |
|
Glad your still here Damon
Robert that’s the kind of observations I’m hoping to inspire. I would agree with your observation. I think the left limb is a little stiffer yet. I’m actually liking it’s bend a little better than the right at this time. It has a pretty even bend now. I wish I could draw on my pictures. It’s a little tricky commenting on the tiller while I can’t see the picture I’m commenting on.
If I remember correctly the right limb has a couple small stiff areas, but is bending more . Meaning the tips are traveling a little further than the left limb.
The left limb has a nice even arch but is has a little less tip travel over all.
That might change when you draw it in hand. Usually that makes the bottom limb bend a little more than it would on the tree. Even though the left limb has that shape snaky curve. I like it’s wood and I’m thinking it might end up being my bottom limb.
I’m sorry I haven’t had a chance to do anymore work on it yet. But it’s might be good to stop and look at where we are here and talk about where we want more bend. In other words. What isn’t a bow and needs to be removed.
|
|
| From: Bjrogg
|
|
|
|
|
|
|
| Date: 15-Dec-20 |
|
I’m trying to do this all on my phone so bare with me. I think I might have figured out how to scribble on my pictures. It’s not going to be fancy and perfect but maybe I can give a general area that I think needs some extra work.
Both limbs need more movement everywhere, but if I can post this picture it shows roughly where we need extra work.
Bjrogg
|
|
| From: Bjrogg
|
|
|
|
|
|
|
| Date: 15-Dec-20 |
|
I really like the curve of the left limb. It might be slightly behind, but not much. It could bend a little more out of fade, but being very careful here. I might not even touch them yet.
the right limb seems a little stiff in the outer half. I will give it a little more attention there. Also a little stiff first couple inches out of fades.
|
|
| From: RonG
|
|
|
|
|
|
|
| Date: 15-Dec-20 |
|
That is what it looks like to me also, like you said I would be very careful around that left fade. I think I would take more off the center 12 to 14 inches of the left limb to get it down to match the right limb.
That is why I am watching, don't take what I think I will continue watching to see if I was in the ballpark.
Looking good Brian
|
|
| From: Bjrogg
|
|
|
|
|
|
|
| Date: 15-Dec-20 |
|
The more I look at the left limb the more I like it. I think I will probably mark the entire limb with pencil and scrape it off twice.
The right limb I will probably mark the areas I indicated and scrape it off. Then mark the entire limb and scrape it off.
I’m hoping I can get back to it tomorrow.
Glad to hear how your test turned out Ron.
Bjrogg
|
|
| From: Bjrogg
|
|
|
|
|
|
|
| Date: 16-Dec-20 |
|
Ok had a little time to work on her.
First I marked the areas on the right limb I indicated with pencil. Then I lightly rasp them off with aggressive side of my rasp. Not a lot of down force. Just enough to take the pencil marks and leave the rasp marks. Then I clean those up with file side of my rasp. Then scraper. Then I marked entire limb and lightly rasped it off same routine.
The left limb I marked about ten inches mid limb and scraped of pencil mark. Then marked entire limb. Lightly rasped off then file then scraper
Here it is at 50 lbs
If I remember right 21”
I also put 15 twists in string to bring up the brace a bit
|
|
| From: Bjrogg
|
|
|
|
|
|
|
| Date: 16-Dec-20 |
|
The left limb is getting further behind.
I put pencil marks about here and lightly rasp,file and scrap.
Then mark entire limb and repeat
|
|
| From: Bjrogg
|
|
|
|
|
|
|
| Date: 16-Dec-20 |
|
Then to the tree. I put another ten twist in the string.
|
|
|
|
| From: Bjrogg
|
|
|
|
|
|
|
| Date: 16-Dec-20 |
|
Thanks jay. Getting closer but we need to be really careful now.
Here’s the unbraced profile. I think I see a slight bit of set in right limb outer third.
|
|
| From: Bjrogg
|
|
|
|
|
|
|
| Date: 16-Dec-20 |
|
Looking at pictures on tree it looks like a little off here. But the unbraced profile is telling me to be careful.
I take a little off out of fades and area indicated
|
|
| From: Bjrogg
|
|
|
|
|
|
|
| Date: 16-Dec-20 |
|
I give the string another 15 twist and put her back on the tree.
50lbs at 25”
It feels balanced drawn in my hand
|
|
| From: Bjrogg
|
|
|
|
|
|
|
| Date: 16-Dec-20 |
|
Here’s the unbraced profile again. I do see a slight amount of set mid limb right side. In between the flashlight and the welding rods to the right on shelves
My full draw is still looking a little stiff there but my unbraced is saying stay away.
Only have a few inches to go. I will put a x in that spot and stay away from it.
I need to looks it over good now. Not much that isn’t a bow anymore
|
|
| From: Bjrogg
|
|
|
|
|
|
|
| Date: 16-Dec-20 |
|
This is how much I removed today. When you get to this point. Just a little wood really makes a difference. You definitely want to make sure your not taking off any that is supposed to be a bow.
|
|
| From: Bjrogg
|
|
|
|
|
|
|
| Date: 16-Dec-20 |
|
I’m thinking next I’m going to shape our handle. Maybe tease a little more out of the fades doing that. Anything there makes a huge difference at the tips.
Also narrow up tips and get as light as we can there. Right limb looks like it might be able to move a little more very outer. That might take a little stress off our area that has set trying to creep in on.
Then I will finish drawn in hand for full draw.
Bjrogg
|
|
| From: Bjrogg
|
|
|
|
|
|
|
| Date: 16-Dec-20 |
|
Well nothing seems to be very easy on this one. And the handle is no exception.
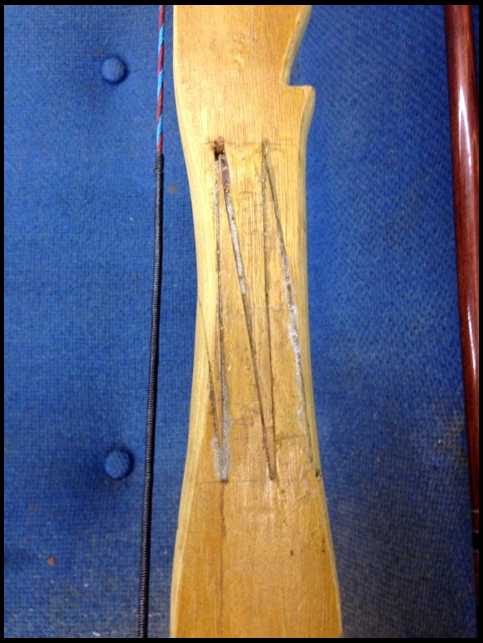
I’m a little nervous about these wind checks in the fades. I shot it a couple dozen times and it really thumps a arrow. Really dead in the hand.
The check could almost be completely removed if it’s going where I think it’s going.
I wasn’t worried about it in the limb.
It does give me concern where it runs off the handle. Normally this area wouldn’t be bending. If it split through the fades I’m sure it would and probably wouldn't be pretty.
|
|
|
|
|
|
|
|
| From: altitude sick
|
|
|
|
|
|
|
| Date: 16-Dec-20 |
|
The bow looks like it should perform well
|
|
| From: Bjrogg
|
|
|
|
|
|
|
| Date: 16-Dec-20 |
|
It does so far Jay. Hopefully I can hold this handle together.
I got a few idea. First one is really thin super glue. I don’t think I’m going to depend on it exclusively though.
I soaked these two but I need more glue. I think these two are actually the same wind check.
I think I could probably remove it and that would be where I normally ended my fades , but I’m not sure.
|
|
| From: Bjrogg
|
|
|
|
|
|
|
| Date: 16-Dec-20 |
|
Here it is from back side.
|
|
| From: Bjrogg
|
|
|
|
|
|
|
| Date: 16-Dec-20 |
|
I really think that is all the same check and I probably could remove it.
|
|
| From: Bjrogg
|
|
|
|
|
|
|
| Date: 16-Dec-20 |
|
The other fade looks better on the backside.
|
|
| From: Bjrogg
|
|
|
|
|
|
|
| Date: 16-Dec-20 |
|
But from the belly side I worry about that check in the limb connecting to the one in the fade.
|
|
| From: Jeff Durnell
|
|
|
|
|
|
|
| Date: 16-Dec-20 |
|
Wear a helmet and safety glasses :^)
|
|
| From: BowAholic
|
|
|
|
|
|
|
| Date: 16-Dec-20 |
|

man, those are deep. I have an old bow that I have hunted with since '99 that had deep checks like that. I used an artificial sinew wrap and super glue...that was 21 years ago.
|
|
| From: Bjrogg
|
|
|
|
|
|
|
| Date: 16-Dec-20 |
|
Well I was hoping to get a couple more inches and keep this weight, but I don’t see getting both of those things with these wind checks. Pretty sure I’m pushing this already.
I’m going to finish her up anyway.
I do think I will sinew wrap it. It could go 25 years or it could blow the next full draw.
I guess we got her this far. Maybe she has something else to teach us yet.
Stay tuned in.
|
|
| From: D.Lewis aka tonto59
|
|
|
|
|
|
|
| Date: 16-Dec-20 |
|
I’m really enjoying the build along. Good luck with her
|
|
| From: Bjrogg
|
|
|
|
|
|
|
| Date: 16-Dec-20 |
|
I’m glad you enjoyed it Don.
I have learned a few things myself. That’s always good. I hope some others have to.
I will try to finish her up. Show anyone interested how we can finish the tips and handle.
I do think she still has something to teach us yet.
Bjrogg
|
|
| From: Kirk
|
|
|
|
|
|
|
| Date: 16-Dec-20 |
|
it never ceases to amaze me how much time, effort, and a little piece of your soul you put into building every one these self bows, and the percentage of these completed bows that have any longevity at all without coming apart or splintering are few.
you guys must really savor the build and the challenge. my hats off to you.... to do something like this is a true test of a bowyers skill. Kirk
|
|
| From: Harry
|
|
|
|
|
|
|
| Date: 16-Dec-20 |
|
I too am enjoying ur post! Never fails that one can learn by watching.i think a sinew wrap would be the answer also? Good luck !Harry
|
|
| From: Jeff Durnell
|
|
|
|
|
|
|
| Date: 17-Dec-20 |
|
"and the percentage of these completed bows that have any longevity at all without coming apart or splintering are few."
Mmm, not in my experience. Of course longevity depends on several factors, but if a bowyer has some experience and makes longevity a high priority in his work, has paid attention, uses good wood, and doesn't exceed moderate limits, odds are they'll last a long time. Those coming apart of splintering will be very few indeed.
|
|
| From: Bjrogg
|
|
|
|
|
|
|
| Date: 17-Dec-20 |
|
Thanks Everyone for following along. This build started out showing how to bend static recurves. I intentionally used a pretty challenging stave knowing it would give us opportunities to explore many of the problems we run into with tip alignment and how I deal with them. I believe this stave has lived up to that challenge. There are still a few tricks we didn’t have to use, but we covered most of them.
That’s another reason We will finish this builds tips and handle. We still have alignment concerns to deal with.
I agree completely with Jeff here. The longevity of these bows and percentages of them lifting a splinter and coming apart are pretty low if the bowyer follows the steps we did and properly tillers and chases a ring.
The wind checks giving us concern now weren’t caused by anything we did in this build. They happened when the tree was still alive and standing. Caused by the wind twisting the tree. It survived and grew through it adapting and twisting in these areas as it grew.
In this case I was concerned about the wind checks from the very beginning. Might have been in one of the other two threads we did but I asked if anyone had problems with them. I wasn’t worried about them in the limbs if they didn’t run off the edge. Now that we start to shape the handle and they threaten to run off the fades I am concerned. As Harry and Bob stated sinew wrap could be the answer.
I wouldn’t be at all surprised if this bow when finished last many, many years. Make a really fine hunting stick and holds it’s shape and performance for many thousands of shots.
I also wouldn’t be surprised if the check grew and exited the fade. That I’m afraid wouldn’t be pretty.
We’re not done yet. Still got a few tricks up my sleeve. This bow could very well out last me.
Bjrogg
|
|
| From: Runner
|
|
|
|
|
|
|
| Date: 17-Dec-20 |
|
Nice work. A very neat wrap of the finished fades like seen on many Asiatic bows would look fine.
I've certainly seen little evidence of self bows not lasting. That statement would have to be based on observing rookies using questionable wood and poor execution of the process.
|
|
| From: Bjrogg
|
|
|
|
|
|
|
| Date: 17-Dec-20 |
|
Thanks Pat. That has been my experience to.
When I first started I had just enough knowledge of this to be dangerous.
I think there are a lot of beginners in that camp.
I was practically expecting my stave to break and it didn’t let me down.
Then I got more serious and learned enough to be successful. I built very overbuilt designs that still had decent performance and were extremely durable.
I learned how to perfect my tiller .
They were fine bows and I learned how to shoot and hunt with them.
As the years past I tried more challenging designs. I pushed a little further until I decided that was a little further than I was willing to except. Even those designs are still shooting. Never lifted a splinter. They did take set though and just didn’t have the mass to handle the stress of the design.
Then I took a couple steps back from the edge.
I have to admit. I love the challenge and looks of these wiggly staves. They just talk to me in a way that I can’t seem to ignore them. Some people will have nothing to do with them and that’s fine. They make some very nice durable bows from really nice staves and they have my total respect. It all comes down to the same skills and attention to detail. A good clean back and a well tiller bow.
Thanks again for following along. I will try to get back at this as soon as I can.
Bjrogg
|
|
| From: altitude sick
|
|
|
|
|
|
|
| Date: 17-Dec-20 |
|
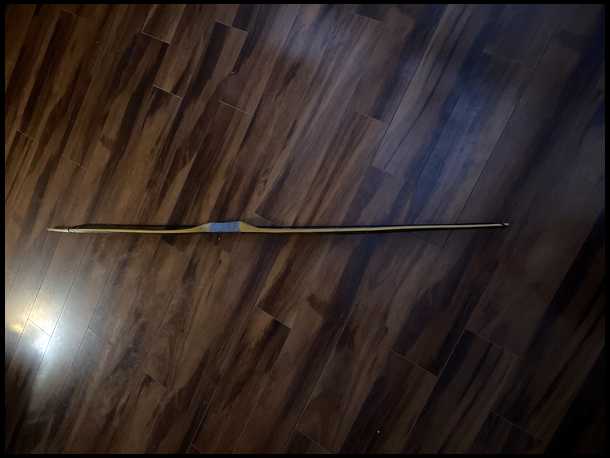
Every one of my first attempts that did fail. Were exactly that. Me Not knowing what wood to start with. And my experience level would not get me out of those situations. Or I violated a ring on the back. The bows that are holding up very well were when I followed the fundamentals.
I left this bow strung for a day and a half while hunting the last few days. and I just unstrung it before the picture. It is a straight limbed bow with no back set.
I have many shots through it and it’s still holding its shape. It’s quick and silent. So by me following the rules set down by others, I’m confident of this bow lasting many shots to come.
|
|
| From: PEARL DRUMS
|
|
|
|
|
|
|
| Date: 17-Dec-20 |
|
Beej I think you could rasp about 3/4-1" off the top of that grip and glue a fresh cap over it. It wont eliminate your checks, but I'll bet it stiffens it right up and reduces the change of breakage or separation quite a lot. Then soak some rawhide in water and use it as a handle wrap, stretch the snot out of it and let it constrict as it dries.
|
|
| From: Jeff Durnell
|
|
|
|
|
|
|
| Date: 17-Dec-20 |
|
That's kind of what I was thinking too, Runner.
Plus I know some folks use wood with more issues than I care to. I like character, sometimes lots of it, but I won't bother with a piece that has those old wind splits in it. If I can't remove such things completely, it gets burned. That's just me. Not because I think there's no possible way it will survive, I just like to keep my odds for durability, reliability, and longevity as high as possible.
Good job on the thread here, Brian. I know taking pictures and explaining things as you go adds a lot of effort and distractions to a bow, but we all appreciate it, and there's likely folks following along who don't comment, or may reference this thread in the future. So thanks again.
|
|
| From: Bjrogg
|
|
|
|
|
|
|
| Date: 17-Dec-20 |
|
Thanks Pearl. That was one of the fixes floating around in my head. I have a couple ideas yet. Not sure which one or combination of them I will employ yet , but we aren’t done yet
Bjrogg
PS glad to see your keeping a eye on me
|
|
| From: George Tsoukalas
|
|
|
|
|
|
|
| Date: 17-Dec-20 |
|
Very nice, BJ. I know these buildalongs are a lot of work. Thanks for doing it. I never had a problem with wind checks. I glued tham and clamped them. Rsuty Craine gave me a nice osage stave. When I cut into it they started showing all over. I took out what I could with my draw knife and glued and clamped the others. That bow is still in my cellar rafters after being shot heavily for 3 years. Jawge
|
|
| From: Bjrogg
|
|
|
|
|
|
|
| Date: 17-Dec-20 |
|
Thanks again everyone.
I might add that a selfbow does need to be treated properly to.
Glass bows are definitely more forgiving when it comes to user. I have seen countless pictures of people shooting glass bows strung backwards. Some even with their “instructors” You don’t get away with that with selfbows. They just aren’t designed to bend backward. The grain on the belly is like many weak links in a chain. It works fine in compression but in tension it is very easy to break.
Even just simply bracing a selfbow has to be done properly. They can be difficult to brace to. I’m a short chubby guy that’s almost 60 years old. I have seen big young muscular guys that absolutely can’t brace a bow like this. It’s all technique. I struggled myself in the beginning. I’ve often wondered how many beginners harmed there bows simply by not using the proper technique. Now I can literally brace this bow with my eyes closed.
Thank You for your appreciation of this build along. The documentation and posting does take an incredible amount of time. My wife keeps asking me how much I’m going to get paid for this.lol. She knows the answer to that.
I also know theirs a bunch of you out there who are watching in the shadows. I probably will never meet. Some have sent me pm’s I’m pretty sure even more remain in those shadows. They are the reason I did this build along. To them I wish them success and hope they learned something helpful here.
Bjrogg
|
|
| From: benzy
|
|
|
|
|
|
|
| Date: 17-Dec-20 |
|
Thank you for doing this build along. It's making me want to take a chainsaw to my brother in-laws farm to try making self bows again. There isn't any Osage at the farm. How well does Hickory do with this design? (static tips) If I do my part right that is...
|
|
| From: Bjrogg
|
|
|
|
|
|
|
| Date: 17-Dec-20 |
|
Rob I don’t have any experience with hickory. I have heard it is very good in tension. With its interlocking grain I am told it even is quite tolerant of violations of the rings on its back. I even saw a picture on here with one that took set and the owner flipped it over and strung it backwards. Still something I wouldn’t advise.
It’s weakness as I understand is compression. It’s back overpowers it belly and it likes to take set. I’m thinking this design might exacerbate the problem but I know guys have done them. I just don’t have any personal experience.
From what I have, I would probably advise a straight limb design first. There’s nothing wrong with a well tillered straight longbow. It’s what I would advise for any wood for a beginner.
Bjrogg
|
|
| From: altitude sick
|
|
|
|
|
|
|
| Date: 17-Dec-20 |
|
I’ll say it again. I saw the stave in person before Brian started. And it was not the best candidate for a recurve. But I guess he likes a challenge. It’s a testament to his experience to coax a recurve out of that stave. Especially in front of this crowd. It would have been very easy to pick a straight un twisted stave to put curves into. Especially for a demonstration
|
|
| From: wooddamon1
|
|
|
|
|
|
|
| Date: 17-Dec-20 |
|
Looking forward to seeing what you do about the checks, one of my blanks has a similar issue, but not as extreme. So far I've superglued them and might end up below them when I get it tillered and the handle shaped all the way.
|
|
| From: Bjrogg
|
|
|
|
|
|
|
| Date: 17-Dec-20 |
|
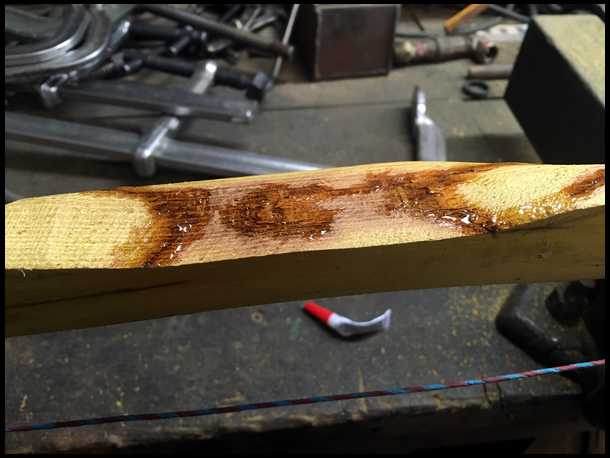
Well Damon so far that’s what I did to. I will probably do more eventually but for now I really soaked it with thin super glue. I did one side last night and the belly today. I probably will let that dry for a few days and think about fixes for awhile.
|
|
| From: Bjrogg
|
|
|
|
|
|
|
| Date: 17-Dec-20 |
|
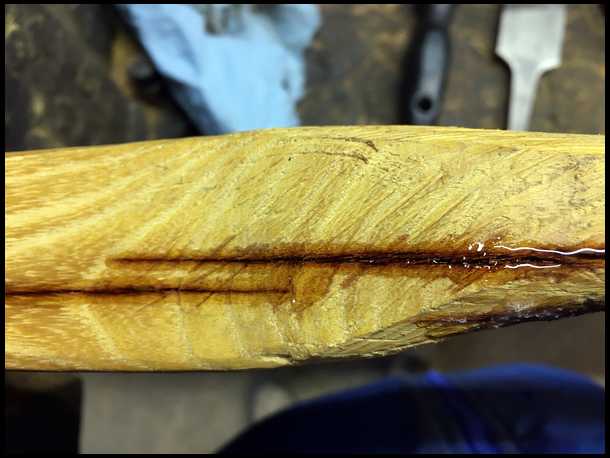
I’m trying to get super glue in from every direction. And continue to apply more as soon as some seeps in.
|
|
| From: Bjrogg
|
|
|
|
|
|
|
| Date: 17-Dec-20 |
|
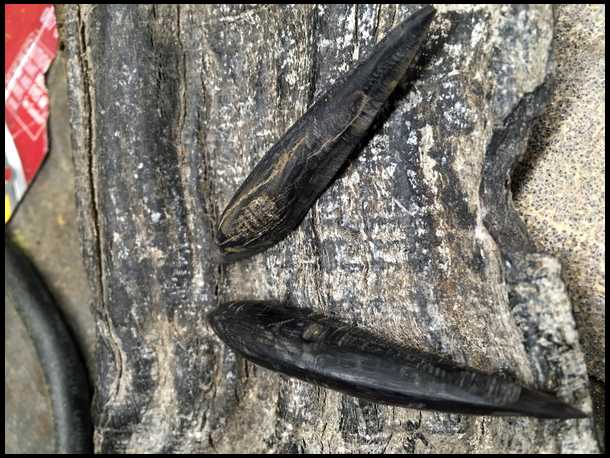
In the meantime I’m thinking about the tips. Before I narrow them any more I would like to glue on some overlays. They aren’t required but they sure do help with string wear.
In this case I think we are going to use some Water Buffalo horn I was gifted from another fine bowyer PASteve.
I roughed out these overlays. Not sure when I going to get back at this. I think I can see a couple busy days ahead. That’s ok though cause I’d really like that super glue to soak in. Setup and then we can re evaluate our handle.
As Arnold would say. I’ll be back.
Bjrogg
PS working with this stuff reminds me of dehorning calves
|
|
| From: PEARL DRUMS
|
|
|
|
|
|
|
| Date: 17-Dec-20 |
|
BJ, take metal object like a hammer, big screw driver, rasp or whatever you have close and gently tap the area the glue is sitting. It will vibrate it down in farther than gravity alone will pull it.
|
|
| From: Bjrogg
|
|
|
|
|
|
|
| Date: 17-Dec-20 |
|
Thanks Peal I never thought of that. The more I look at it the more I think it might just survive. But one never knows for sure. Bjrogg
|
|
| From: Bjrogg
|
|
|
|
|
|
|
| Date: 17-Dec-20 |
|
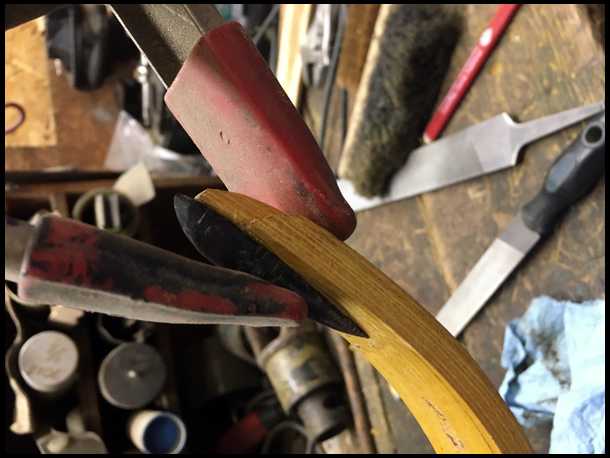
I used jell gorilla super glue to attach our water buffalo horn overlays. They are just rough yet. I will shape and refine them when I get back at it.
Until then all the glue can cure.
|
|
| From: Arvin
|
|
|
|
|
|
|
| Date: 18-Dec-20 |
|
Looking great. Arvin
|
|
| From: Bjrogg
|
|
|
|
|
|
|
| Date: 18-Dec-20 |
|
Hope I didn’t screw up this thread. Said error try again
Bjrogg
|
|
|
|
| From: Bjrogg
|
|
|
|
|
|
|
| Date: 18-Dec-20 |
|
Thanks Arvin. Nice Christmas Present. Thank You much gonna have to see how far I can fling a arrow when I finish that one.
|
|
| From: Bjrogg
|
|
|
|
|
|
|
| Date: 18-Dec-20 |
|
Thanks Brian.
Sorry I didn’t get a chance to do anything with bow today. Maybe tomorrow.
I don’t know why, but I tried to post picture and couldn’t. See if it works tomorrow
Bjrogg
|
|
| From: Bjrogg
|
|
|
|
|
|
|
| Date: 19-Dec-20 |
|
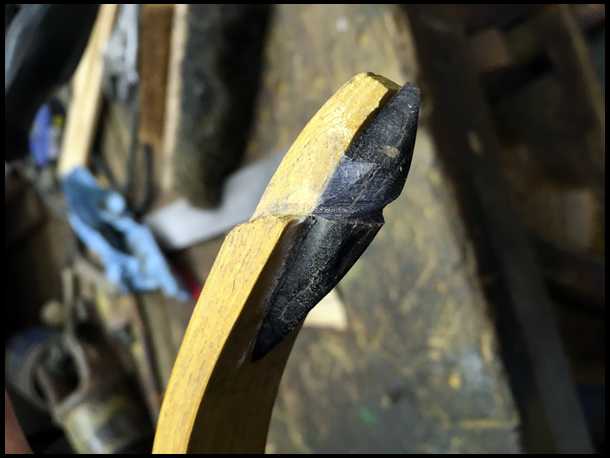
Ok had a few minutes here with our bow.
I let it sit for a couple days and gave the glue some time to really set up good. I actually think it looks pretty good.
Our glued on overlays should be set up good to. I think we will give them a rough shape and make them functional now.
My tool of chose is my bastard file again. I start by marking the “step” ledge that will hold our string.
|
|
| From: Bjrogg
|
|
|
|
|
|
|
| Date: 19-Dec-20 |
|
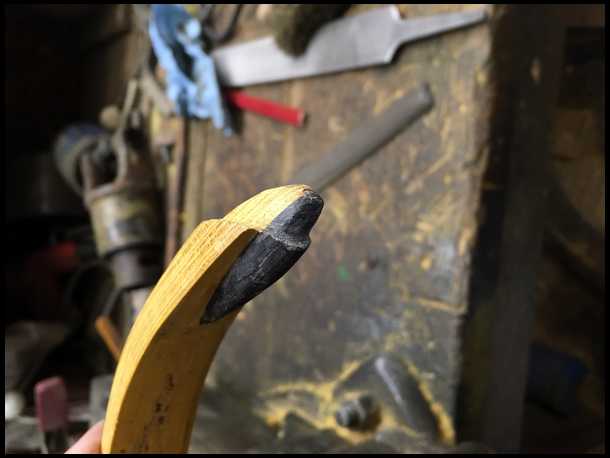
Then I file a “step” ahead of the line. Flat side of bastard file down.
|
|
| From: Bjrogg
|
|
|
|
|
|
|
| Date: 19-Dec-20 |
|
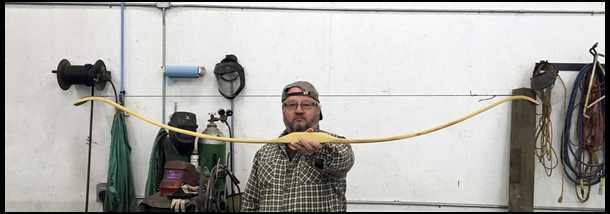
I repeat on other limb. I still don’t narrow up any narrower than the overlay. We might still tweak tips slightly.
Slide the string on any here’s braced profile.
|
|
| From: Bjrogg
|
|
|
|
|
|
|
| Date: 19-Dec-20 |
|
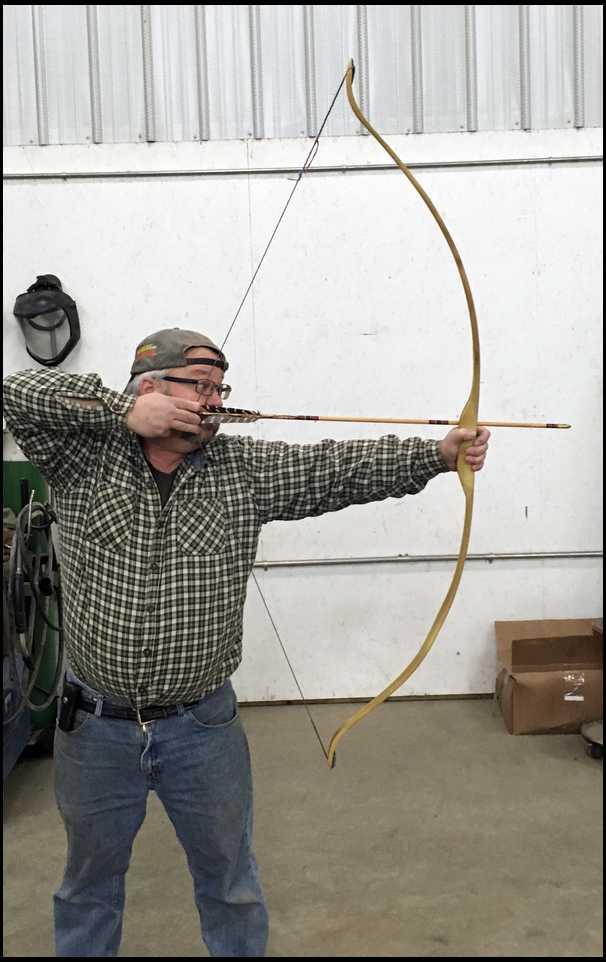
Here she is at slightly over 25”. I’m still undecided about what next. I’m pretty sure I could get a few more inches but I would probably have to get right out of the fades working a little more adding stress to my already questionable handle
Well here she is slightly over 50@25
Bjrogg
|
|
| From: altitude sick
|
|
|
|
|
|
|
| Date: 19-Dec-20 |
|
Man that looks good especially since it has a lot of snake, rattle and roll to It. Which can make the tiller look funny
|
|
| From: Bjrogg
|
|
|
|
|
|
|
| Date: 19-Dec-20 |
|
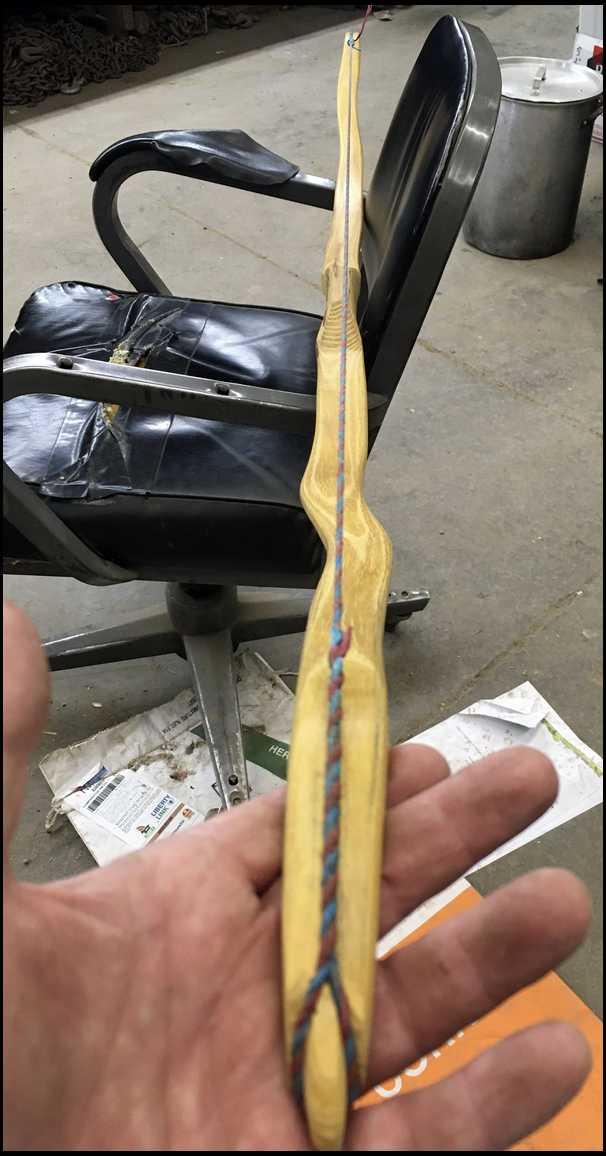
Thanks Jeff.
I think I will just keep shooting the snot out of it for awhile till I decide where we go from here.
Bjrogg
|
|
| From: Pa Steve
|
|
|
|
|
|
|
| Date: 19-Dec-20 |
|
Braced profile is looking really good to my eye BJ. I'm in agreement you could probably eek out another inch or two. Tips and handle appear to have good alignment. Like you said..guess it's time to shoot her in and go from there. I want to commend you on an excellent build-a-long especially with such an interesting stave. Yes, it probably would have been much simpler to keep a straight limb design but you took on the challenge and did a fine job with a static. Thanks for doing this and hope you have a Merry Christmas.
|
|
| From: Draven
|
|
|
|
|
|
|
| Date: 19-Dec-20 |
|
Great job! Thank you for the topic
|
|
| From: Bjrogg
|
|
|
|
|
|
|
| Date: 19-Dec-20 |
|
Sorry Jay some reason typed Jeff
Thanks Steve Merry Christmas to you too.
Thanks Draven so glad you enjoyed it
Well I pretty much shoot it til a worn my fingers off. Seems to be doing tine
|
|
| From: Bjrogg
|
|
|
|
|
|
|
| Date: 19-Dec-20 |
|
Next servings string
|
|
| From: PA Bones
|
|
|
|
|
|
|
| Date: 19-Dec-20 |
|
Great post/great bow!! Thanks for taking time to share all the photos. Really enjoyed it!
|
|
| From: Gray Goose Shaft
|
|
|
|
|
|
|
| Date: 19-Dec-20 |
|
Yes, thanks for taking the time to photograph and post an excellent build-along.
I admire how you can look at a stave and feel the thickness with your fingers then know what needs to be done. Very enjoyable presentation.
|
|
| From: Arvin
|
|
|
|
|
|
|
| Date: 19-Dec-20 |
|
I enjoyed the build Brian. Great job. And have a great Christmas and a solid New Years. Arvin
|
|
| From: Gifford
|
|
|
|
|
|
|
| Date: 19-Dec-20 |
|
Great build along, 256 posts/pictures, that alone took a lot of time. Thanks for producing this build along.
|
|
| From: bodymanbowyer
|
|
|
|
|
|
|
| Date: 19-Dec-20 |
|
This was fun and informative. Great thread. JF
|
|
| From: Bjrogg
|
|
|
|
|
|
|
| Date: 19-Dec-20 |
|
Thanks everyone. Must have took awhile to follow along to. Thanks for looking
Bjrogg
|
|
| From: D.Lewis aka tonto59
|
|
|
|
|
|
|
| Date: 19-Dec-20 |
|
Nice looking bow Brian. Thanks for doing the build along for us. Like they say each bow teaches you something. It was very interesting watching what you could do with heat and steam.
|
|
| From: Bjrogg
|
|
|
|
|
|
|
| Date: 21-Dec-20 |
|
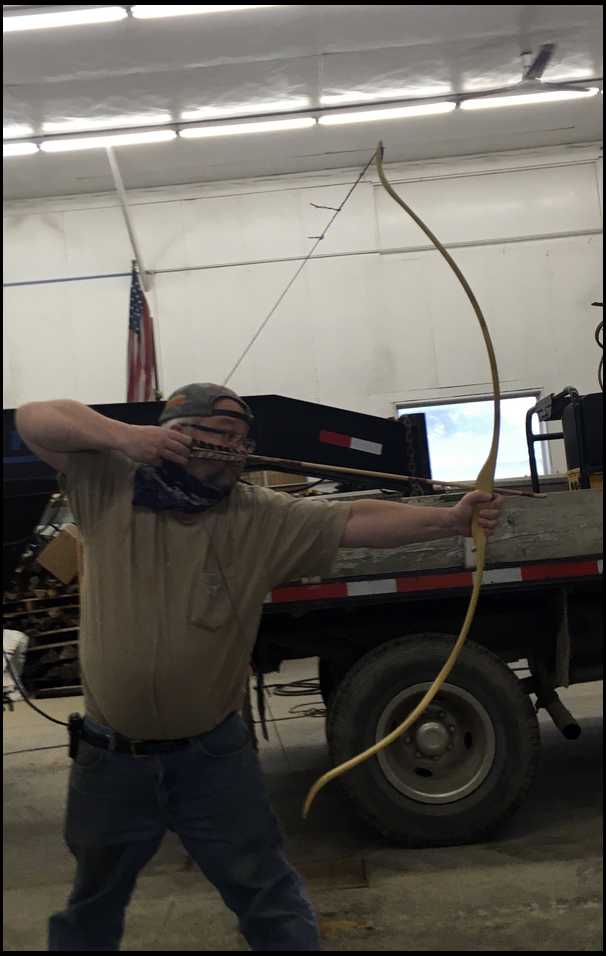
Thanks Don. I’m not sure why I enjoy this so much but I certainly do.
Gifford you would be amazed what your eyes and fingers can tell you. I know I could never do the same trying to measure with a calipers. I don’t know exactly what the measurements are, but I know when they are starting to feel close.
We can’t build one of these just using measurements anyway. Especially not one like this. We need to let the bend tell us where we need to remove what isn’t a bow.
I’ve been shooting this one hard. I did get the outers moving a little more top limb.
Got the fades and inners moving ever so slightly more.
I had her to 52@26” on the tree. I forgot to snap a picture then.
I drew her by hand to just shy of 27” here. Probably close to 55@27” feels really nice in hand.
I really shouldn’t draw over the 50 lbs but I just had to see if the handle was going to take it.
Bjrogg
|
|
| From: Bjrogg
|
|
|
|
|
|
|
| Date: 21-Dec-20 |
|
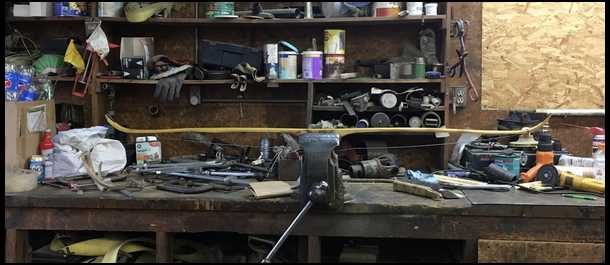
I see a little set mid limb both limbs now. I probably shouldn’t have drawn the 55 lbs.
I’m liking it here. I think by the time I get her sanded down and finish tips and handle. She will be pretty close to my original goal.
|
|
| From: BowAholic
|
|
|
|
|
|
|
| Date: 21-Dec-20 |
|
awesome bow and awesome craftsmanship BJ! thanks... that bow looks like it'll put meat in the freezer for sure.
|
|
| From: wooddamon1
|
|
|
|
|
|
|
| Date: 21-Dec-20 |
|
That's looking nice! Can't wait to see it with some finish on it. Thanks for sharing the great build, BJ!
|
|
| From: wooddamon1
|
|
|
|
|
|
|
| Date: 21-Dec-20 |
|
That's looking nice! Can't wait to see it with some finish on it. Thanks for sharing the great build, BJ!
|
|
|
|
|
|
| From: Bjrogg
|
|
|
|
|
|
|
| Date: 21-Dec-20 |
|
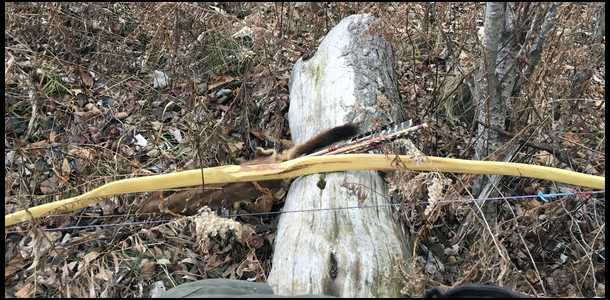
We’re gonna try tonight Bob. Sitting on a stump with her right now.
Thanks everyone.
Jay maybe you’ll have to come give her a pull
Bjrogg
|
|
| From: altitude sick
|
|
|
|
|
|
|
| Date: 21-Dec-20 |
|
I would love to. Maybe later this winter
|
|
|
|
|
|
|
|
| From: Loubeck
|
|
|
|
|
|
|
| Date: 22-Dec-20 |
|
Would a thin Rawhide backing tend to keep highly reflexed heat treated (31" draw tillered) osage bow from breaking?
|
|
| From: Bjrogg
|
|
|
|
|
|
|
| Date: 22-Dec-20 |
|
Sounds good Jay
The bow was always there Curt, just had to get rid of everything that wasn’t a bow and give it a string.lol thanks
Louis I’m not sure if my short draw is a blessing or a course. 31” does make all this trickier.
I like reflex for my short draw. I feel like it makes better use of my short power stroke. At least that’s what my mind thinks so believing in something is 90% there already.
I’m not sure about longer draws and what designs Archer’s who shoot them like. Just guessing I would think a deflexed handle and reflex in the limbs and maybe static recurves might work nicely. I’m just guessing though.
I don’t really call this bow highly reflexed. Just enough to make a noticeable difference.
I have way more confidence in a nice clean back and good tillering than rawhide or anything on the back. I do think rawhide will help to hold down lifted splinters to a point. I’m not sure they can save a violation of the back. I really have only backed one of my bows. The second one I made after I broke my first one. I shot that bow a lot. It didn’t break, but it wasn’t because I backed it . It was because I tillered it properly. For this design I probably would just make bow 2” longer.
For highly reflexed design and 31” draw I would probably prefer sinew backing than rawhide. Sinew will help with the set and is very good in tension. It will even pull in some reflex as it cures. I still haven’t done one yet but I have one ready for when I get a chance. Hopefully pretty soon. Maybe I will try to do a build along but it would be a learning experience for me to. And taking pictures with hide glue sloped all over my fingers could be a problem.
Bjrogg
|
|
| From: Jeff Durnell
|
|
|
|
|
|
|
| Date: 22-Dec-20 |
|
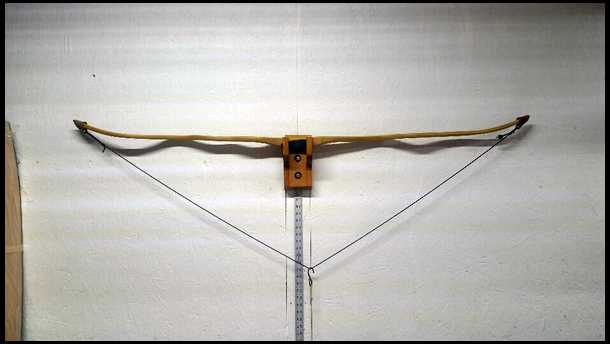
I'm going to sinew this one soon. I want to get it bending a little more and verify a few things first.
Pssst... take note of the shadow :)
|
|
| From: Bjrogg
|
|
|
|
|
|
|
| Date: 22-Dec-20 |
|
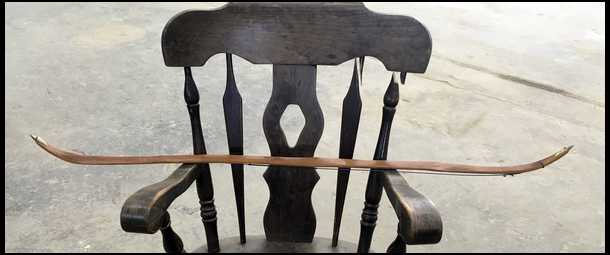
Hope you post your progress Jeff. One of the other problems with sinew build alongside is waiting for the sinew to cure. It’s even slower than paint.
This is the one I’m thinking of. It 46” n- n I kinda forget what lbs and draw are now. I think it was something like 30@ 23”. It’s really Snappy but it was starting to take set and I think a very good candidate for sinew.
|
|
| From: Bentstick54
|
|
|
|
|
|
|
| Date: 22-Dec-20 |
|
1st thing I noticed Jeff. How come the shadow doesn’t match the bow?
Job well done Brian. Good luck with it.
|
|
| From: Jeff Durnell
|
|
|
|
|
|
|
| Date: 22-Dec-20 |
|
It does. Matches the front.
|
|
| From: Bjrogg
|
|
|
|
|
|
|
| Date: 22-Dec-20 |
|
It matches the snaky front profile. The side profile is what we can see of the bow.
Might be interesting to see which way the sinew pulls that one Jeff
|
|
| From: Jeff Durnell
|
|
|
|
|
|
|
| Date: 22-Dec-20 |
|
Yeah, I hope it goes straight. That's partly why I want to tiller it down a little farther first. See how it bends and how things line up.
Geeze, don't ever call a bow that.... snappy.
;^)
|
|
| From: Bjrogg
|
|
|
|
|
|
|
| Date: 22-Dec-20 |
|
lol snappy in a good kinda way.
|
|
| From: Bjrogg
|
|
|
|
|
|
|
| Date: 22-Dec-20 |
|
Funny side note. The first time I braced this one was at Marshall PA meet a year and half ago. I was sitting on a picnic table talking to Knoll.lol I got in the habit of not even looking at bow when I string it in case I slip and tip doesn’t take my eye out. I was watching knoll as I braced it and he was trying to get the heck out of there. Guess he was a little nervous to. Bjrogg
|
|
| From: altitude sick
|
|
|
|
|
|
|
| Date: 22-Dec-20 |
|
Brian, What is a good bend through the handle design for a short Osage stave
|
|
| From: Bjrogg
|
|
|
|
|
|
|
| Date: 22-Dec-20 |
|
I kinda like 2x your draw length for bow length. Really light static recurves to helps with the string angle. I might even go a little longer. The problem I seem to run into with bend through handle bows is the amount of wood that’s really a bow is pretty light in mass. The shorter you get the less leverage you have and the less wood it takes to get the same draw weight. Also the shorter the bow the more the limbs have to bend for the same draw length. This all adds up to more stress on less wood. From what I understand a very good place for sinew.
Don’t get me wrong I still like a bend through handle, but they do tend to take more set. At least the ones I have done
I think my favorite bend through I’ve made I gave to Paulsemp. I think it was 60” with reflex through the handle and limbs with static recurves. I tillered it out to 27” and kept handle barely bending. Seemed to hold its unbraced profile really nice. Wasn’t quite as stressed with the extra couple inches and still pretty maneuverable.
Bjrogg
|
|
| From: Bjrogg
|
|
|
|
|
|
|
| Date: 22-Dec-20 |
|
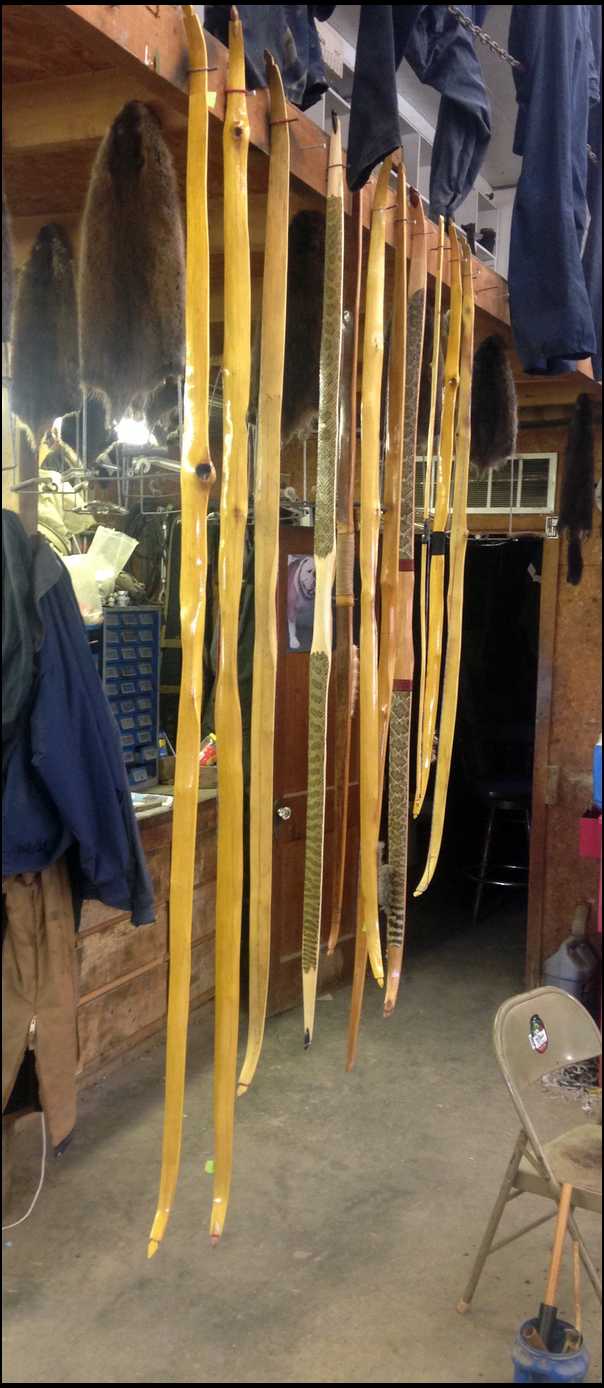
I don’t know if I have any other pictures of it. The one hanging in the back.
Bjrogg
|
|
| From: Bentstick54
|
|
|
|
|
|
|
| Date: 22-Dec-20 |
|
I should have realized that Jeff. Can’t wait to so see that one done.
|
|
| From: Arvin
|
|
|
|
|
|
|
| Date: 23-Dec-20 |
|
Snappy is better than snake bit! Yes it broke!!????????Arvin
|
|
| From: Bjrogg
|
|
|
|
|
|
|
| Date: 23-Dec-20 |
|

What broke Arvin?
Not this one. I’m still shooting her in. I think she’s going to make it.
Think I have a name for her.
Seeing how Wolf gave me this stave. I’m think “the Big Bad Wolf”
Who’s afraid of the big bad wolf?
Bjrogg
In case you missed it the full draw
About 55@27
|
|
|
|
| From: Arvin
|
|
|
|
|
|
|
| Date: 24-Dec-20 |
|
I built a bow for a man. He named it Snake Bit! And it broke. I told him to never name a bow Snake Bit. Arvin
|
|
| From: Bjrogg
|
|
|
|
|
|
|
| Date: 25-Dec-20 |
|
I’ll try to remember that Arvin.
Maybe Snake Charmed would be better?
Merry Christmas
Bjrogg
PS I did narrow up the tips and do some sanding yesterday. Still shooting really nice.
|
|
| From: BowAholic
|
|
|
|
|
|
|
| Date: 25-Dec-20 |
|
"Wiggles"? :) Merry Christmas guys!
|
|
| From: Hutch
|
|
|
|
|
|
|
| Date: 25-Dec-20 |
|
Amazing work! As always... Another thread added to my favorites list!
Hutch
|
|
| From: Bjrogg
|
|
|
|
|
|
|
| Date: 28-Dec-20 |
|
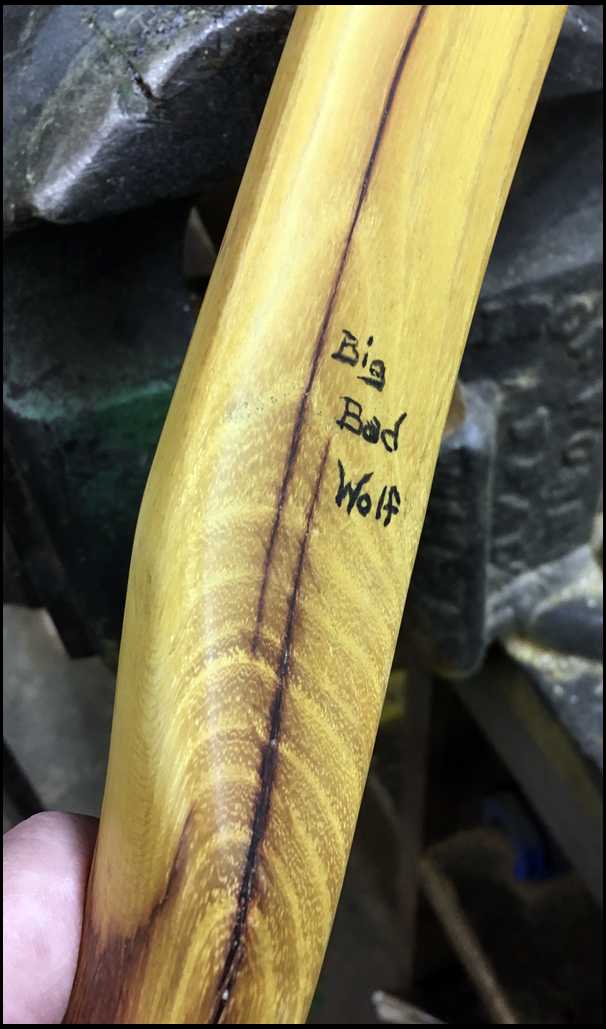
Well “Big Bad Wolf” she is BowAholic
Thanks Hutch that means a lot to me.
Well I put a few coats of polycrylic on and sanded her down to a smooth dull finish. I think she will grow more beautiful with time. That is if the Big Bad Wolf doesn’t get her.
Bjrogg
|
|
| From: Bjrogg
|
|
|
|
|
|
|
| Date: 30-Dec-20 |
|
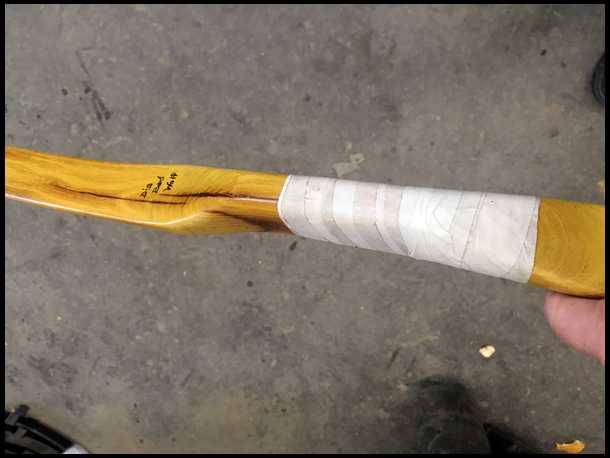
The more I’ve shot this bow the more I just thought I should just leave it like it is. I could have wrapped it. Maybe even should have wrapped it with sinew. I really thinks it’s going to be ok.
I decided just to put some Black leather one of my buddies gave me. I’m not the greatest at stitching them up but I can show you a trick for making a pattern for your piece of leather. Saw this on PA to.
Wrap masking tape sticky side out where you want leather on handle to be. Wrap it nice and tight. Squeeze wrinkles flat with your fingers.
|
|
| From: Bjrogg
|
|
|
|
|
|
|
| Date: 30-Dec-20 |
|
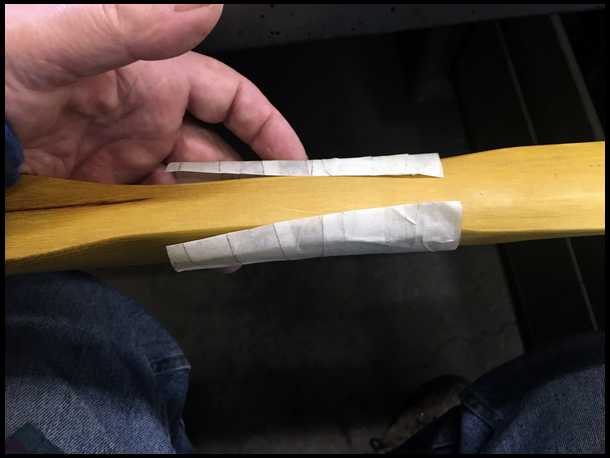
Then carefully slice it on the back side top to bottom
|
|
| From: Bjrogg
|
|
|
|
|
|
|
| Date: 30-Dec-20 |
|
Then put on your piece of leather sticky against the leather.
|
|
| From: Bjrogg
|
|
|
|
|
|
|
| Date: 30-Dec-20 |
|
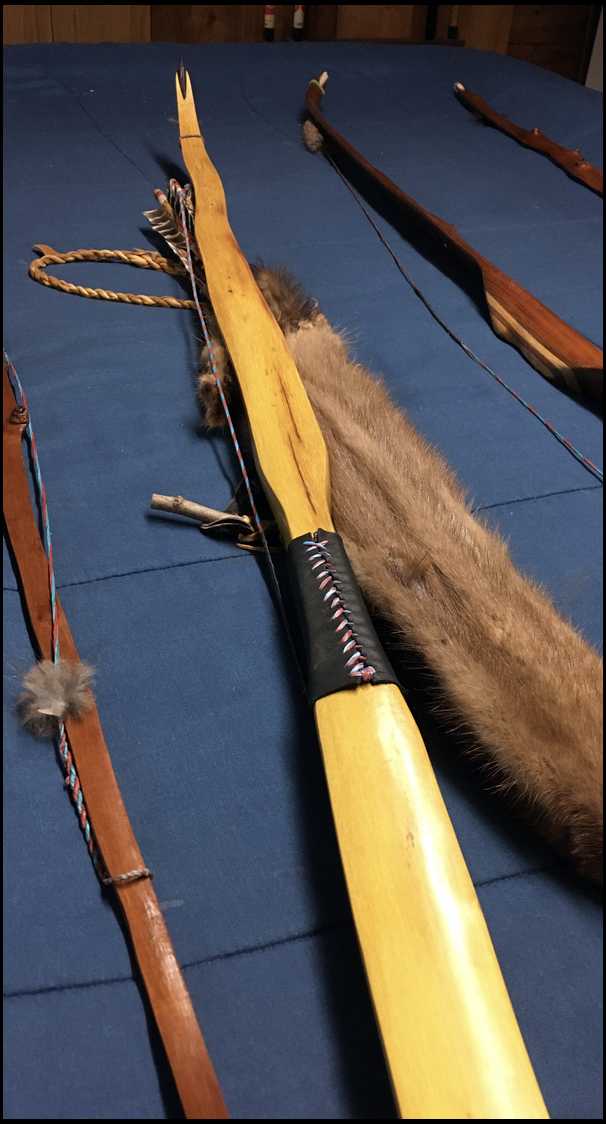
Then I use a scissors to cut the leather. I usually take about a sixteenth of a inch of the tape.
This makes a nice tight grip. Then I stitch it up using two needles doing a baseball stitch. I kinda messed up with the stitching on this one. Not the neatest pattern but it’s nice and tight.
Bjrogg
Ps the leather will have more stretch one way than the other. I like to mate the two edges that don’t stretch as much
|
|
|
|
| From: altitude sick
|
|
|
|
|
|
|
| Date: 30-Dec-20 |
|
Very nice Brian! I’ve got some Boa skin I’m putting on the bow you helped me with. I’ll bring you some some time.
|
|
| From: BR
|
|
|
|
|
|
|
| Date: 30-Dec-20 |
|
Fine looking bow BJ. Your build has been very informative. Thank you.
|
|
|
|
| From: Draven
|
|
|
|
|
|
|
| Date: 30-Dec-20 |
|
It looks GREAT!
|
|
| From: Bentstick54
|
|
|
|
|
|
|
| Date: 30-Dec-20 |
|
Brian, I basically do the same on my leather wraps except I use the stretchy direction for the seam. Allow just a tad more space at the seam, dip the leather in warm water for 30 seconds, pat it dry, then wrap and stitch. The leather will stretch a little more wet, then as it dries it shrinks back and makes a tighter wrap. I also use a little barge cement on three sides to keep leather from moving around with continual usage.
|
|
| From: Bjrogg
|
|
|
|
|
|
|
| Date: 31-Dec-20 |
|
Thanks Jay. I’ve never tried Boa. I’ve heard it’s thicker skin and even helps a little with lifting splinters like rawhide. Look forward to seeing your bow.
Bill Thank You. I’m so happy you found it informative. That is my total motivation for doing this build. I know this stave has some problems. It may have even had more problems than I anticipated. I picked it to be able to demonstrate some tricks to saving a stave with problems. So far it has turned out to be a really decent shooter.
Thanks Jeff, I like it to. The more I shoot it the more I like it. I would normally have shaped the handle a little differently, but I didn’t want to push this one any further than I already did.
Than You Draven. I gotta agree. I like how she looks. I usually use tru oil. I used water base clear poly acrylic on this one. I wasn’t sure I was going to like it at first. It took more sanding than I usually care to do. But I like the finish now. It feels like a nice hard durable finish. I sanded it smooth but dull . I started with 200 and ended with 1000 grit. It’s a nice look and feel. It’s doesn’t seem like it is going to be to shinny for hunting either.
Brian I’m certainly not the most talented guy when it comes to handle wrap. I have tried it both ways. Have done like you described to. I guess I like this way best so far, but I’m not the number one guy for this step for sure.
Now that the finish is hard and dry and handle wrap is on. I will really put her to the test and shoot her hard again.
Thanks for watching
Bjrogg
|
|
| From: RonG
|
|
|
|
|
|
|
| Date: 31-Dec-20 |
|
Brian, Super bow, thanks for the info on how to do a handle wrap I always have trouble with those.
|
|
| From: Wayne Hess
|
|
|
|
|
|
|
| Date: 31-Dec-20 |
|
I’m exhausted from start to finish , Big Bad Wolf , Hope the bow holds up for a long time enjoy. Thanks for taking me along Brian, Make a Better New Year 2021.
|
|
| From: Pa Steve
|
|
|
|
|
|
|
| Date: 31-Dec-20 |
|
Very nice BJ. Thanks again for the build-a-long. Hopefully, Big Bad Wolf will make it to Marshall this spring and I'll get to see it in person.
|
|
| From: Bjrogg
|
|
|
|
|
|
|
| Date: 31-Dec-20 |
|
Not my strongest talent either Ron. I bet that trick will help though. It sure helped me.
I’ll give you a chance to catch your breath Wayne. Thanks for following along. Best Wishes for a Happy Healthy New Year
Steve I sure hope so. My wife and I are really looking forward to seeing our Marshall friends again. It’s been to long
Bjrogg
|
|
If you have already registered, please sign in now
For new registrations Click Here
|
|
|
|