| From: soap creek
|
|
|
|
|
|
|
| Date: 28-Apr-20 |
|
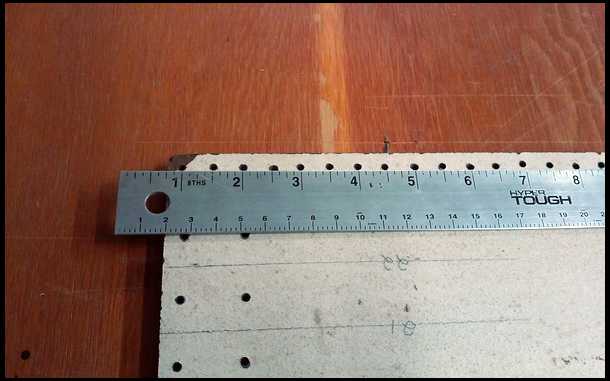
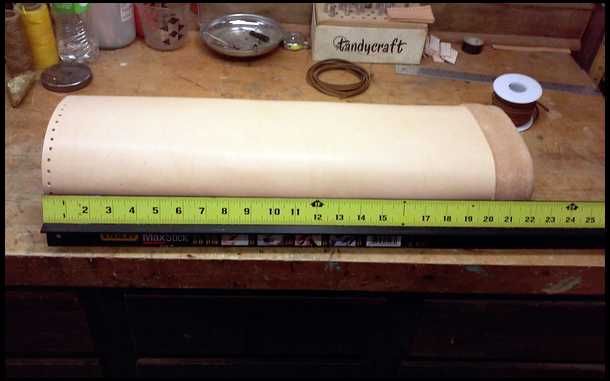
Well here goes. My first attempt at a build along. This is how I got my start, building quivers. Bud B did a build along on another site. Thank you Bud. Well you start with a single shoulder 6/7oz. Vegetable tanned that will allow a 19in x 24in workable piece.
|
|
| From: soap creek
|
|
|
|
|
|
|
| Date: 28-Apr-20 |
|
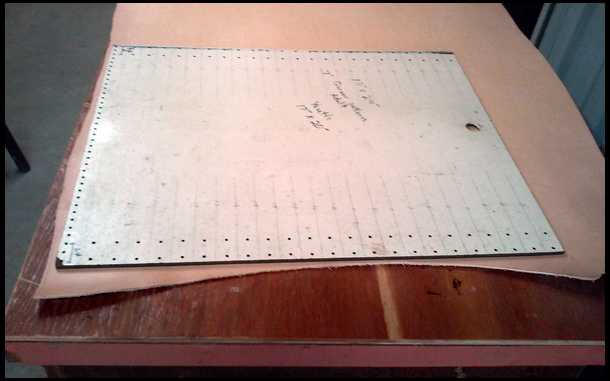
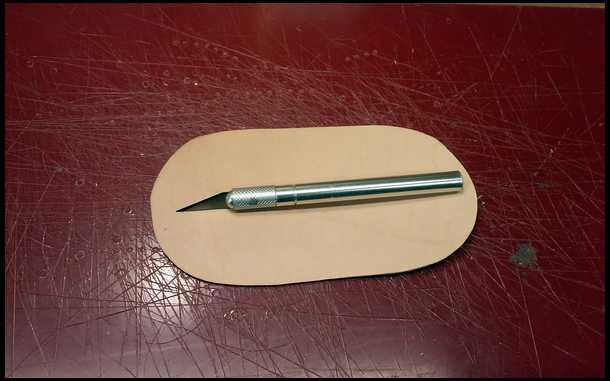
I took a piece on masonite and cut it to size. Then drilled holes for lacing to make a template. You don't need to do this you can just cut to size.
|
|
| From: Thogg
|
|
|
|
|
|
|
| Date: 28-Apr-20 |
|
I'm interested!
|
|
| From: soap creek
|
|
|
|
|
|
|
| Date: 28-Apr-20 |
|
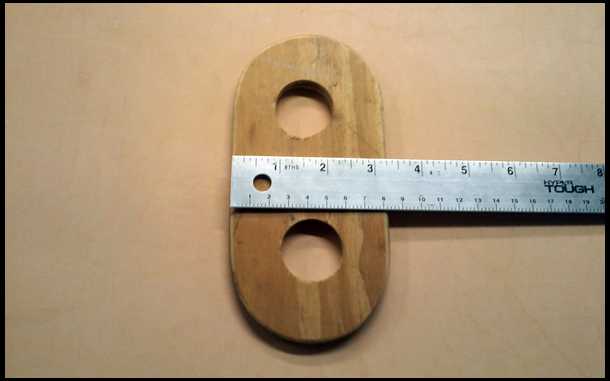
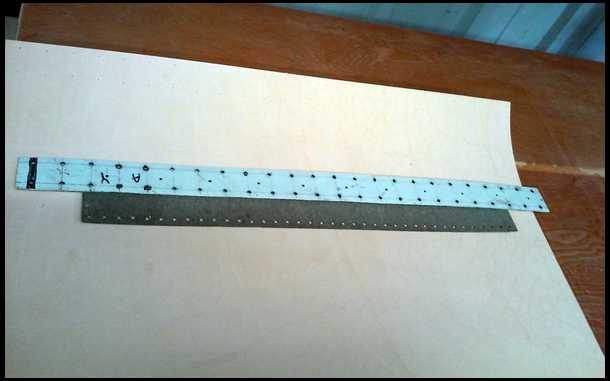
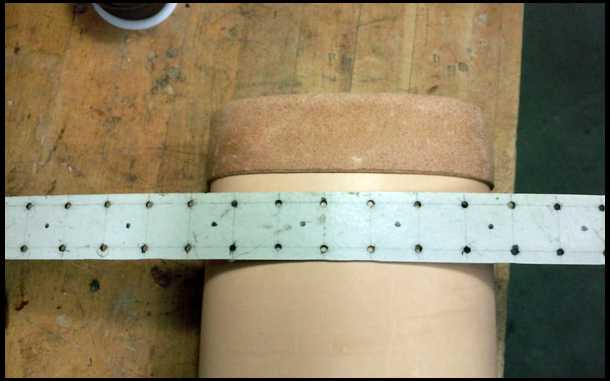
Those two strips are templates I used before the larger template was made. One has holes one inch apart and one has holes 1/2in. apart. One is for the bottom of quiver and one for horizontal lacing.
|
|
|
|
| From: soap creek
|
|
|
|
|
|
|
| Date: 28-Apr-20 |
|
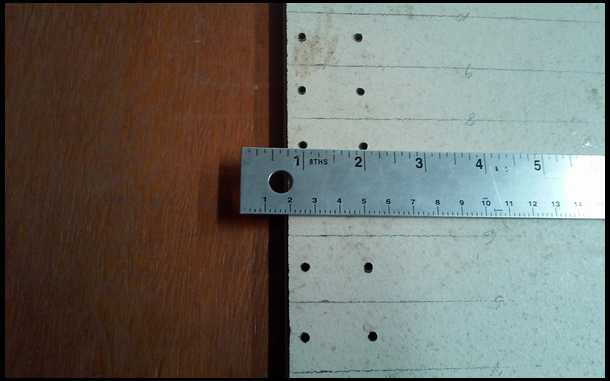
With leather cut to size. Mark your holes bottom holes will be 1/4in from bottom and 1/4in from end and 1/2in apart. The vertical lacing holes start 1/2in from top and 1/4in from side. The last holes for vertical lacing stop approximately 1 1/2in from bottom.
|
|
| From: BATMAN
|
|
|
|
|
|
|
| Date: 28-Apr-20 |
|
RG? Doan stop now! Waiting with bated breath! BLESSED BE!
|
|
| From: soap creek
|
|
|
|
|
|
|
| Date: 28-Apr-20 |
|
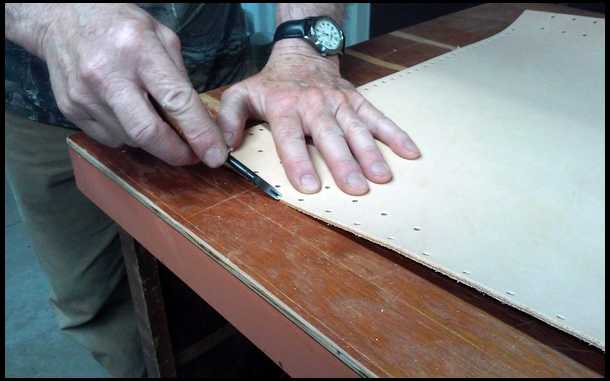
I use a 1/8in punch for holes. Once all holes are punched you can bevel the edges if you like or not. I bevel the side and the inside of the top but it's not necessary.
|
|
| From: soap creek
|
|
|
|
|
|
|
| Date: 28-Apr-20 |
|
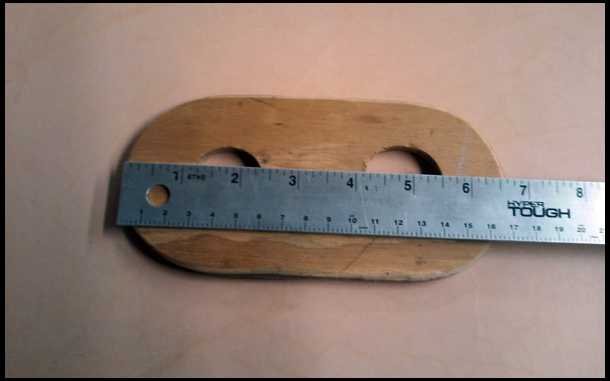
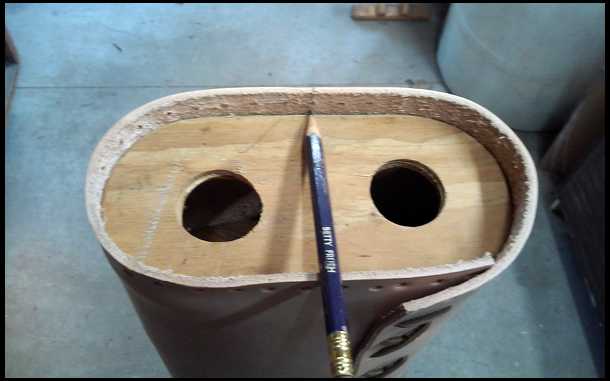
I made this template for the bottom from 1/2in plywood. The two bigger holes in the center are to make it easy to position it.
|
|
| From: Roadrunner
|
|
|
|
|
|
|
| Date: 28-Apr-20 |
|
Hopefully got it saved to favorites. I like these.
|
|
|
|
| From: soap creek
|
|
|
|
|
|
|
| Date: 28-Apr-20 |
|
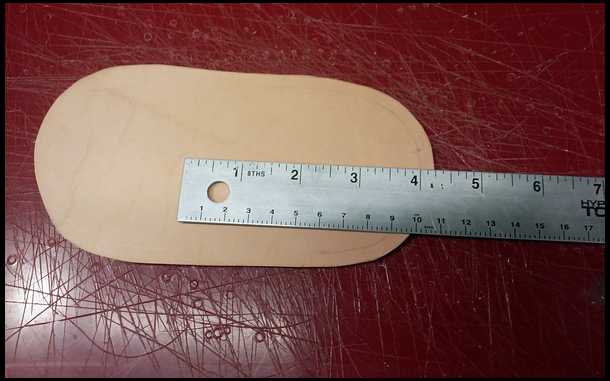
Cut out the bottom and set aside for latter.
|
|
| From: soap creek
|
|
|
|
|
|
|
| Date: 28-Apr-20 |
|
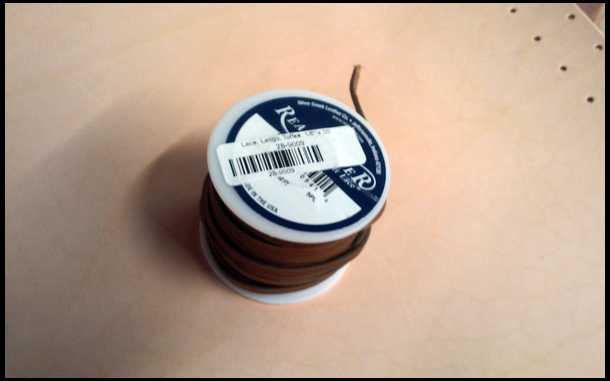
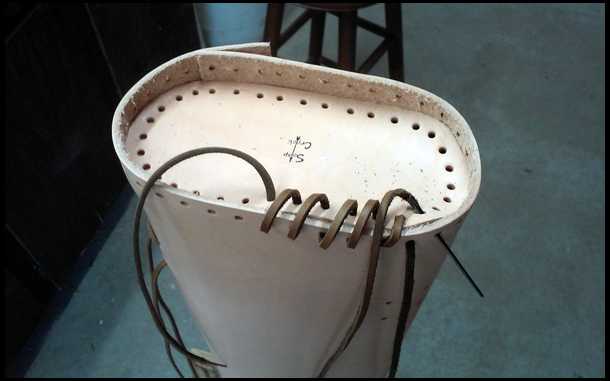
You will need 3 6ft pieces of 1/8in lacing. You can use what I use(latigo lace) or boot lacing. Just make sure it's strong.
|
|
| From: soap creek
|
|
|
|
|
|
|
| Date: 28-Apr-20 |
|
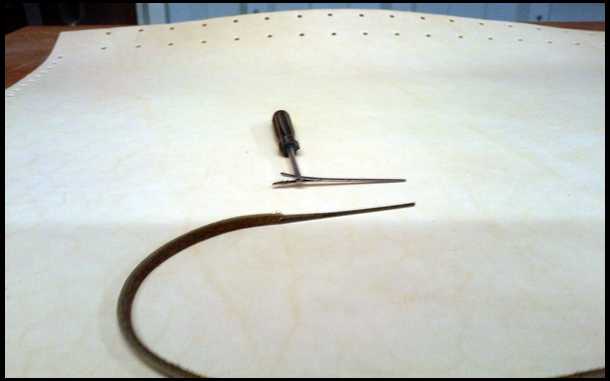
Now it's time to start lacing it up. You don't have to use lacing needles but it helps speed up the process.
|
|
| From: soap creek
|
|
|
|
|
|
|
| Date: 28-Apr-20 |
|
I forgot to mention the last 3 holes on the underneath side of the bottom don't punch. We will do those latter.
|
|
| From: soap creek
|
|
|
|
|
|
|
| Date: 28-Apr-20 |
|
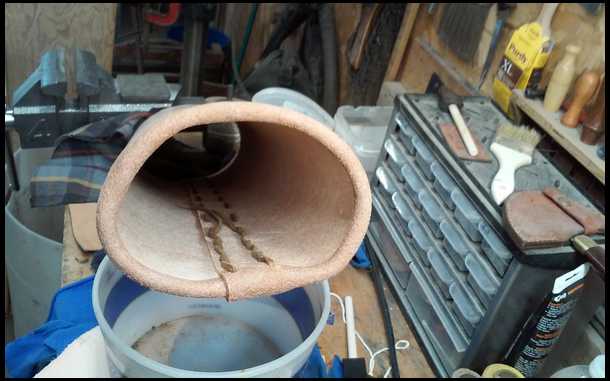
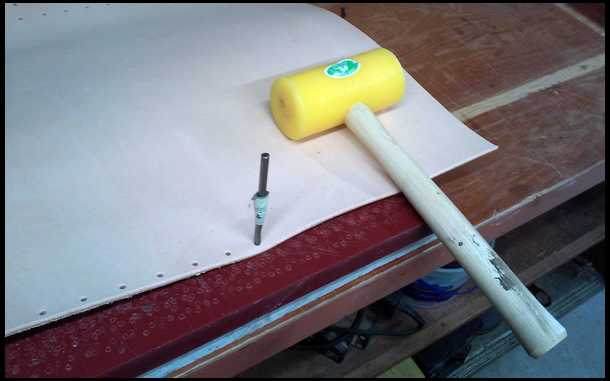
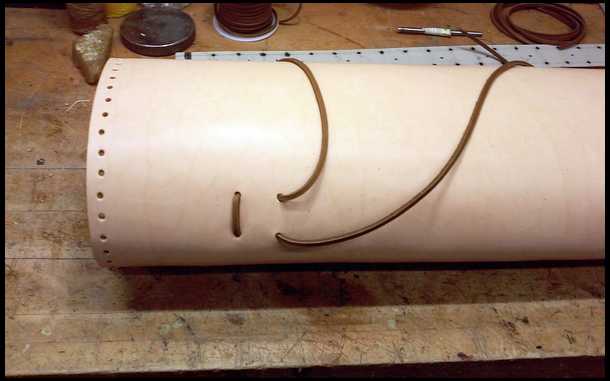
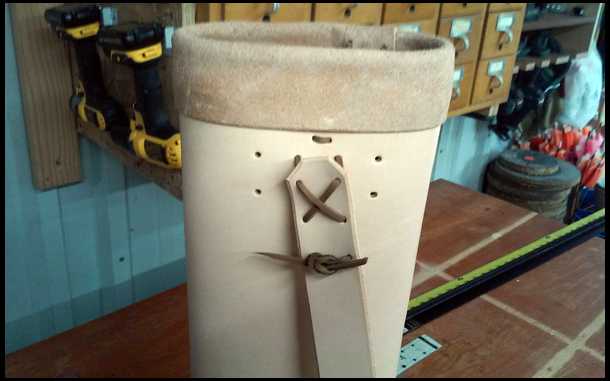
When you get to this point stop. We are going to wet the top to make it easier to roll over.
|
|
| From: soap creek
|
|
|
|
|
|
|
| Date: 28-Apr-20 |
|
Time wet leather. You do it this way. You can also use a sponge or cloth.
|
|
| From: soap creek
|
|
|
|
|
|
|
| Date: 28-Apr-20 |
|
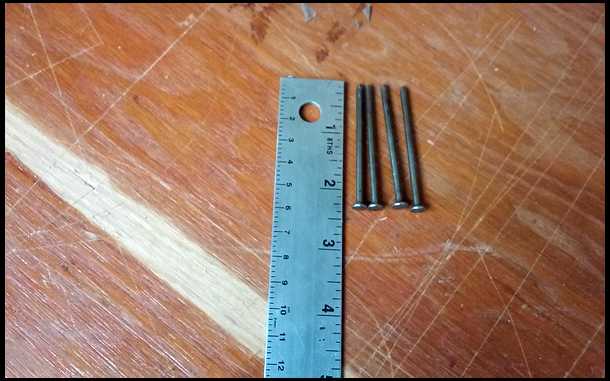
You will need 4 nails with the ends blunted. We will use them to aid in rolling the top.
|
|
| From: Zagnee
|
|
|
|
|
|
|
| Date: 28-Apr-20 |
|
Very cool thanks for putting this up
|
|
| From: soap creek
|
|
|
|
|
|
|
| Date: 28-Apr-20 |
|
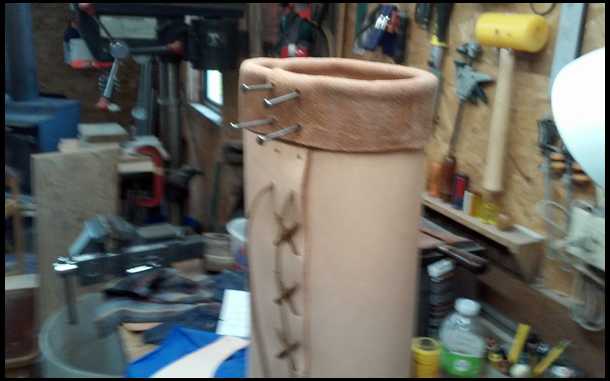
I soak only a few minutes. Then it's time to roll the top. This is where the nails come into play.
|
|
| From: soap creek
|
|
|
|
|
|
|
| Date: 28-Apr-20 |
|
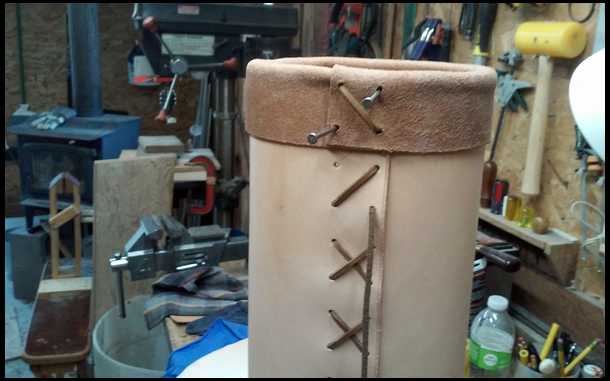
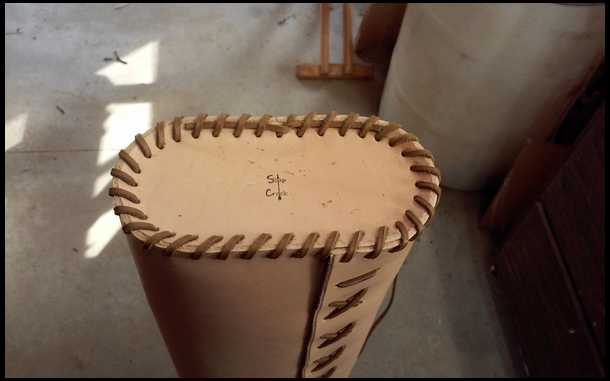
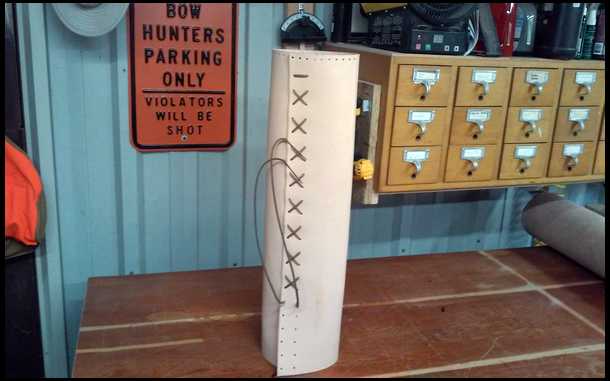
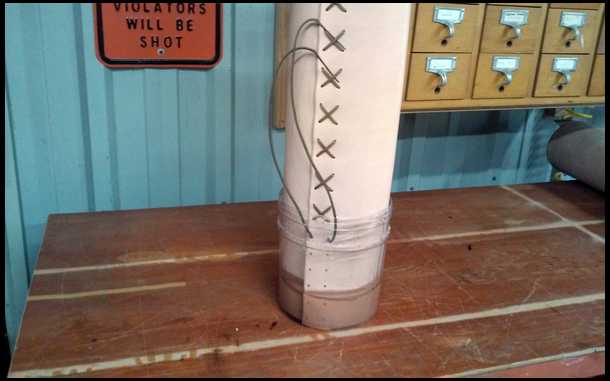
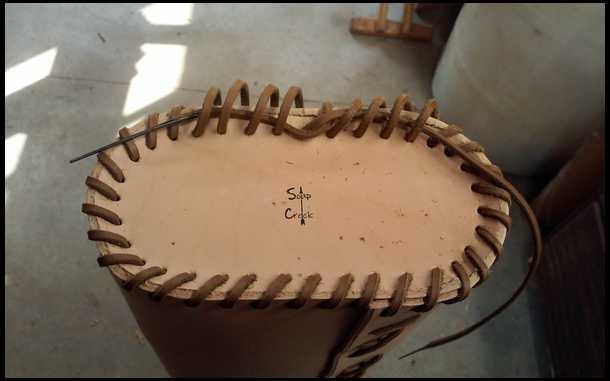
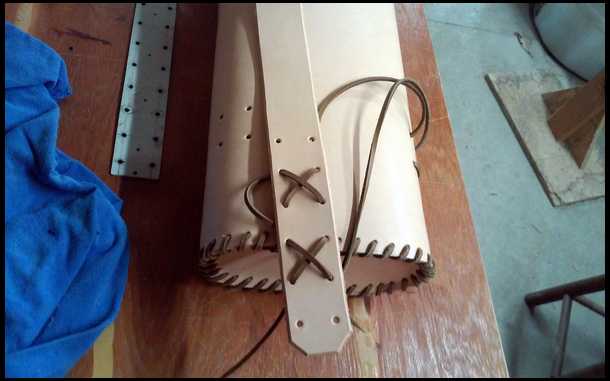
Now that this is done go ahead and finish lacing up the side.
|
|
| From: soap creek
|
|
|
|
|
|
|
| Date: 28-Apr-20 |
|
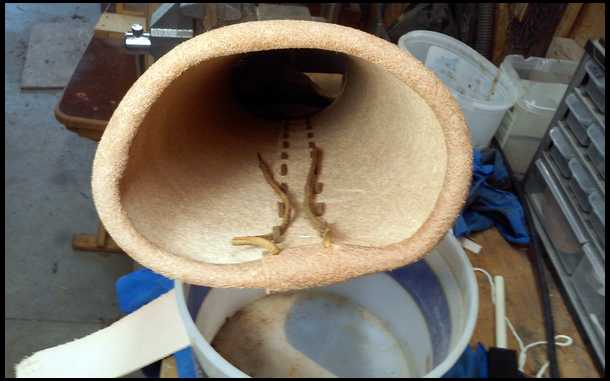
This how I finish on the inside. Lace under 3 laces inside. Then cut off excess.
|
|
|
|
| From: soap creek
|
|
|
|
|
|
|
| Date: 28-Apr-20 |
|
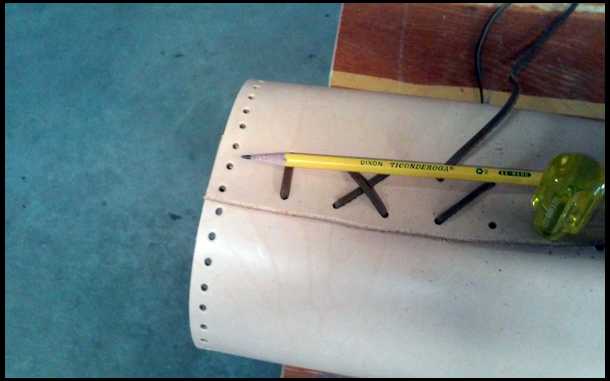
Now it's time to position holes for the strap. Keep in mind I make extra holes. Holes for right and left hand use. You only need holes for yourself. Top holes. Approximately a 1/2in from bottom of roll over.
|
|
| From: soap creek
|
|
|
|
|
|
|
| Date: 28-Apr-20 |
|
Side holes 3 3/8in from bottom.
|
|
| From: soap creek
|
|
|
|
|
|
|
| Date: 28-Apr-20 |
|
Now is the time to put in the bottom lacing for the strap. Use approximately 4ft.
|
|
| From: soap creek
|
|
|
|
|
|
|
| Date: 28-Apr-20 |
|

Go ahead and punch those last 3 holes.
|
|
| From: soap creek
|
|
|
|
|
|
|
| Date: 28-Apr-20 |
|
Take your bottom piece and mark a line with a pencil about a 1/4in in from the edge all the way around the outside.
|
|
| From: soap creek
|
|
|
|
|
|
|
| Date: 28-Apr-20 |
|
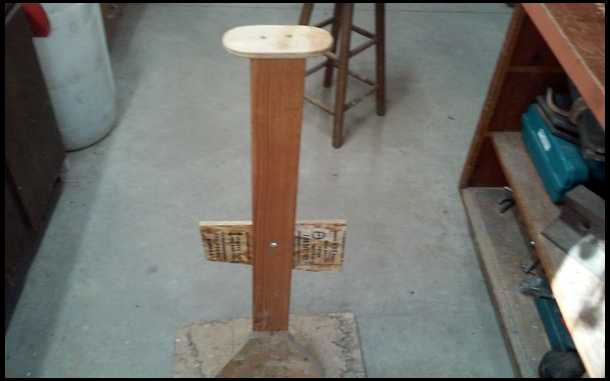
This is a high tech stand I made to hold the quiver while lacing up the bottom.
|
|
| From: soap creek
|
|
|
|
|
|
|
| Date: 28-Apr-20 |
|
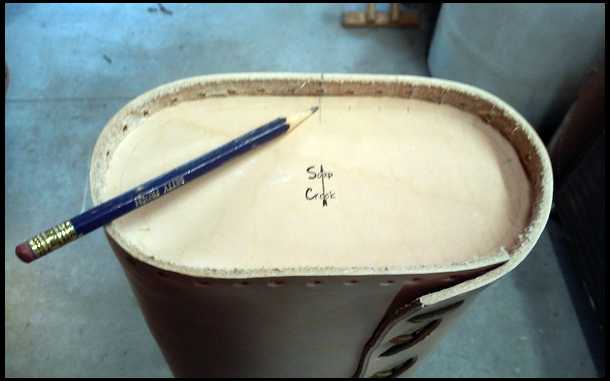
Now with your quiver upside down and template installed mark a hole close to center of back with a pencil. We will use it latter.
|
|
| From: soap creek
|
|
|
|
|
|
|
| Date: 28-Apr-20 |
|
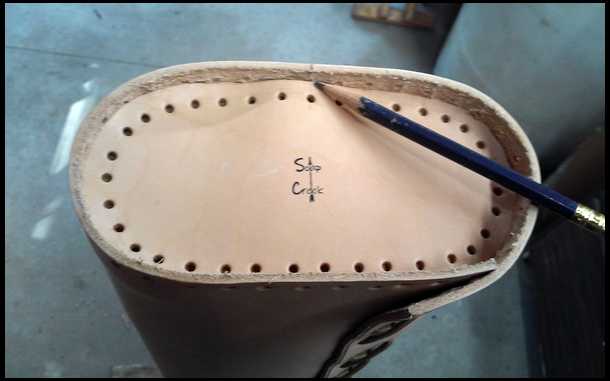
Place the bottom leather piece in place. Now starting with the mark on quiver mark holes on bottom.
|
|
| From: soap creek
|
|
|
|
|
|
|
| Date: 28-Apr-20 |
|
After holes are marked and punched. Make sure bottom piece and quiver have the same number of holes. If so we're ready to lace the bottom.
|
|
| From: soap creek
|
|
|
|
|
|
|
| Date: 28-Apr-20 |
|
The first 4 laces and the last 4 leave loose. This will help in finishing up the bottom.
|
|
| From: soap creek
|
|
|
|
|
|
|
| Date: 28-Apr-20 |
|
Now thread ends through loose lacing. Then go ahead and tighten and trim off excess.
|
|
|
|
| From: soap creek
|
|
|
|
|
|
|
| Date: 28-Apr-20 |
|
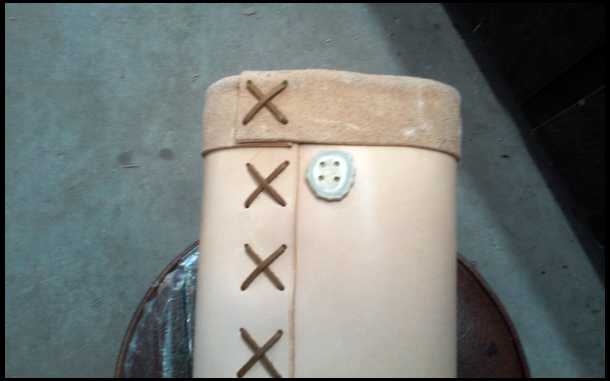
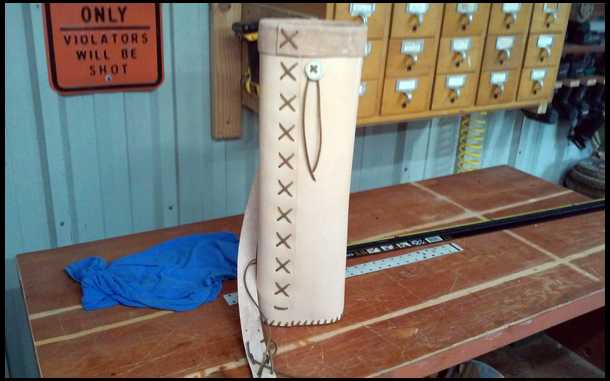
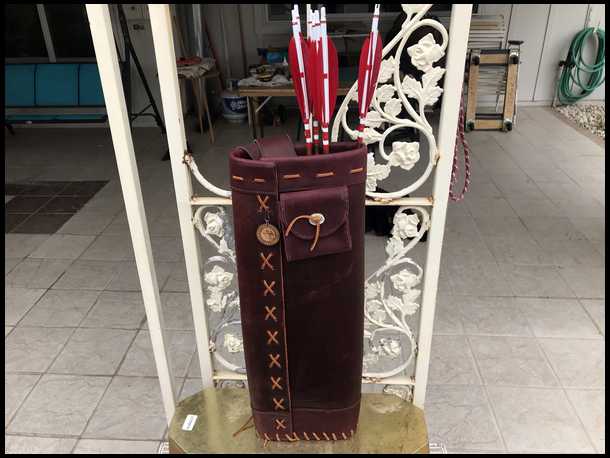
Time to install the divider. I use antler buttons. You can use whatever you like. This is where some use a pouch. I placed button in place to mark holes.
|
|
| From: soap creek
|
|
|
|
|
|
|
| Date: 28-Apr-20 |
|
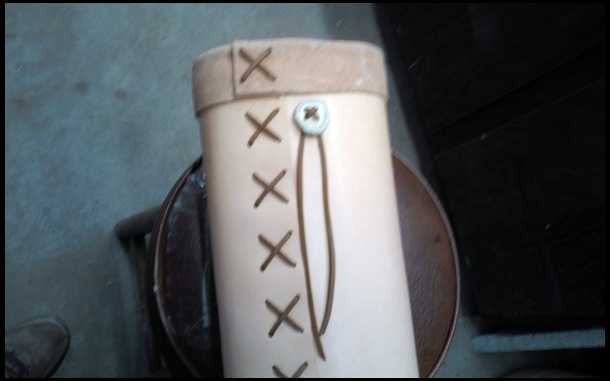
Thread lacing from back to front. Give a few twist then thread through front and antler button.
|
|
| From: soap creek
|
|
|
|
|
|
|
| Date: 28-Apr-20 |
|
The strap is 1 1/2in wide x 28in long. If you make it shorter you will need to make sure your strap lacing is longer to accommodate that.
|
|
| From: soap creek
|
|
|
|
|
|
|
| Date: 28-Apr-20 |
|
I put 6 holes in the top and 12 in the bottom. Its all however you like though.
|
|
| From: soap creek
|
|
|
|
|
|
|
| Date: 28-Apr-20 |
|
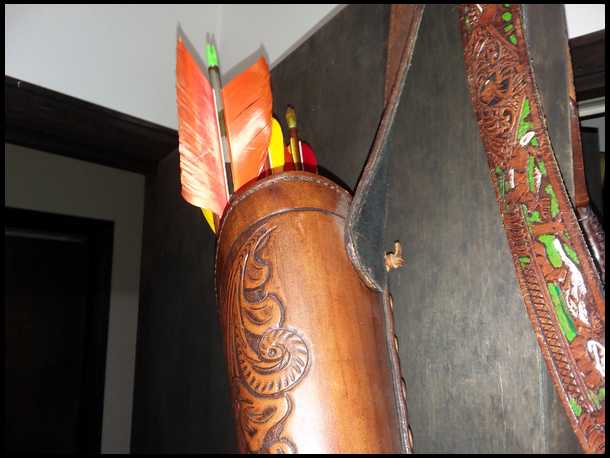
All that's left is to oil it up. It will turn a nice acorn color in time. Really doesn't take that long when exposed to the sun.
|
|
| From: soap creek
|
|
|
|
|
|
|
| Date: 28-Apr-20 |
|
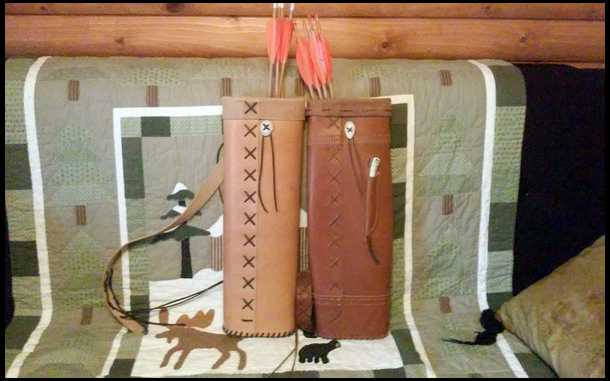
The only difference between these two quivers color wise is time spent in the sun. Both made from the same leather and treated with oil. No stain.
|
|
| From: fishin coyote
|
|
|
|
|
|
|
| Date: 28-Apr-20 |
|
Impressive, Thanks for the build along
|
|
|
|
| From: M60gunner
|
|
|
|
|
|
|
| Date: 28-Apr-20 |
|
Thank you for sharing. I like your presentation. Clear and easy to follow. Even this caveman can can understand it.
|
|
| From: Deno
|
|
|
|
|
|
|
| Date: 28-Apr-20 |
|
Great easy to follow build along Greg. Thanks
Deno
|
|
| From: GF
|
|
|
|
|
|
|
| Date: 28-Apr-20 |
|
Tidy as can be!
|
|
| From: Skeets
|
|
|
|
|
|
|
| Date: 28-Apr-20 |
|
Thanks. I like your quivers and the way you lace them. I attach my strap different though. I have made a few for my kids years ago. Your post here would have made it much easier, especially the bottom. Of course, there was no such thing as the internet back then!
|
|
| From: soap creek
|
|
|
|
|
|
|
| Date: 28-Apr-20 |
|
Yea Sleets the is a personal thing for sure. My old HH quiver rode more horizontal than what I make today. It just what I can reach the best. Takes less quiver bump. These days I like the arrow nocks between my head and my shoulder.
|
|
|
|
| From: soap creek
|
|
|
|
|
|
|
| Date: 28-Apr-20 |
|
Sorry Skeets spell check takes over sometimes.
|
|
| From: Skeets
|
|
|
|
|
|
|
| Date: 28-Apr-20 |
|
That's one of the nice things about your quivers. The strap can be easily changed by each individual to suit whatever they want. I was and still am thinking of ordering one or 2 for for the grandboys. Well I have 3 boys. Ages 7, 5 and 3. So how am I going to get away with 2 quivers!
|
|
| From: JusPassin
|
|
|
|
|
|
|
| Date: 29-Apr-20 |
|
I'm not a fan of back quivers, but your build along was top notch. Good job. I see you added a small knife sheath on the one. Nice touch too.
|
|
| From: soap creek
|
|
|
|
|
|
|
| Date: 29-Apr-20 |
|
Yea, the one with the knife is my personal quiver. When I built it I didn't have a piece of leather big enough, so I sewed 3 pieces together. Turned out ok so kept it for myself. Lol.
|
|
| From: Bud B.
|
|
|
|
|
|
|
| Date: 29-Apr-20 |
|
Glad to see you're still going with the quivers!!
I have enough for myself to last many years. I just wish I would last as long. ;-)
|
|
| From: Stoner
|
|
|
|
|
|
|
| Date: 01-May-20 |
|
Just found this thread, don't know how I missed it. Well maybe I do, just got a new computer and haven't been here for a week or so.
THANK YOU for the build-a-long. I have been wanting to build one these Hill style quivers forever. Now there's no excuse, jus' gotta git after it. Thank you again for sharing. John
|
|
| From: soap creek
|
|
|
|
|
|
|
| Date: 01-May-20 |
|
I buy all my leather and supplies from Springfield Leather Supply. I've had excellent service there.
|
|
| From: Tom McCool
|
|
|
|
|
|
|
| Date: 01-May-20 |
|
That is some very nice workmanship. The quiver has a great look too.
Thanks for the extra effort to share your talent with us all.
|
|
| From: Scooter Trash
|
|
|
|
|
|
|
| Date: 01-May-20 |
|
Nice build along. I have a small leather business. I make hand and neck straps for Chemnitzer Concertinas. I used to buy all my leather from Tandy, but I find myself buying more from Springfield Leather. I've stopped in there a couple times on the way back from hog hunting in Oklahoma and a pit stop at Black Widow. That store is Amazing.
|
|
| From: Stoner
|
|
|
|
|
|
|
| Date: 02-May-20 |
|
Greg one question I have is the top strap is laced hanging down, not up? Thanks John
|
|
| From: Wild Bill
|
|
|
|
|
|
|
| Date: 02-May-20 |
|
Nice build along, nice knife sheath too.
|
|
| From: MikeT
|
|
|
|
|
|
|
| Date: 02-May-20 |
|
Great build along. Did you just add the button for looks, or is there a divider inside the top? My back quiver is wide, I need to add a divider or two, I`ll use the buttons, they look great on there.
|
|
| From: cobra
|
|
|
|
|
|
|
| Date: 02-May-20 |
|
Very nice!
|
|
| From: soap creek
|
|
|
|
|
|
|
| Date: 02-May-20 |
|
The antler button is holding the divider. I have two holes on the back just above strap, and two holes behind button.
|
|
| From: soap creek
|
|
|
|
|
|
|
| Date: 02-May-20 |
|
Stone I'm not sure I understand your question regarding the strap.
|
|
| From: Andy Man
|
|
|
|
|
|
|
| Date: 02-May-20 |
|
Stoner- I got one for a friend- its EZ to tie it "UP" like a hill quiver or Nate steen
|
|
| From: MikeT
|
|
|
|
|
|
|
| Date: 02-May-20 |
|
he might be talking the top of the strap going "up" to go over the shoulder
|
|
| From: Stoner
|
|
|
|
|
|
|
| Date: 03-May-20 |
|
Thank you fella's, That is exactly what I was thinking. Over the shoulder. John
|
|
| From: soap creek
|
|
|
|
|
|
|
| Date: 03-May-20 |
|
Sorry Stoner. Just wasn't clicking in my pea brain.
|
|
| From: soap creek
|
|
|
|
|
|
|
| Date: 09-May-20 |
|
Here you go Dale. Maybe this will help.
|
|
| From: redheadlover
|
|
|
|
|
|
|
| Date: 09-May-20 |
|
I can attest to the build quality and beauty of a Soap Creek back quiver. I got one like in this build-along. It is the one that got the oil treatment. Waiting on a matching arm guard that's on its way to me.
|
|
| From: Barry Winner
|
|
|
|
|
|
|
| Date: 04-Jun-20 |
|
Thanks for the great build-a-long. I have a question regarding the depth of the quiver. Looks like this one is 22 inches deep. How do you decide on the correct depth for an archer? My arrows are 32 inches total in length (back of nock to tip of point). Would a 24 inch depth work better or is 22 pretty well standard? Thanks.
|
|
| From: MikeT
|
|
|
|
|
|
|
| Date: 04-Jun-20 |
|
Theres no rule, and DIY begs for custom. The last one I made is 24.5" at the tallest point for my 28" arrows. My fletching is just above the quiver. You could go taller
|
|
| From: Sunset Hill
|
|
|
|
|
|
|
| Date: 04-Jun-20 |
|
All depends. Backquivers work best if the arrows aren't too long compared to the quiver body and your arm length.
You can make a long quiver to accomodate long arrows. You can have arrows that are 2-4" longer than your draw. You can have a smaller body size. All are factors to make a backquiver not work for you.
If you shoot long arrows for tuning purposes that are longer in proportion to your actual draw length (arm length)...you will have a difficult time drawing it out of a "too long" quiver unless you make other arrangements.
That said....some guys don't mind backquivers that hang down to the back of their knees, some don't mind grabbing arrows under the feathers instead of the arrow nock, some don't mine arrows looking like spears sticking out of the quiver and catching on every tree branch they are around. It's up to you
|
|
| From: soap creek
|
|
|
|
|
|
|
| Date: 11-Jan-21 |
|
Found my old build a long thread. Thought it come in handy on some of these winter days.
|
|
| From: The Whittler
|
|
|
|
|
|
|
| Date: 11-Jan-21 |
|
soap creek, well done and very easy to follow thank you.
|
|
| From: okiebones
|
|
|
|
|
|
|
| Date: 11-Jan-21 |
|
Wish i would've started following this back in April.
|
|
| From: M60gunner
|
|
|
|
|
|
|
| Date: 11-Jan-21 |
|
Thanks for bringing this thread back up. Wish I could find one for a stitched quiver instead of laced. Not that I don’t like the lace but would like to try something different. I could join the leather club at the rec center, they have a leather sewing machine or just pay someone there to stitch it up.
|
|
|
|
| From: Kunzie
|
|
|
|
|
|
|
| Date: 15-Jan-21 |
|
Very good build-a-long. Thank you.
|
|
|
|
| From: 1sthound
|
|
|
|
|
|
|
| Date: 15-Jan-21 |
|
Very nice and informative
|
|
| From: Droptine
|

|
|
|
|
|
|
| Date: 16-Jan-21 |
|
Thanks for posting this
|
|
| From: Bud B.
|
|
|
|
|
|
|
| Date: 16-Jan-21 |
|
Quote: "Thanks for bringing this thread back up. Wish I could find one for a stitched quiver instead of laced. Not that I don’t like the lace but would like to try something different. I could join the leather club at the rec center, they have a leather sewing machine or just pay someone there to stitch it up."
Thomas,
You can hand stitch it yourself with a pack of needles, thread, and a simple stitch punch tool. I have stitched one up. It dies take a while. Just break it down into a few sessions. A stitching awl can work, too.
|
|
| From: Leathercutter
|
|
|
|
|
|
|
| Date: 16-Jan-21 |
|
Well done, thanks for posting
|
|
| From: Andy Man
|
|
|
|
|
|
|
| Date: 16-Jan-21 |
|
Realy clearly done
wish I had this when I built my first one
|
|
| From: M60gunner
|
|
|
|
|
|
|
| Date: 16-Jan-21 |
|
Bud B. From the pictures I have seen the stitched quivers the makers run two rows of stitches, side by side. Don’t know if I am that patient doing all that by hand.
|
|
| From: Drahthaar
|
|
|
|
|
|
|
| Date: 16-Jan-21 |
|
Nice, thanks for sharing. Forrest
|
|
| From: Tom McCool
|
|
|
|
|
|
|
| Date: 17-Jan-21 |
|
Fantastic! Thanks for sharing your talents and time with us.
|
|
| From: RonG
|
|
|
|
|
|
|
| Date: 17-Jan-21 |
|
Great and easy follow along, If I can follow without any questions then it is a fantastic presentation.
I am going to try that myself and you give a lot of great tips to save time and discouragement.
Thank You, now this is what this site needs more of.
|
|
| From: Aeronut
|
|
|
|
|
|
|
| Date: 17-Jan-21 |
|
Looks great.
I made a similar one many years ago and realized I am not a back quiver guy.
|
|
| From: soap creek
|
|
|
|
|
|
|
| Date: 03-Sep-21 |
|
With the interest in build-a-longs on another post I thought I'd bring this back up. One thing I do different (on Nate Steen's recombination) is use 5/32 lacing instead of 1/8. The 5/32 is easier to work with and stronger. I get Kodiak lacing from Tandy its more expensive but better.
|
|
| From: M60gunner
|
|
|
|
|
|
|
| Date: 03-Sep-21 |
|
Thanks agian for bringing this back up. I did save this to my favs. I made one from a piece of Latigo I have had for years. But since I made it I have modified it twice. A good thing when using lace. Also have had to move the strap. I fear now I made it a little short as I have an issue “bumping it up”” with my bow arm.
|
|
| From: White Falcon
|
|
|
|
|
|
|
| Date: 03-Sep-21 |
|
One I made. Good information Soap Creek.
http://www3.sympatico.ca/ragiwarmbear/diy/bc/backplan.html
|
|
| From: Buckeye
|
|
|
|
|
|
|
| Date: 03-Sep-21 |
|
Great , Just when I thought I had too many projects already , now I need to make a quiver! Thanks for the build along , very informative and easy to follow. One question. Is there something sitting on top of the bottom piece of leather to protect it from the points/broadheads?
|
|
| From: Andy Man
|
|
|
|
|
|
|
| Date: 03-Sep-21 |
|
put a piece of carpet in the bottom
|
|
| From: M60gunner
|
|
|
|
|
|
|
| Date: 03-Sep-21 |
|
I use a piece of foam about 1/2” thick for field points. For broadheads I have a piece of 12oz leather I cut to fit bottom. The carpet works well also.
|
|
| From: soap creek
|
|
|
|
|
|
|
| Date: 03-Sep-21 |
|
I don't use anything for field points. For broadheads I like carpet the best but another piece of leather works too. I always thought the carpet held them in place a little better.
|
|
| From: Buckeye
|
|
|
|
|
|
|
| Date: 03-Sep-21 |
|
Thanks Greg
|
|
If you have already registered, please sign in now
For new registrations Click Here
|
|
|
|