| From: Nemah
|
|
|
|
|
|
|
| Date: 30-Mar-17 |
|
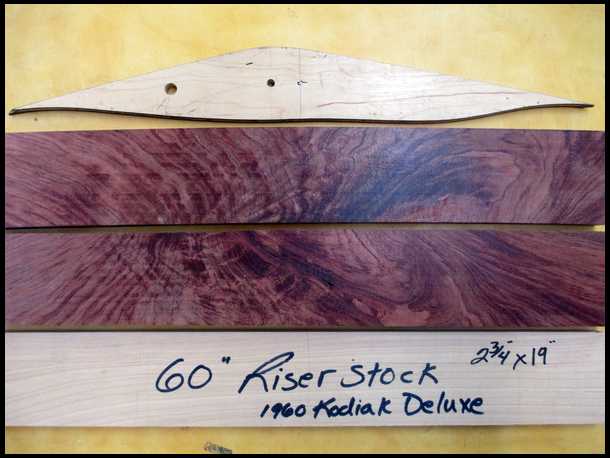
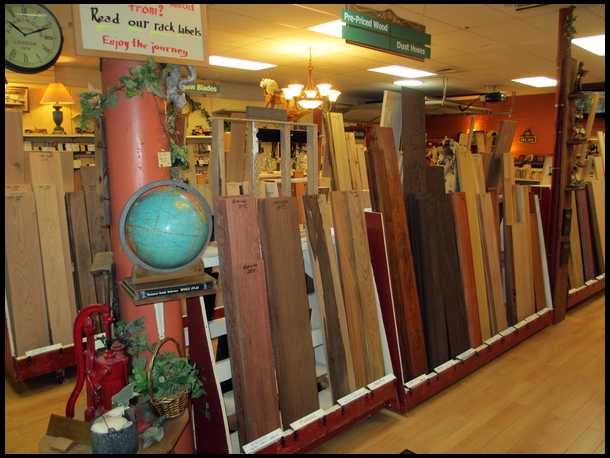
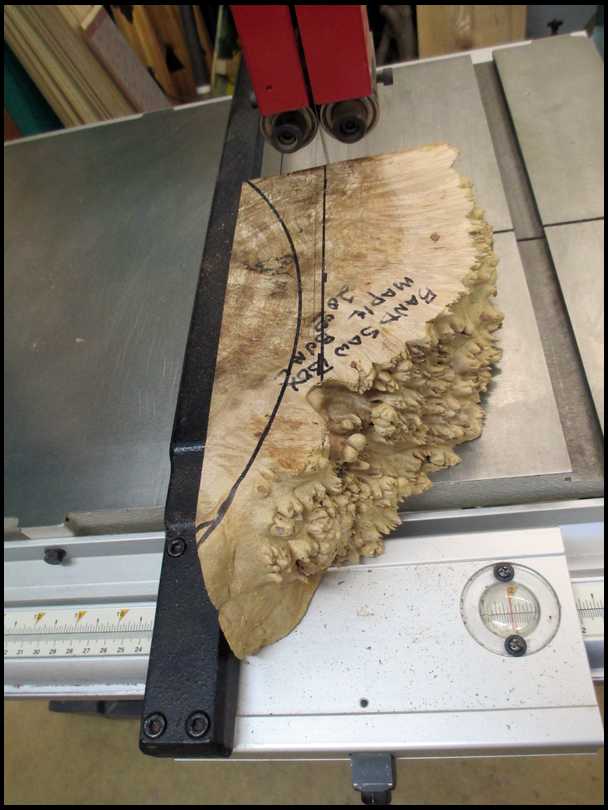
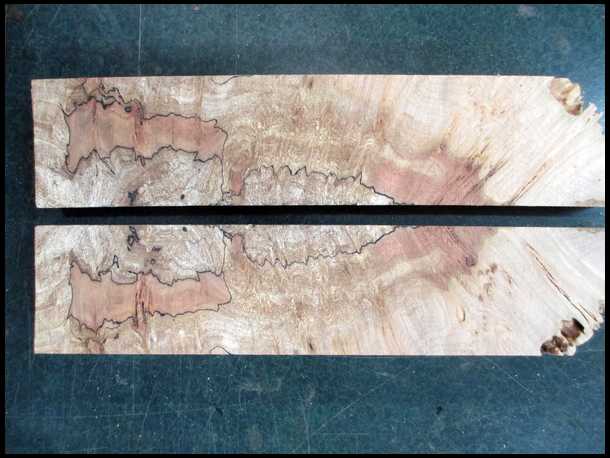
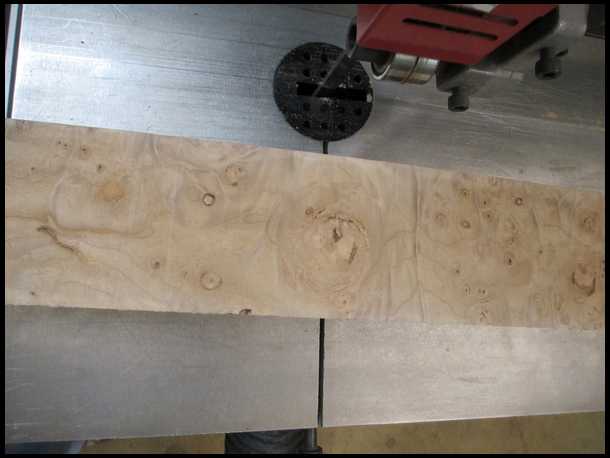
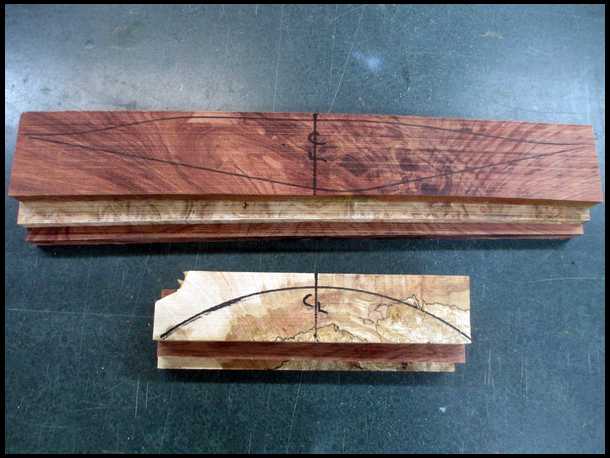
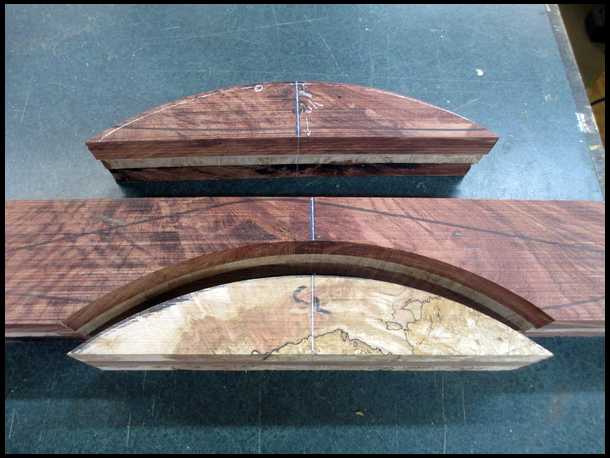
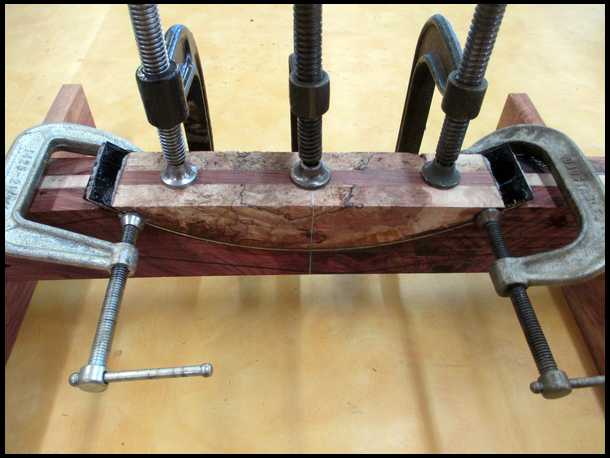
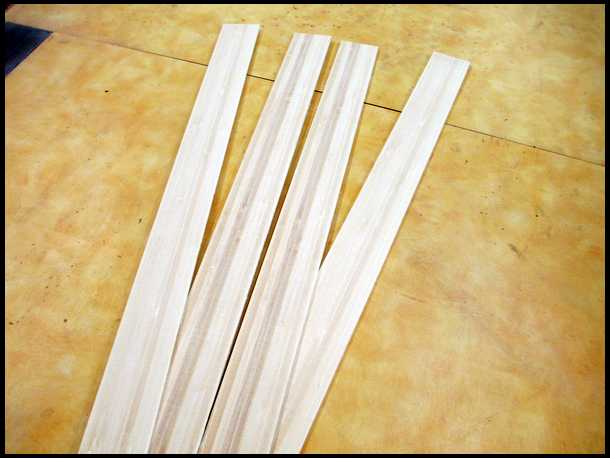
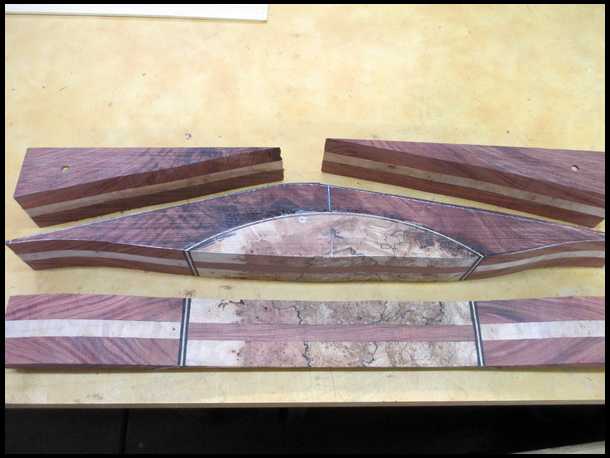
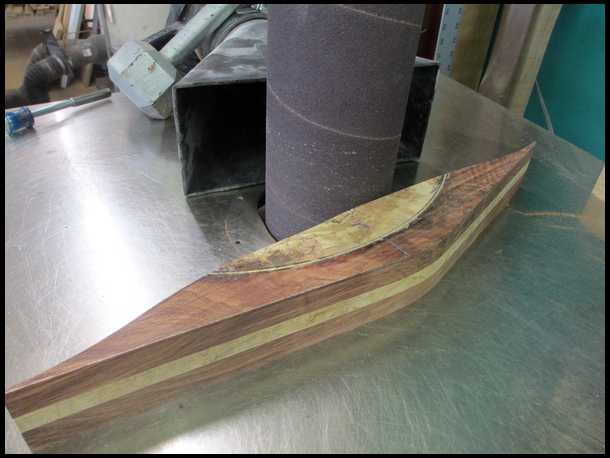
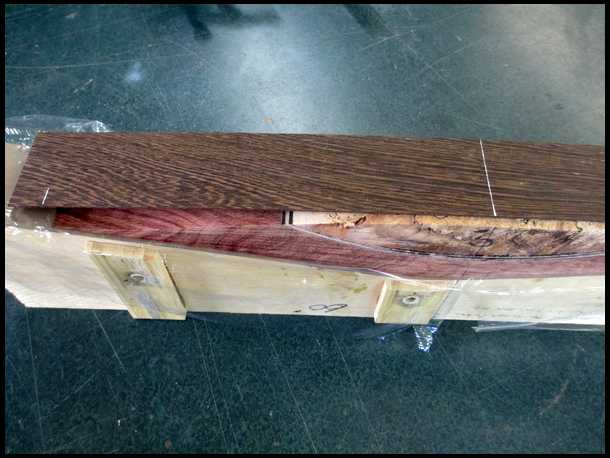
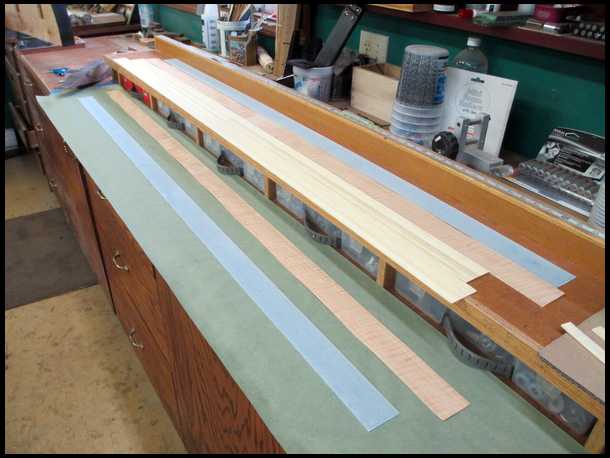
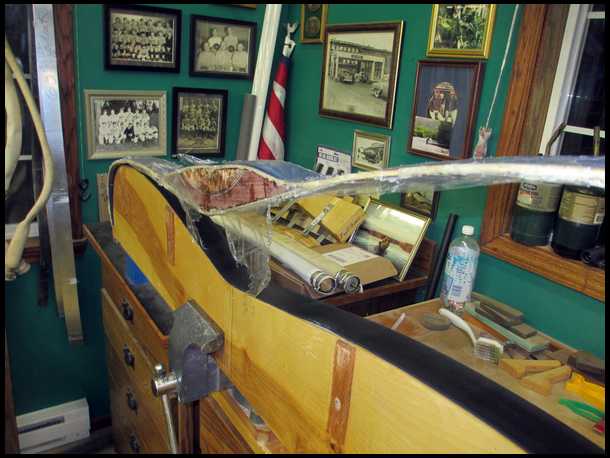
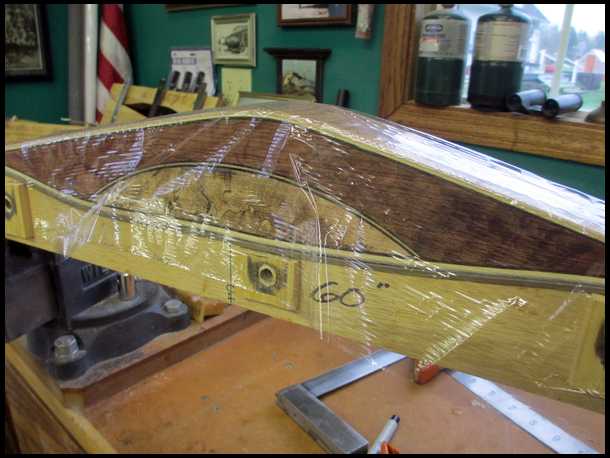
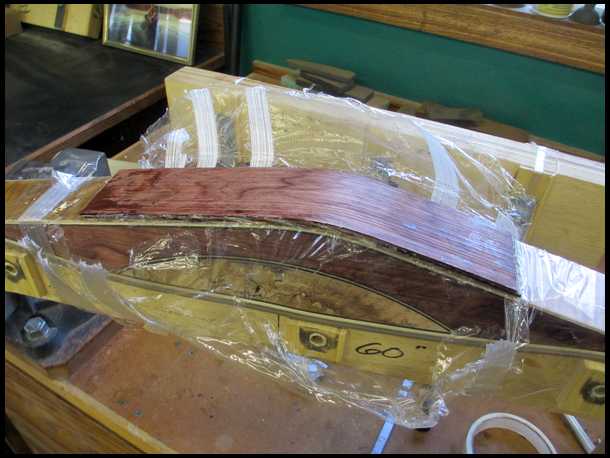
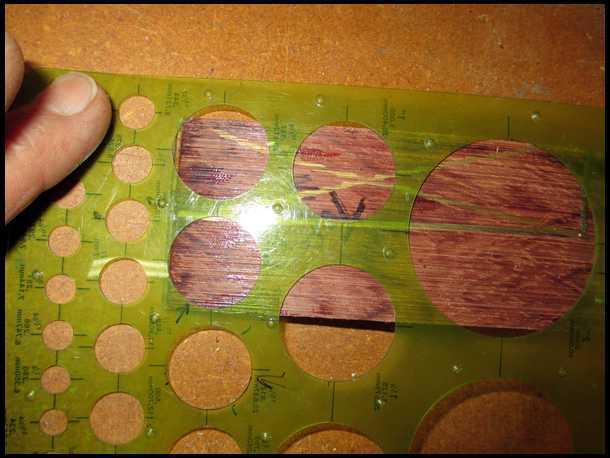
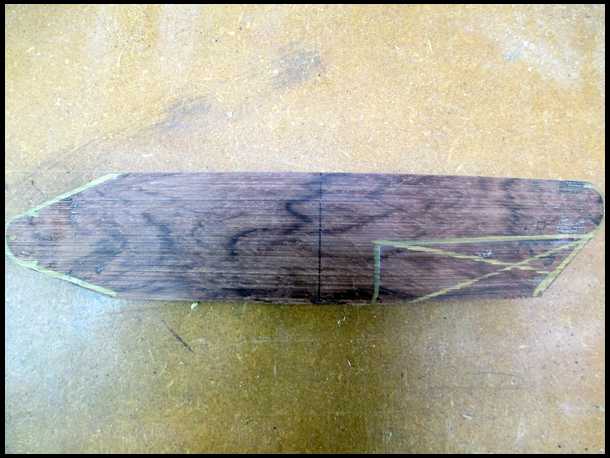
So here we go! These two Bubinga boards will make up the outside of the riser for a copy of a 60" 1960 Bear Archery Kodiak Deluxe. I try to cut my stock to the size of the pattern board. It makes all the gluing and cutting in the future much easier. I'm still trying to decide on the wood for the riser center and grip, and your suggestions are much appreciated!
|
|
| From: Nemah
|
|
|
|
|
|
|
| Date: 30-Mar-17 |
|
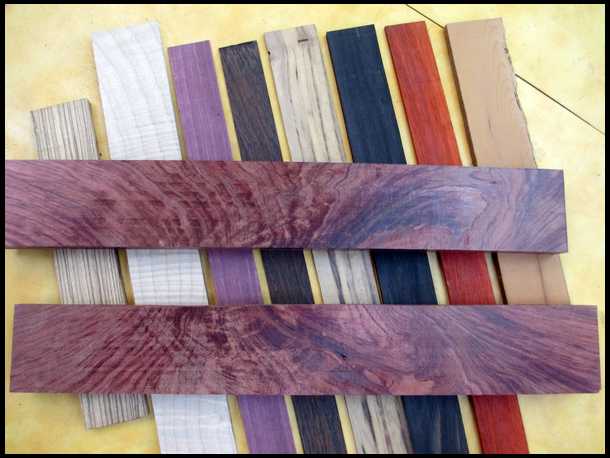
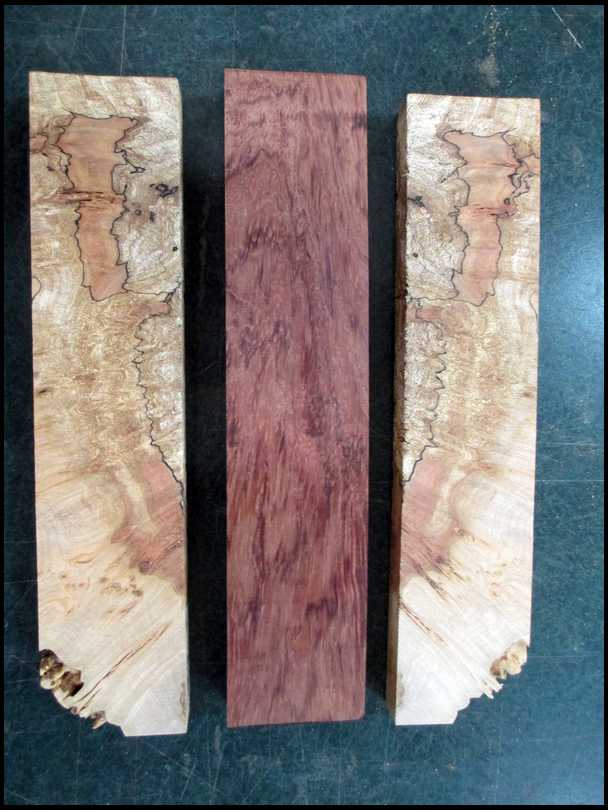
Which wood? Still trying to decide. I found out that rushing a bow is deadly, so I'll take my time. And remember, if you don't like the results, you can always build another one!
|
|
| From: bodymanbowyer
|
|
|
|
|
|
|
| Date: 30-Mar-17 |
|
You got that right Richard :-) can always build another one. JF
|
|
| From: mgerard
|
|
|

|
|
|
|
| Date: 30-Mar-17 |
|
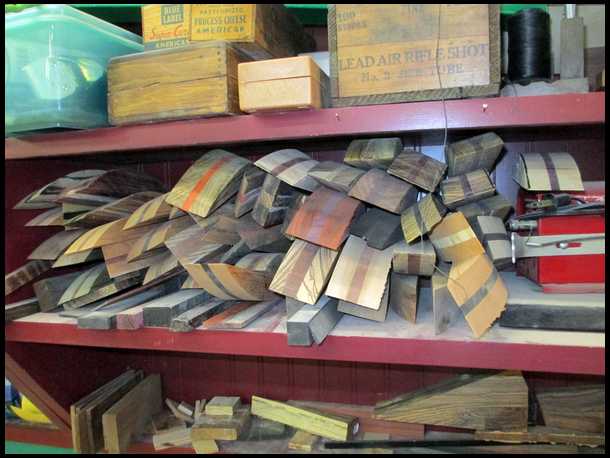
Always a market for well made "ugly" bows! I like #3,#4, or #6 left to right.
|
|
| From: Blackhawk
|
|
|
|
|
|
|
| Date: 30-Mar-17 |
|
I like the contrast that #4 and #6 (from L-R) would provide.
...but save that B&W ebony for me...:)
|
|
| From: joe vt
|
|
|
|
|
|
|
| Date: 30-Mar-17 |
|
That is some wonderful pieces of bubinga! I'm kinda liking board #1 or #5
#6 would indeed make a nice contrast.
|
|
| From: cueman
|
|
|
|
|
|
|
| Date: 30-Mar-17 |
|
I don't know Richard, ebony and bubinga with curly maple limb veneers, or green glass? Bubinga with curly maple and black veneer in the riser and black glass? Allot of great combinations with those woods. Whatever you decide I am sure it will be beautiful and you know I need a partner for my other one!
|
|
| From: M60gunner
|
|
|
|
|
|
|
| Date: 30-Mar-17 |
|
I would go with the Maple. Is there a way I could beg, borrow, or steal a paper copy of your riser template? I am challenged when it comes to drawing. This would make a neat project for the summer months.
|
|
| From: Nemah
|
|
|
|
|
|
|
| Date: 30-Mar-17 |
|
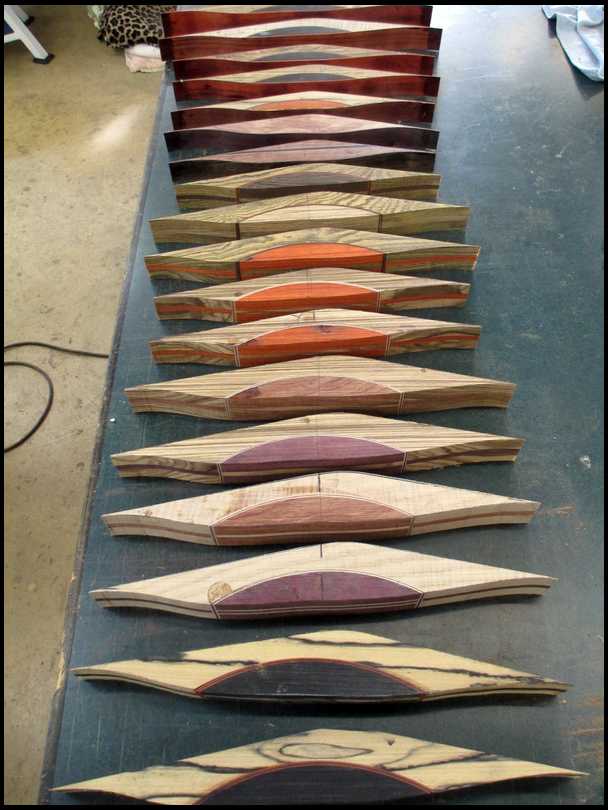
That #5 is actually Oregon Myrtle. I've decided to make a 54" at the same time, out of the same 6' board I got the figured wood from. I'm still trying to decide on the accent wood. The last 2 months have been the wettest on record here in Olympia, WA, rain and cold almost every day. So this is what happens when I couldn't get outside.
|
|
| From: Nemah
|
|
|
|
|
|
|
| Date: 30-Mar-17 |
|
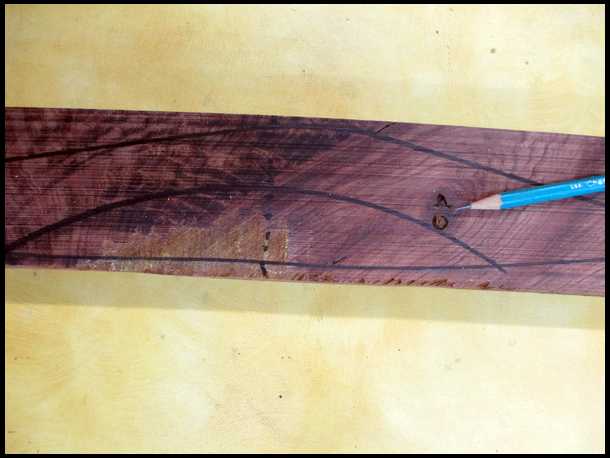
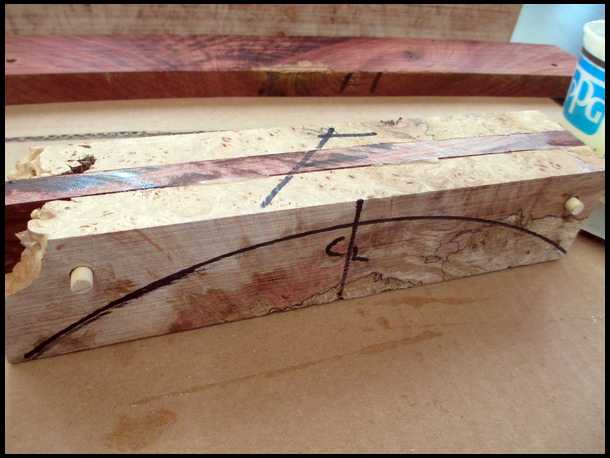
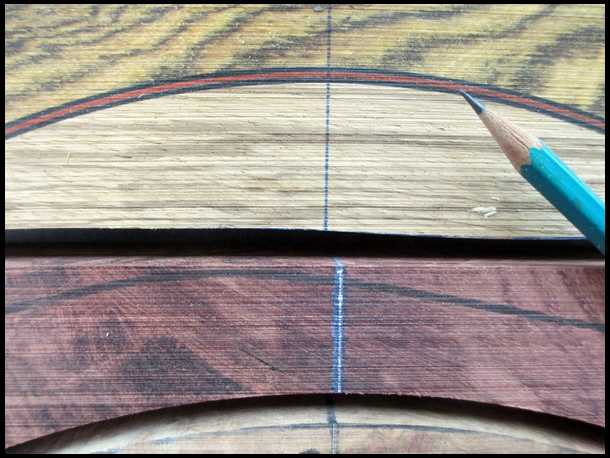
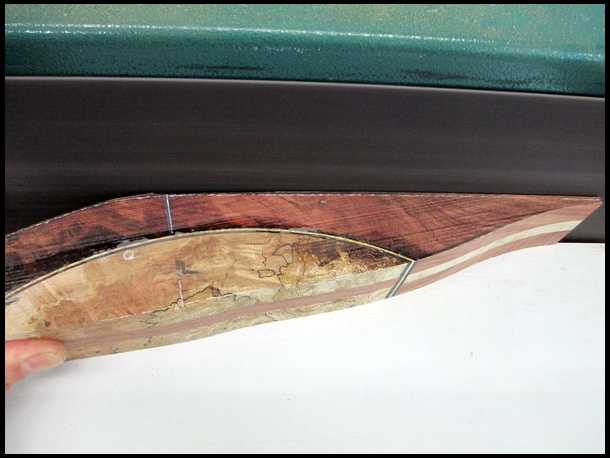
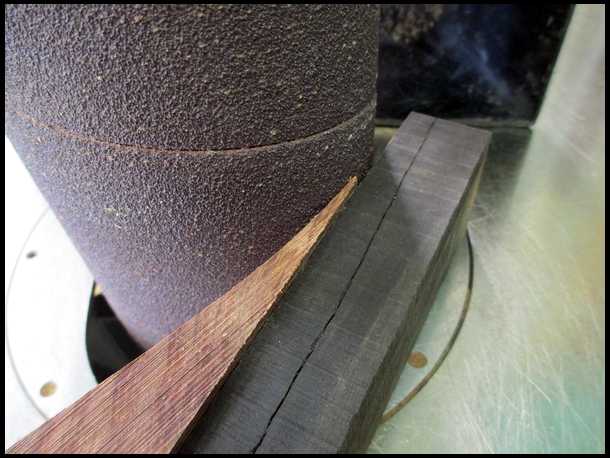
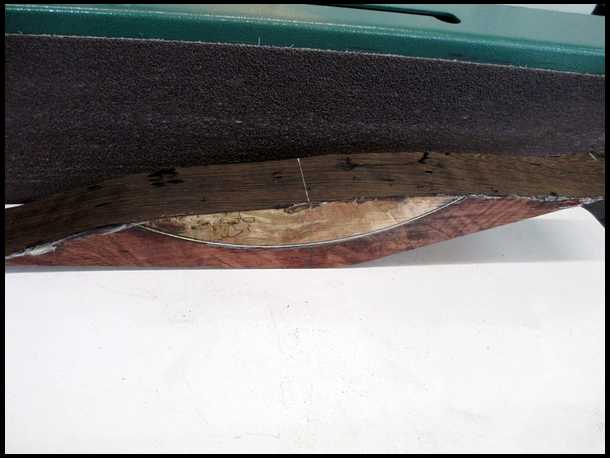
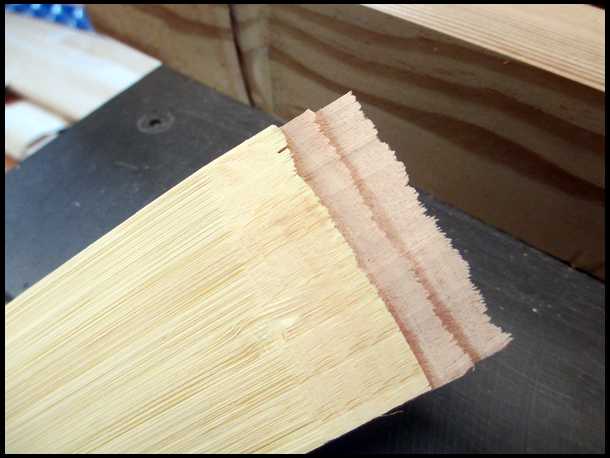
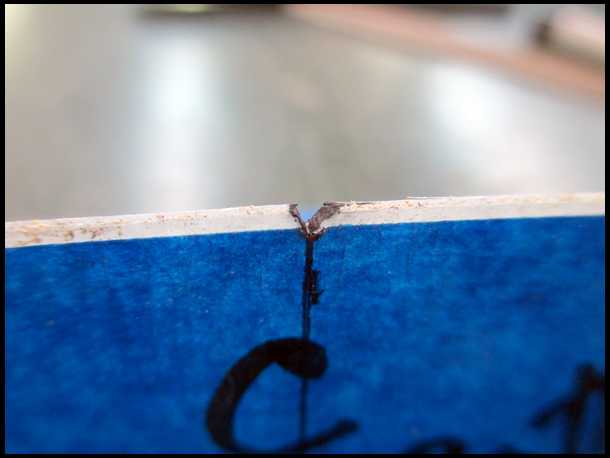
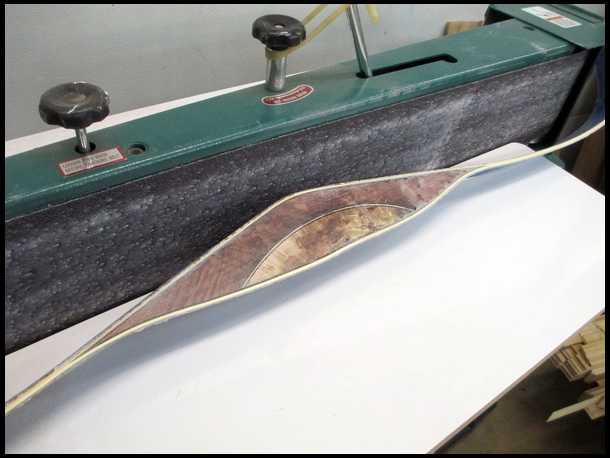
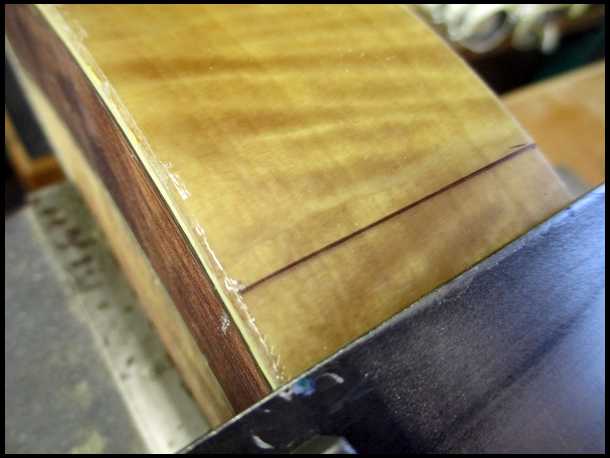
I ran into a little challenge while running the boards thru the sander. There is a knot and a little patch of decayed wood showing on one piece. I could position my template such that the knot would be removed when I cut the site window and the rot would be cut out when I cut the grip arc.
|
|
| From: Nemah
|
|
|
|
|
|
|
| Date: 30-Mar-17 |
|
Or...I can simply place this side against the center "I-beam" and forget about it. The rot will be replaced by the grip, and the other side of the board is just as nice. You will ALWAYS run up against these problems when bow building, and I find that it's sometimes best to quit for the day, walk the dogs, shoot your bow, or do yardwork, and the solution will very often come to you. Remember,....never rush! Now it's sunny, so I better mow our lawn! More tomorrow. Now.......which contrast wood????
|
|
| From: zonic
|
|
|
|
|
|
|
| Date: 30-Mar-17 |
|
Great buildalong, Richard. Awesome to witness your process.
|
|
| From: mgerard
|
|
|
|
|
|
|
| Date: 30-Mar-17 |
|
I like those risers with the orange color in. Neat. Guess i better shut up and see what YOU choose :>)
|
|
| From: RymanCat
|
|
|
|
|
|
|
| Date: 30-Mar-17 |
|
Purty sharp.
|
|
| From: cueman
|
|
|
|
|
|
|
| Date: 30-Mar-17 |
|
Holy cow Richard, a bow building mad man here. Thanks for the doing the build along, love these kind of threads.
|
|
| From: crookedstix
|
|
|
|
|
|
|
| Date: 30-Mar-17 |
|
I think the accent wood should be of bland grain and either very light or very dark. The contrast and the blandness will isolate and accentuate the bubinga's figure, rather than compete with it. Black phenolic would be nice as well.
|
|
| From: Kodiak
|
|
|
|
|
|
|
| Date: 30-Mar-17 |
|
Loving this thread. Thanks for taking the time to do it.
|
|
| From: muddyIA
|
|
|
|
|
|
|
| Date: 30-Mar-17 |
|
No matter the wood choice Jeff will buy it!
|
|
| From: Corson2010
|
|
|
|
|
|
|
| Date: 30-Mar-17 |
|
What's the best way to buy one of these?!? I love em!
|
|
| From: GF
|
|
|
|
|
|
|
| Date: 30-Mar-17 |
|
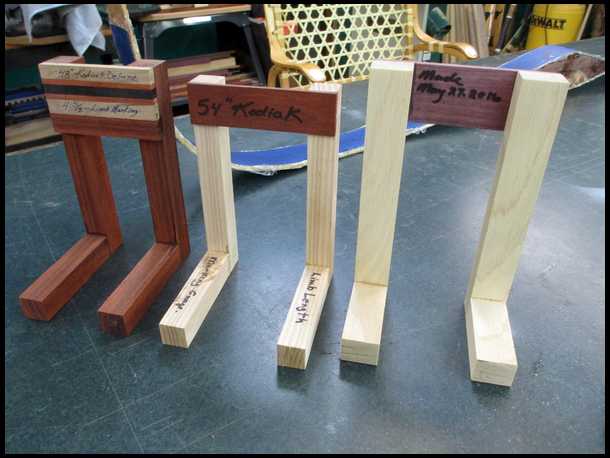
I like #2 and #5, myself...
And those two risers at the bottom of that third pic are just.... Va-Va-Voom!
|
|
| From: Gator1
|
|
|
|
|
|
|
| Date: 30-Mar-17 |
|
Thank you for sharing. This is going to be fun to follow
|
|
| From: Nemah
|
|
|
|
|
|
|
| Date: 30-Mar-17 |
|
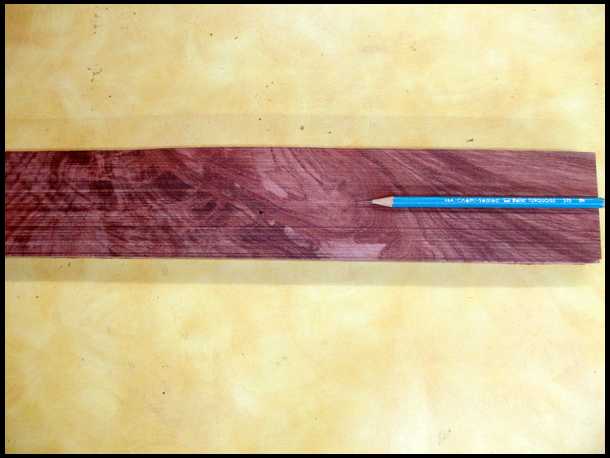
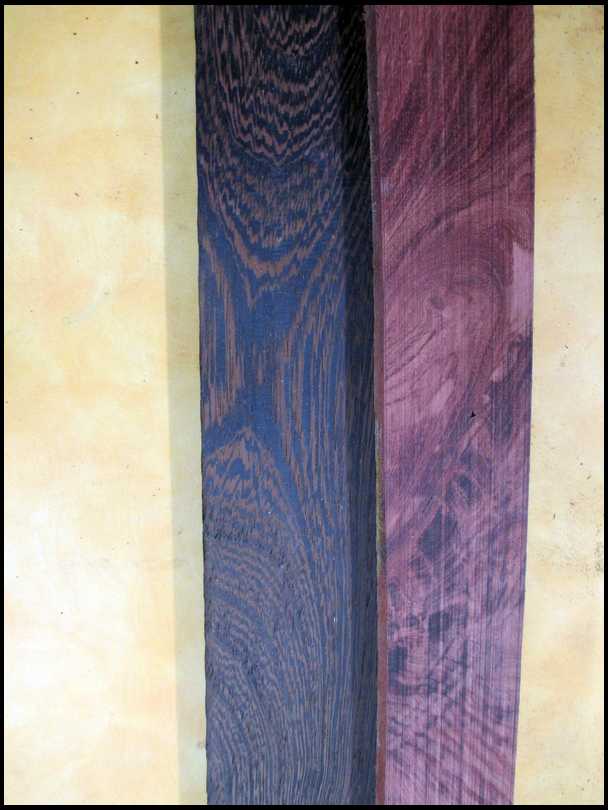
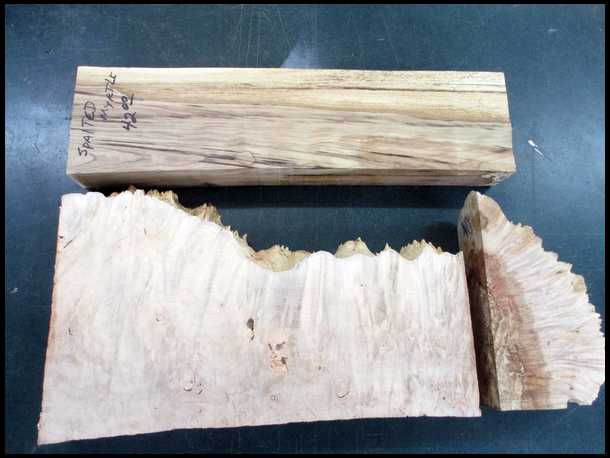
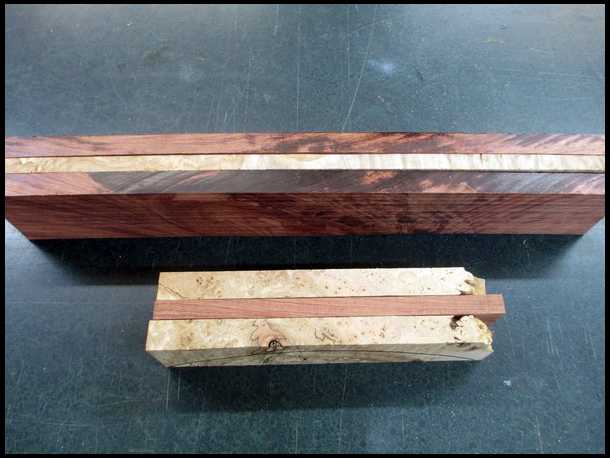
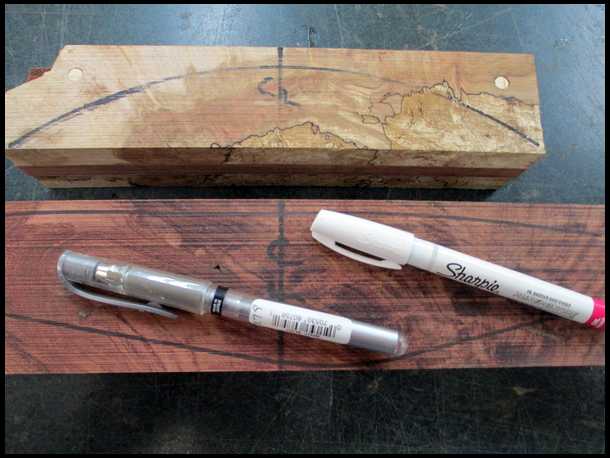
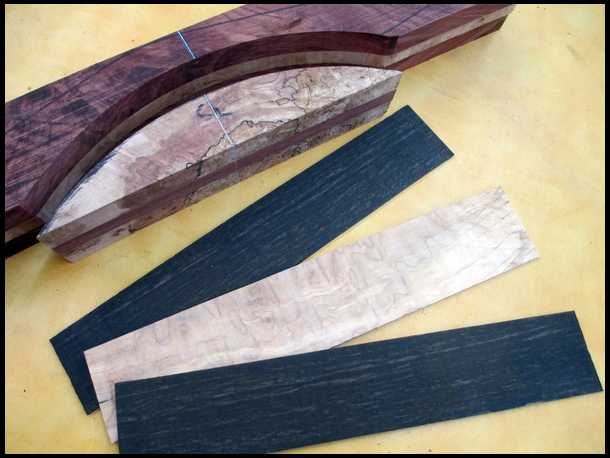
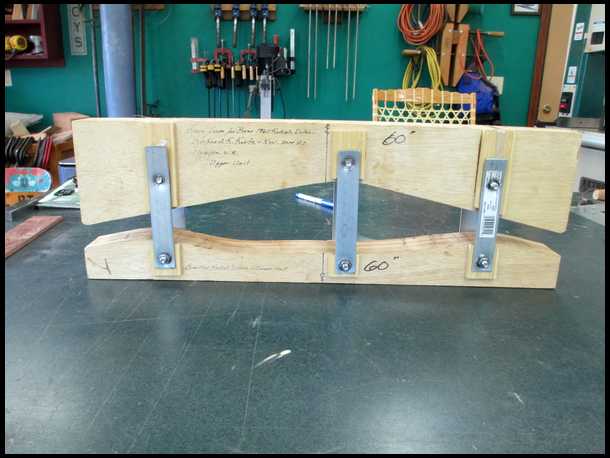
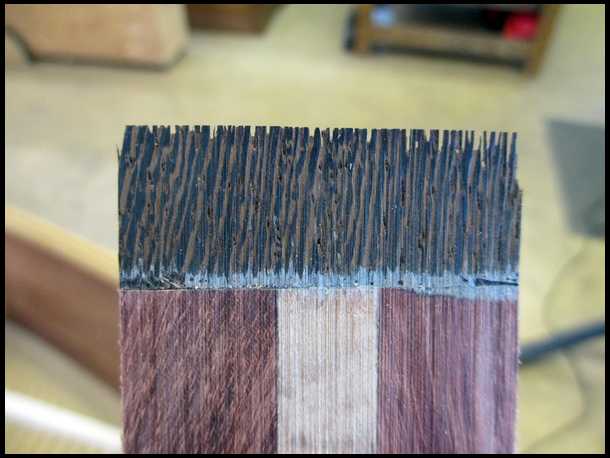
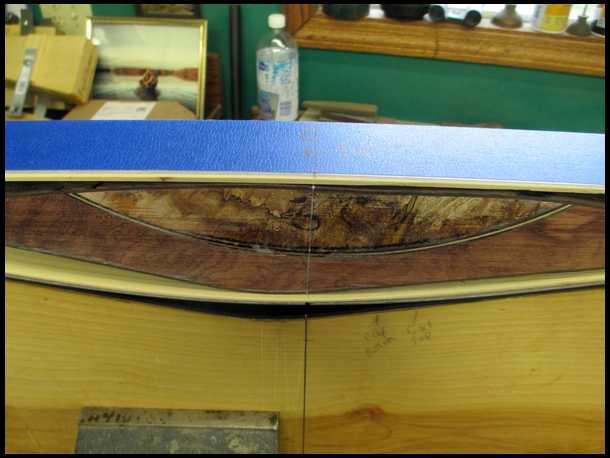
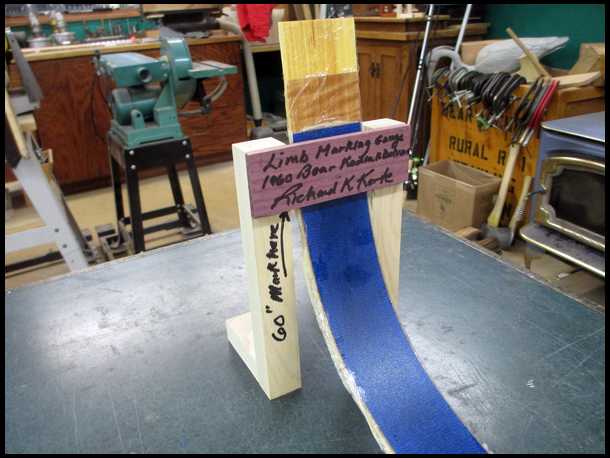
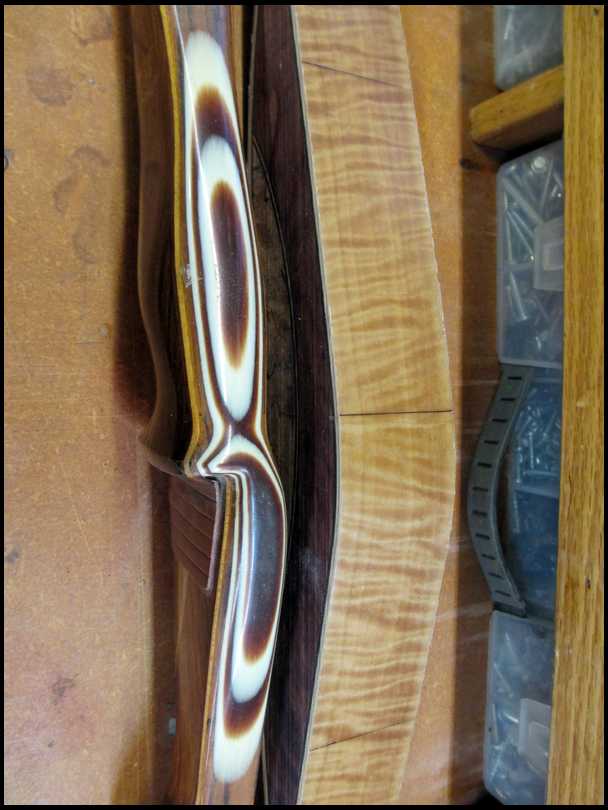
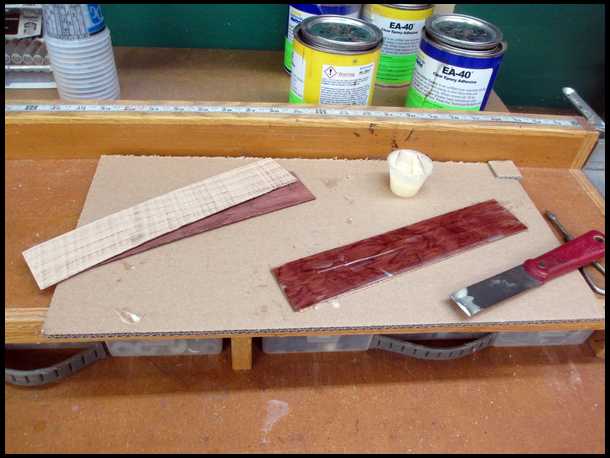
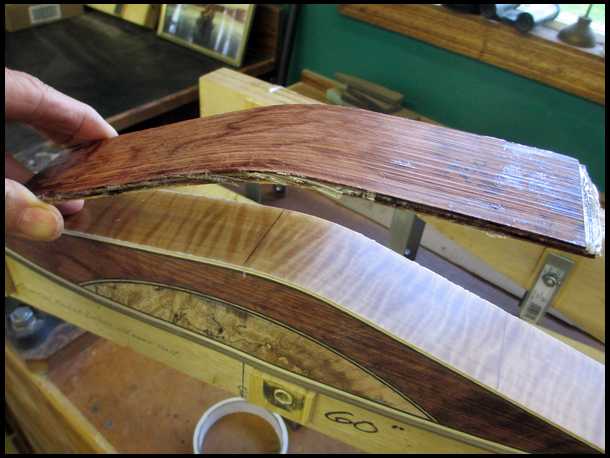
That orange looking wood in the group of risers is Padauk. It will darken greatly with age and turn out to be a dark, rich red. OK! I've decided to use Wenge in the 54" riser after walking my 2 Golden Retrievers and the neighbors' Chocolate Lab. The young Golden Retrievers' deep red coat and the dark brown of the lab looked great together. Inspiration comes in mysterious forms! The photo is the Wenge I'll use compared with the 60" riser block. What do you think?
|
|
| From: Nemah
|
|
|
|
|
|
|
| Date: 30-Mar-17 |
|
ooppss! Forgot to post the photo! Here it is.
|
|
| From: mgerard
|
|
|
|
|
|
|
| Date: 30-Mar-17 |
|
When Jeff suggested it was a good idea. When I suggested it...great :>) Thanks for the build along. I enjoy following these.
|
|
| From: Scooby-doo
|
|
|
|
|
|
|
| Date: 30-Mar-17 |
|
I really like Wenge but it is tough to get it to take a finish, isn't it? Shawn
|
|
| From: Gator1
|
|
|
|
|
|
|
| Date: 30-Mar-17 |
|
Awesome.
|
|
| From: ca
|
|
|
|
|
|
|
| Date: 30-Mar-17 |
|
High quality.
|
|
| From: Nemah
|
|
|
|
|
|
|
| Date: 30-Mar-17 |
|
No problem finishing Wenge. I use several coats of marine epoxy which fills the pores completely. Smooth as glass!
|
|
| From: badshotdb
|
|
|
|
|
|
|
| Date: 31-Mar-17 |
|
I will be following along to see how they turn out. Thanks for taking the time for a build along.
|
|
| From: oldman
|
|
|
|
|
|
|
| Date: 31-Mar-17 |
|
Oh my, what some people do with their spare time. Looking forward to following your build along. Thank you for the posting. Gil
|
|
| From: Nemah
|
|
|
|
|
|
|
| Date: 31-Mar-17 |
|
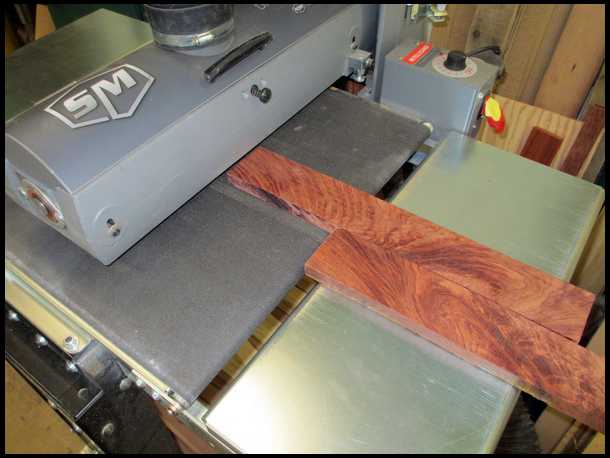
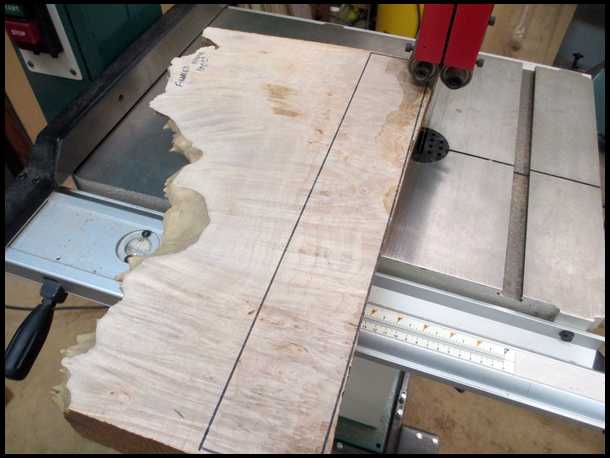
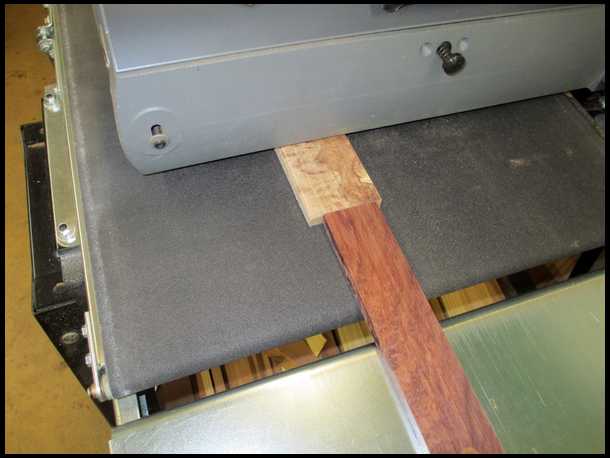
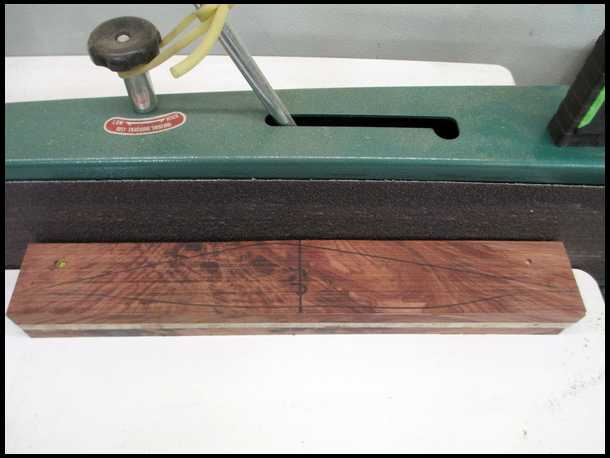
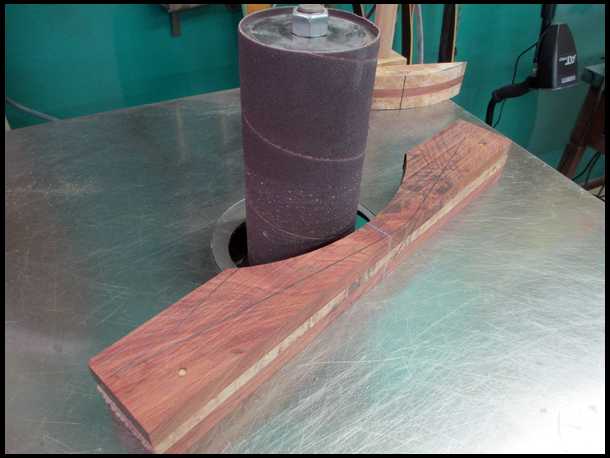
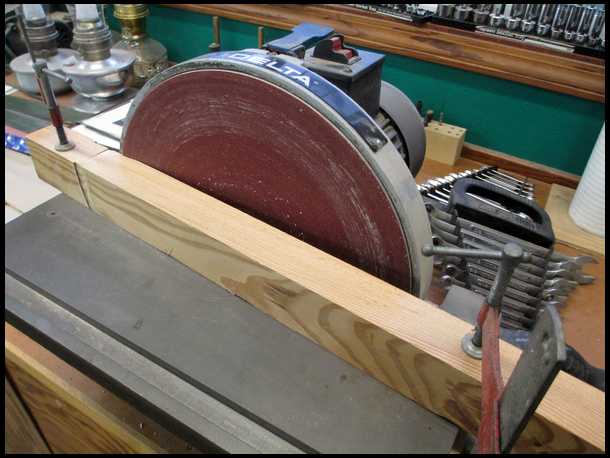
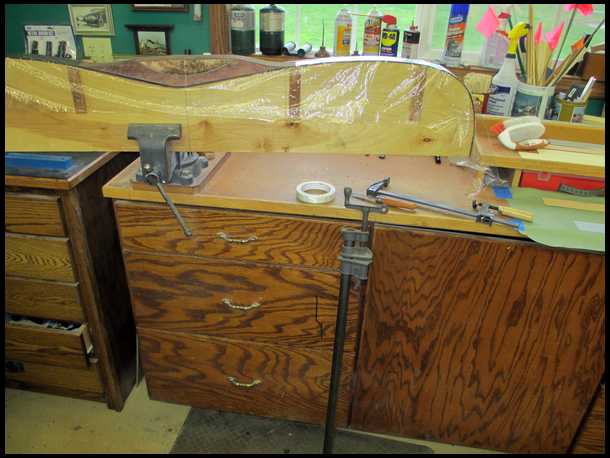
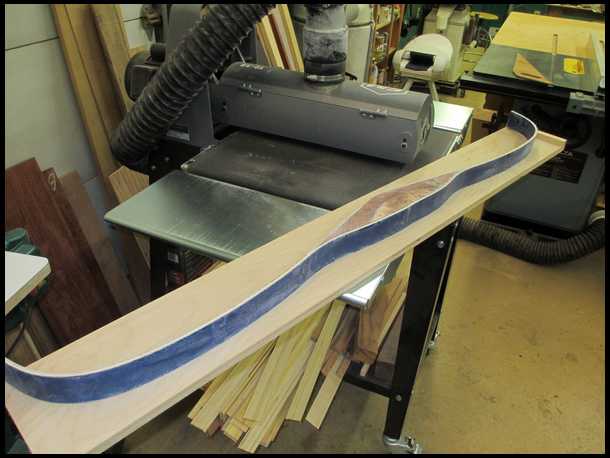
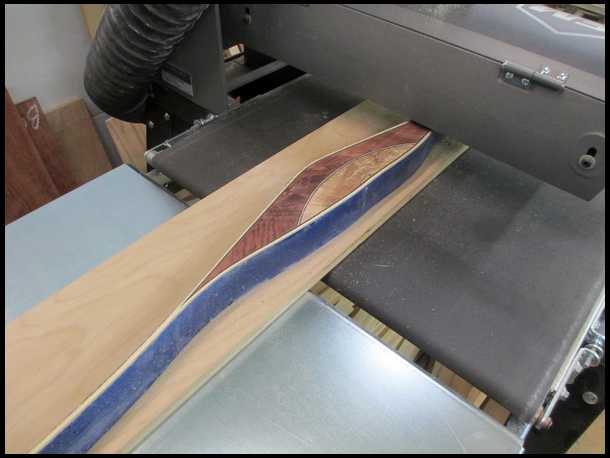
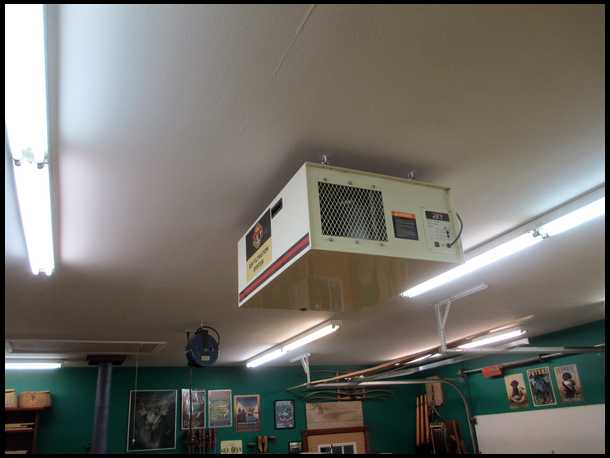
Good morning all! Another rare day here in Olympia...no rain! Here is a picture of my Supermax 1938 drum sander doing it's job perfectly! I tried a Grizzly 12" Baby drum sander, but never was satisfied with it's accuracy due to the inconsistency of it's Velcro-sandpaper attachment system. The Supermax has a solid drum and produces excellent, consistent results. I use a lot of oily woods like Bocote and Verawood, so I use 36 grit paper to achieve strong glue joints. I've decided to use highly figured Maple with the figured Bubinga. When wood choices are made, I must consider all aspects of the bow, like limb glass, overlays, and tip color. Thanks to all of you for your kind comments and suggestions! Richard
|
|
| From: M60gunner
|
|
|
|
|
|
|
| Date: 31-Mar-17 |
|
Question, have you ever used Koa? I have a couple of pieces that started out as stock for Gibson Guitar. Wondering how it would hold up to our heat and super dry climate here in Phx., AZ. area. Thanks, TomM
|
|
|
|
| From: Nemah
|
|
|
|
|
|
|
| Date: 31-Mar-17 |
|
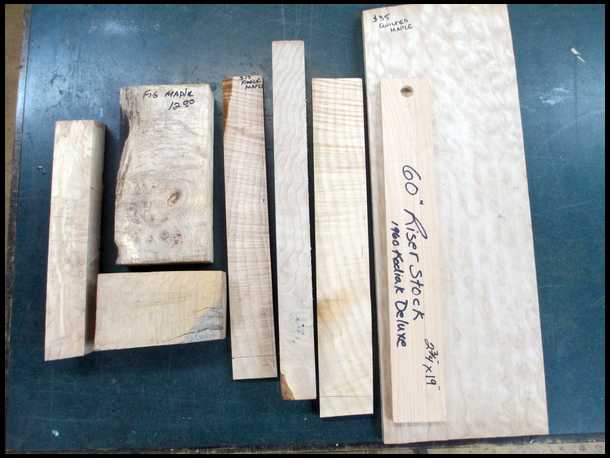
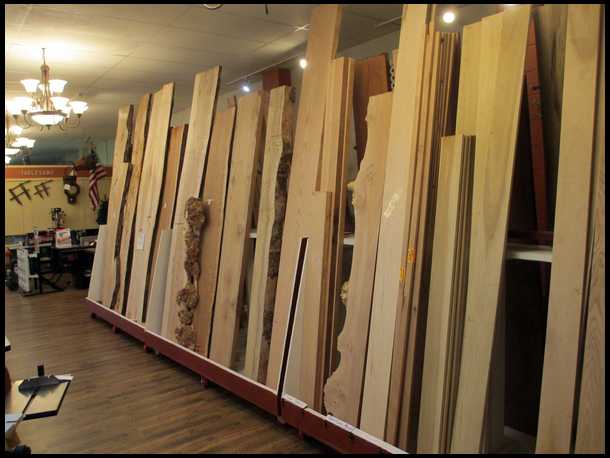
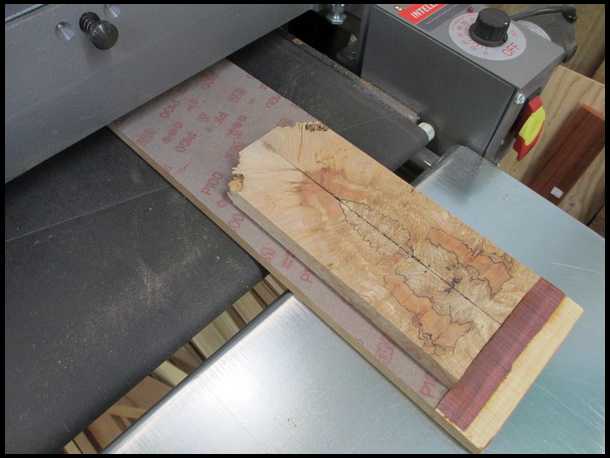
Never tried Koa, so I don't know much about it. After going thru all my wood piles, this is all the Maple I have on hand. I need a piece the same dimensions as the template.
|
|
| From: Nemah
|
|
|
|
|
|
|
| Date: 31-Mar-17 |
|
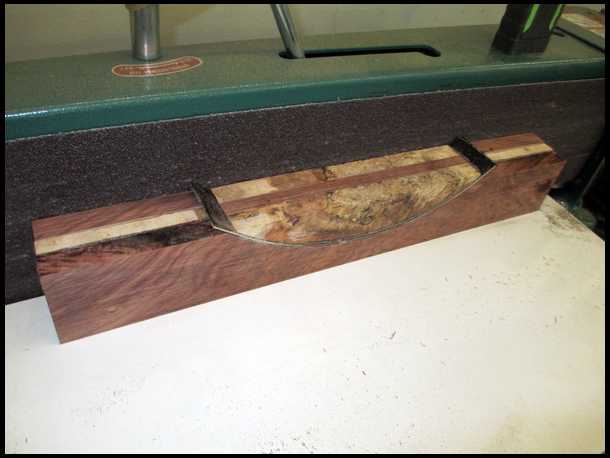
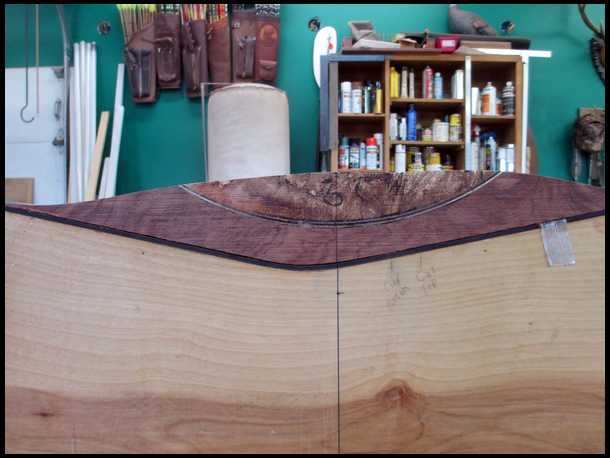
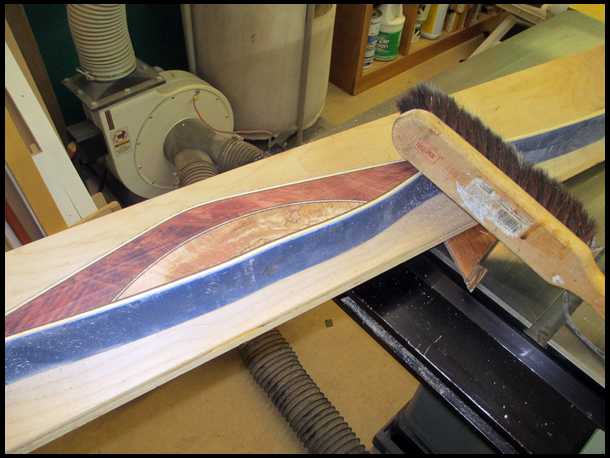
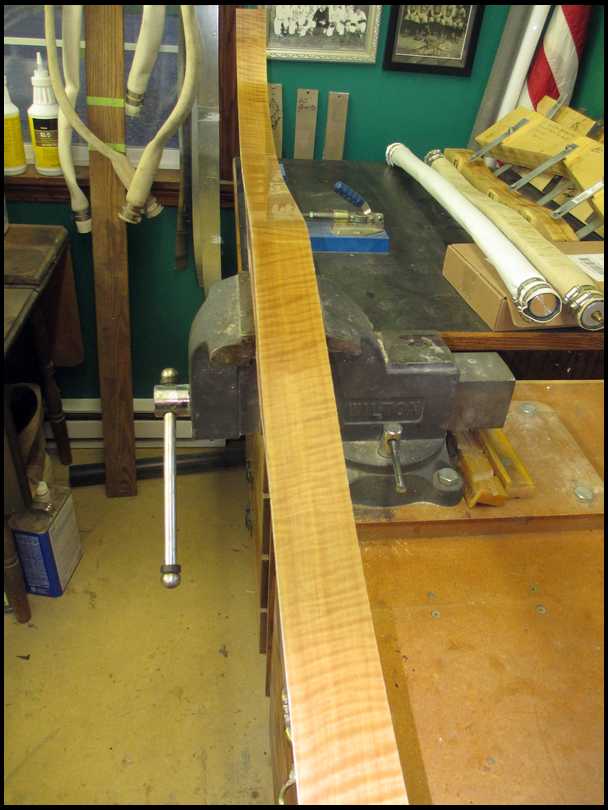
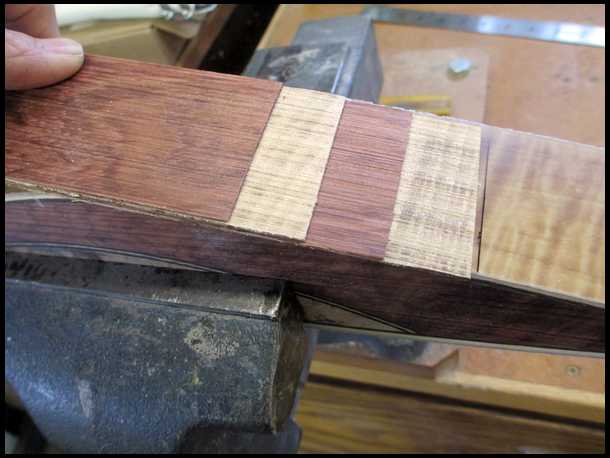
The only part of the Maple I-beam that will show is pointed out by the dividers, but I want it to be spectacular. The grip will show most of the Maple's character, so it has to be highly figured and unique. I'm going to have search for that special piece, so it's off to the Woodworking Shop in Sumner, WA.
|
|
| From: Nemah
|
|
|
|
|
|
|
| Date: 31-Mar-17 |
|
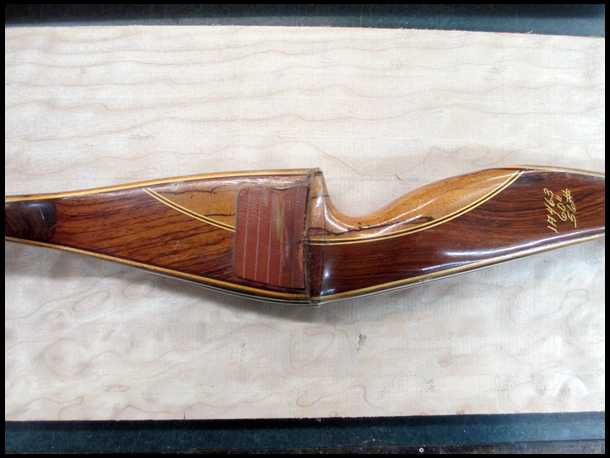
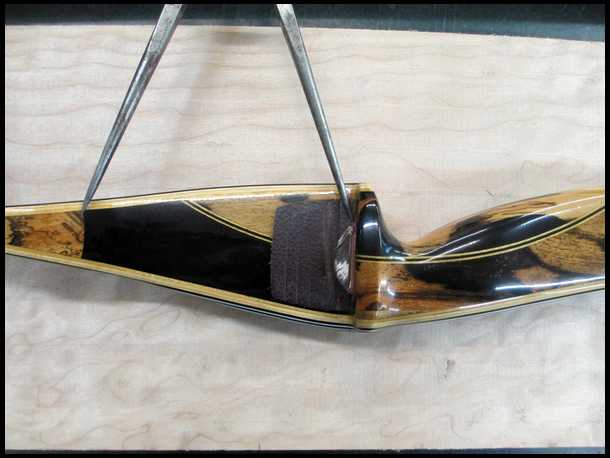
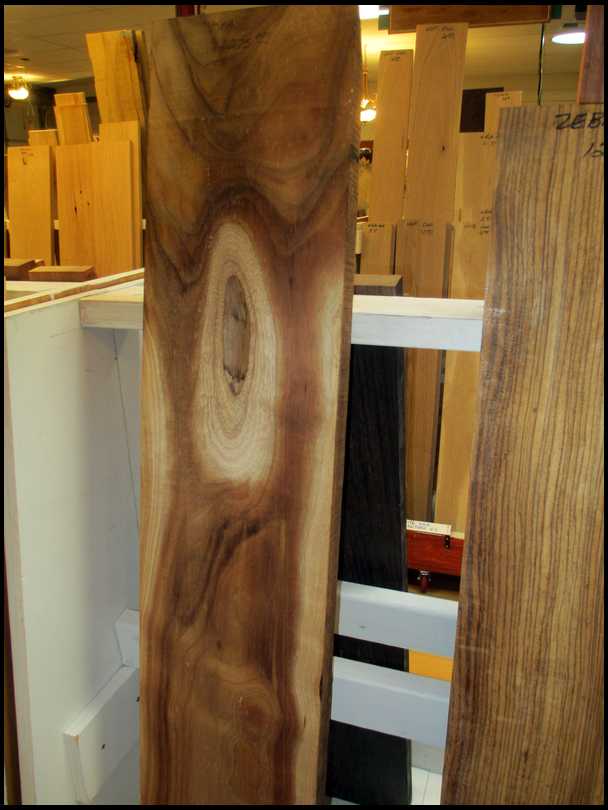
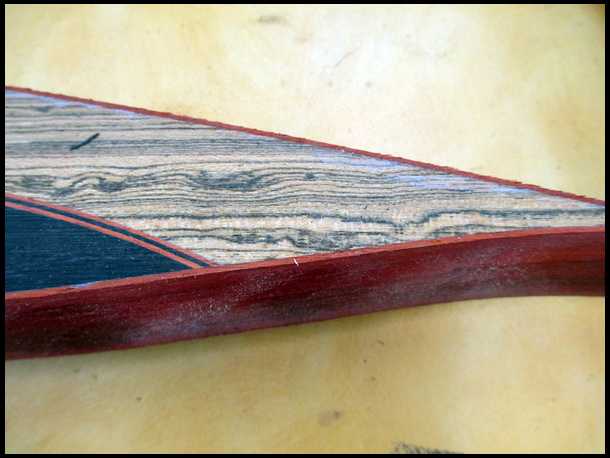
Here's the bow I took all my patterns from. The grip is made up of 2 pieces of Zebrawood, laminated together, but I add a center piece of contrasting wood, usually the same color as the main part of the riser. This bow is unshootable due to a fracture of the glass in the lower limb.
|
|
| From: Dry Bones
|
|
|
|
|
|
|
| Date: 31-Mar-17 |
|
Neemah, Jeff had posted some pics of your works, and man they are beautiful. Glad both of you do these buildalaongs... SORT OF. It makes me think I need another bow, but I sure like watching it all come together. Shawn, Jeff put a piece of Wenge in my longbow and it looks sleek as glass. :-D not sure how he finished it out, but it really does look nice and adds GREAT contrast. For the record I like the 4th and 9th riser from the bottom, and in woods liked 1 and 6 from the left. See, everyone has a different taste. But they are all nice!!
-Bones
|
|
| From: Nemah
|
|
|
|
|
|
|
| Date: 31-Mar-17 |
|
I'm back from Sumner Woodworking! It's sure nice to have a quality wood store so close.
|
|
| From: Nemah
|
|
|
|
|
|
|
| Date: 31-Mar-17 |
|
Lots to choose from..
|
|
| From: Nemah
|
|
|
|
|
|
|
| Date: 31-Mar-17 |
|
This nice piece of Koa caught my eye...
|
|
| From: Nemah
|
|
|
|
|
|
|
| Date: 31-Mar-17 |
|
But this REALLY got me interested!
|
|
| From: Nemah
|
|
|
|
|
|
|
| Date: 31-Mar-17 |
|
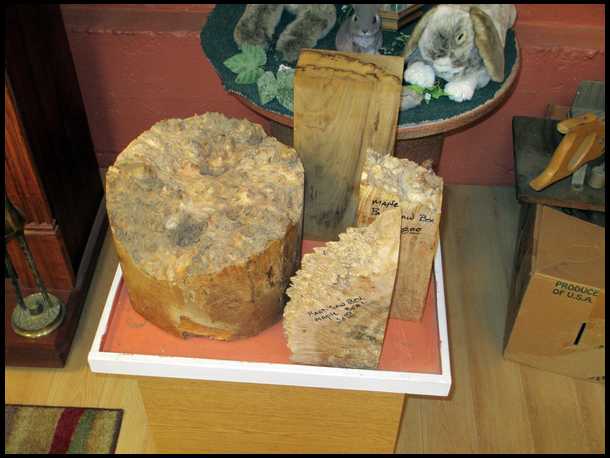
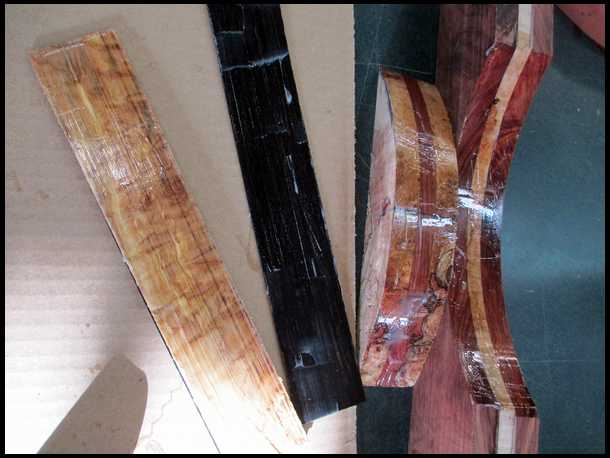
So, here's what I ended up buying. The large Maple block will be the I-beam in the Bubinga riser, and the small Maple burl will be the grip. I can get another riser out of the larger block also. The Myrtle block will make two great risers in the future......I just couldn't resist
|
|
| From: Nemah
|
|
|
|
|
|
|
| Date: 31-Mar-17 |
|
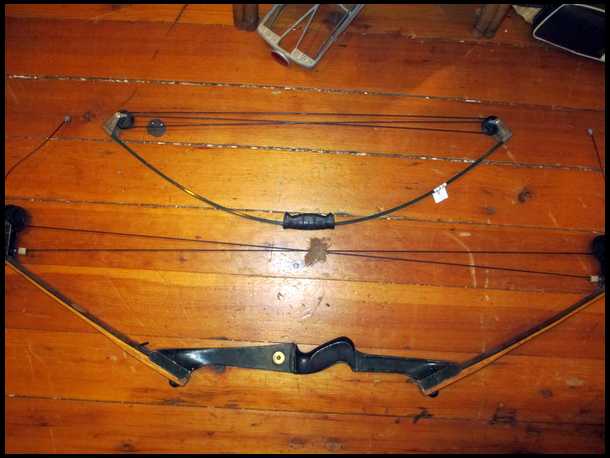
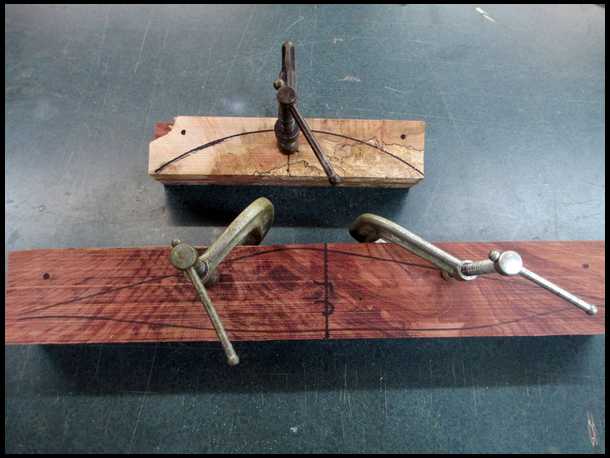
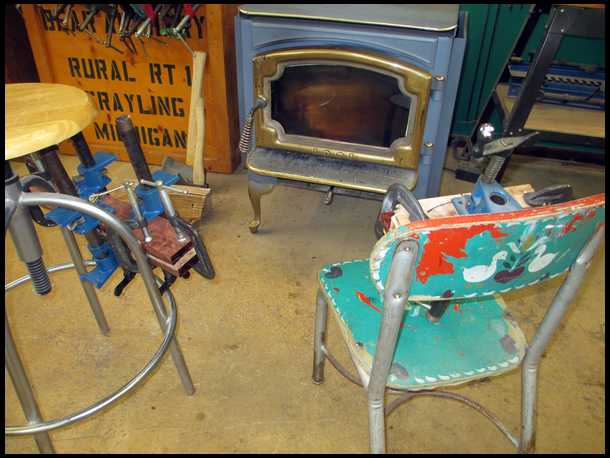
Sumner also has several antique shops and I found these 4 old compounds for $25 each. The kids bow is reversible....just turn it upside down for lefties. Here's 2.
|
|
| From: Nemah
|
|
|
|
|
|
|
| Date: 31-Mar-17 |
|
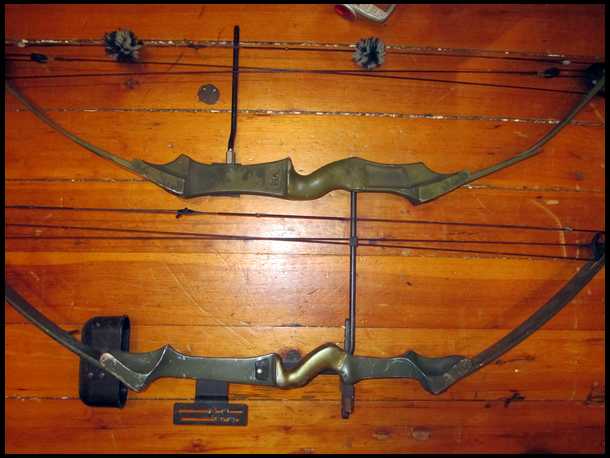
And here's the other 2. The top one is a Bear.
|
|
| From: Nemah
|
|
|
|
|
|
|
| Date: 31-Mar-17 |
|
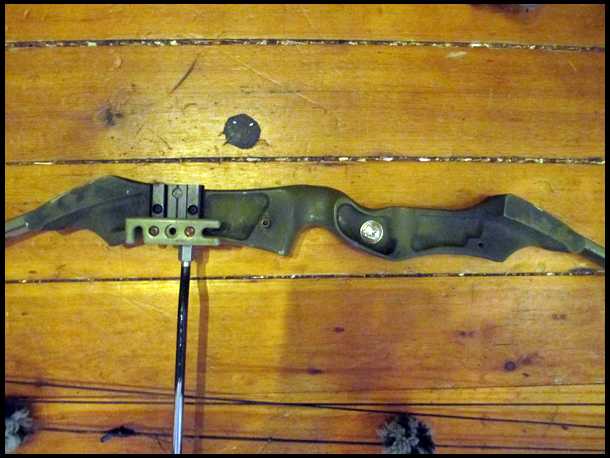
Another view of the Bear... Now I'm going to sit back with a brew and watch the NCAA Women's Final Four. By the way, I received 2 new band saw blades today. I like the Highland Woodworking Wood Slicers for my 17" Grizzly. Tomorrow morning I'll be performing surgery on the two Maple burls, sanding the 3 riser boards to the correct thickness, and gluing up the riser block and grip block. And, I got the front yard mowed! It's been a great day! Richard
|
|
| From: Steve Milbocker
|
|
|
|
|
|
|
| Date: 31-Mar-17 |
|
Koa is beautiful wood. I saw a lot of stuff made from it in Kauai. I tried to get Dan Toelke to build me a Pika from it but he told me it wasn't stable enough for risers. Excited to see these bows being built Richard. You do beautiful work.
|
|
| From: Nemah
|
|
|
|
|
|
|
| Date: 31-Mar-17 |
|
Steve, type in "Koa bow risers" on Google and hit images. There are some real beauties in there! I'll try Koa in the future for sure. RK
|
|
| From: bodymanbowyer
|
|
|
|
|
|
|
| Date: 31-Mar-17 |
|
Now that looks like a sweet wood store. I'm drooling here a bit :) JF
|
|
| From: Knifeguy
|
|
|
|
|
|
|
| Date: 31-Mar-17 |
|
Dang Richard! Thanks for taking me along. Hope to see you again soon. Lance.
|
|
| From: Bob Rowlands
|
|
|
|
|
|
|
| Date: 31-Mar-17 |
|
Diggin this thread. Those old compounds are a crack up. How they ever took off is a testament to something, but I don't know exactly what. lol
|
|
| From: Nemah
|
|
|
|
|
|
|
| Date: 01-Apr-17 |
|
Good morning, and congratulations to Mississippi!! I marked out the grip on the small chunk of Maple, using an old cut-out for a pattern, and cut out the grip block on my bandsaw.
|
|
| From: Nemah
|
|
|
|
|
|
|
| Date: 01-Apr-17 |
|
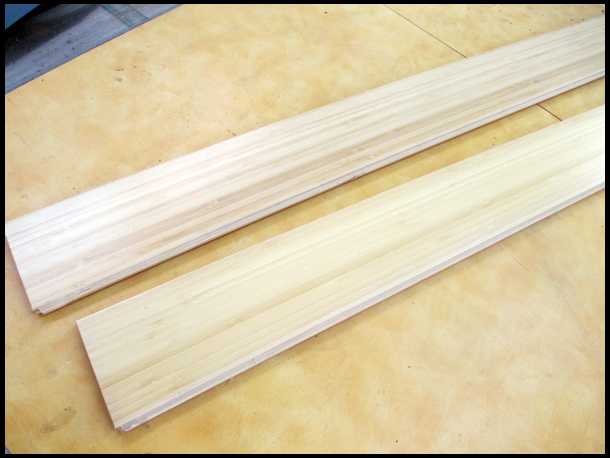
I then split the piece in two, giving me both outside pieces of the grip.
|
|
| From: Nemah
|
|
|
|
|
|
|
| Date: 01-Apr-17 |
|
I then cut a piece of Bubinga to serve as the center of the grip.
|
|
| From: oldman
|
|
|
|
|
|
|
| Date: 01-Apr-17 |
|
Wow! That is some beautiful piece of maple. Looking forward to seeing some more. Gil
|
|
| From: Nemah
|
|
|
|
|
|
|
| Date: 01-Apr-17 |
|
I cut a chunk out of the large Maple piece for the main I-beam in the riser.
|
|
| From: Nemah
|
|
|
|
|
|
|
| Date: 01-Apr-17 |
|
Here's the I-beam piece I choose.
|
|
| From: bodymanbowyer
|
|
|
|
|
|
|
| Date: 01-Apr-17 |
|
WOW! That's a really cool piece of Maple. Nice pick :-) JF
|
|
| From: Nemah
|
|
|
|
|
|
|
| Date: 01-Apr-17 |
|
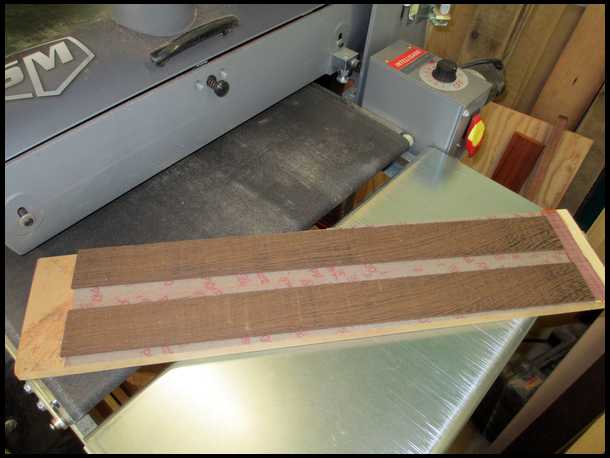
Here's all the pieces, ready for the drum sander. I'm making this riser 2" wide, so I'll run both I-beams at the same time.
|
|
| From: 2 bears
|
|
|
|
|
|
|
| Date: 01-Apr-17 |
|
Prettiest wood I ever saw. I can't wait to see it with finish on it. Keep it up and keep us posted.>>>------> Ken
|
|
| From: Nemah
|
|
|
|
|
|
|
| Date: 01-Apr-17 |
|
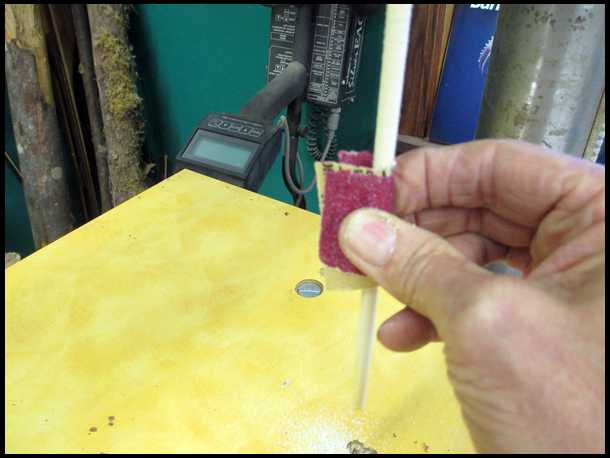
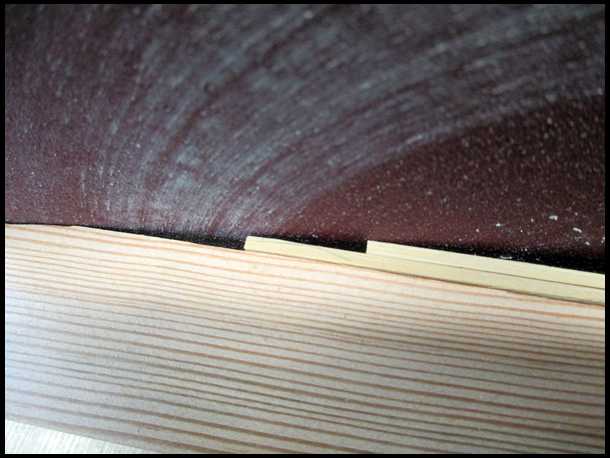
Sometimes, but not often, I get a little snipe, but if I run the pieces thru like this, no problem. I hold them up to the light to make sure all surfaces have been sanded.
|
|
| From: Nemah
|
|
|
|
|
|
|
| Date: 01-Apr-17 |
|
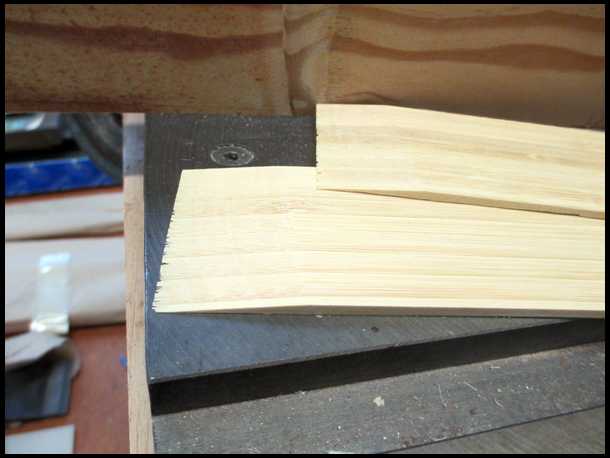
Now it's time for the grip pieces. Because they are so short, I put them on a sled covered with sandpaper.
|
|
| From: Nemah
|
|
|
|
|
|
|
| Date: 01-Apr-17 |
|
All sanded to size, ready for glue. At this time, I always mark the edges of the block with a heavy felt pen so I know for sure how the fit. You may be sorry if you don't.
|
|
| From: Nemah
|
|
|
|
|
|
|
| Date: 01-Apr-17 |
|
I clamp the pieces of each block together, mark some dots where I will drill them for 1/4" dowels and head to the drill press. I never have trouble with the pieces slipping out of place when I'm trying to clamp them up after applying the glue.
|
|
| From: ca
|
|
|
|
|
|
|
| Date: 01-Apr-17 |
|
Great thread. Thanks
|
|
| From: Nemah
|
|
|
|
|
|
|
| Date: 01-Apr-17 |
|

Drilling the dowel holes. Some folks might want to save those wedges, so you might want to devise another way to hold your boards together while trying to clamp them. This works best for me.
|
|
| From: Nemah
|
|
|
|
|
|
|
| Date: 01-Apr-17 |
|
I buy the 1/4" pine dowels at Home Depot and cut them just short of the block thickness, about 1-7/8" for these 2" blocks. Be sure to check the dowel fit before you start gluing. In this case, the dowels were slightly too large, so I had to sand them down a bit on my drill press. You will ALWAYS face minor problems like this when bow making.
|
|
| From: Nemah
|
|
|
|
|
|
|
| Date: 01-Apr-17 |
|
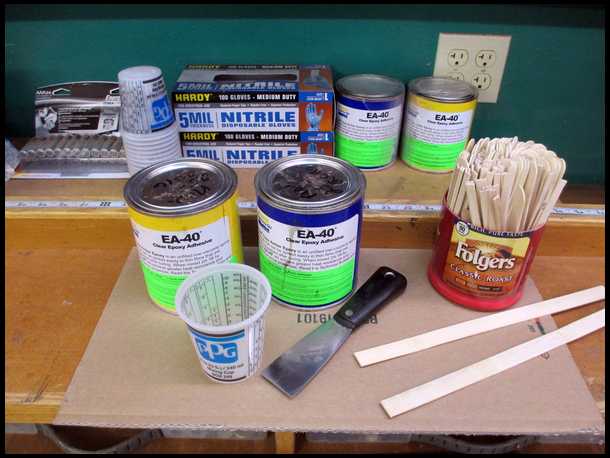
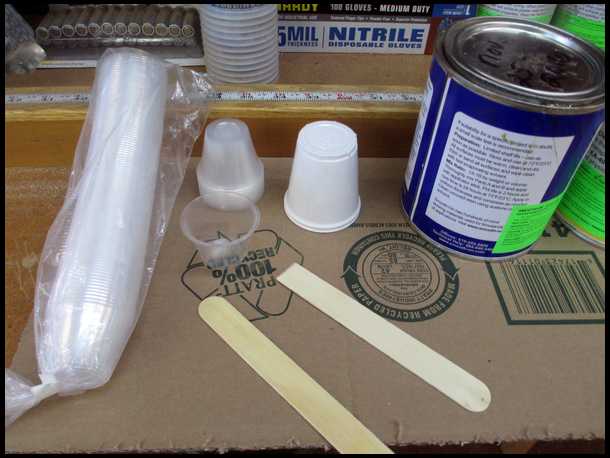
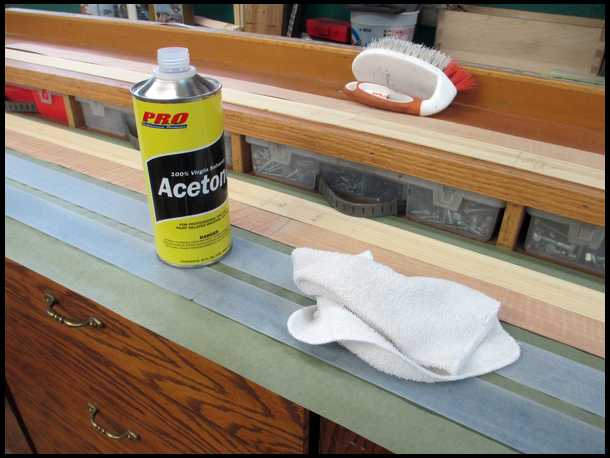
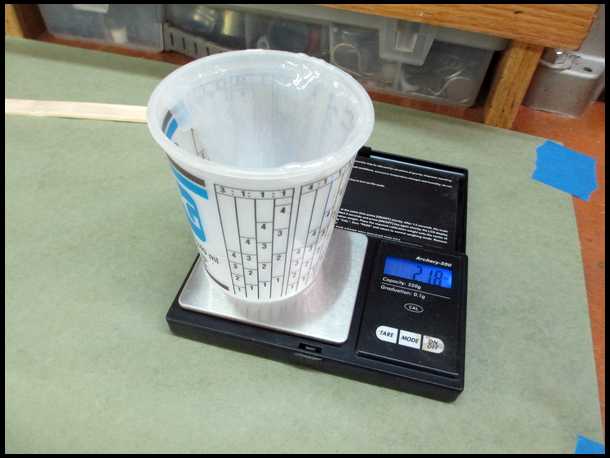
Ready for glue! I buy my mixing cups at our local Wesco Auto paint store, and they throw in free Bamboo mixing sticks. For small jobs, I buy large Popcicle sticks and straight mixing sticks at our local supermarket. I always use Smooth-On for ALL my gluing. I get my rubber gloves at Harbor Freight.
|
|
| From: Nemah
|
|
|
|
|
|
|
| Date: 01-Apr-17 |
|
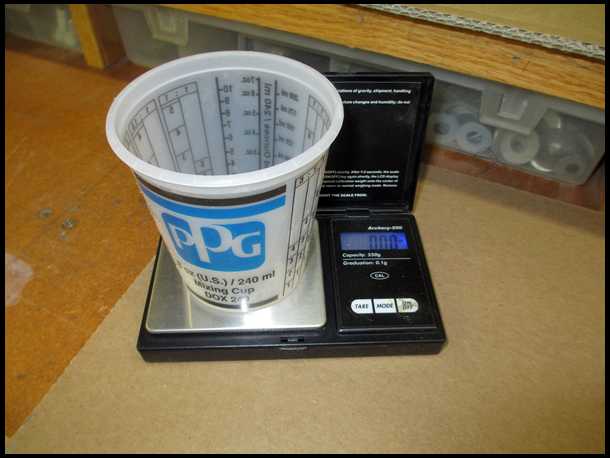
You mix smooth on at a 1 to 1 raito by volume or weight, and some folks use a grain scale to measure out the correct amount. I find that the ratio isn't too critical, and after building a hundred bows, I just mix by sight for the risers and accent pieces. I do usually measure for the limb laminations, though.
|
|
| From: Nemah
|
|
|
|
|
|
|
| Date: 01-Apr-17 |
|

I always brush the pieces off before I glue, of use my compressor to blow off any dust. Be sure to mark the edges so you'll glue them in the right order!
|
|
| From: Nemah
|
|
|
|
|
|
|
| Date: 01-Apr-17 |
|

Slop it on and spread out. DO NOT RUSH! Just make sure all surfaces are totally covered with glue. You must apply glue to both surfaces you are gluing...very important!
|
|
| From: Nemah
|
|
|
|
|
|
|
| Date: 01-Apr-17 |
|
Put the pieces together (aren't you glad you marked them?)and push the dowels thru until they are just below the surfaces. Now you can clamp the boards together and they will not slip or slide around. I made some short pipe clamps especially for gluing riser blocks but always add several c-clamps to apply even pressure.
|
|
| From: Nemah
|
|
|
|
|
|
|
| Date: 01-Apr-17 |
|
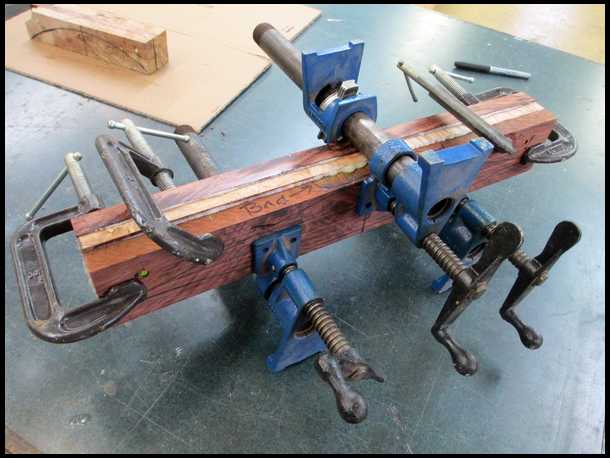
Clamped up!
|
|
| From: Nemah
|
|
|
|
|
|
|
| Date: 01-Apr-17 |
|
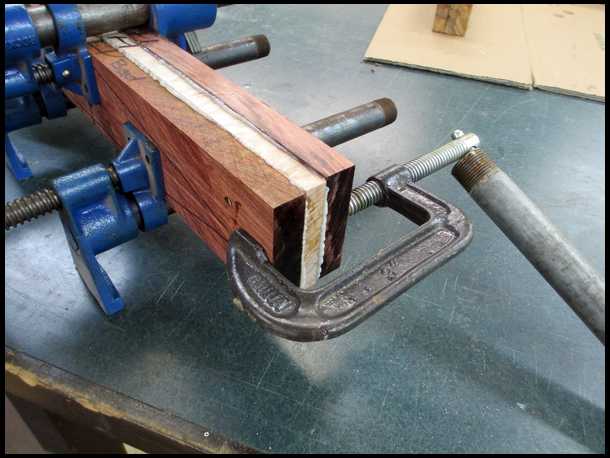
See that 10" piece of galvanized pipe? I use it to apply more leverage to the clamps. I flattened one end to fit over the flat end of the pipe clamp handle. It sure save your hands from aches and pain and bruised knuckles.
|
|
| From: PECO
|
|
|
|
|
|
|
| Date: 01-Apr-17 |
|
That is going to be a beauty!
|
|
| From: Nemah
|
|
|
|
|
|
|
| Date: 01-Apr-17 |
|
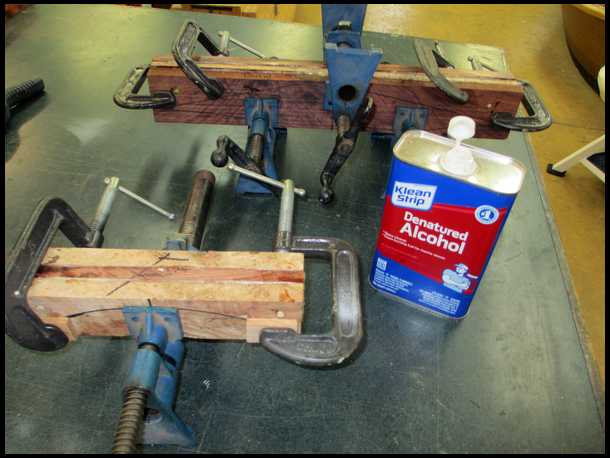
You'll always get glue on your hands and tools. I use this to clean up a bit. Don't worry about wiping glue drips off the clamped up blocks. You'll grind or sand the cured glue off later.
|
|
| From: Nemah
|
|
|
|
|
|
|
| Date: 01-Apr-17 |
|
I used to throw the riser blocks in the heat box to cure, but not anymore. No matter how careful you are, some woods will "move" on you. Could be they're not totally dry. Even though they are clamped, some of the glue lines will separate. Now I just place them somewhere warm, like in front of my wood stove or over my baseboard heater or under a lamp. The glue will cure no matter what, and I've never had a glue joint fail. That's enough for today. Hope you enjoy Gonzaga winning their game today! I grew up in Spokane near the college and have many pleasant memories of that area. GO ZAGS!
|
|
| From: Gator1
|
|
|
|
|
|
|
| Date: 01-Apr-17 |
|
This is going to be good.
Thanks for sharing.
|
|
| From: Dry Bones
|
|
|
|
|
|
|
| Date: 01-Apr-17 |
|
From the appearance of the glue on the cut blocks, that is one going to be one figured and very beautiful bow.
-Bones
|
|
| From: bodymanbowyer
|
|
|
|
|
|
|
| Date: 01-Apr-17 |
|
I'm enjoying the buildalong Richard, alot. Thanks for taking the time. JF
|
|
| From: Longtrad
|
|
|
|
|
|
|
| Date: 01-Apr-17 |
|
that is some stunning wood
|
|
| From: Nemah
|
|
|
|
|
|
|
| Date: 01-Apr-17 |
|
How about those Zags?! Now if Oregon wins, it's an all West Coast final! Go Ducks!
|
|
| From: CD
|
|
|
|
|
|
|
| Date: 01-Apr-17 |
|
And an all SEC match up for the girl's NCAA championship game tomorrow! :)
Hail State! Go Bulldogs!
Big congrats to the Zags!
I'm loving this build-a-long and can't wait for more pics
|
|
| From: Deno
|
|
|
|
|
|
|
| Date: 02-Apr-17 |
|
Thanks for the terrific build along. Just catchin' up with it. Deno
|
|
| From: Nemah
|
|
|
|
|
|
|
| Date: 02-Apr-17 |
|
Good Morning All! It's a glorious sunny morning here in Olympia! Glue is all cured, so I sanded the edges of the grip and riser blocks.
|
|
| From: Nemah
|
|
|
|
|
|
|
| Date: 02-Apr-17 |
|
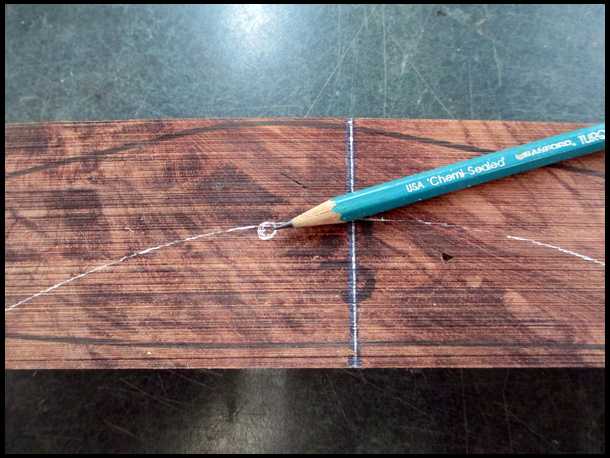
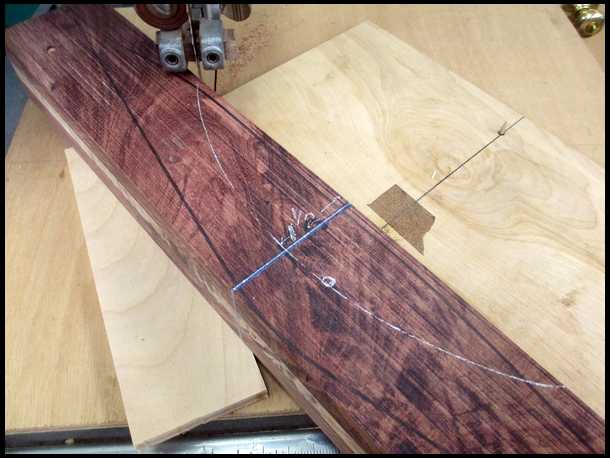
Be sure to sand the glue from the dowels also, otherwise problems will occur when you make the required cuts with the band saw. I'm a fan of white or silver pens when it comes to marking dark woods. I marked the centerlines of the riser and grip and extended those lines down the edges of each block.
|
|
| From: Nemah
|
|
|
|
|
|
|
| Date: 02-Apr-17 |
|
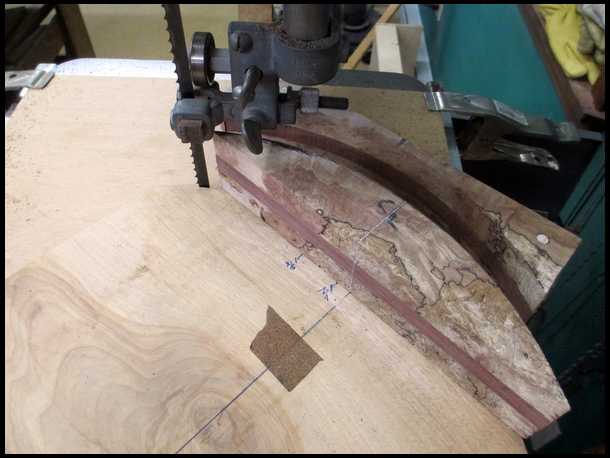
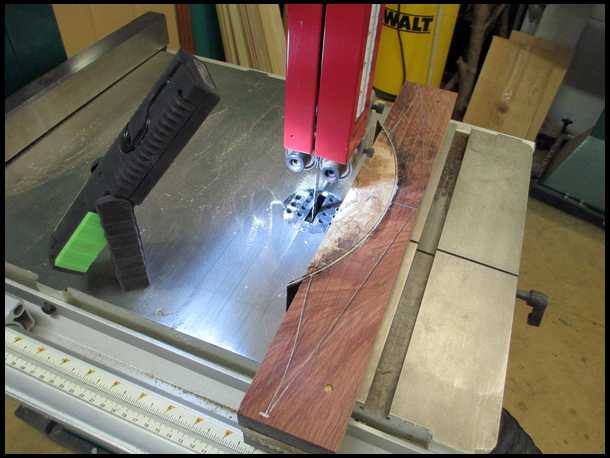
I'm ready to make the arc cut on each block. Here's my simple set-up on my old Delta bandsaw. I use double-sided tape to hold the blocks down. I stick my shop-vac nozzle under the saw table to catch the dust.
|
|
| From: Nemah
|
|
|
|
|
|
|
| Date: 02-Apr-17 |
|
Done with the grip block! Go slow and steady. If you stop during the cut, you'll have a groove in the surface. And make sure you use a sharp bandsaw blade. I use a 3/8" blade for these cuts.
|
|
| From: Nemah
|
|
|
|
|
|
|
| Date: 02-Apr-17 |
|
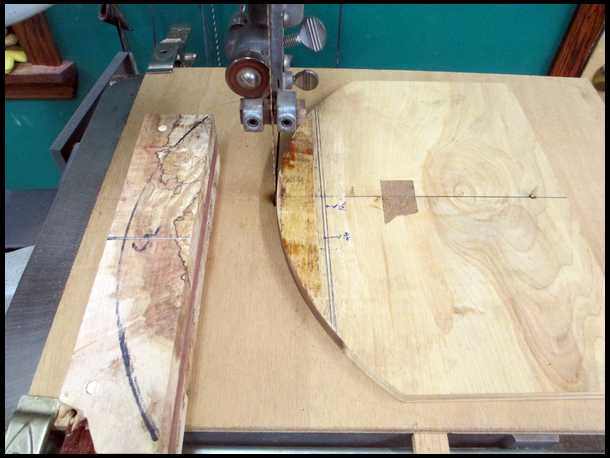
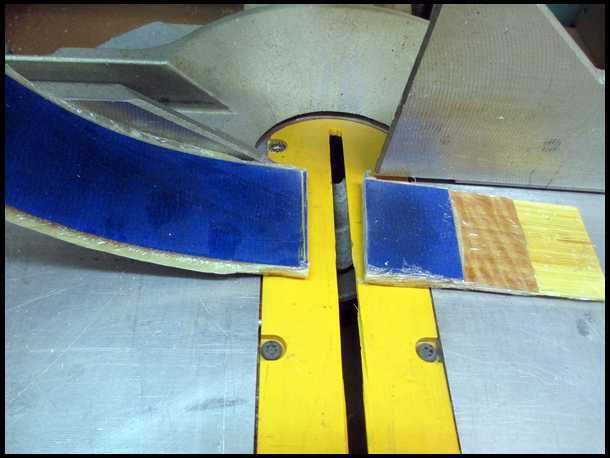
Now it's time for the riser. I want the cut to just hit the front of the small circle. The accent strips will fill in the space between the riser and the grip and hopefully be centered in the site window.
|
|
| From: Nemah
|
|
|
|
|
|
|
| Date: 02-Apr-17 |
|
Cutting the arc. The plywood piece to the left supports the riser during the cut. Slow and steady...no stopping!
|
|
| From: Nemah
|
|
|
|
|
|
|
| Date: 02-Apr-17 |
|
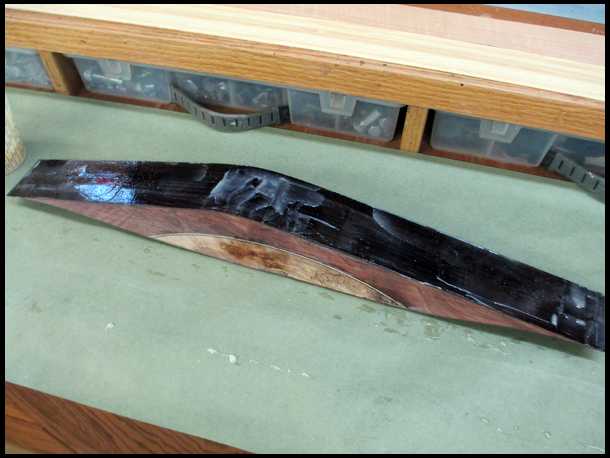
RATS!! I miss-measured the distance and took a little too much out of the riser! It's always something! But life goes on! Here's the completed blocks. The piece I cut out of the main riser will be saved and possibly be used in another bow.
|
|
| From: Nemah
|
|
|
|
|
|
|
| Date: 02-Apr-17 |
|
I have a few from other bows...
|
|
| From: Nemah
|
|
|
|
|
|
|
| Date: 02-Apr-17 |
|
Off to the spindle sander to perfect the fit between the two pieces. Sometimes they fit perfectly, but most times they both need a little work. Sometimes they fight you, but don't let them win!
|
|
| From: Nemah
|
|
|
|
|
|
|
| Date: 02-Apr-17 |
|
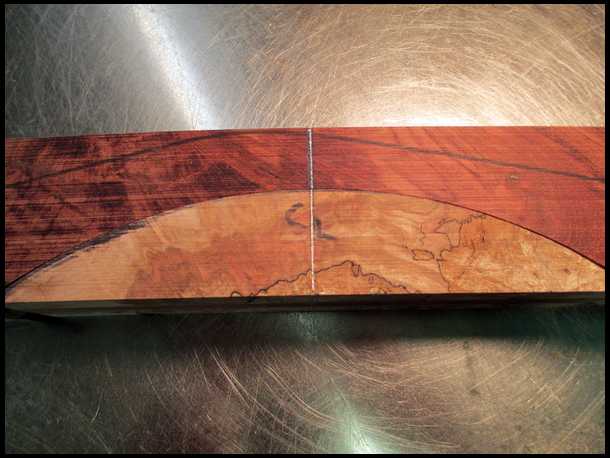
Close enough for me! Any minor gaps will be filled in by the accent strips and epoxy.
|
|
| From: Nemah
|
|
|
|
|
|
|
| Date: 02-Apr-17 |
|
Now I must make the grip accents. Here's a riser showing what they'll look like, but what woods shall I use? I finally chose Wenge-Maple-Wenge. When it's finished, the Wenge will appear almost black, and I'll use that wood to also wrap the entire riser. It will make a nice contrast against the light Bamboo limb cores.
|
|
| From: 2 bears
|
|
|
|
|
|
|
| Date: 02-Apr-17 |
|
Nemah, May I ask a couple of questions? I want to make sure I understand. The bow parts are taped to the top of the jug, right? The jig is on a pivot, right? Doesn't the band saw blade still want to walk? I don't understand the little circle. It is tangent to the curved line. What is the purpose? To check that the cut is in the exact place on the line,on both ends and the middle,could you remove the blade? Then rotate the jig watching or using short piece of blade or material in the saw guides? I need to make accurate cuts as I am prone to messing things up on the spindle sander. Then it takes for ever to get a good fit. Thanks a bunch. >>>------> Ken
|
|
| From: Nemah
|
|
|
|
|
|
|
| Date: 02-Apr-17 |
|
I cut out the required pieces on my bandsaw. I found a nice, figured piece of Maple for the center, so it should look great.
|
|
| From: Nemah
|
|
|
|
|
|
|
| Date: 02-Apr-17 |
|
I ran all the accent pieces thru the sander to obtain the correct thickness and then clamped them into the riser to see what they'll look like. They look good, so it's off to the glue table.
|
|
| From: Nemah
|
|
|
|
|
|
|
| Date: 02-Apr-17 |
|
This is when you get a preview of the woods' character.
|
|
| From: Nemah
|
|
|
|
|
|
|
| Date: 02-Apr-17 |
|
Clamped up! The two smaller clamps hold the strips in position so they won't slip. I remove them after the large clamps are tight, otherwise you'll glue them to the block.
|
|
| From: Nemah
|
|
|
|
|
|
|
| Date: 02-Apr-17 |
|
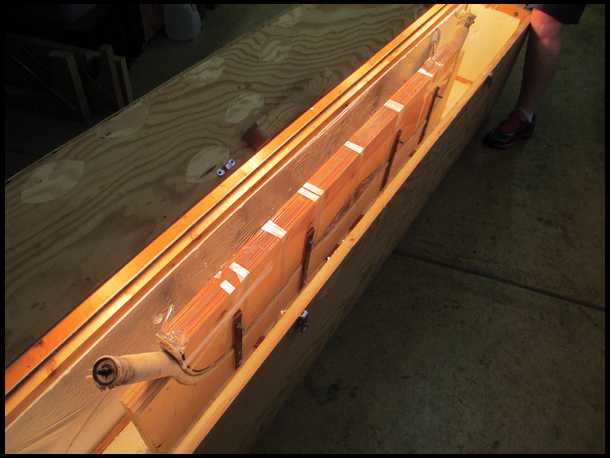
While the glue is curing on the riser, I'll make the strips that line the outside of the entire riser. Here's a riser that has been wrapped with Padauk, but I'll use Wenge.
|
|
| From: Nemah
|
|
|
|
|
|
|
| Date: 02-Apr-17 |
|
After cutting them out on my bandsaw, I run them thru the sander to get the thickness I want. Then I'll set them aside and move on to the limb cores.
|
|
| From: Nemah
|
|
|
|
|
|
|
| Date: 02-Apr-17 |
|
I make ALL my bows with limb cores of vertical grained Bamboo which I cut from Bamboo flooring. I buy it by the case from a local flooring dealer.
|
|
| From: Nemah
|
|
|
|
|
|
|
| Date: 02-Apr-17 |
|
I use my bandsaw to cut the flooring into the rough laminations that will make up the limb cores. These are 2" wide and .137" thick, and will be sanded down to achieve the correct draw weight of the finished bow.
|
|
| From: 2 bears
|
|
|
|
|
|
|
| Date: 02-Apr-17 |
|
Nemah, You can build faster than I type. I am enjoying this build along, and learning so much. You have 7 more posts while I was asking questions. Would you back track to my post please. Thanks again. <----< Ken
|
|
| From: Nemah
|
|
|
|
|
|
|
| Date: 02-Apr-17 |
|
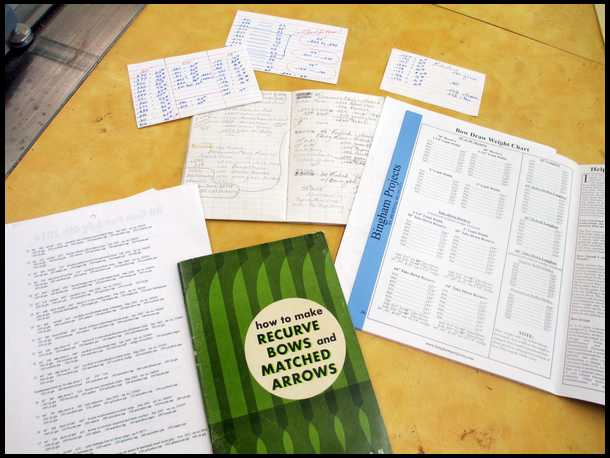
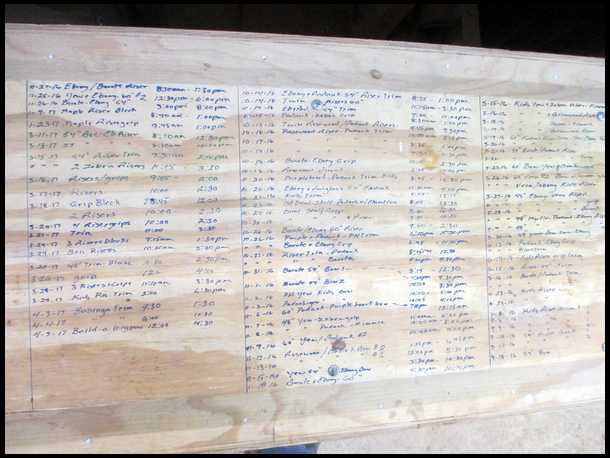
Now comes the math, a subject I struggled with all thru my school years! How thick will the Bamboo laminations have to be? Should I taper both, or only one? What thickness of glass should I use? Am I going to use colored glass or clear? If it's clear, what wood will show thru? How thick should that wood be? It's a tough subject, especially if you're just starting your first bow. Here's a few of the sources I've used. My bow booklet has the dimensions of every Kodiak Deluxe I've built, so now it's not so hard. What's crazy is I can make two identical bows of exactly the same material, using exactly the same measurements, and end up with 2 different draw weights! Go figure! That's all for today. I have some yard work to do and basketball to watch!
|
|
| From: Bowlim
|
|
|
|
|
|
|
| Date: 02-Apr-17 |
|
Just for those people who don't have the expertise of the OP, for your own projects:
The reason epoxy is supposed to be mixed accurately is because it is not catalyzed it is mixed. If you do not provide identical components, then you can't fully cross-link the mixture. It is basically like it is contaminated, though it is acceptable within certain limits, but those are generally that you actually try for a 100% mix. With a lot of epoxies you also have to be careful that the weight and volume mixes are actually both 50/50. That isn't all that common, be sure to check your instructions.
It is also important to realize that an I-beam is a directional structure, it is not uniformly strong. In areas where cost or weight are an issue, it allows one to have maximum strength and stiffness in one direction. But risers are structures with a complex load path, and they are mostly solid, and weight is not necessarily a problem. The sight window is a poor structure for an I-beam, as it ends up with the flange removed and the web on the wrong side of the structure. Of course in making an I-beam in a riser, it is possible to use materials in the I-beam (as is the case with fiberglass) that are stronger than the wood they replace. The issues arise when the non-I-beam components are weaker than ones would normally employ in that role. If you don't have hundreds of bows behind you, you might produce one like one custom I owned, that bent at the sight window.
|
|
| From: Nemah
|
|
|
|
|
|
|
| Date: 02-Apr-17 |
|
Ken, Yes, I just tape the piece to be cut to the plywood table with double sided tape. The table turns on a pivot point. That little white circle on the riser hopefully will be the center of the site window and all 3 accents strips will fill it in. I don't seem to get any blade drift with a 3/8" blade, but you can use a 1/4" wide blade if you're worried. Thanks for the question...I hope I gave you a satisfactory answer! Richard
|
|
| From: bodymanbowyer
|
|
|
|
|
|
|
| Date: 02-Apr-17 |
|
Looks like my note comparisons when I look through for a stack to hit my target wieght. Informative? buildalong and great pictures too. Thumbs up Richard. JF
|
|
| From: Archre167
|
|
|
|
|
|
|
| Date: 02-Apr-17 |
|
Richard and Jeff, both of your build alongs are top shelf for sure. Thanks for taking the time and sharing! Very talented and beautiful works you make.
|
|
| From: Nemah
|
|
|
|
|
|
|
| Date: 02-Apr-17 |
|
Good evening! I just couldn't wait so I sanded the glue gobs off the riser block so it would sit flat on the bandsaw.
|
|
| From: mgerard
|
|
|
|
|
|
|
| Date: 02-Apr-17 |
|
Richard, that looks amazing. looking forward to more. Thank you.
|
|
| From: Nemah
|
|
|
|
|
|
|
| Date: 02-Apr-17 |
|
All set up to cut out the riser shape. Notice my magnetic LED made in China light....super handy for this job!
|
|
| From: Nemah
|
|
|
|
|
|
|
| Date: 02-Apr-17 |
|
All cut out! Sometimes cutting into wood is a little like opening a present! I always leave a little wood for the final fitting on my bow form.
|
|
| From: Nemah
|
|
|
|
|
|
|
| Date: 02-Apr-17 |
|

Wow, that's really pretty! Several folks have asked why I never take orders. It's because I WANT to make this bow! I don't HAVE to make it! I woke up at 5 this morning, eager to work on it and rarin' to go! I would never feel that way if I had to make it a certain way and hit a certain draw weight for a customer. Someone will end up with this bow sooner or later and then I get another chance to create something new. I have no idea what the final draw weight will be on this bow. I'll shoot for a certain weight, but what if I'm off 5-8 pounds? I don't think a guy who want a 50 pounder would be happy with a 42. I'm just not that consistent with draw weights. So, now there is zero pressure on me if I just make what I like, and someone is kind enough to buy it. Life is good! Good night everyone! Sleep warm!
|
|
| From: CD
|
|
|
|
|
|
|
| Date: 03-Apr-17 |
|
Love it!
|
|
| From: muddyIA
|
|
|
|
|
|
|
| Date: 03-Apr-17 |
|
Amazing build along. Shot a couple of your bows when I visited Jeff after his shoulder surgery. Proof is in the pudding, great job so far. Looking forward to the rest.
|
|
| From: Burnsie
|
|
|
|
|
|
|
| Date: 03-Apr-17 |
|
Richard, understand your desire to keep your bow building enjoyable and not getting caught up with time lines and expectations for customer orders...etc. Similar to the approach Brandon Stahl at Rose Oak has taken - build them on his own schedule and sell them as stock bows. But, how does one go about finding out when you have a bow available? - I would love to own one of your bows some day.
|
|
| From: Kwikdraw
|
|
|
|
|
|
|
| Date: 03-Apr-17 |
|
Great thread Nemah, and wonderful, creative, artwork! The craftsmanship is also well done, and it's really nice to see a true artisan at work! I too would entertain owning one of your creations. Thanks a lot, I know it's a real pain doing a complete build-a-long, Wyatt
|
|
| From: Nemah
|
|
|
|
|
|
|
| Date: 03-Apr-17 |
|
Burnsie, I sent you a private reply.
|
|
| From: ermont
|
|
|
|
|
|
|
| Date: 03-Apr-17 |
|
Nemah, Let me know if you have one in the 43-45 pound range lying around gathering dust that you may want to move.
|
|
| From: Biathlonman
|
|
|
|
|
|
|
| Date: 03-Apr-17 |
|
I love how these bows look, always eatching the classifieds for that low #50 beauty to show up when I have cash.
|
|
| From: Biathlonman
|
|
|
|
|
|
|
| Date: 03-Apr-17 |
|
I love how these bows look, always eatching the classifieds for that low #50 beauty to show up when I have cash.
|
|
| From: Nemah
|
|
|
|
|
|
|
| Date: 03-Apr-17 |
|
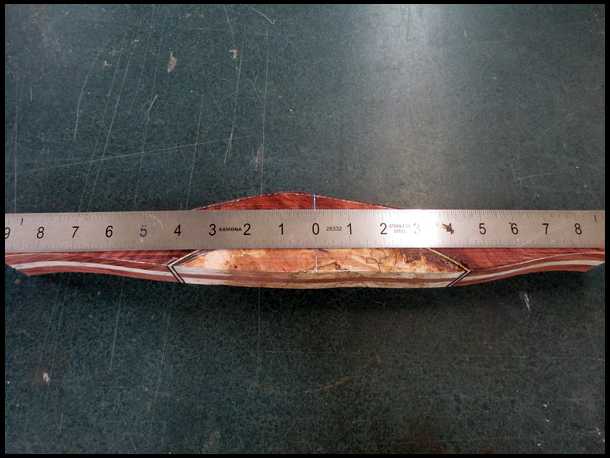
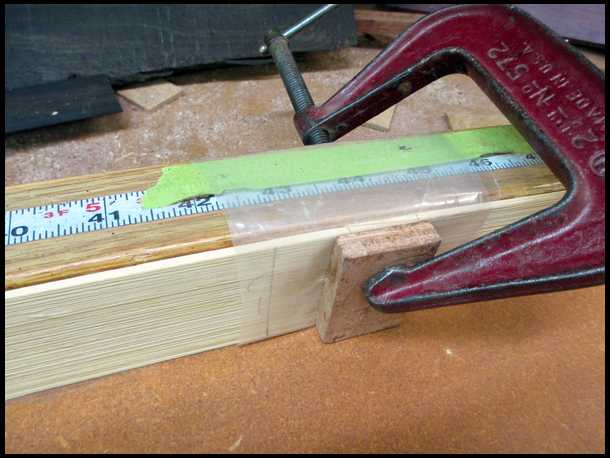
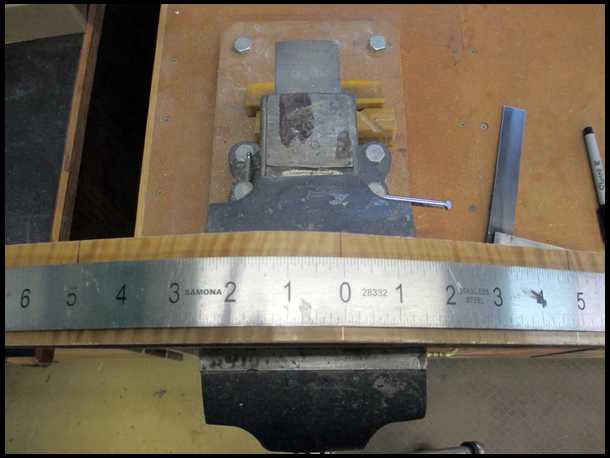
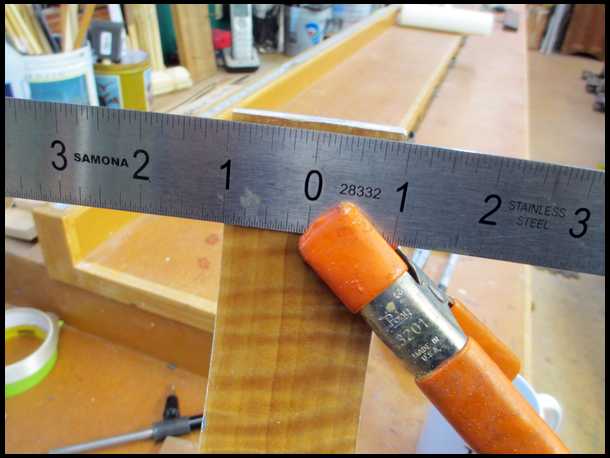
Happy Monday! I'll be shaping and wrapping the riser this morning. First, I want to make sure the riser is the correct length, so I'll measure it. The double ruled ruler is great for this!
|
|
| From: Nemah
|
|
|
|
|
|
|
| Date: 03-Apr-17 |
|
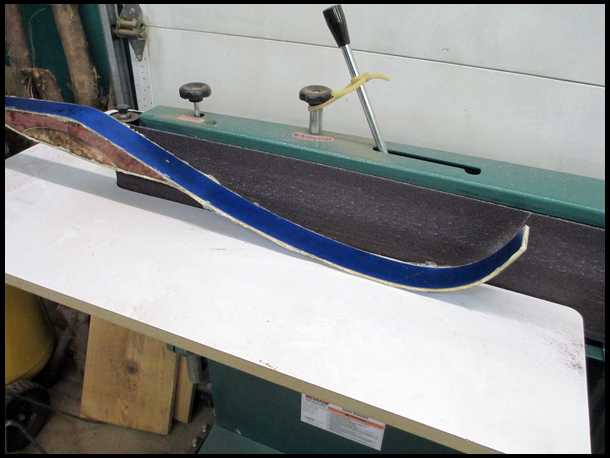
I had to trim a little off both ends with the bandsaw. Now I'll begin to shape the riser with my sander for a perfect fit on the bow form. This takes a while. Patience is a virtue. Fit-sand-fit-sand-fit-sand-etc.
|
|
| From: Nemah
|
|
|
|
|
|
|
| Date: 03-Apr-17 |
|
TA-DA! I'm happy with this fit, and it only took 10 minutes! Now it's off to the spindle sander to shape the other side.
|
|
| From: Nemah
|
|
|
|
|
|
|
| Date: 03-Apr-17 |
|

But before I begin, I'll run the riser thru the drum sander to make sure both sides are flat. I should have done this before I fitted the riser to the form....I just forgot. But all seems square.
|
|
| From: Nemah
|
|
|
|
|
|
|
| Date: 03-Apr-17 |
|
Here we go! Sand-sand-sand. I use a backer of Ebony to apply even pressure. I run my fingers over the riser length, feeling for little bumps or depressions, making sure the drum has hit every area.
|
|
| From: Nemah
|
|
|
|
|
|
|
| Date: 03-Apr-17 |
|
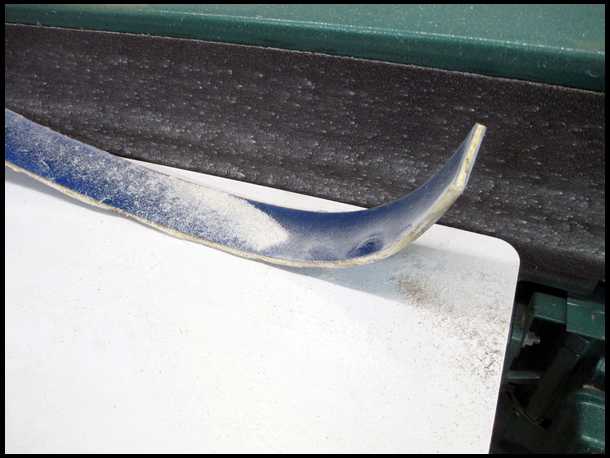
Here's my backer board doing it's job at the fade-out. Be very careful here! Go very slow. Use light pressure. I want the fade-out to be VERY thin, but not shredded.
|
|
| From: Nemah
|
|
|
|
|
|
|
| Date: 03-Apr-17 |
|
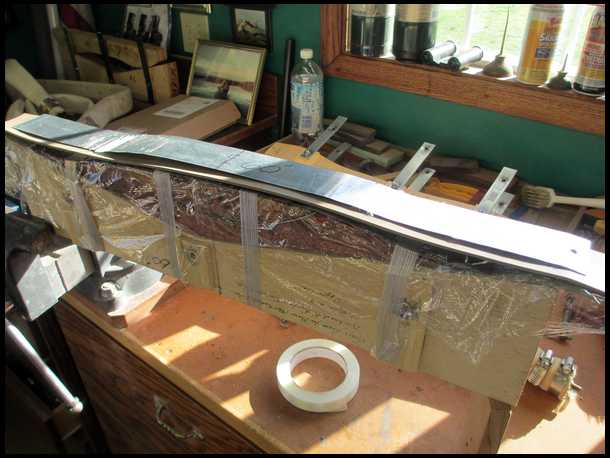
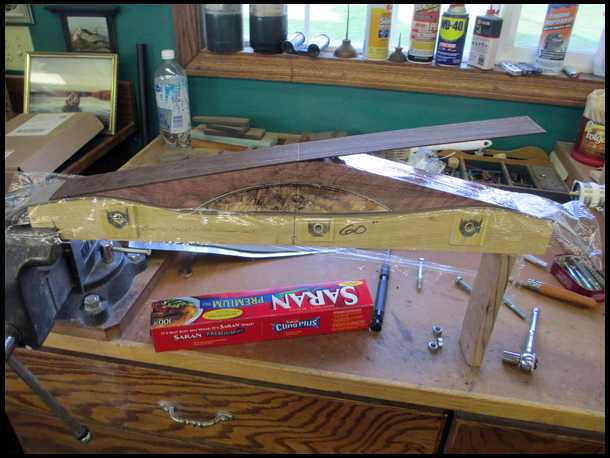
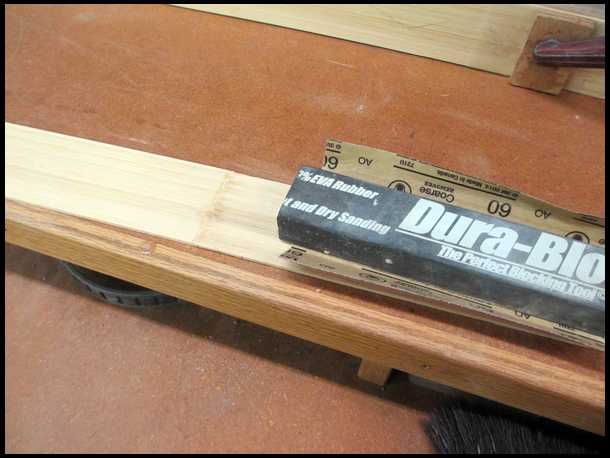
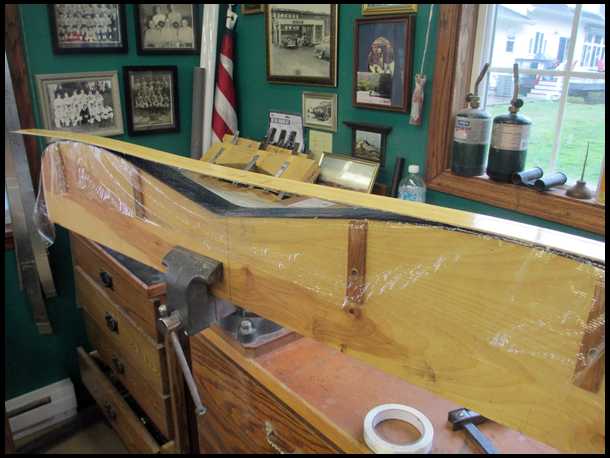
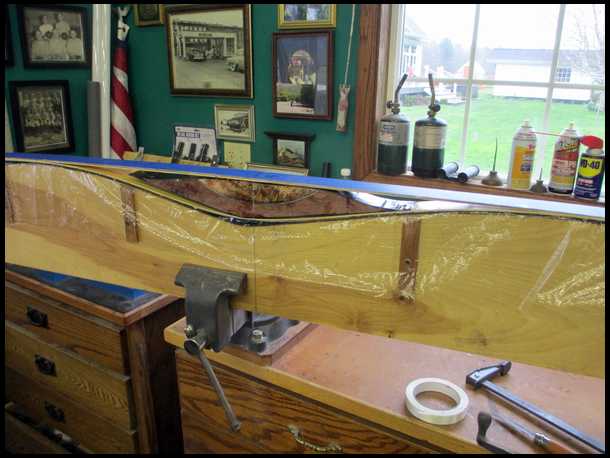
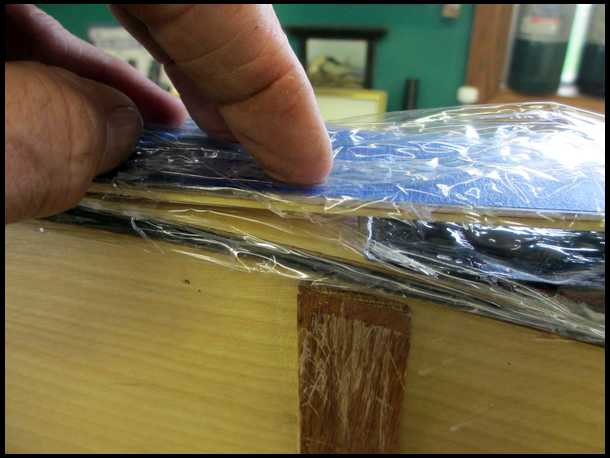
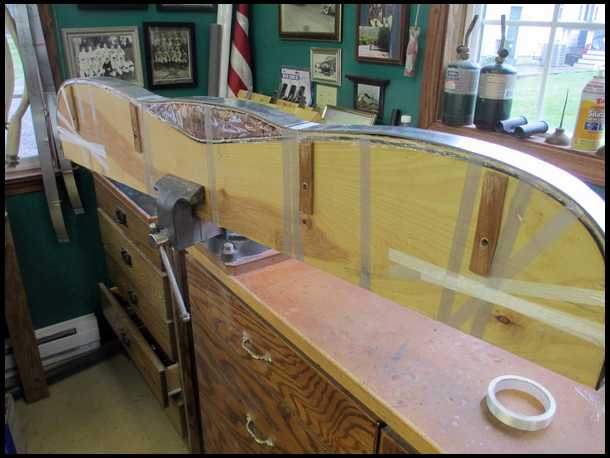
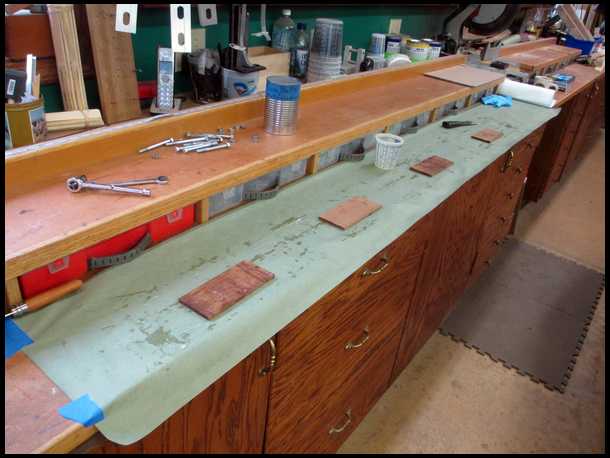
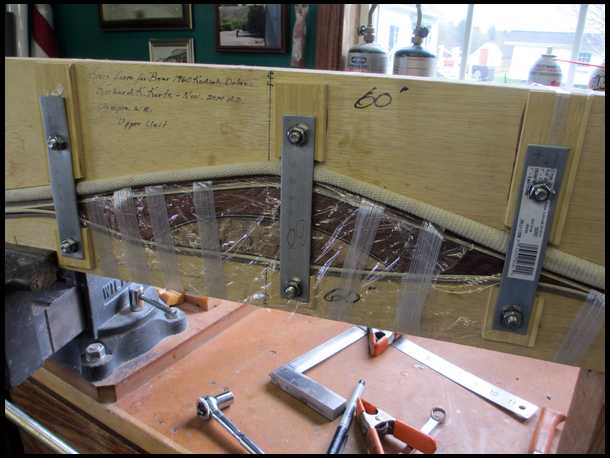
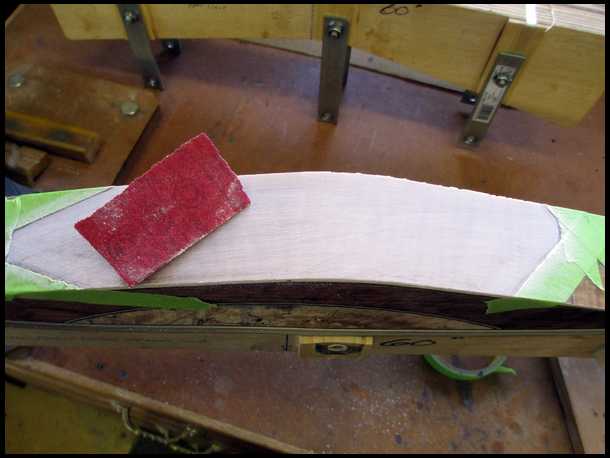
Finished! I'm happy with the fade-outs, so it's on wrapping the riser with trim strips, just like the 1960 original. They used Purpleheart on the bow I have, but I'll use Wenge. Here's the form I'll use. Always glue the belly strip on first, the side of the riser that faces you while shooting.
|
|
| From: Nemah
|
|
|
|
|
|
|
| Date: 03-Apr-17 |
|
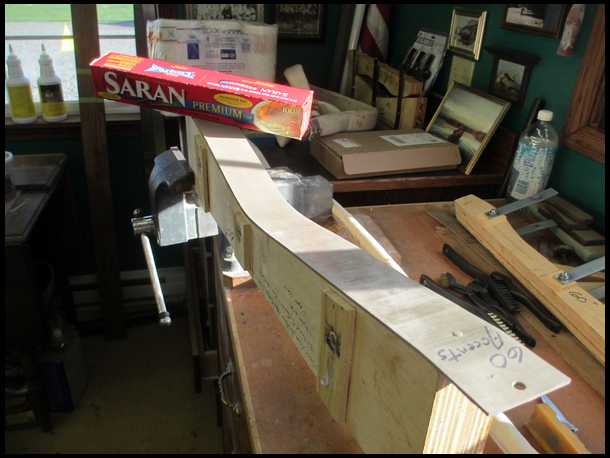
I buy rubber baseboard molding at Home Depot and cut strips to fit my form, one below and one above. Works for me. I use Saran Wrap to cover the lower molding and form. I hold the form in my bench vice for stability.
|
|
| From: Nemah
|
|
|
|
|
|
|
| Date: 03-Apr-17 |
|
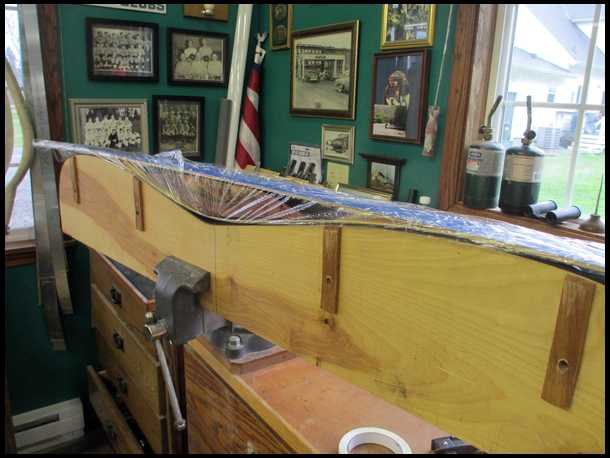
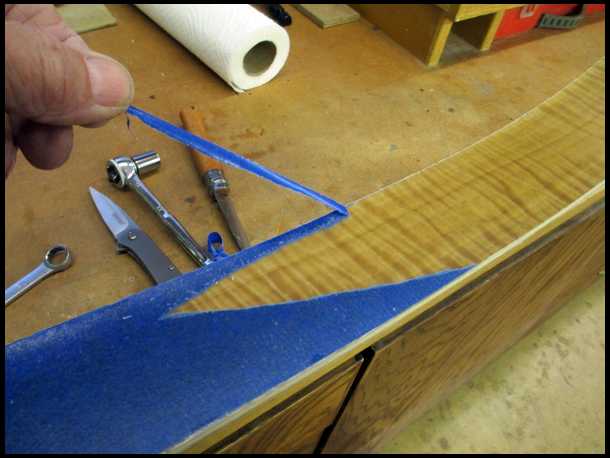
I like the trim to overhang the riser fade-out by 3/4" on both ends, so I use my silver pen to mark one end. Then I mark the center, and then the other end. I then cut the trim strip to fit perfectly.
|
|
| From: Nemah
|
|
|
|
|
|
|
| Date: 03-Apr-17 |
|
Ready for glue! For small jobs, I buy the graduated medicine cups off EBay, a hundred at a time. Dirt cheap-free shipping. For medium jobs, I just use plastic cups from the supermarket. I use large popcicle sticks for mixing, but cut off one end of the stir stick to make sure I get all the epoxy out of the corners of the cup. I'll use a narrower, flexible putty knife for spreading the glue, as it will fit inside the plastic cup.
|
|
| From: Nemah
|
|
|
|
|
|
|
| Date: 03-Apr-17 |
|
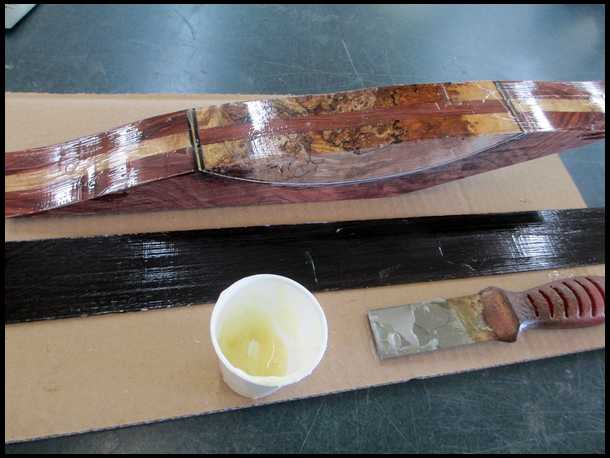
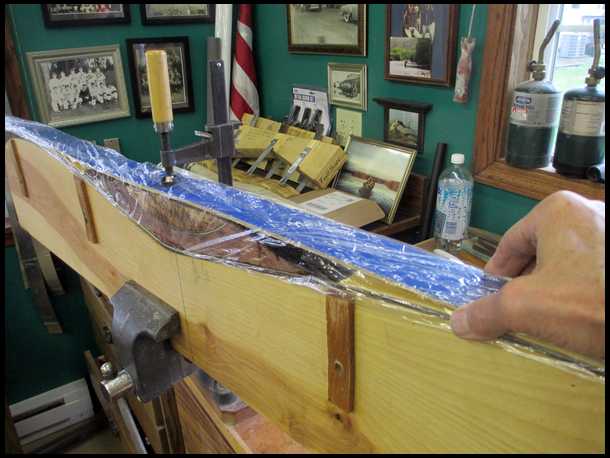
I used compressed air to clean off both surfaces, especially the Wenge. Lots of pores! Slop it on-spread it out! Wenge soaks up a lot of glue. Make sure all areas are covered.
|
|
| From: Nemah
|
|
|
|
|
|
|
| Date: 03-Apr-17 |
|
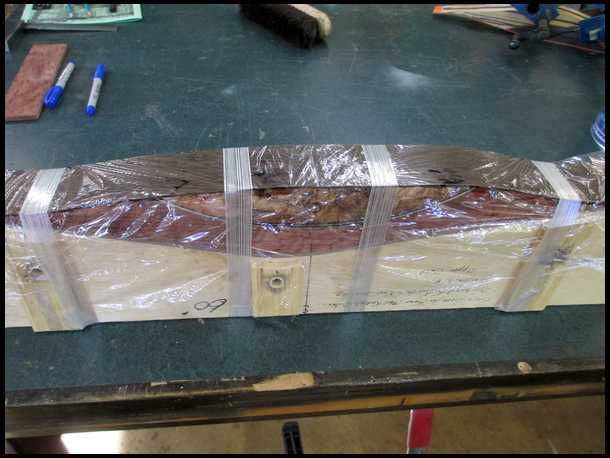
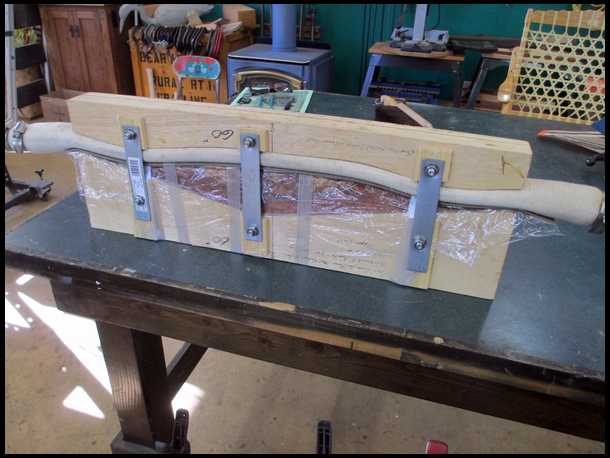
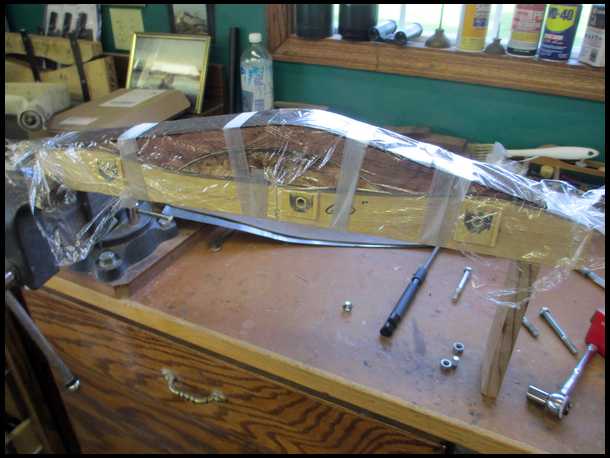
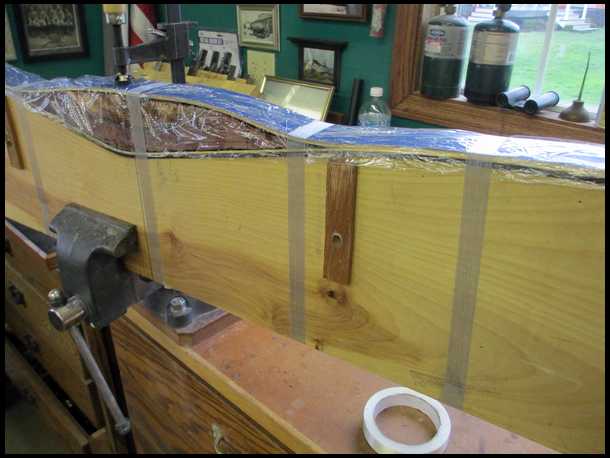
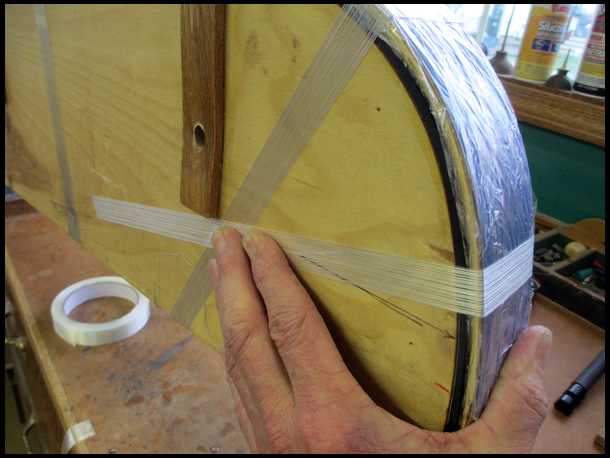
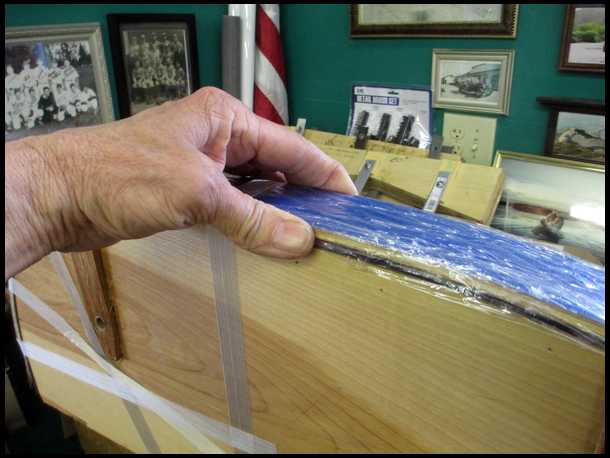
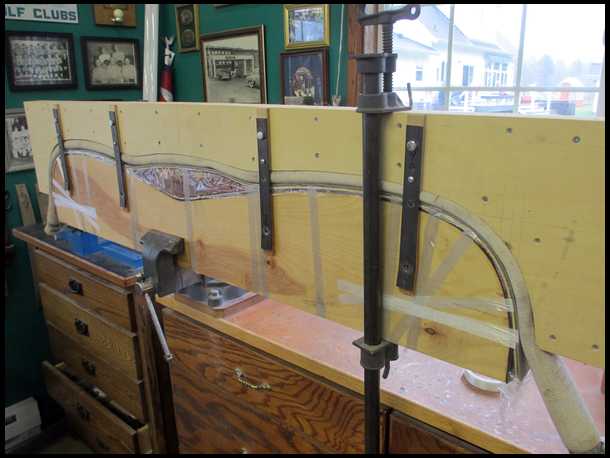
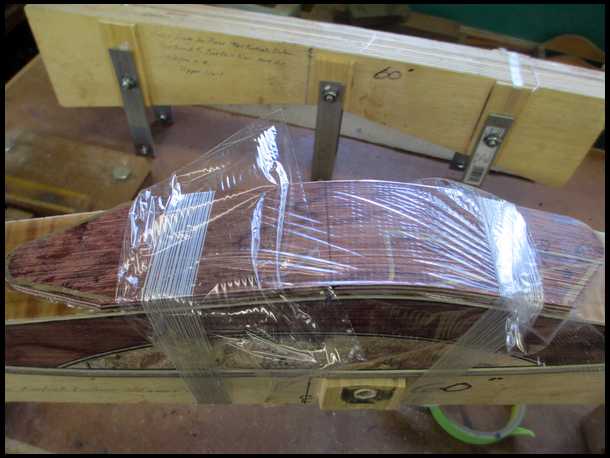
I place the riser and trim strip in the form, fold the Saran wrap over, and use strapping tape to hold it down. I have to press down hard on the trim strips in the concave areas just before the fade-outs to make sure the trim contacts the riser. Also, I have to be careful not to trap the Saran Wrap in the glue joint.
|
|
| From: Nemah
|
|
|
|
|
|
|
| Date: 03-Apr-17 |
|
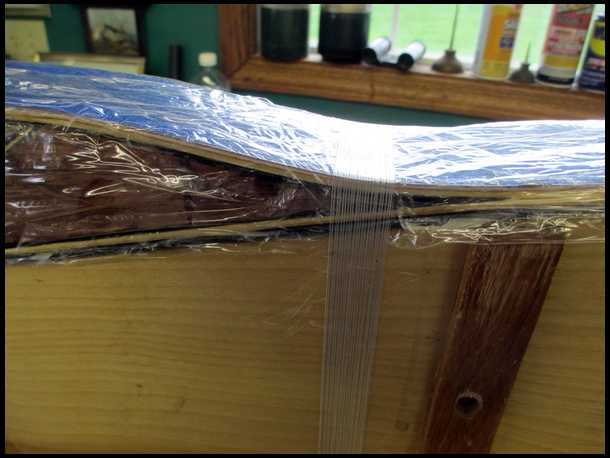
On goes the rubber pad and the metal pressure strip. Strapping tape again.
|
|
| From: Nemah
|
|
|
|
|
|
|
| Date: 03-Apr-17 |
|
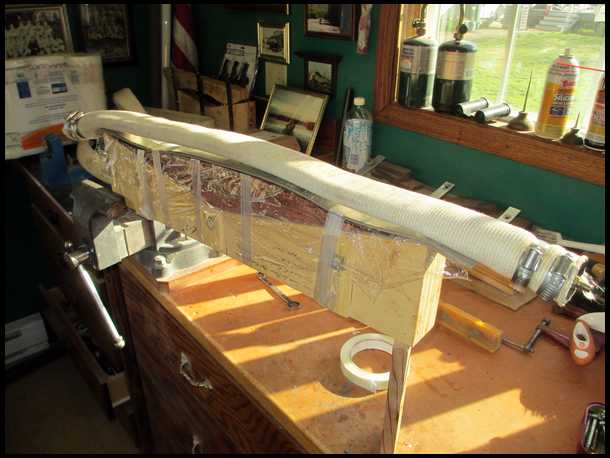
A short piece of hose, especially for this purpose, is next. Bought mine at Binghams'.
|
|
| From: Nemah
|
|
|
|
|
|
|
| Date: 03-Apr-17 |
|
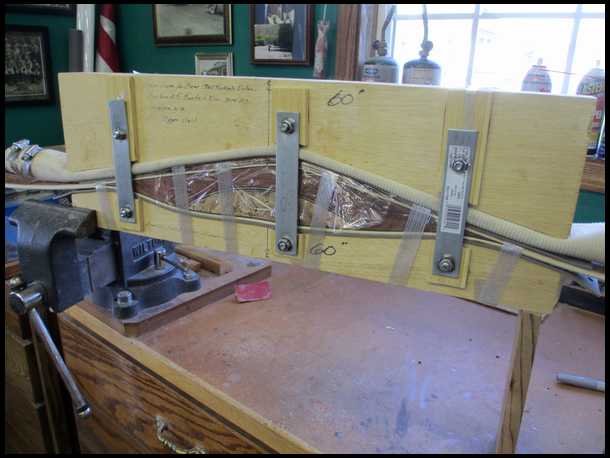
On goes the other half of the form. I add about 60+ psi to the hose, add a valve cap, and either place the form on front of the wood stove or into the heat box. I have to head to town to run some errands, but I'll be back! Richard
|
|
| From: Nemah
|
|
|
|
|
|
|
| Date: 03-Apr-17 |
|
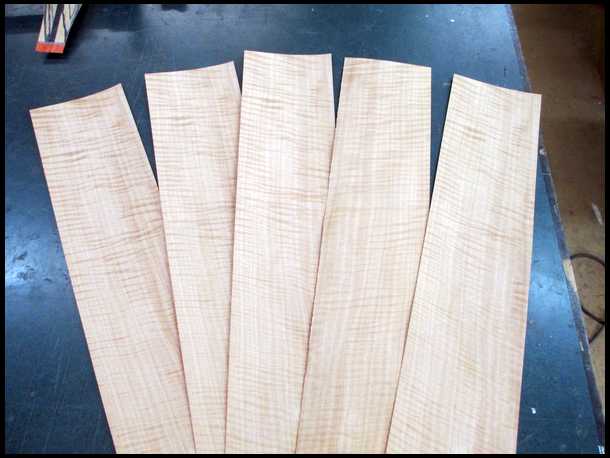
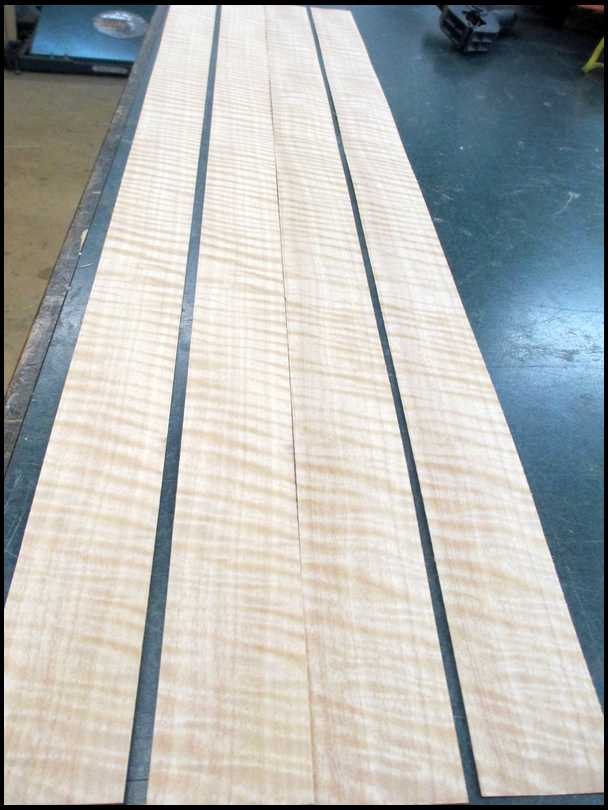
I've been pondering the limb materials and draw weight question as I've built the riser. I've looked at hundreds of bows on the internet and decided I'll use curly Maple under clear glass. But I have a little surprise for you! Remember my trip to Sumner Woodworking? I found these great looking veneers used in furniture making and they're perfect! The wood is called Anegre or Anigre and comes from Africa. The sheets are uniform in color and texture and mic at a consistant .025", perfect for bow limb veneers! They look just like curly Maple. They are 34" long and about 5" wide.
|
|
| From: Nemah
|
|
|
|
|
|
|
| Date: 03-Apr-17 |
|

These were $36.95 for a package of 5 and the Zebrawood was $26.99. Curly Maple laminations run about $20 a pair, or $40 for one bow. Nice, huh? Here's the address and website.
|
|
| From: heavybows
|
|
|
|
|
|
|
| Date: 03-Apr-17 |
|
Great job Richard very nice bows!
|
|
| From: mgerard
|
|
|
|
|
|
|
| Date: 03-Apr-17 |
|
Richard, any chance you will stain those veneers so the character will pop?
|
|
|
|
| From: CD
|
|
|
|
|
|
|
| Date: 03-Apr-17 |
|
It just keeps getting better! :)
|
|
| From: CD
|
|
|
|
|
|
|
| Date: 03-Apr-17 |
|
It just keeps getting better! :)
|
|
| From: Nemah
|
|
|
|
|
|
|
| Date: 03-Apr-17 |
|
I took the riser out of the form and sanded the glue gobs off.
|
|
| From: Nemah
|
|
|
|
|
|
|
| Date: 03-Apr-17 |
|
I used the same sander to feather out the trim strip.
|
|
| From: Nemah
|
|
|
|
|
|
|
| Date: 03-Apr-17 |
|
I measure the same as before....3/4" overhang on both ends and centerline marked. I then blew off the dust with my compressor and glued the parts up.
|
|
| From: Nemah
|
|
|
|
|
|
|
| Date: 03-Apr-17 |
|
Ready for the glue to cure. I'll be back Tuesday afternoon. We're going smallmouth bass fishing in the morning, first time this year. Goodnight, all! Richard
|
|
| From: oldman
|
|
|
|
|
|
|
| Date: 04-Apr-17 |
|
Really enjoying your buildalong. Thank you for taking us along. Really makes me appreciate the amount of work that goes into one of our custom bows. Gil
|
|
| From: bodymanbowyer
|
|
|
|
|
|
|
| Date: 04-Apr-17 |
|
Thanks for sharing your Bow build. Have fun fishing. JF
|
|
| From: Dry Bones
|
|
|
|
|
|
|
| Date: 04-Apr-17 |
|
GREAT THREAD, and thanks for taking time to do it.
-Bones
|
|
| From: Bob Rowlands
|
|
|
|
|
|
|
| Date: 04-Apr-17 |
|
Coming right along. Enjoying this. Thanks.
|
|
|
|
| From: Nemah
|
|
|
|
|
|
|
| Date: 04-Apr-17 |
|
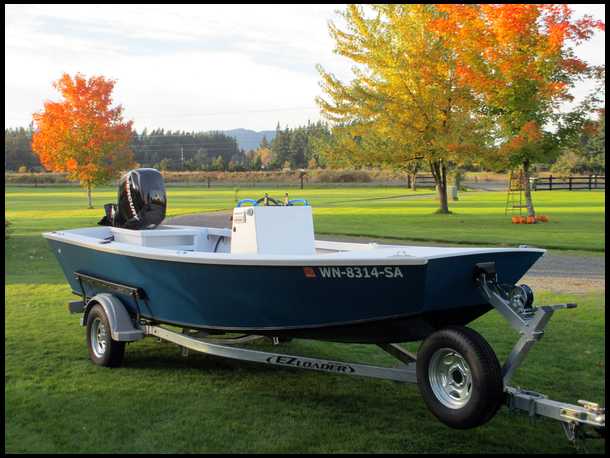
We had a nice, sunny day on American Lake near Tacoma, WA., but it's still a little early and the water temp was 47 degrees, so no bass. The picture is the 17' "Scrambler", our fishing boat I built a few years ago from Glen-L plans. Back to bow building: After looking at all my records of previous bows I've made, the total thickness of the limbs at the fade-outs of this bow is going to measure .270", which SHOULD give me around 45# at 28". But who knows? Could be 50#, could be 40#. Another reason I don't take orders! I'll use.040" Crystal Clear Glass from OMC, the .025" Anegre veneers, and vertical grained bamboo. I'll get started on the limb materials first thing in the morning and glue up the bow tomorrow! Good Night, All! Richard
|
|
| From: romanator
|
|
|
|
|
|
|
| Date: 05-Apr-17 |
|
Love your Boat, as much as your bows, Nemah. Beautiful design and definitely looks like it fishes great; form and function, just like in your bows. Thanks for this great post. A joy to follow.
|
|
| From: Barber
|
|
|
|
|
|
|
| Date: 05-Apr-17 |
|
Thanks for doing this build along, I'm enjoying it a lot !
|
|
| From: Nemah
|
|
|
|
|
|
|
| Date: 05-Apr-17 |
|
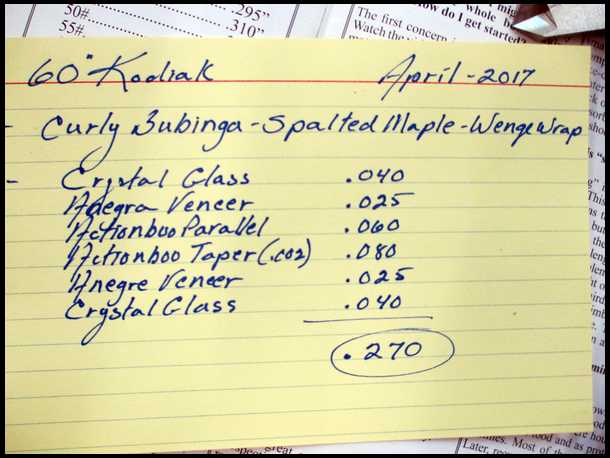
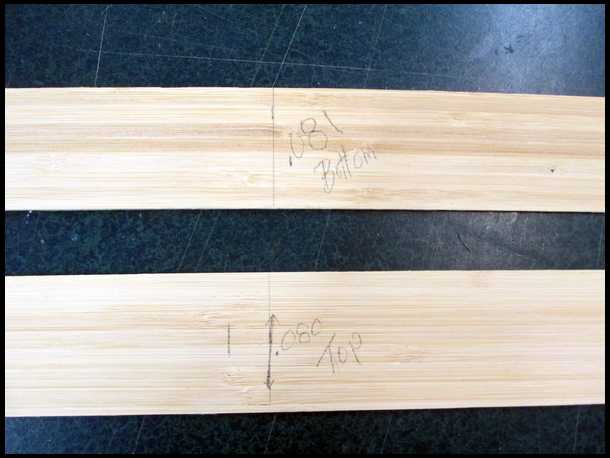
GLUE UP DAY! Here's the plan. My records show that a .270" stack at the fade-out of the Kodiak Deluxe copy will give me a bow of about 45#.
|
|
| From: Nemah
|
|
|
|
|
|
|
| Date: 05-Apr-17 |
|
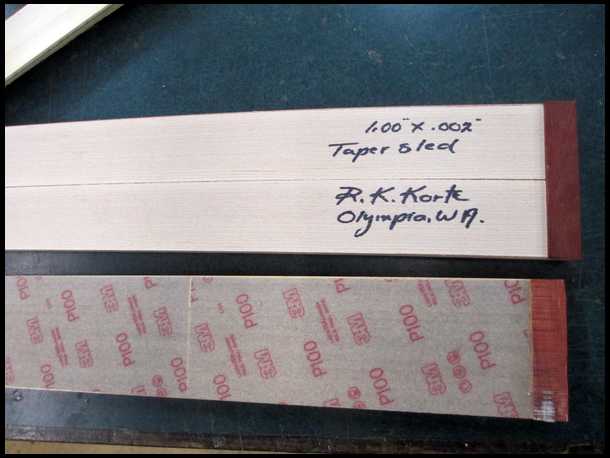
I run the Bamboo strips thru the sander, checking them often with the micrometer, until I get as close as I can. I'll error on the high side......I can always take pounds off, but I can't put pounds on. Here's my sleds.
|
|
| From: Nemah
|
|
|
|
|
|
|
| Date: 05-Apr-17 |
|
Done to my satisfaction. Now I'll taper the ends to join them together.
|
|
| From: Nemah
|
|
|
|
|
|
|
| Date: 05-Apr-17 |
|
Here's how I taper the ends of the lams. Make sure the disc and the guide fence are all square.
|
|
| From: Nemah
|
|
|
|
|
|
|
| Date: 05-Apr-17 |
|
I run them very carefully! Watch out for your fingers! I always have a supply of band-aids on hand!
|
|
| From: Nemah
|
|
|
|
|
|
|
| Date: 05-Apr-17 |
|
Five seconds later..... almost perfect tapers! Now I'll glue them together.
|
|
| From: Nemah
|
|
|
|
|
|
|
| Date: 05-Apr-17 |
|
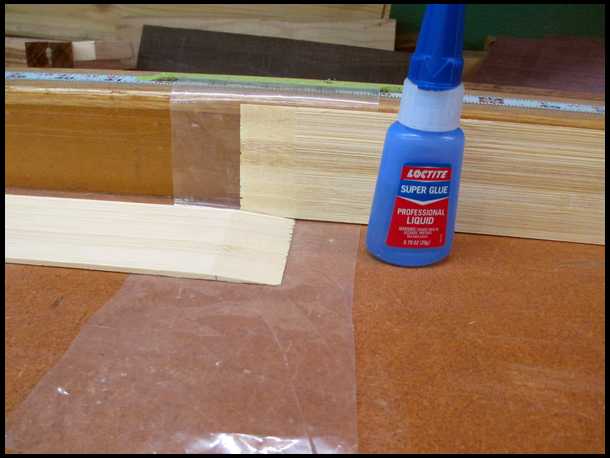
Here's my setup against the long table and backstop for my chop saw. The plastic folds under and over the glue joint to prevent sticking. I just use superglue....quick and easy.
|
|
| From: Nemah
|
|
|
|
|
|
|
| Date: 05-Apr-17 |
|
Clamped up! Those were the tapers. Now I'll sand the parallels to size, taper them, and glue them up in the same manner.
|
|
| From: Nemah
|
|
|
|
|
|
|
| Date: 05-Apr-17 |
|
When the superglue is dry, I sand the joints smooth, but not too much. Just enough to get and gobs of glue off.
|
|
| From: Nemah
|
|
|
|
|
|
|
| Date: 05-Apr-17 |
|
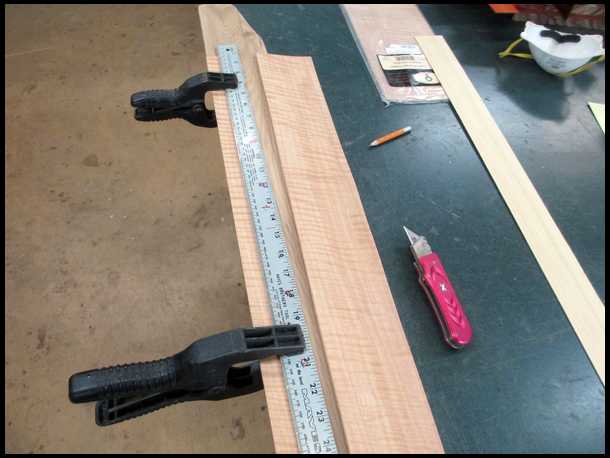
I'm cutting the Anegre veneers to 2". Simple, if you use a sharp knife. I'll need 4 pieces total.
|
|
| From: Nemah
|
|
|
|
|
|
|
| Date: 05-Apr-17 |
|
Done. On to tapering these thin veneers with the 12" disc sander.
|
|
| From: Nemah
|
|
|
|
|
|
|
| Date: 05-Apr-17 |
|
I put a thicker scrap piece of Bamboo on the sandpaper side of the stack to prevent shredding. BE CAREFUL-GO SLOW-watch your fingers!
|
|
| From: Nemah
|
|
|
|
|
|
|
| Date: 05-Apr-17 |
|
I glue them up the same way as the Bamboo lams. While they are drying, I'll prepare the glass. I use a stiff brush to clean the smooth glass surface, the side that will be on the surface of the limbs. Be very careful here! Do not run your fingers along the edges of the glass, or you'll be VERY sorry!! Invisible glass sliver!!! Very painful-impossible to remove!
|
|
| From: Nemah
|
|
|
|
|
|
|
| Date: 05-Apr-17 |
|
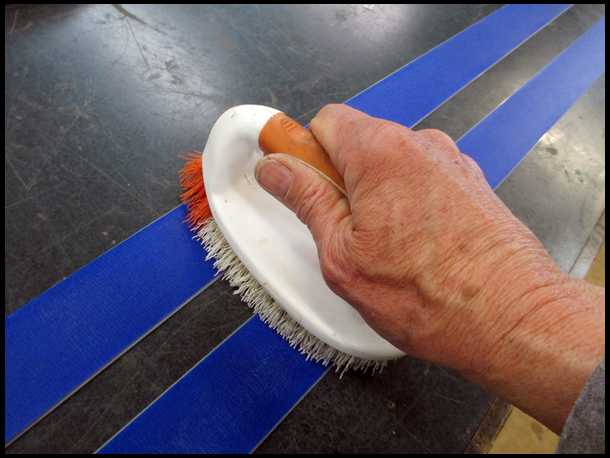
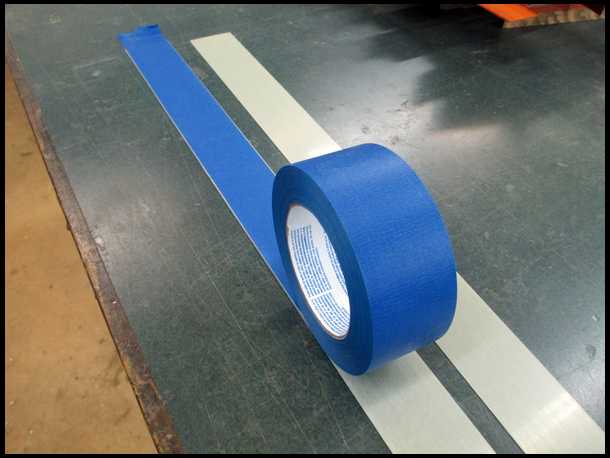
I use easy release blue tape to protect the non-glue side of the glass. Don't worry that it does not reach all the way to the edges-you'll cut that part off anyway. You can buy special tape made for this step, if you want, at Binghams'. After you apply the tape, use a stiff brush to push it down, NOT YOUR FINGERS!
|
|
| From: Nemah
|
|
|
|
|
|
|
| Date: 05-Apr-17 |
|

After marking the correct length of the glass, 65" in this case, I just cut it with my carbide blade on my chop saw. I ALWAYS wear a dust mask when cutting or grinding fiberglass! Use a backer board, or you'll be sorry!
|
|
| From: Nemah
|
|
|
|
|
|
|
| Date: 05-Apr-17 |
|
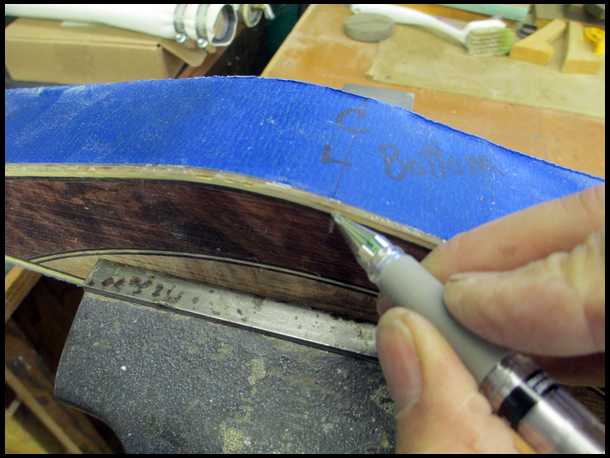
After finding the center of the glass and marking it with a pen or pencil on the tape (do not mark on the rough side of the glass!), I use a triangle file to make a small groove in the glass edge that will be facing me when I glue up the bow. You only have to file the glass that is on the back of the bow, the side that faces toward the target.
|
|
| From: Nemah
|
|
|
|
|
|
|
| Date: 05-Apr-17 |
|
I then fill it in with a fine point felt pen. Now you'll be able to see the exact center of the glass during glue-up. Very important.
|
|
| From: Nemah
|
|
|
|
|
|
|
| Date: 05-Apr-17 |
|
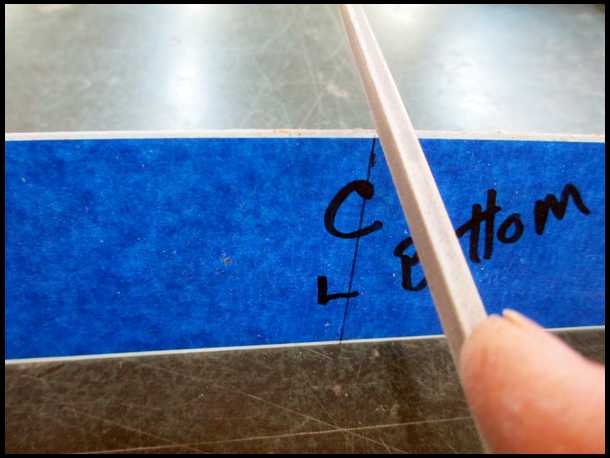
Did you notice that I marked (on the tape) top and bottom? That will remind me where they go during glue-up. I also marked in pencil both Bamboo laminations telling me which is the top and lower limb. I oriented the tapered lamination glue joint to fall below the bows centerline to make the lower limb a bit stiffer, as it should be. Now I stack all lams and glass, in order, on the form. Dry run. Make sure all is good. Then double check it!
|
|
| From: Nemah
|
|
|
|
|
|
|
| Date: 05-Apr-17 |
|
I prepare my glue up area by taping down a 12" wide roll of masking paper(Home Depot) about 7' long. Then I lay out all my lams in the order I'll glue them up, making sure the tapered lam will have the weaker end toward the upper limb. I double check the riser to make sure the fade-out is perfect and there are no glue gobs on the gluing surfaces.
|
|
| From: boatbuilder
|
|
|
|
|
|
|
| Date: 05-Apr-17 |
|
Very nice and very talented this is why I quit building my own bows and went with bows built by people that know what they are doing. Can't wait for the rest.
|
|
| From: Nemah
|
|
|
|
|
|
|
| Date: 05-Apr-17 |
|
I gather all I'll need to do a good job: strapping tape, paper towels, short bar clamp, long bar clamp, knife, Saran Wrap. Then I set out the Smooth-On glue, weight scale, mixing cup, stir sticks, rubber gloves, pressure hose, form bolts and nuts, wrench, rubber pressure strip, metal pressure strip, air pressure gauge, valve cap. I'll turn on the compressor and plug in the heat box. After double checking everything, I'll leave the shop, head to the house and have a snack and something to drink. Not alcohol. I'll sit down a moment and run the process over in my mind. Often I'll remember things I forgot to do.
|
|
| From: Nemah
|
|
|
|
|
|
|
| Date: 05-Apr-17 |
|
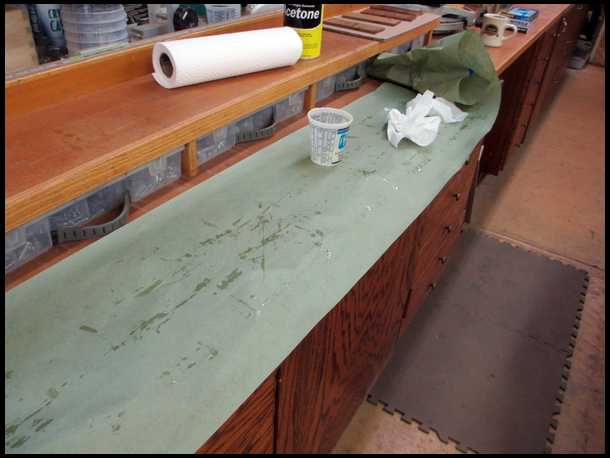
So, here we go! First I brush off all surfaces to be glued with a stiff, clean brush. My glass strips were very dirty, so I gave them a wipe down with acetone.(Some folks say no to this step, but I works for me.)
|
|
| From: Nemah
|
|
|
|
|
|
|
| Date: 05-Apr-17 |
|
From experience, I know I'll need 4 total ounces of Smooth-On, so I'll weigh out 2 oz of resin and 2 oz of hardener, and stir thoroughly for a minute or two, and spread it out. Do not miss any areas!
|
|
| From: Nemah
|
|
|
|
|
|
|
| Date: 05-Apr-17 |
|
Here's my gluing order. Glass first, then the veneer. Then I lay the two glued surfaces together. I apply glue to the other side of the veneer and to the parallel bamboo. Lay the bamboo onto the veneer and glue the back of the bamboo. Then stop. You now have a stack of lams on the counter all aligned at the centerline. Pick up the stack and place it on the Saran Wrap covered bow form.
|
|
| From: oldman
|
|
|
|
|
|
|
| Date: 05-Apr-17 |
|
Whew! All the detail. That's why some of us are not so good at this and some are. You, my friend obviously are. Great post. Don't want to miss a single installment. Someone is going to be a happy recipient. Gil
|
|
| From: Nemah
|
|
|
|
|
|
|
| Date: 05-Apr-17 |
|
Now take the riser and apply glue to the front surface, being very careful not to damage the thin fade-outs! Turn it over in you hand and apply glue to the back also. I always put a little extra glue on both sides of the fade-outs. Now set it in place. It will want to slide off, so be careful and just push it down gently.
|
|
| From: Nemah
|
|
|
|
|
|
|
| Date: 05-Apr-17 |
|
Keep an eye on that riser...don't let it slip off the form! Now glue up the other lams on the counter top: glass first, then the veneer, and the tapered lam last. Double check the centerlines! Keep them in alignment! You can spread the glue when the lams are on the form, but it's too awkward for me, so I always glue them on the counter top. Now pick up the last stack and place it on the form.
|
|
| From: Nemah
|
|
|
|
|
|
|
| Date: 05-Apr-17 |
|
Now gently move the lams if you have to so that the alignment of the centerlines match. Then fold the Saran Wrap over, first one side, then the other. At this point I remove my rubber gloves and use the short bar clamp to squeeze the riser and lams together, but not too tight, constantly squeezing the sides of the stack so the edges are even.
|
|
| From: Nemah
|
|
|
|
|
|
|
| Date: 05-Apr-17 |
|
|
|
| From: Nemah
|
|
|
|
|
|
|
| Date: 05-Apr-17 |
|

Time for strapping tape! I cut several lengths so they are handy and tape the riser down first. You must be careful not to trap the plastic wrap between the glue joints in the fade-out area, Push down hard here with one hand and apply tape with the other.
|
|
| From: Nemah
|
|
|
|
|
|
|
| Date: 05-Apr-17 |
|
|
|
| From: Nemah
|
|
|
|
|
|
|
| Date: 05-Apr-17 |
|
|
|
| From: Nemah
|
|
|
|
|
|
|
| Date: 05-Apr-17 |
|
I work my way toward the ends. Use lots of tape! Push it down and strap it!
|
|
| From: Nemah
|
|
|
|
|
|
|
| Date: 05-Apr-17 |
|
|
|
| From: Nemah
|
|
|
|
|
|
|
| Date: 05-Apr-17 |
|
I'm pushing all the edges together. Now I'll tape on the rubber and metal pressure strips.
|
|
| From: Nemah
|
|
|
|
|
|
|
| Date: 05-Apr-17 |
|
All done with tape! On goes the hose and top of the bow form.
|
|
| From: Nemah
|
|
|
|
|
|
|
| Date: 05-Apr-17 |
|
Sometimes the top of the form fights you and you cannot get the bolt holes to line up. The bar clamp will make you win.
|
|
| From: Nemah
|
|
|
|
|
|
|
| Date: 05-Apr-17 |
|
TA DA! Done...into the heat box. Don't forget to pump up the hose! I mark the bow and time on the top of the heat box.
|
|
| From: Nemah
|
|
|
|
|
|
|
| Date: 05-Apr-17 |
|
Now don't forget to clean up your mess!
|
|
| From: Nemah
|
|
|
|
|
|
|
| Date: 05-Apr-17 |
|
|
|
| From: Nemah
|
|
|
|
|
|
|
| Date: 05-Apr-17 |
|
The masking paper makes short work of the clean up. Now it seems I hear a 6-pack of Rainier beer calling my name...... Till tomorrow! Richard
|
|
| From: CD
|
|
|
|
|
|
|
| Date: 05-Apr-17 |
|
I love it! It is amazing what goes into building a bow.
CD
|
|
| From: fishin coyote
|
|
|
|
|
|
|
| Date: 05-Apr-17 |
|
I was going to wait till the end to comment but I couldn't. The amount of detail in both the bow and the build along is quite impressive. Thank you for taking us along for the ride.
Mike
|
|
| From: Kodiak
|
|
|
|
|
|
|
| Date: 05-Apr-17 |
|
Great thread.
|
|
| From: Dry Bones
|
|
|
|
|
|
|
| Date: 05-Apr-17 |
|
Is it done yet, smells ready.. :-) Really nice work.
-Bones
|
|
|
|
| From: bodymanbowyer
|
|
|
|
|
|
|
| Date: 06-Apr-17 |
|
:-) I've seen a few ways to make my builds go better. Thanks RKK :-) looking great. JF
|
|
| From: Deno
|
|
|
|
|
|
|
| Date: 06-Apr-17 |
|
Super build along Richard. Been a long time since I had Ranier beer:).
Deno
|
|
| From: Nemah
|
|
|
|
|
|
|
| Date: 06-Apr-17 |
|
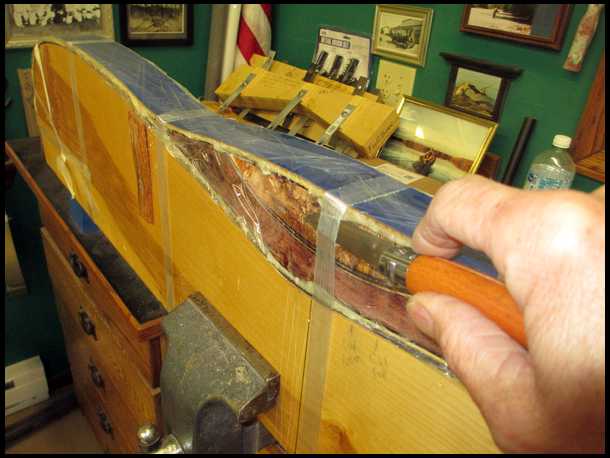
Good Morning from Soggy Olympia! Perfect bow building weather! I took the bow out of the heat box and removed the top of the form. Cutting the strapping tape...
|
|
| From: Nemah
|
|
|
|
|
|
|
| Date: 06-Apr-17 |
|
The tape will fight you, but go slow. Saran Wrap will fight on the side of the tape...
|
|
| From: Bob Rowlands
|
|
|
|
|
|
|
| Date: 06-Apr-17 |
|
This ain't your first rodeo. Very nice. Looking forward to seeing it out of the form. Thanks again for this thread Nemah.
|
|
| From: Nemah
|
|
|
|
|
|
|
| Date: 06-Apr-17 |
|
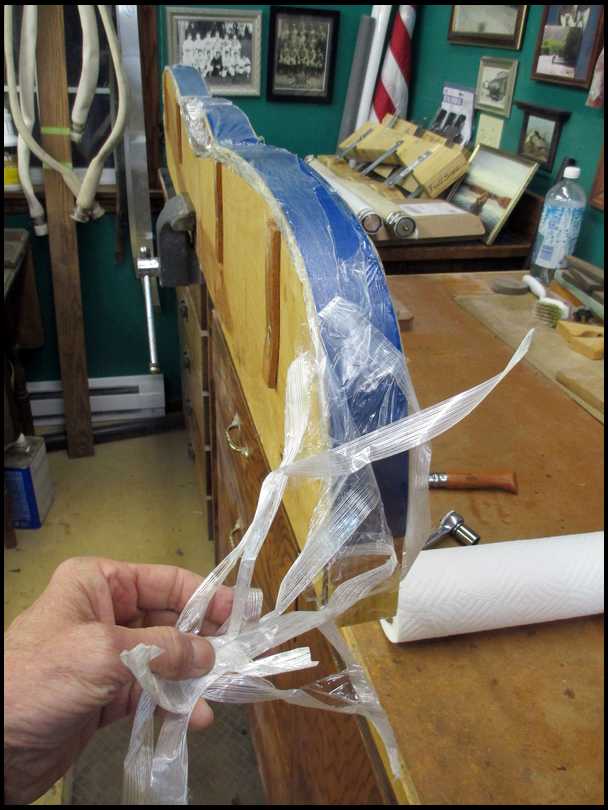
Free at last! (Watch out for sharp gobs of epoxy. They bite!)
|
|
| From: Nemah
|
|
|
|
|
|
|
| Date: 06-Apr-17 |
|
Time to cut off the ends of the bow. I made these handy jigs to speed things along. You should make some too!
|
|
| From: Nemah
|
|
|
|
|
|
|
| Date: 06-Apr-17 |
|
Just slide it over the limb and use a felt pen to mark the cut-off line.
|
|
| From: Nemah
|
|
|
|
|
|
|
| Date: 06-Apr-17 |
|
Off to my chop saw with a carbide blade. Hold the bow tight against the fence. I leave a little extra just in case. Don't forget to put on your dust mask!
|
|
| From: Nemah
|
|
|
|
|
|
|
| Date: 06-Apr-17 |
|
Done! Now it's off to the sander to knock off the extra glue..
|
|
| From: Nemah
|
|
|
|
|
|
|
| Date: 06-Apr-17 |
|
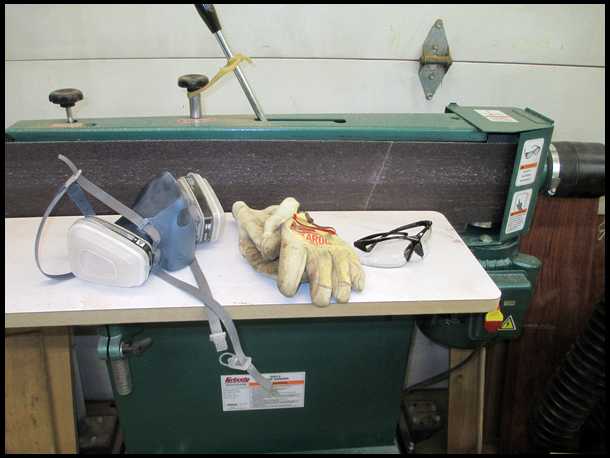
Safety first! Eye protection-gloves-respirator. This is a nasty job with epoxy and fiberglass slivers flying thru the air. I always wear long-sleeved shirts. If you start itching when you're done, take a shower and change your clothes
|
|
| From: Nemah
|
|
|
|
|
|
|
| Date: 06-Apr-17 |
|
I just try to sand the glue off. I'll flip the bow over several times to get all edges. Bad dust!
|
|
| From: Nemah
|
|
|
|
|
|
|
| Date: 06-Apr-17 |
|
|
|
| From: Nemah
|
|
|
|
|
|
|
| Date: 06-Apr-17 |
|
Done! Most glue gone. Now I'll run the bow thru the drum sander to even out the edges.
|
|
| From: Wohlf63
|
|
|
|
|
|
|
| Date: 06-Apr-17 |
|
Nemah, What do you charge to have RH 45@28,60" 1960 Bear Archery Kodiak Deluxe built?
Thank you
|
|
| From: Nemah
|
|
|
|
|
|
|
| Date: 06-Apr-17 |
|
A piece of plywood with a raised edge on the end does the job nicely...
|
|
| From: Nemah
|
|
|
|
|
|
|
| Date: 06-Apr-17 |
|
I make 2-3 passes on each edge, supporting the end of the board as it move thru the sander. Perfect!
|
|
| From: Nemah
|
|
|
|
|
|
|
| Date: 06-Apr-17 |
|
I pick up the bow and dust off the board after each pass, otherwise glass and wood dust can accumulate under the bow.
|
|
| From: Nemah
|
|
|
|
|
|
|
| Date: 06-Apr-17 |
|
All this time, I have my air filtration fan going and I'm wearing my respirator. Be sure to wear yours too.
|
|
| From: Nemah
|
|
|
|
|
|
|
| Date: 06-Apr-17 |
|
Time to take the tape off the back of the bow. I mark the centerline on the riser and attack the tape.
|
|
| From: Nemah
|
|
|
|
|
|
|
| Date: 06-Apr-17 |
|
The blue tape will fight you sometimes too. Go slow, use your fingernails, but be careful of the edges! Fiberglass slivers! Now you get to see what the limbs look like. If you applied the glue carefully to all surfaces, they should be perfect. If you see white or cloudy spots, you didn't apply enough glue. You will next time though, won't you?
|
|
| From: Nemah
|
|
|
|
|
|
|
| Date: 06-Apr-17 |
|
I like what I see!
|
|
| From: vintage-bears
|
|
|
|
|
|
|
| Date: 06-Apr-17 |
|
Incredible! Jeez, I want one!!!
|
|
| From: Nemah
|
|
|
|
|
|
|
| Date: 06-Apr-17 |
|
Now I use a felt pen to mark the centerline of the bow. If you look carefully just above the line, you can see the joint in the veneers where I glued them together. That will be covered up with the grip accents.
|
|
| From: Nemah
|
|
|
|
|
|
|
| Date: 06-Apr-17 |
|
Here's the grip accent on an original 1960 Kodiak Deluxe. I'm not trying to make an exact copy, and I'm out of brown glass anyway. So what do you think I should use?
|
|
| From: Nemah
|
|
|
|
|
|
|
| Date: 06-Apr-17 |
|
My grip accents will be 10" long, so I'll use my center ruler to mark the location. I'm headed back to the shop to do some more work, so I'll continue this later. Richard
|
|
| From: Wohlf63
|
|
|
|
|
|
|
| Date: 06-Apr-17 |
|
I really want one!
|
|
|
|
| From: mgerard
|
|
|
|
|
|
|
| Date: 06-Apr-17 |
|
Those veneers look great! Thought they might be much lighter.
|
|
| From: cueman
|
|
|
|
|
|
|
| Date: 06-Apr-17 |
|
Got green and white Richard? I think that would add a nice contrast to the red/brown and warm tones in the bow.
|
|
| From: mgerard
|
|
|
|
|
|
|
| Date: 06-Apr-17 |
|
orange and gray accents
|
|
| From: Nemah
|
|
|
|
|
|
|
| Date: 06-Apr-17 |
|
Who make orange glass?
|
|
| From: Nemah
|
|
|
|
|
|
|
| Date: 06-Apr-17 |
|
Back from the shop! I decided to use thin wood strips for the grip accents instead of glass. Figured Bubinga, same as the riser, and curly maple. I cut the strips on the bandsaw and ran them thru the drum sander.
|
|
| From: Nemah
|
|
|
|
|
|
|
| Date: 06-Apr-17 |
|
I'm going to use the riser as a form so I cover it with Saran Wrap.
|
|
| From: Nemah
|
|
|
|
|
|
|
| Date: 06-Apr-17 |
|
Glue them up, but not the top and bottom surfaces.
|
|
| From: Nemah
|
|
|
|
|
|
|
| Date: 06-Apr-17 |
|
Lay them on the form (riser) and align the centerlines. (You did mark the strips, didn't you?) Cover with more Saran Wrap and tape them down with Strapping tape.
|
|
| From: Nemah
|
|
|
|
|
|
|
| Date: 06-Apr-17 |
|
Lay on the rubber and metal pressure strips (with tape) and bolt the top to the form. Pump up the hose (I use 60#+) and place the glue-up in front of a wood stove or other warm place. DO NOT PUT IT IN THE HEAT BOX! THE LIMBS MAY DE-LAMINATE! (voice of experience!)
|
|
| From: bodymanbowyer
|
|
|
|
|
|
|
| Date: 06-Apr-17 |
|
Glad to see wood for overlay, since you didn't have brown and white Glass. JF
|
|
| From: Nemah
|
|
|
|
|
|
|
| Date: 06-Apr-17 |
|
After looking at the previous picture, I noticed that you couldn't tell that I was using the short bow form, not the full size one I glue up the entire bow in. Why didn't I glue the strips to the riser? You'll see! But right now, I'm going to have a few Rainiers and watch the Masters golf tournament. (This is called, "Waiting for epoxy to cure." I'll be back in about 4 hours! Richard
|
|
| From: Knifeguy
|
|
|
|
|
|
|
| Date: 06-Apr-17 |
|
This is going to be a beautiful bow. Thanks again, Richard. Lance.
|
|
| From: Bob Rowlands
|
|
|
|
|
|
|
| Date: 06-Apr-17 |
|
Organized, thorough, and professional. Nicely done.
|
|
| From: beachbowhunter
|
|
|
|
|
|
|
| Date: 06-Apr-17 |
|
I'm gonna guess that you will taper/feather edge the ends of the overlay so when you glue it on, you won't chance messing up the adjacent glass.
This is an awesome build along!
|
|
| From: Dry Bones
|
|
|
|
|
|
|
| Date: 06-Apr-17 |
|
Enjoying and tapping the LIKE button... Continuously.
-Bones
|
|
| From: oldman
|
|
|
|
|
|
|
| Date: 07-Apr-17 |
|
Like the choice of material for the riser overlays. Matching the riser woods. Beautiful. Gil
|
|
| From: Nemah
|
|
|
|
|
|
|
| Date: 07-Apr-17 |
|
Good morning! I unwrapped the overlay last evening ad all looks good. I sanded the glue off the edges.
|
|
| From: Nemah
|
|
|
|
|
|
|
| Date: 07-Apr-17 |
|
That was supposed to be "and", not ad. I used a felt pen to mark the upper and lower orientation, just in case.
|
|
| From: Nemah
|
|
|
|
|
|
|
| Date: 07-Apr-17 |
|
|
|
| From: Nemah
|
|
|
|
|
|
|
| Date: 07-Apr-17 |
|
I use a circle template to mark the top and bottom contours.
|
|
| From: Nemah
|
|
|
|
|
|
|
| Date: 07-Apr-17 |
|
Then I trim a few areas with my band saw and finish up with the 12" disc sander. This whole step really isn't THAT necessary, but it saves me times and frustration trying to shape the overlay. I do not like overlays or bow tips that are not rounded.
|
|
| From: Nemah
|
|
|
|
|
|
|
| Date: 07-Apr-17 |
|
I mask off the overlay area on the bow and sand it carefully with 60 grit sandpaper. I also sand the back of the overlay a bit. I pull off the masking tape and wipe the sanded area with acetone. (I buy the acetone from a quality auto paint store) All ready for glue.
|
|
| From: Nemah
|
|
|
|
|
|
|
| Date: 07-Apr-17 |
|
I use a small craft stick to spread the glue on the bow in tight areas. I place the overlay in place, cover it with Saran Wrap, and tape it down tightly. Then I lift up the plastic wrap and wipe off any excess glue from the rounded overlay areas. Do not use acetone on the cloth here! It may bleed under the edges and compromise the glue joint. I don't taper the upper and lower edges at this time. I'll do that later. Once again, this shaping of the overlay is a step you can skip. I just find it makes life easier for me when I shape the bow.
|
|
| From: Nemah
|
|
|
|
|
|
|
| Date: 07-Apr-17 |
|
The bow and form spent the night in front of my wood stove, along with Mickey, my big, wild tom cat who adopted me two years ago. He likes me so much, he's never sprayed urine on anything in or around the shop as most tom cats do. After a quick breakfast, I'll head to the shop and begin shaping the bow.
|
|
| From: bodymanbowyer
|
|
|
|
|
|
|
| Date: 07-Apr-17 |
|
Wish I could watch in person, educational, for sure. JF
|
|
| From: HitorMiss
|
|
|
|
|
|
|
| Date: 07-Apr-17 |
|
Great tutorial and thread. Really looking good.
|
|
| From: Bob Rowlands
|
|
|
|
|
|
|
| Date: 07-Apr-17 |
|
This thread IS particularly good. After seeing Nemahs tipi on here I had a gut feeling this was thread was gonna be real good.
|
|
| From: Nemah
|
|
|
|
|
|
|
| Date: 07-Apr-17 |
|
I just returned from Tacoma where I picked up some Bamboo flooring and medicine for our aging Springer Spaniel, Harley. So, here we go again! Time to shape the bow. Since I ran the bow thru the drum sander, I know the side are parallel, so I simply find the center of each limb and mark them with a carbide tipped scriber. The clamp really helps.
|
|
| From: Nemah
|
|
|
|
|
|
|
| Date: 07-Apr-17 |
|

Here's my pattern for the limbs, made out of an old scrap of thin fiberglass. I use the scribe to mark all my cuts in the fiberglass and a felt pen for the wood.
|
|
| From: Nemah
|
|
|
|
|
|
|
| Date: 07-Apr-17 |
|
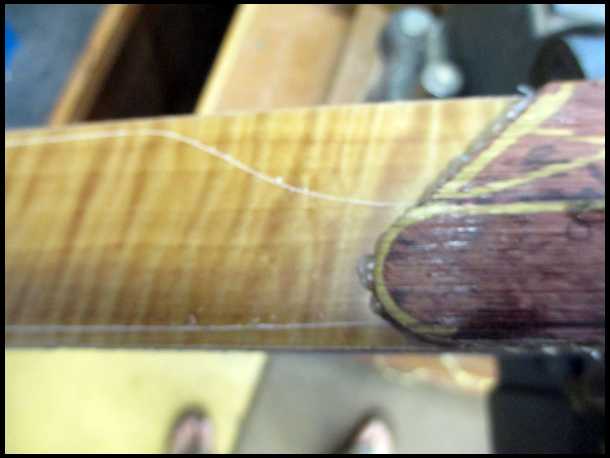
|
|
| From: Nemah
|
|
|
|
|
|
|
| Date: 07-Apr-17 |
|

All ready to cut out the bow. Respirator, gloves, safety glasses, and shop vac needed here. I wear ear protection too, as sometime the limbs scream very loudly while being cut up. I also turn on the air filtration unit. I use a 3/8" 4 tooth blade to do the job.
|
|
| From: Nemah
|
|
|
|
|
|
|
| Date: 07-Apr-17 |
|
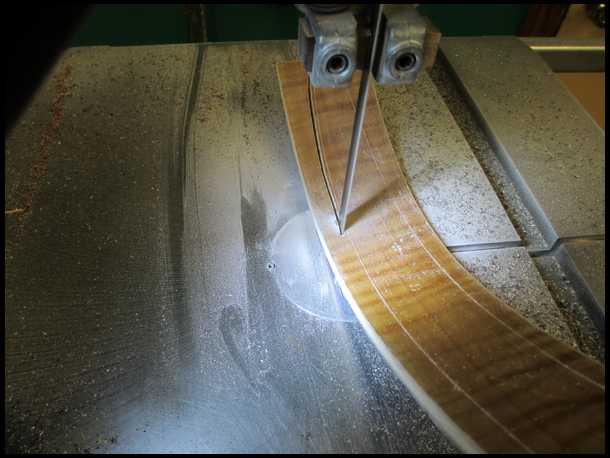
The cardinal rule here is DO NOT CUT INTO THE LINE! Leave a little extra, you can always sand it off, but you can't put it back on! Go slow if you must.
|
|
| From: Nemah
|
|
|
|
|
|
|
| Date: 07-Apr-17 |
|
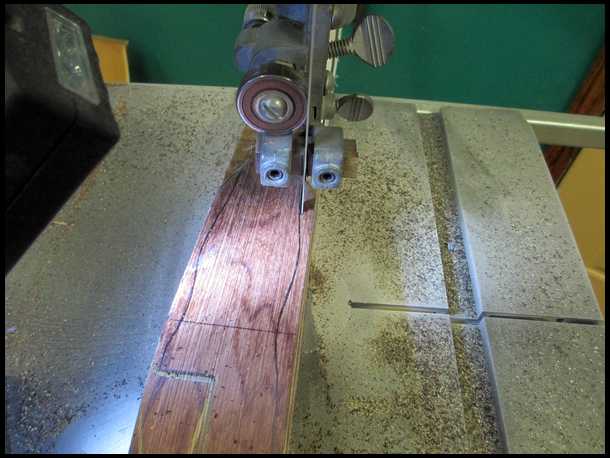
The light comes from my Chinese magnetic LED. Very handy! I normally would have made the riser and limbs 1-3/4" wide, but I already had 2" Crystal Clear glass from OMC on hand, so I used it. But now I have to trim the extra wood off the sides of the riser. Slow down here-you're cutting thick wood. It will smoke, but be strong and carry on, slowly!
|
|
| From: Nemah
|
|
|
|
|
|
|
| Date: 07-Apr-17 |
|
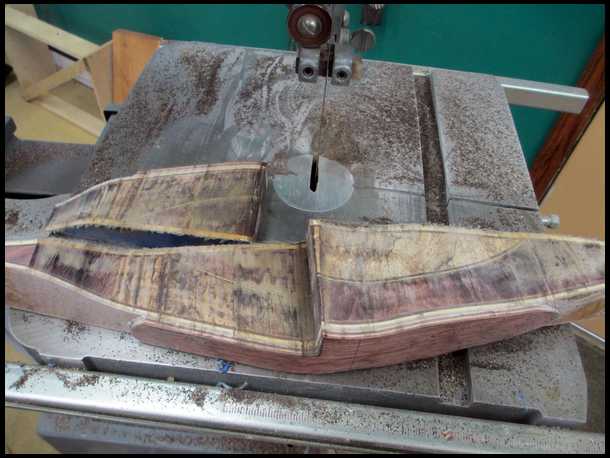
I leave the blue tape on the belly side of the limbs to protect them from scratches. Works for me. Next I'll cut out the sight window. Be careful when the bandsaw blade approaches the "L" where the arrow shelf and sight window meet. I leave a little extra wood here to file out later. Looking good!
|
|
| From: Nemah
|
|
|
|
|
|
|
| Date: 07-Apr-17 |
|
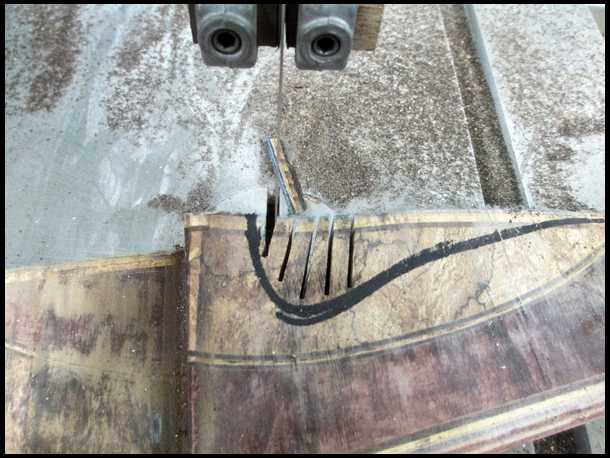
Now I'll cut out the grip. I used the original Bear bow as a pattern for this, but because the wood overlay is thicker than a fiberglass overlay would have been, I moved it forward a bit. I make several straight cuts first and connect them with a final cut. Don't try to be perfect here. You can always grind or sand this area later.
|
|
| From: Nemah
|
|
|
|
|
|
|
| Date: 07-Apr-17 |
|
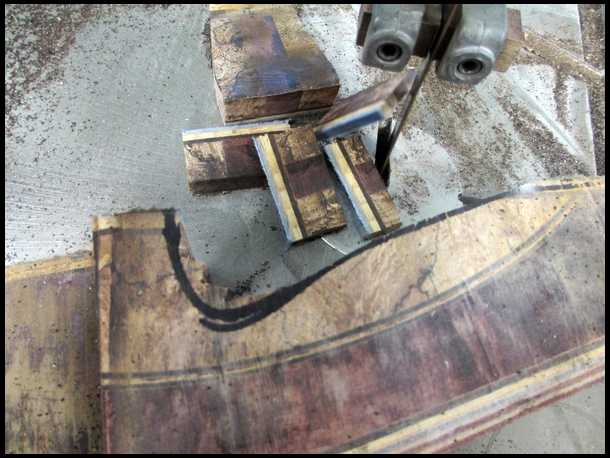
|
|
| From: Nemah
|
|
|
|
|
|
|
| Date: 07-Apr-17 |
|
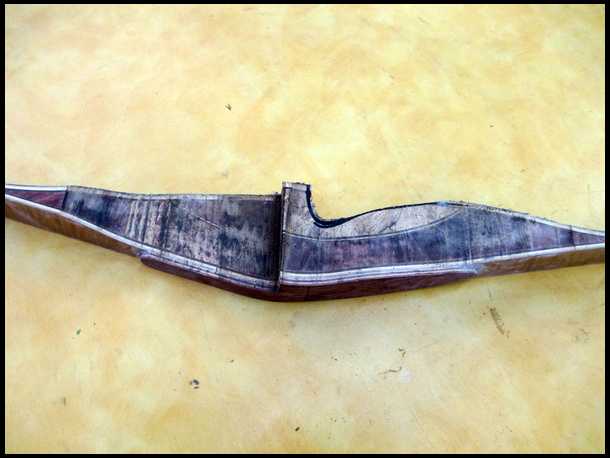
TA DAA! All cut out and looking better every moment!
|
|
| From: Nemah
|
|
|
|
|
|
|
| Date: 07-Apr-17 |
|
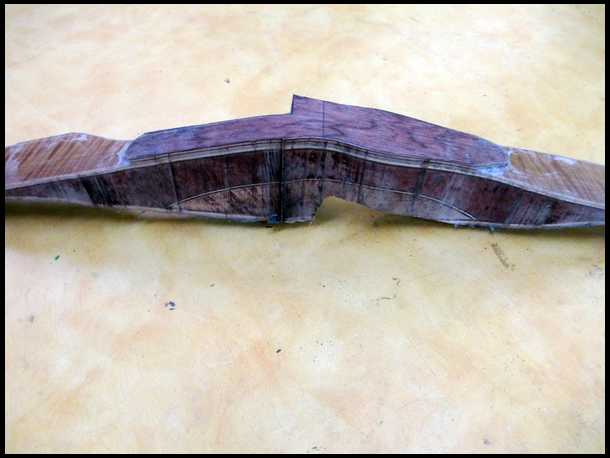
|
|
| From: Nemah
|
|
|
|
|
|
|
| Date: 07-Apr-17 |
|
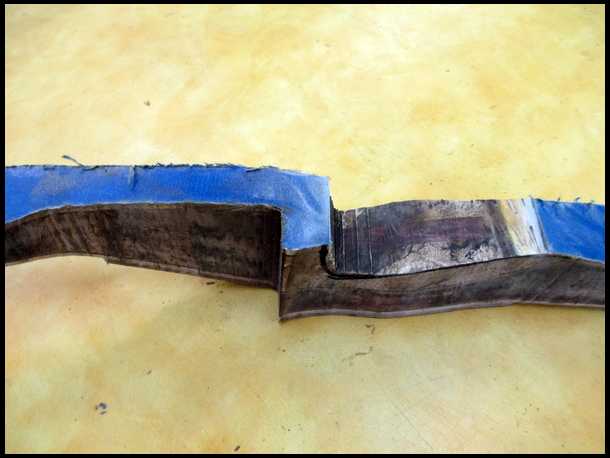
I leave all my protective gear on and head for the big belt sander. The rule here is "Don't sand past your lines!" This step is very dusty, so make sure the dust collection system is working! WEAR YOUR RESPIRATOR!!
|
|
| From: Nemah
|
|
|
|
|
|
|
| Date: 07-Apr-17 |
|
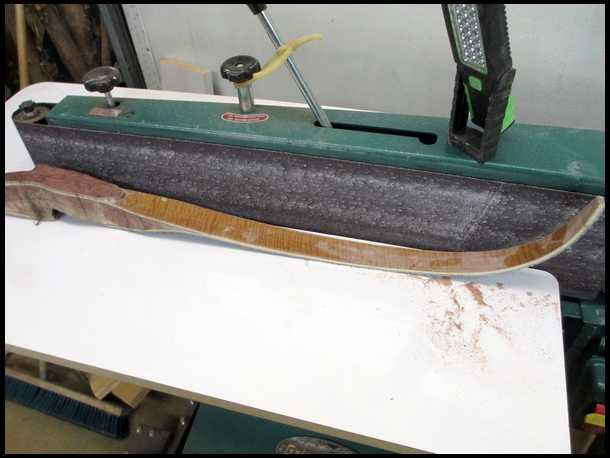
Sand carefully, slowly, always wiping off the dust and checking your lines. Be VERY careful that as you are sanding one area, the other end of the bow or limb doesn't wander into the sandpaper. You can cut into your lines in a heartbeat!
|
|
| From: Nemah
|
|
|
|
|
|
|
| Date: 07-Apr-17 |
|
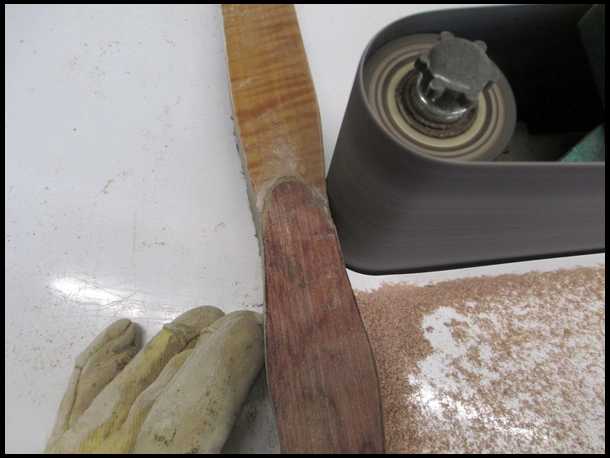
I use the entire belt to shape the bow. Don't worry about areas you can't reach with the sander. You'll clean them up later.
|
|
| From: Nemah
|
|
|
|
|
|
|
| Date: 07-Apr-17 |
|
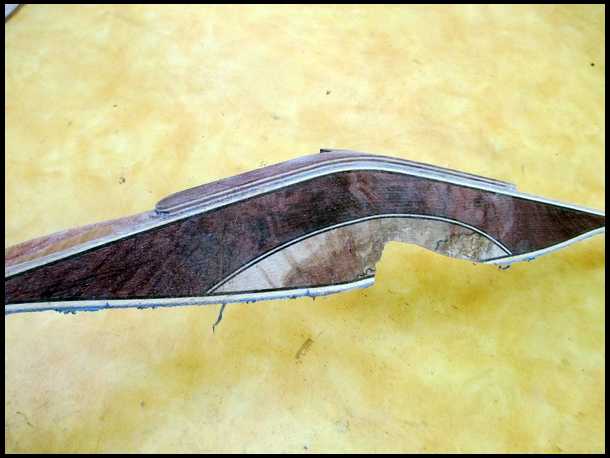
Looking VERY nice!
|
|
| From: Nemah
|
|
|
|
|
|
|
| Date: 07-Apr-17 |
|
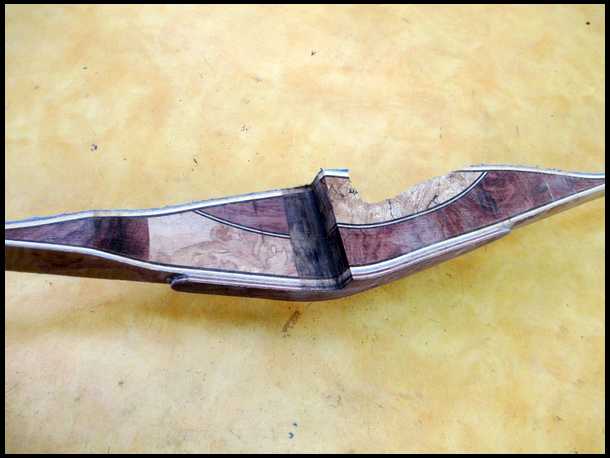
|
|
| From: Nemah
|
|
|
|
|
|
|
| Date: 07-Apr-17 |
|
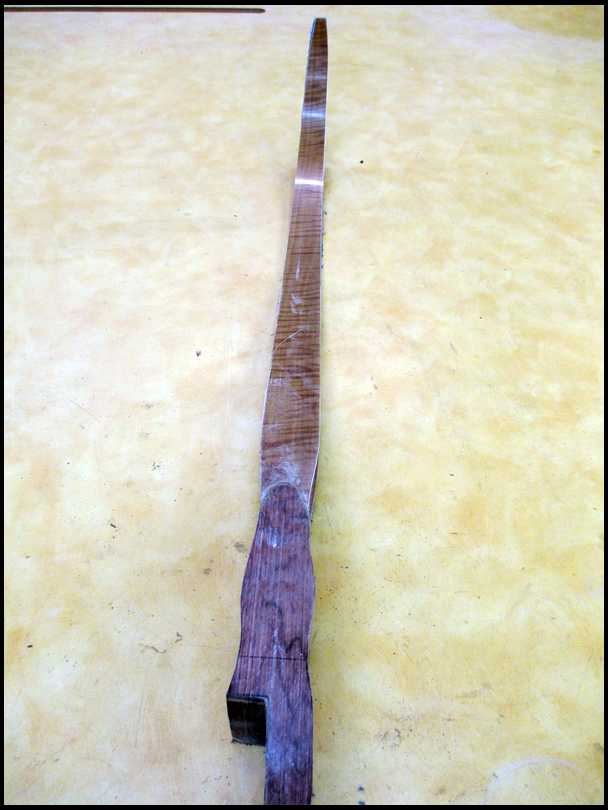
Time for a break. The total time from the first bandsaw cut to the end of sanding was one hour and 22 minutes. Time for a Rainier and the Masters Golf Tournament! Next on the agenda will be shaping, smoothing, and sanding. A LOT of sanding!
|
|
| From: Nemah
|
|
|
|
|
|
|
| Date: 07-Apr-17 |
|
Mickey says "See you all later!"
|
|
| From: Nemah
|
|
|
|
|
|
|
| Date: 07-Apr-17 |
|
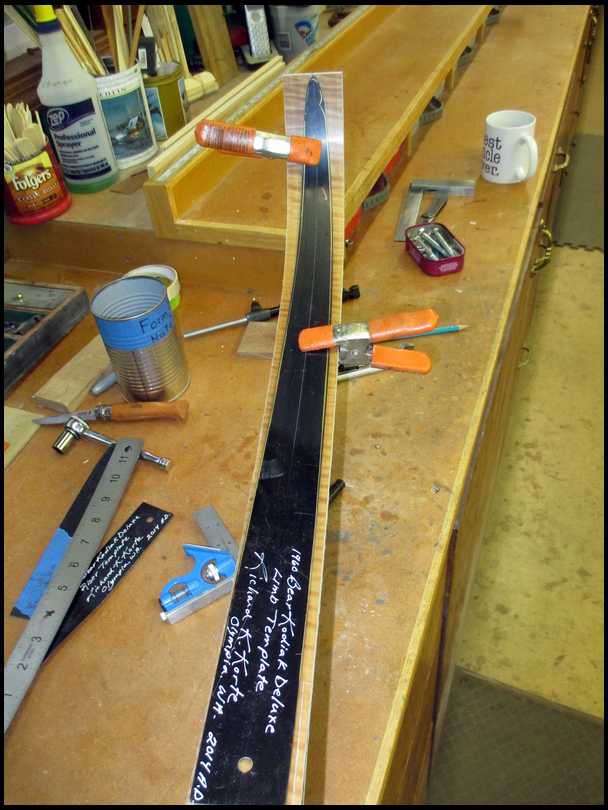
Oopps! Someone reminded me to show the limb template, so here it is. Old strip of fiberglass lam. It's not exactly the same as the original Bear, but it works for me.
|
|
| From: brianbfree
|
|
|
|
|
|
|
| Date: 07-Apr-17 |
|
You Sir are an artist.
B
|
|
| From: CD
|
|
|
|
|
|
|
| Date: 07-Apr-17 |
|
Absolutely fantastic!
|
|
| From: bodymanbowyer
|
|
|
|
|
|
|
| Date: 07-Apr-17 |
|
Pretty cool and all I had to do is tap a finger,lol. JF
|
|
|
|
|
|
| From: Nemah
|
|
|
|
|
|
|
| Date: 08-Apr-17 |
|
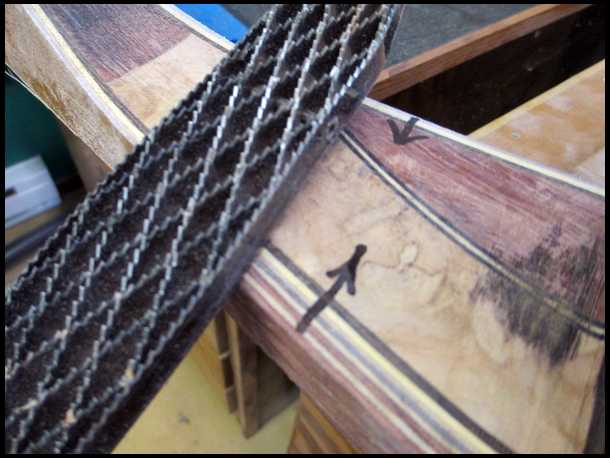
Good Morning! I worked on the sight window last night. I want a mild radius near the arrow rest so the arrow only touches the arrow plate. This Japanese 2-sided file works great for this task. Be very careful to file only in the direction of the arrows, otherwise you may shred or tear the fiberglass. I only use the "fine" side of the file....the "coarse" side will cut too deep and leave gouges that are VERY hard to remove.
|
|
| From: Nemah
|
|
|
|
|
|
|
| Date: 08-Apr-17 |
|
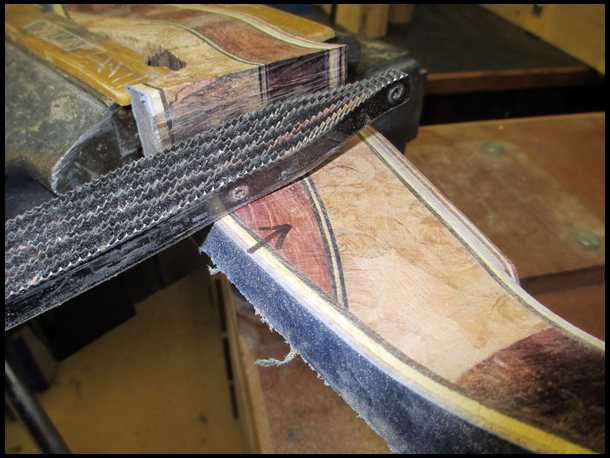
File away, but be careful near the shelf. Take your time. Turn the bow around in the vice when you do the other side of the window.
|
|
| From: Nemah
|
|
|
|
|
|
|
| Date: 08-Apr-17 |
|
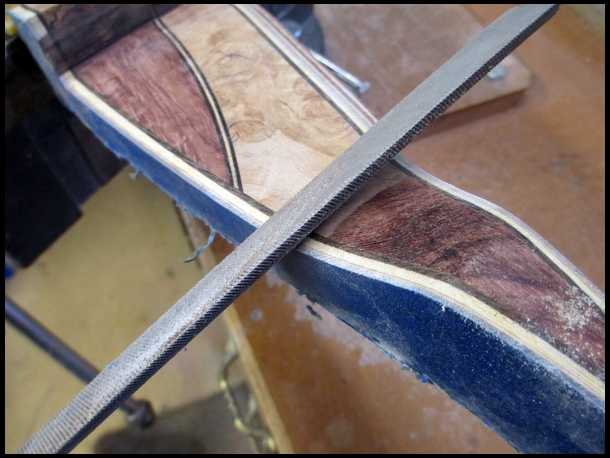
Don't try to use this file to do the concave area (to the right of the arrow in the above picture, where light and dark wood meet) or you'll gouge the edges. I switch to a 10" half round wood file (Nicholson) and use the rounded side for this spot. Take your time! Why hurry?
|
|
| From: Nemah
|
|
|
|
|
|
|
| Date: 08-Apr-17 |
|
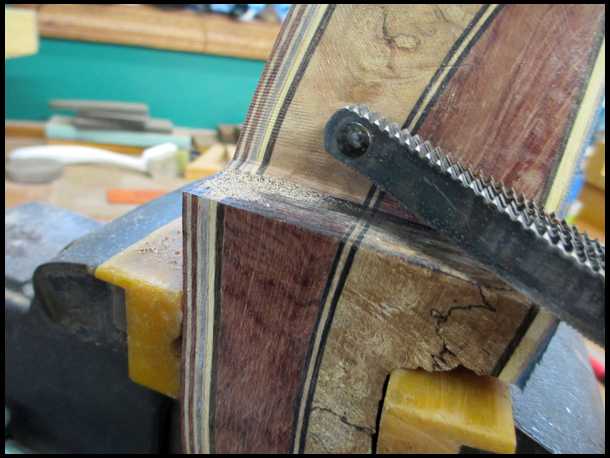
When I said "Don't use this file" in the above picture,I meant the flat Japanese rasp. DO use the half-round. When I'm happy with the sight window radius, I start on the shelf. I want a very slight radius (front to back) on the shelf so that the feather rest (original on the 1960 Bear) lies fairly flat. I also want the shelf to be level & perpendicular to the sight window. Be careful here! Always file FROM FIBERGLASS TO WOOD, never from wood to glass! I've messed up a few bows during this step!
|
|
| From: Nemah
|
|
|
|
|
|
|
| Date: 08-Apr-17 |
|
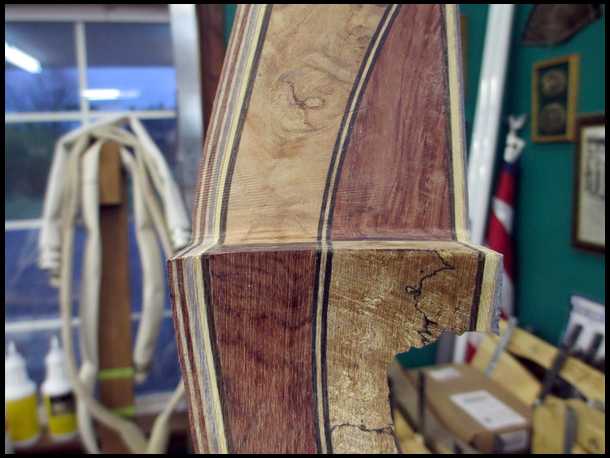
|
|
| From: Nemah
|
|
|
|
|
|
|
| Date: 08-Apr-17 |
|
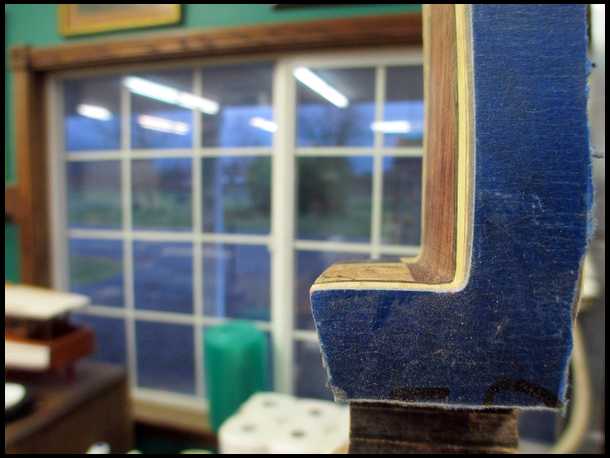
|
|
| From: Nemah
|
|
|
|
|
|
|
| Date: 08-Apr-17 |
|
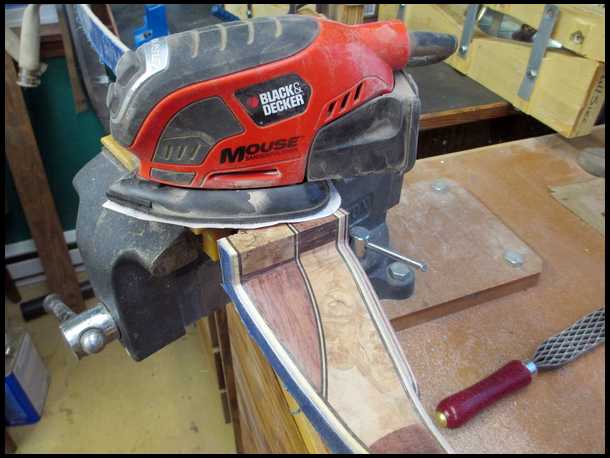
I'm happy with the results, so I'll clean up the rasp and file marks with my "Mouse" sander and 80 grit sandpaper. I use these sanders for much of the sanding I do on my bows. They are inexpensive and work great! I have 3!
|
|
| From: Nemah
|
|
|
|
|
|
|
| Date: 08-Apr-17 |
|

I use those soft yellow pads in my bench vise to protect the bows while I file or sand. Get some! Here's the sight window after a minute or two of sanding. I wiped it down with denatured alcohol to get a preview of the colors and grain.
|
|
| From: Nemah
|
|
|
|
|
|
|
| Date: 08-Apr-17 |
|
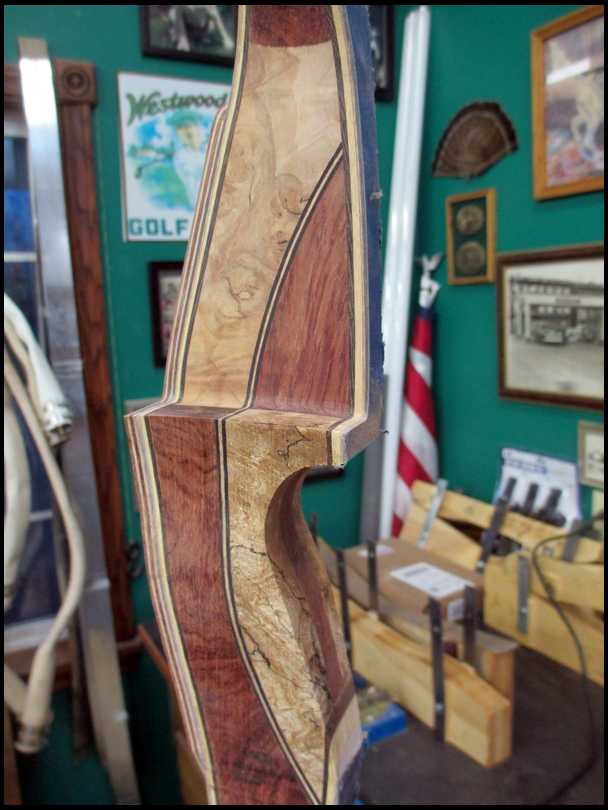
I used my spindle sander to clean up the throat of the grip. Now it's on to shaping! I'll tackle that job after breakfast! See you later! Richard
|
|
| From: oldman
|
|
|
|
|
|
|
| Date: 08-Apr-17 |
|
Look at that wood grain and burl pop! Absolutely beautiful. Great work and lot's of it. Thank you for sharing. Hard to believe how quickly you are moving along. I admire your skill and workmanship. Gil
|
|
| From: Dry Bones
|
|
|
|
|
|
|
| Date: 08-Apr-17 |
|
I completely agree. Absolutely Beautiful.
-Bones
|
|
| From: Nemah
|
|
|
|
|
|
|
| Date: 08-Apr-17 |
|
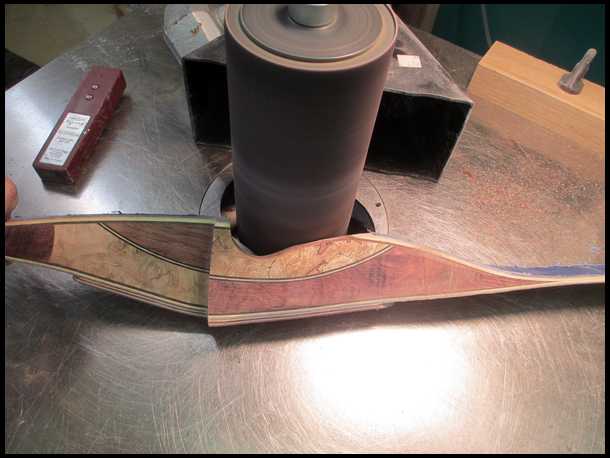
The file is a "Shinto Saw Rasp" available on Amazon for $15.95. Super tool, highly recommend it! I've been shaping and sanding the riser area of the bow now for 2-1/2 hours straight, and I need a break. I ran into a problem (as usual). The Bubinga is VERY hard and tough and the Maple burl is soft. That make shaping and sanding hard. I cut a little too deep in the grip area Maple and have 2 slight depressions. I'm not happy about that! More on that later. Here's how I begin shaping, with my spindle sander. Dust collector on, respirator, glasses, and gloves on also.
|
|
| From: Nemah
|
|
|
|
|
|
|
| Date: 08-Apr-17 |
|
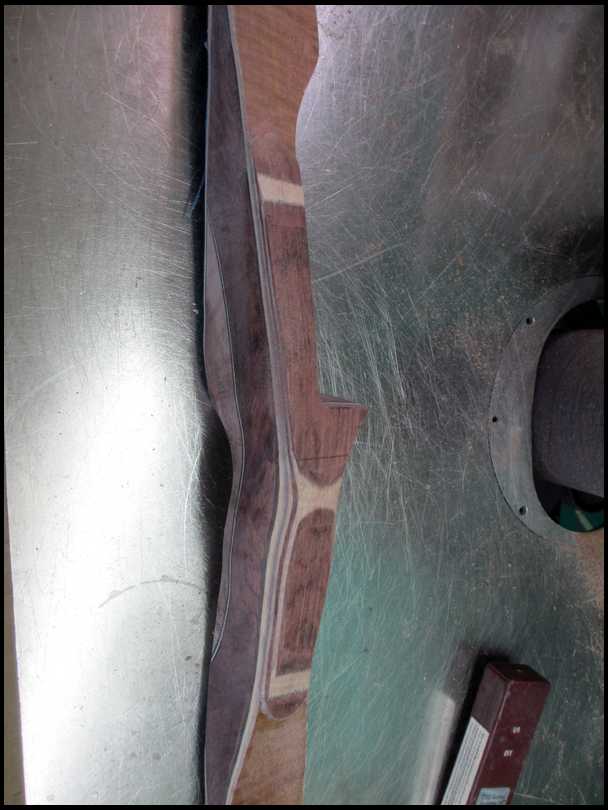
When I get to this point, it's time to stop.
|
|
| From: Nemah
|
|
|
|
|
|
|
| Date: 08-Apr-17 |
|
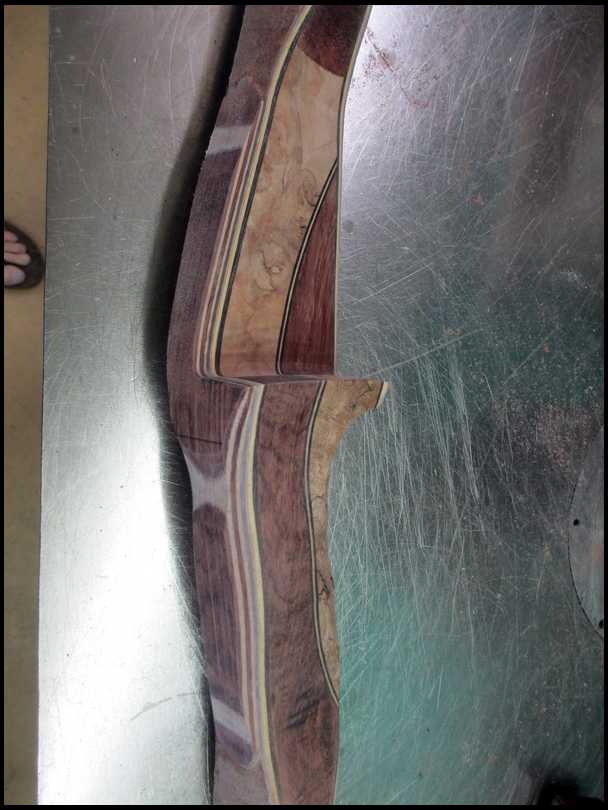
|
|
| From: Nemah
|
|
|
|
|
|
|
| Date: 08-Apr-17 |
|
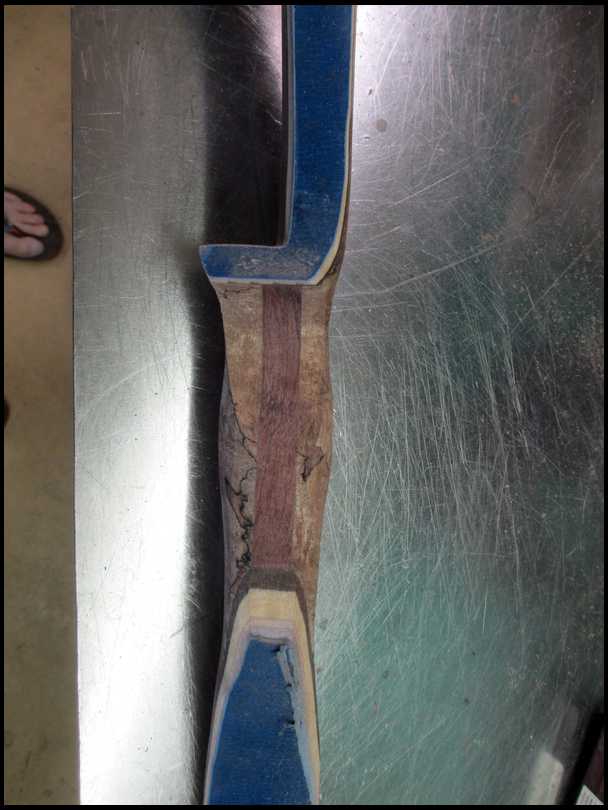
|
|
| From: Nemah
|
|
|
|
|
|
|
| Date: 08-Apr-17 |
|
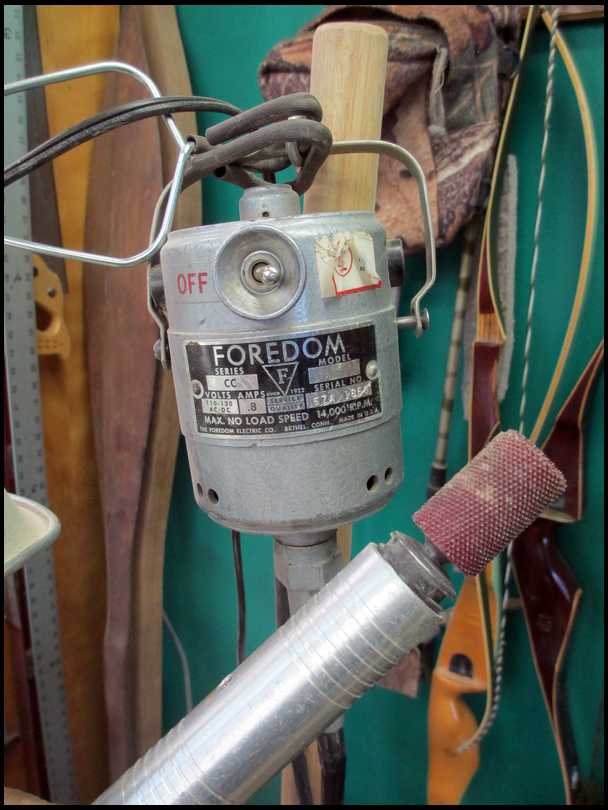
I bought this Foredom tool many years ago when I was carving duck decoys. It has a foot control and many different bits are available. It's perfect for shaping any wooden project. I have a 3/4" carbide rasp in the hand piece. Here we go!
|
|
| From: Nemah
|
|
|
|
|
|
|
| Date: 08-Apr-17 |
|
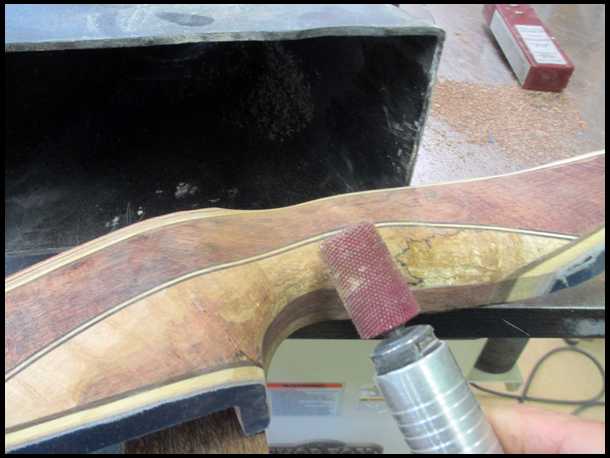
This is where I ran into a problem: the burl was soft and I took off a little too much material.
|
|
| From: Nemah
|
|
|
|
|
|
|
| Date: 08-Apr-17 |
|
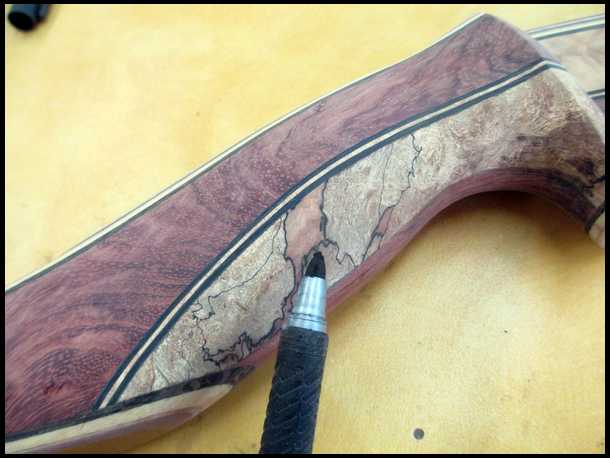
But life goes on! I'm pointing to the low spot. I continued shaping for over an hour, then switched to my "Mouse" sander with 80 grit paper and worked for 35 minutes. Then on to 120 grit paper and more sanding. After 2-1/2 hours, I pooped out, disappointed in the low spots on the grip. Time to take a break, have a snack, and think through the problem. I'll have at it again later in the day, and everything will work out! I've learned to NEVER work on a project when I'm tired and frustrated. That's when I make the most mistakes, and many projects I've done ended up in the woodstove.
|
|
| From: Nemah
|
|
|
|
|
|
|
| Date: 08-Apr-17 |
|
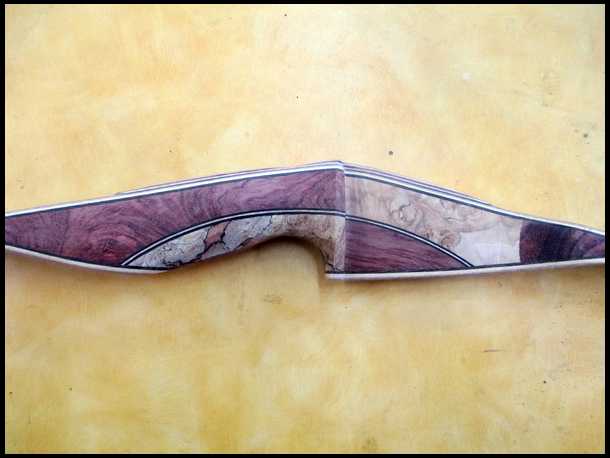
Sanded to 120 grit..
|
|
| From: Nemah
|
|
|
|
|
|
|
| Date: 08-Apr-17 |
|
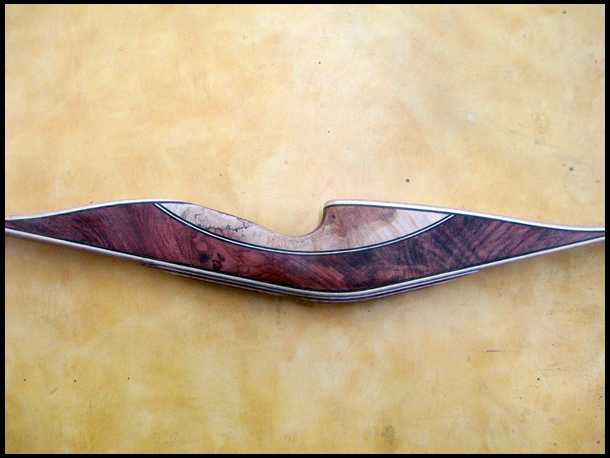
|
|
| From: Nemah
|
|
|
|
|
|
|
| Date: 08-Apr-17 |
|
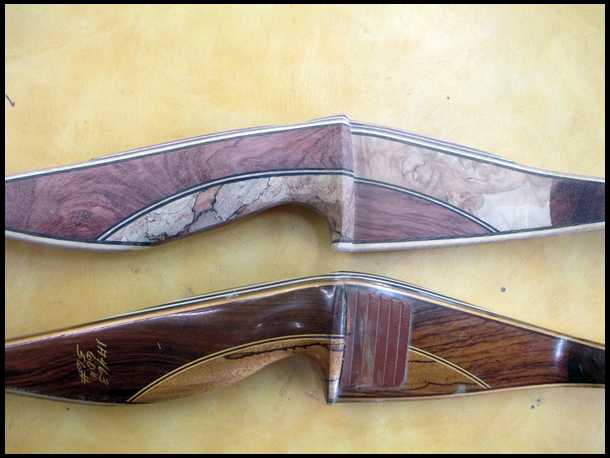
Compared to an original....many differences obvious.....still a lot of shaping and sanding to do. I'll be back! Richard
|
|
| From: Bob Rowlands
|
|
|
|
|
|
|
| Date: 08-Apr-17 |
|
I hate that when something goes wrong in a project. It deflating. Kinda sucks the life out. But you just have to bite the bullet and proceed. I have found as time goes by, I've said many times ,why did that bug me?, One thing about power tools, you can work real fast, and you can screw up real fast as well. Oh well. Bow is a looker for sure.
|
|
| From: Homey88
|
|
|
|
|
|
|
| Date: 08-Apr-17 |
|
looking good!
|
|
| From: CD
|
|
|
|
|
|
|
| Date: 08-Apr-17 |
|
Looks great!
|
|
| From: Nemah
|
|
|
|
|
|
|
| Date: 08-Apr-17 |
|
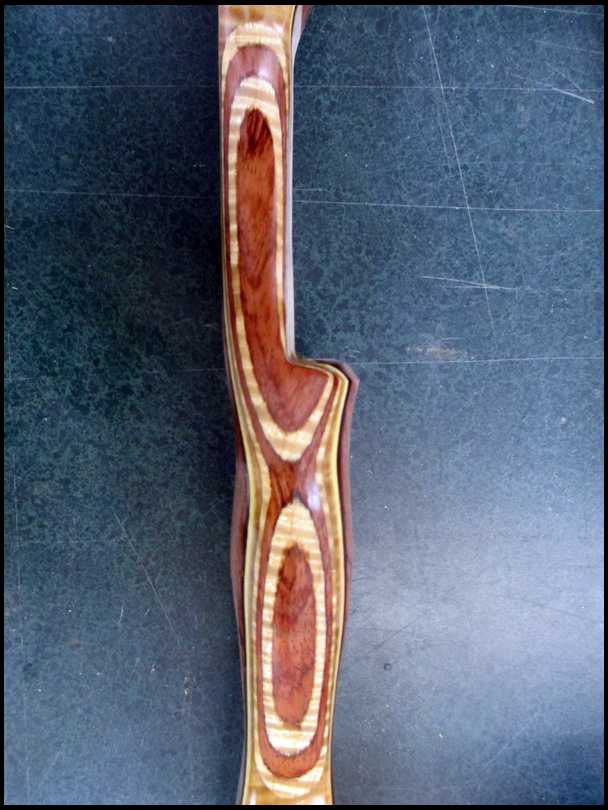
After watching the Masters this afternoon, I went back to the shop and spent about 3 more hours shaping and sanding the riser to the point where I'm satisfied with it. The problem of a depression or two in the grip area will be solved by several coats of MAS marine epoxy, built up in those two spots, then sanded to match the grip contours. The epoxy will also seal and harden the spalted Maple. When building bows, I complete the riser first and apply 4-6 coats of epoxy, then move on to the limbs. When the limbs are done, I sand all the epoxy and then spray on the finish. So tomorrow, I'll give the riser all the epoxy coats and let it cure overnight before working on the limbs. Here are some photos of the riser. I wiped it down with alcohol so you can see the grain better.
|
|
| From: Nemah
|
|
|
|
|
|
|
| Date: 08-Apr-17 |
|
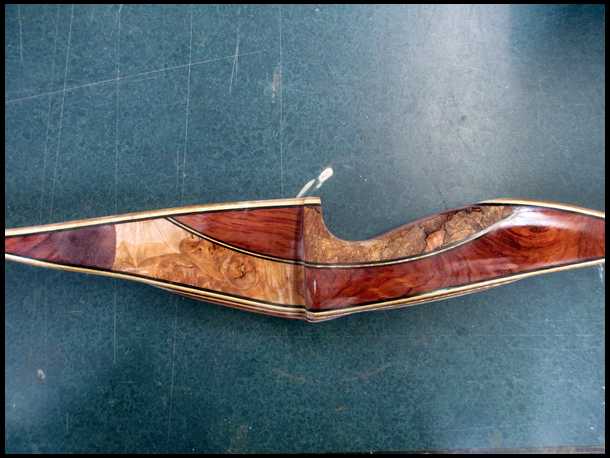
|
|
| From: Nemah
|
|
|
|
|
|
|
| Date: 08-Apr-17 |
|
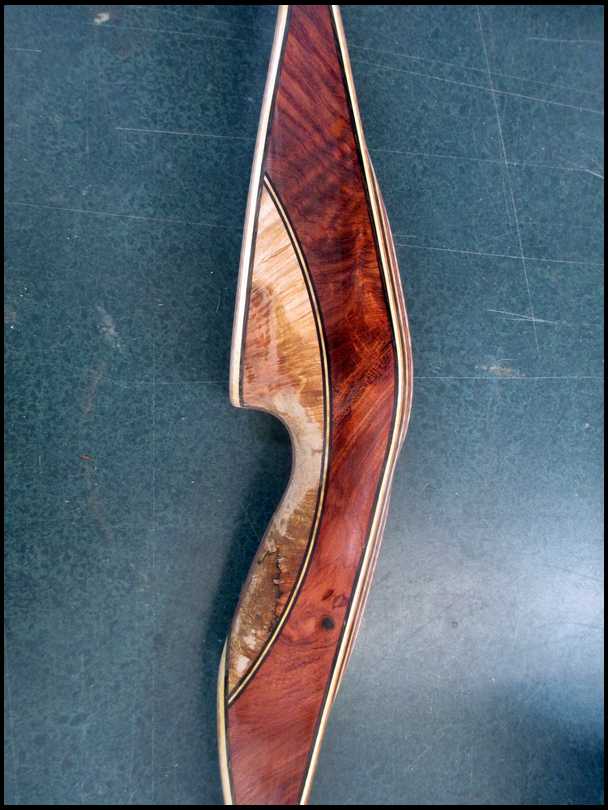
|
|
| From: Nemah
|
|
|
|
|
|
|
| Date: 08-Apr-17 |
|
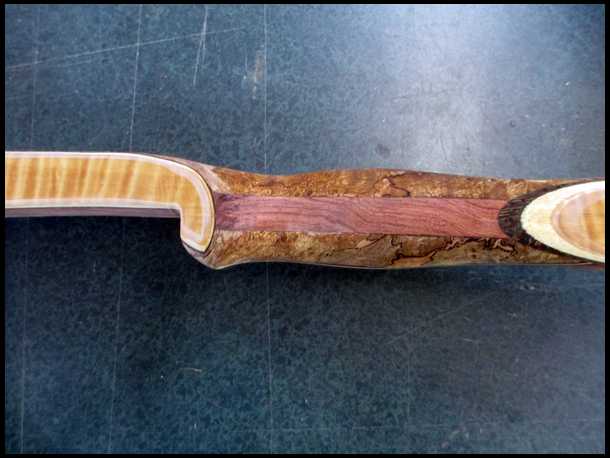
|
|
| From: Gator1
|
|
|
|
|
|
|
| Date: 08-Apr-17 |
|
Looking good.
|
|
| From: oldman
|
|
|
|
|
|
|
| Date: 09-Apr-17 |
|
What depressions? Looks like you've got it covered. Great work. Gil
|
|
| From: Dry Bones
|
|
|
|
|
|
|
| Date: 09-Apr-17 |
|
Nice Gil. LOL Richard, I am enjoying this thread, and that riser looks amazing.
-Bones
|
|
| From: Nemah
|
|
|
|
|
|
|
| Date: 09-Apr-17 |
|
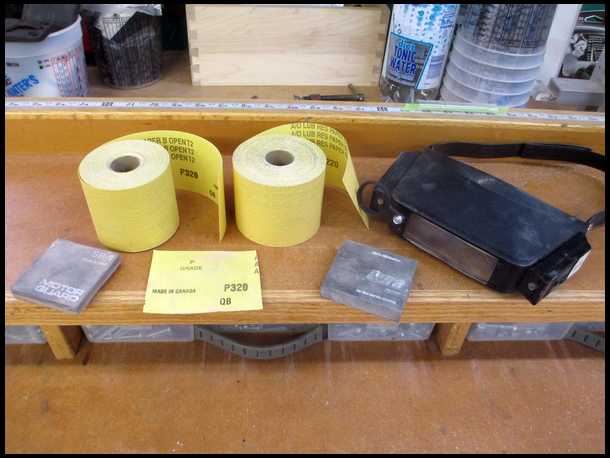
Good Sunday Morning! We have sunshine in Olympia, even though we had a light frost last night! I was up early, finishing the riser with 400 grit sandpaper, in preparations for epoxy. I buy my sandpaper in adhesive rolls from Wesco, our local auto paint store. I use the magnifying goggles to spot tiny imperfections and scratches, and then clean them up with 320 or 400 grit paper.
|
|
| From: Nemah
|
|
|
|
|
|
|
| Date: 09-Apr-17 |
|
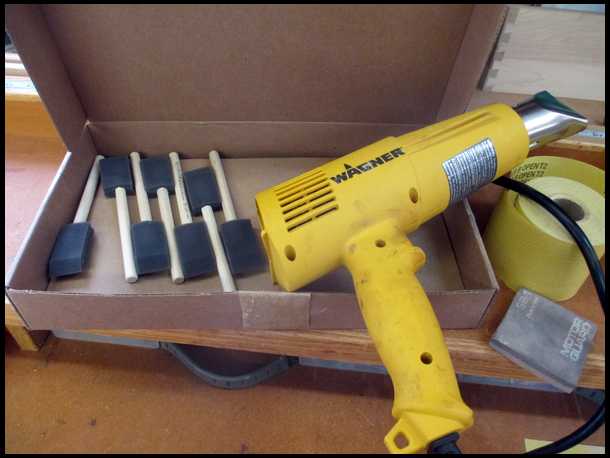
Those pads in the previous photo are sanding pads that I also get from Wesco. Visit your auto paint store....you'll be happy! I get my foam brushes, to apply the epoxy, from Ebay. They cost about one dollar each at the local hardware store, but pennies each if you buy them on line. The heat gun.....a trick I learned from building 6 wooden boats and working extensively with epoxy: if you apply epoxy to wood and then heat the wood, outgassing will occur.(tiny air bubbles pushing out of the wood by the heat) and your epoxy will have thousands of tiny bubbles in the finish. Not pretty. You'll have to sand them all out and start again, not an easy task on a 17' boat! BUT...if you heat the wood before you apply the epoxy, the opposite will occur: the cooling wood will actually suck the epoxy deep into the pores, leaving your finish clear and bubble-free! But in the case of a bow, don't apply too much heat, especially in the fade-out areas.
|
|
| From: Biathlonman
|
|
|
|
|
|
|
| Date: 09-Apr-17 |
|
Thats the best looking Bear reproduction I've ever seen!
|
|
| From: Nemah
|
|
|
|
|
|
|
| Date: 09-Apr-17 |
|

I've always used Mas epoxy products, although any high quality epoxy will do nicely. 2 parts resin to 1 part hardener, perfectly metered out by the handy pumps, saves all the hassle of measuring in cups. I use a 1 oz. graduated medicine cup for this purpose, as only a small amount will be required for a bow riser. I'm going to apply 4-6 coats of epoxy. I'll slop on a coat and let it cure till it's masking tape sticky, then apply another coat. Repeat-repeat-repeat. Don't let the epoxy set till it's hard, otherwise you'll have to wait 24 hours and sand the riser before applying the next coat. DO NOT PLACE THE RISER NEAR A HEAT SOURCE! GAS OUT WILL OCCUR-many bubbles! Every now and then, lightly touch the riser too see if it feels like masking tape sticky. If it does, mix up another batch of epoxy and slop it on. Don't worry about the smoothness of the finish-you're going to sand it smooth later.
|
|
| From: Nemah
|
|
|
|
|
|
|
| Date: 09-Apr-17 |
|
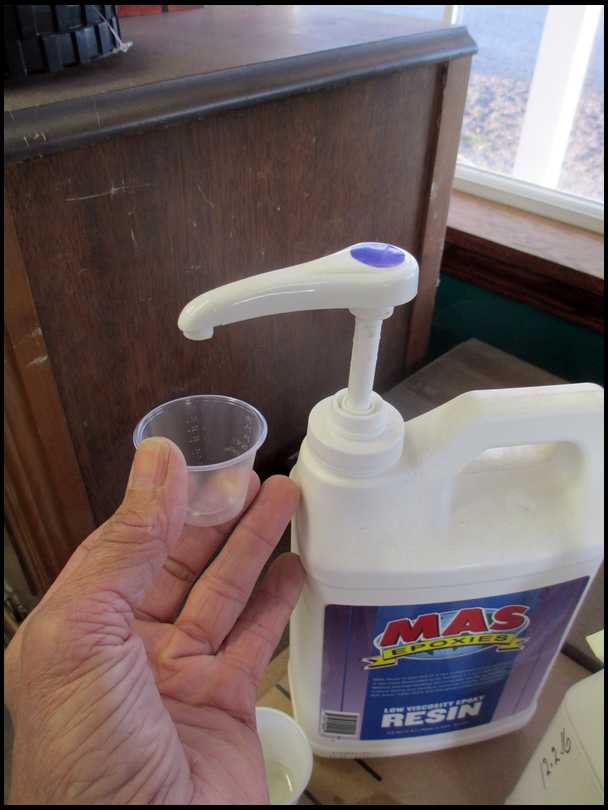
|
|
| From: Nemah
|
|
|
|
|
|
|
| Date: 09-Apr-17 |
|
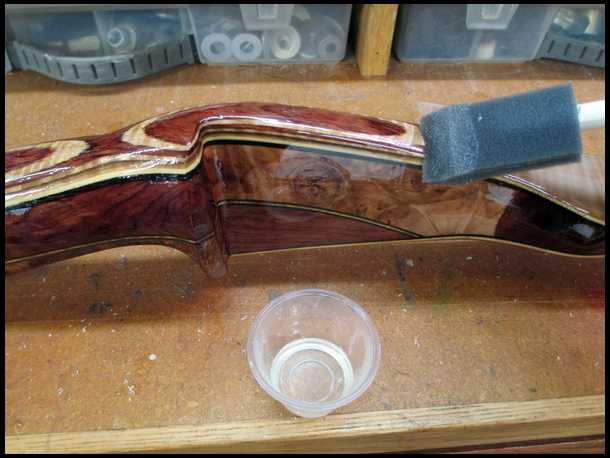
You can't work the epoxy into smoothness, so don't even try. All you're doing is slopping on 4-6 coats to COMPLETELY SEAL all the pores and imperfections in the wood. Smooth the epoxy out as best you can with the foam brush. Throw away the brush and epoxy after each coat, they cannot be used again.
|
|
| From: Nemah
|
|
|
|
|
|
|
| Date: 09-Apr-17 |
|
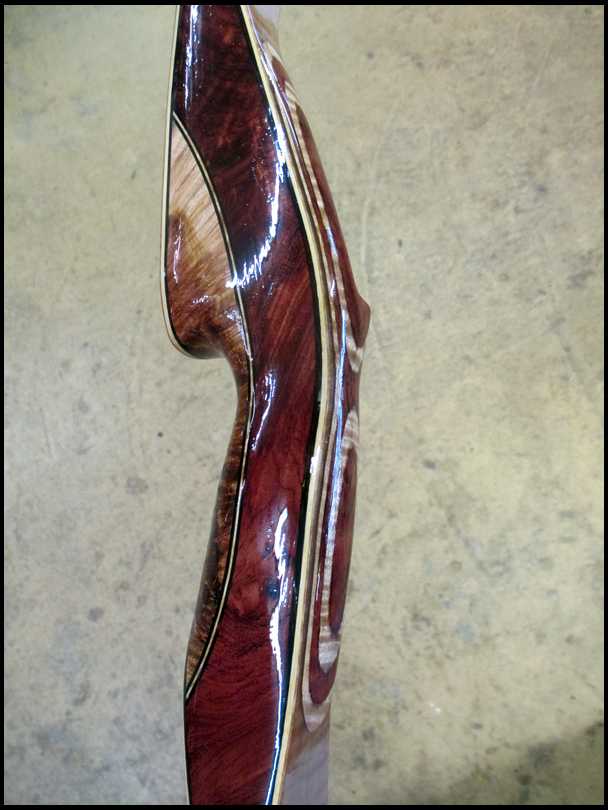
You can get a little epoxy on the fiberglass, but be careful. You'll have to sand it off the glass when it's cured. You'll get to really see the grain pop out at this point! I check the riser every 15-30 minutes. Touch it lightly-check it's state of tackiness. Masking tape sticky. Then apply another coat. This may take all day for 6 coats, depending on the temperature. But remember-DO NOT PLACE IT NEAR A HEAT SOURCE TO SPEED THINGS UP! This bow really sucked up the epoxy in the spalted grip area, a sure sign the epoxy is being drawn into the wood. You do not have to heat the riser again after the first coat.
|
|
| From: Nemah
|
|
|
|
|
|
|
| Date: 09-Apr-17 |
|
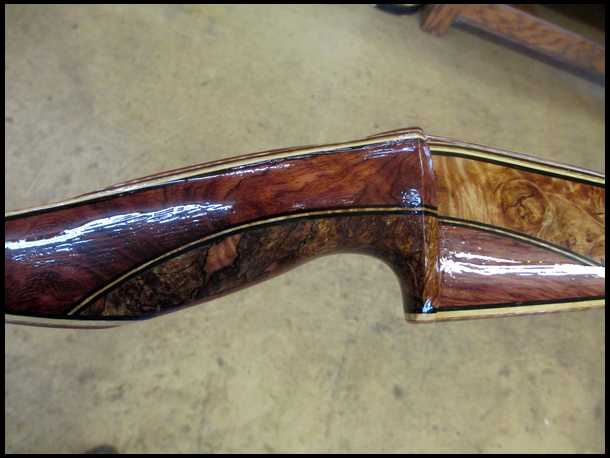
|
|
| From: Nemah
|
|
|
|
|
|
|
| Date: 09-Apr-17 |
|
Once again...don't worry about the appearance! Just continue to brush on additional coats. Good luck!
|
|
| From: Nemah
|
|
|
|
|
|
|
| Date: 09-Apr-17 |
|
I might add that you should smooth out each coat-many thin coats are better than a few thick coats. Beware of big drips or gobs! You'll have to deal with them later and they'll be very hard! Mine tend to form at the back of the arrow shelf where it meets the curvature of the grip.
|
|
| From: Gator1
|
|
|
|
|
|
|
| Date: 09-Apr-17 |
|
Lots or work to build a bow.
|
|
| From: Bob Rowlands
|
|
|
|
|
|
|
| Date: 09-Apr-17 |
|
That's good Nemah. Don't let it bug you. This is an epic build thread on this site.
|
|
| From: CD
|
|
|
|
|
|
|
| Date: 09-Apr-17 |
|
Like Bob said... this is an EPIC build!
Two thumbs up for sure!!
|
|
| From: Burnsie
|
|
|
|
|
|
|
| Date: 10-Apr-17 |
|
Great build along- Thanks Nemah!
|
|
| From: stick33
|
|
|
|
|
|
|
| Date: 10-Apr-17 |
|
I love this thread! Can't wait to see the bow finished - outstanding work!
|
|
| From: Bob Rowlands
|
|
|
|
|
|
|
| Date: 10-Apr-17 |
|
True that about thin coats. Took me a lot of gooey screw ups before learning that. Off topic, TruOil on gunstocks about two dozen coats yields a looker finish that feels great in the hand. Totally worth the effort.
|
|
| From: Nemah
|
|
|
|
|
|
|
| Date: 10-Apr-17 |
|
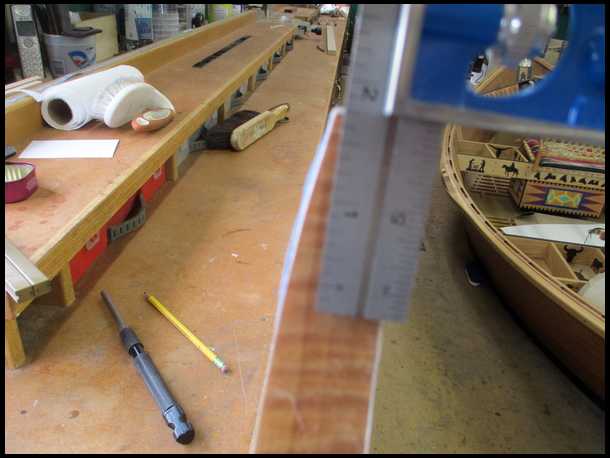
It's Monday! I'm going to let the Epoxy cure a while longer....if it gums up while you sand...wait. If dust is created while sanding...go ahead. I'll work on the tips today. 2-3/4" down for my bows....mark it.
|
|
| From: Nemah
|
|
|
|
|
|
|
| Date: 10-Apr-17 |
|
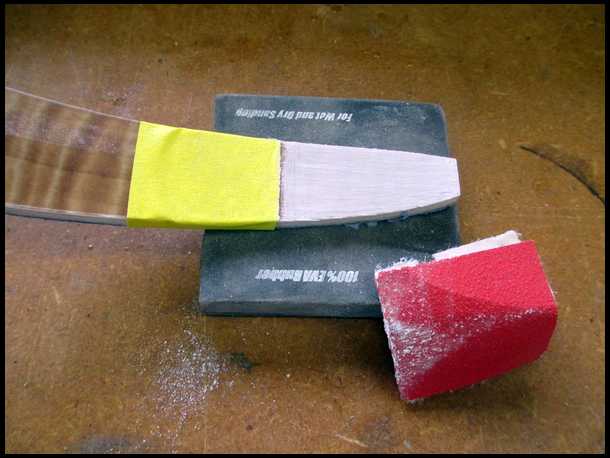
Sorry about that last photo...Mask it off and sand it with 80grit.
|
|
| From: Nemah
|
|
|
|
|
|
|
| Date: 10-Apr-17 |
|
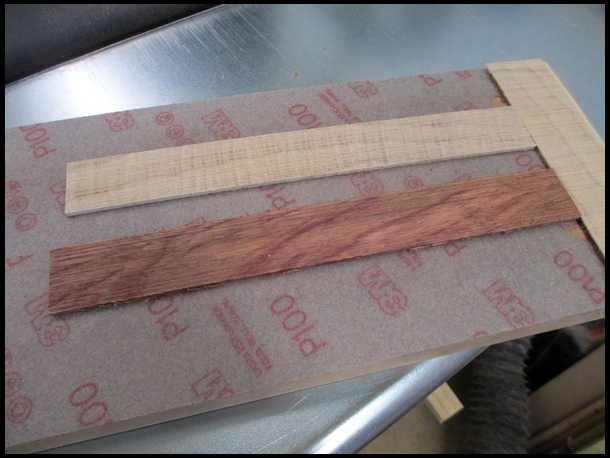
Choose your material and sand to thickness...
|
|
| From: Nemah
|
|
|
|
|
|
|
| Date: 10-Apr-17 |
|
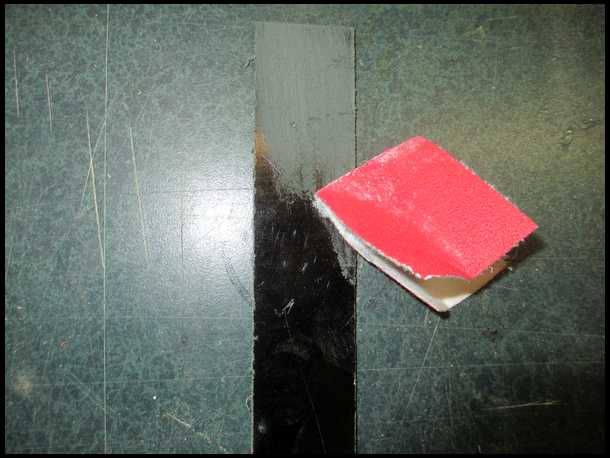
Phenolic layer for modern strings. Sand with 80 grit...
|
|
| From: Nemah
|
|
|
|
|
|
|
| Date: 10-Apr-17 |
|

Done...ready for Smooth-on. I know some folks use super glue. I like the epoxy.
|
|
| From: Nemah
|
|
|
|
|
|
|
| Date: 10-Apr-17 |
|
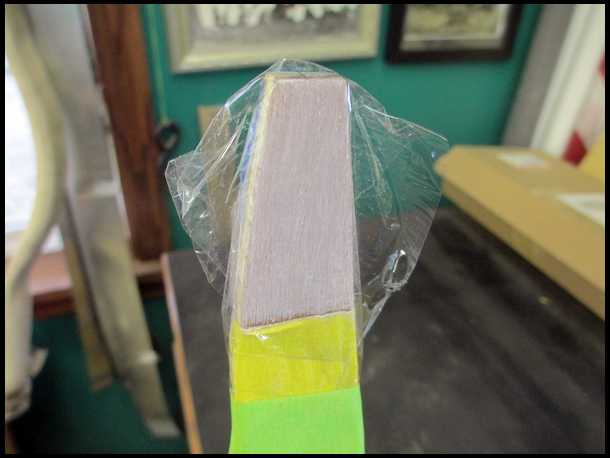
I do my tips in 2 steps....glue the small lams together first, using the tip of the bow as a form, shape them, and finally glue them to the bow. Saran Wrap prevents the tip pieces from sticking to the bow.
|
|
| From: Nemah
|
|
|
|
|
|
|
| Date: 10-Apr-17 |
|
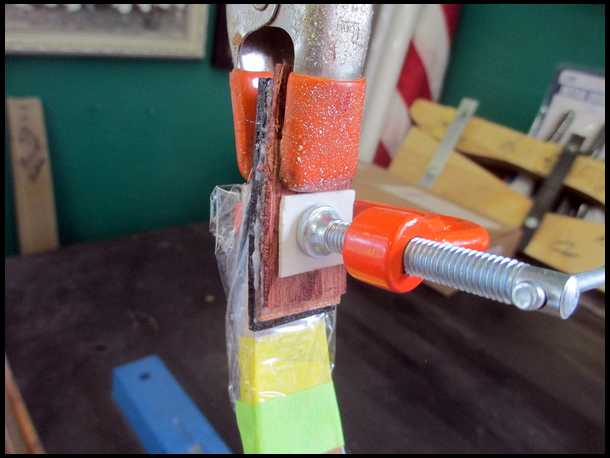
Glued up! I just place the bow in a warm spot, or sometimes place light fixtures above each tip. DO NOT PUT IT INTO A HEAT BOX! THE LIMBS MAY DELAMINATE. (done that..)
|
|
| From: Glunt@work
|
|
|
|
|
|
|
| Date: 10-Apr-17 |
|
Great build along. Is that 1 3/4" for the tips instead of 2 3/4"?
|
|
| From: Nemah
|
|
|
|
|
|
|
| Date: 10-Apr-17 |
|
Yep. Sorry. Good eyes!
|
|
| From: Nemah
|
|
|
|
|
|
|
| Date: 10-Apr-17 |
|
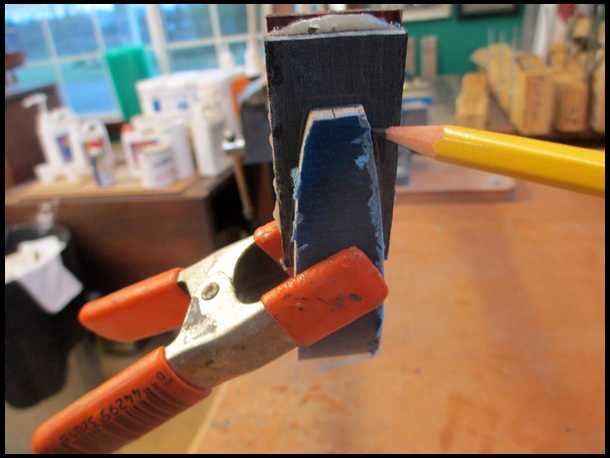
1-3/4", the same as the 1960 original. I pulled off the cured tips and marked the limb profile on the back.
|
|
| From: Nemah
|
|
|
|
|
|
|
| Date: 10-Apr-17 |
|
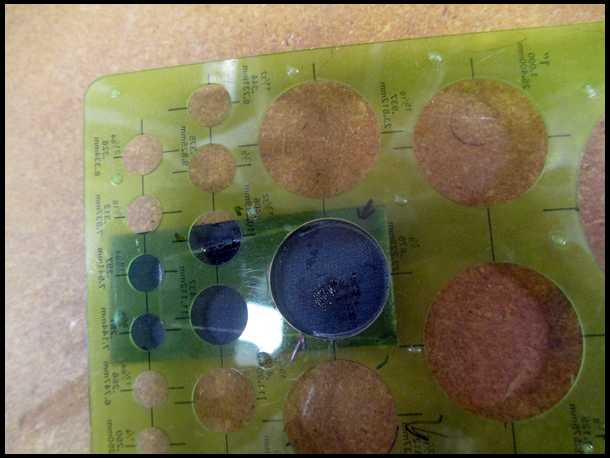
I used my circle template for the contour...
|
|
| From: Nemah
|
|
|
|
|
|
|
| Date: 10-Apr-17 |
|

|
|
| From: Nemah
|
|
|
|
|
|
|
| Date: 10-Apr-17 |
|
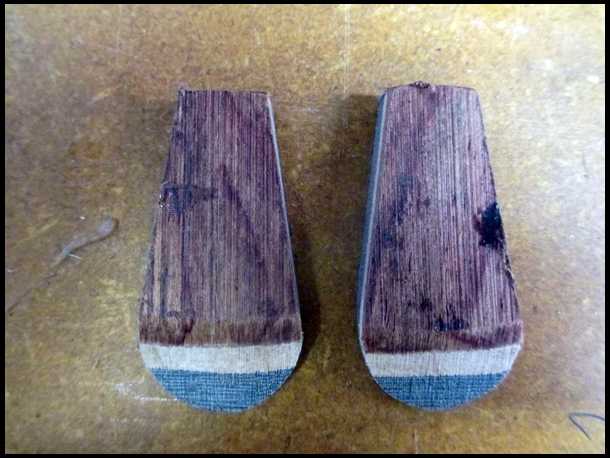
I used the belt sander to shape them. I used 80 grit paper to lightly sand the phenolic, then wiped the sanded part of the limbs and the back of the tips with acetone. Glued and clamped them up.
|
|
| From: Nemah
|
|
|
|
|
|
|
| Date: 10-Apr-17 |
|
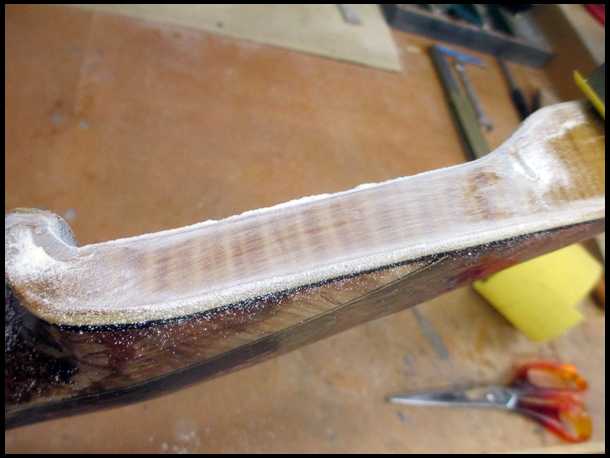
I did a little sanding on the riser epoxy to see if it's totally cured, and it looks great. But it's getting late, so I'll finish sanding the riser tomorrow.
|
|
| From: Nemah
|
|
|
|
|
|
|
| Date: 10-Apr-17 |
|
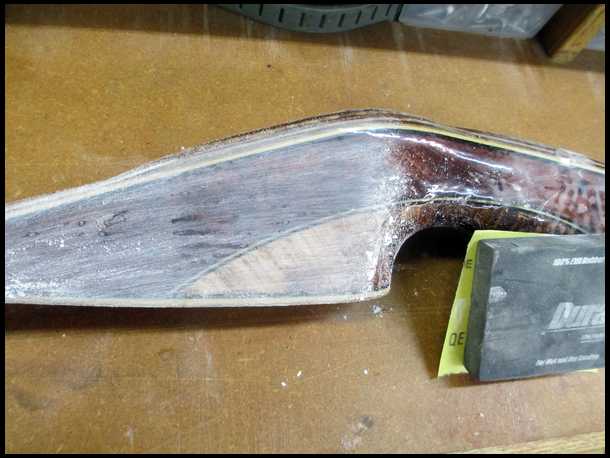
|
|
| From: mgerard
|
|
|
|
|
|
|
| Date: 11-Apr-17 |
|
So much work, and you take the time to share the process and your knowledge. Thanks! Looking forward to seeing the finished product.
|
|
| From: wonderbowman
|
|
|
|
|
|
|
| Date: 11-Apr-17 |
|
As Mike stated, So much work and taking the time to photo it too. Wow!
|
|
| From: Nemah
|
|
|
|
|
|
|
| Date: 11-Apr-17 |
|
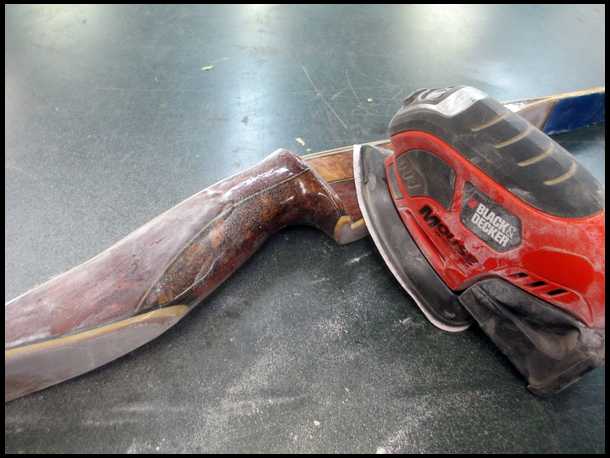
It's a chilly morning here in Olympia...29 degrees! The bow tips are cured so I began to sand the epoxy-covered riser. I want to knock off all the big gobs and drips first, so I use 120 grit paper on my Mouse sander and LIGHTLY start to level things out. Be careful...your goal is not to sand thru the epoxy into the wood!
|
|
| From: Nemah
|
|
|
|
|
|
|
| Date: 11-Apr-17 |
|

I tear off the triangle of paper and turn it to use the next, fresh edge...
|
|
| From: Nemah
|
|
|
|
|
|
|
| Date: 11-Apr-17 |
|
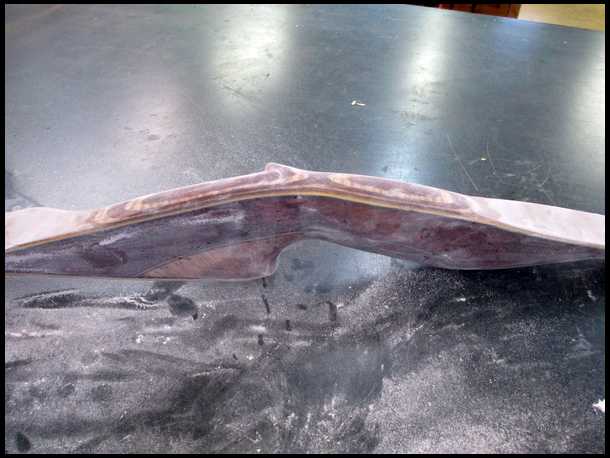
After the high areas are leveled, I switch to 220 grit and go over the entire riser, smoothing and leveling the epoxy without sanding thru! When you are satisfied, stop. You may still see several spots that are shiny, but leave them for hand sanding.
|
|
| From: Nemah
|
|
|
|
|
|
|
| Date: 11-Apr-17 |
|
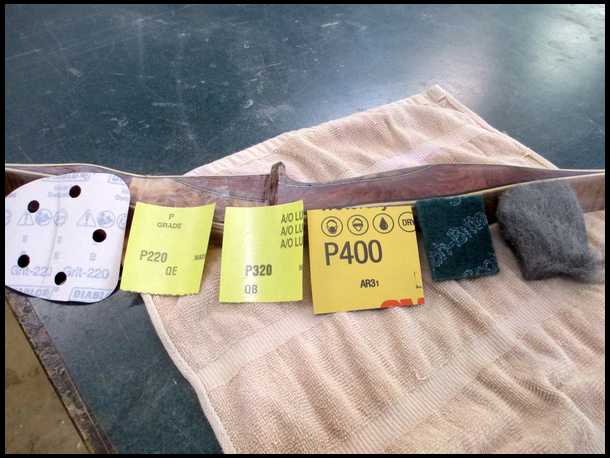
Now it's time for careful hand sanding. Here's my progression, from left to right: 220 grit on the Mouse sander, then 220 grit, 320 grit, 400 grit, green Scotch-Brite pad, and 000 steel wool. Remember, your goal is to smooth the riser without cutting thru the epoxy. If you do, and I have...many times, you'll have to wipe down the riser with denatured alcohol and give the whole thing 2-3 more coats of epoxy.
|
|
| From: Nemah
|
|
|
|
|
|
|
| Date: 11-Apr-17 |
|
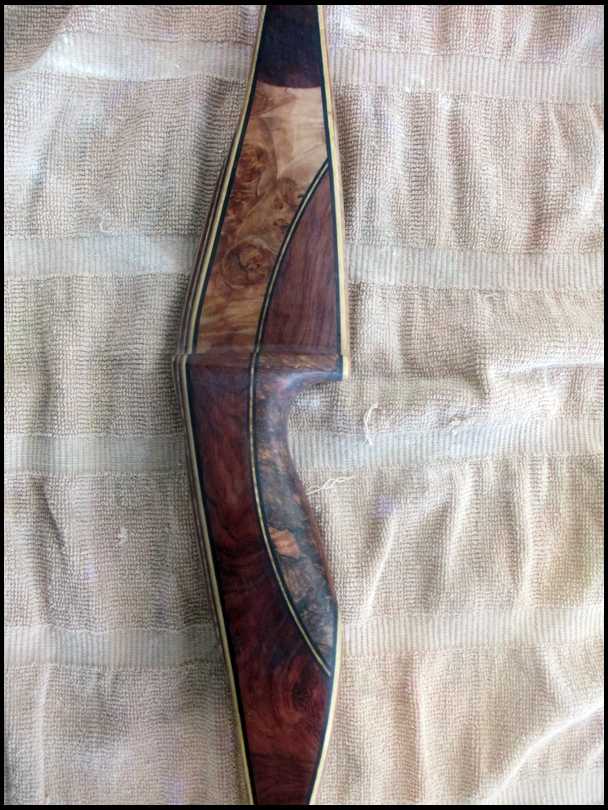
Today I did not sand thru the epoxy! YEA! From start to finish, it took 1 hour, 45 minutes total. Go very slow, especially around the deepest part of the grip and the ridges on the arrow shelf. Time for a break. Then I'll attack the tips and limbs.
|
|
| From: Nemah
|
|
|
|
|
|
|
| Date: 11-Apr-17 |
|
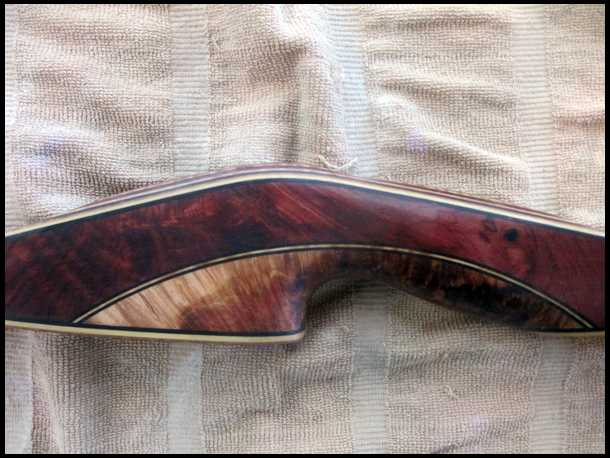
|
|
| From: MStyles
|
|
|
|
|
|
|
| Date: 11-Apr-17 |
|
Very impressive, stunning in fact.
|
|
| From: Nemah
|
|
|
|
|
|
|
| Date: 11-Apr-17 |
|
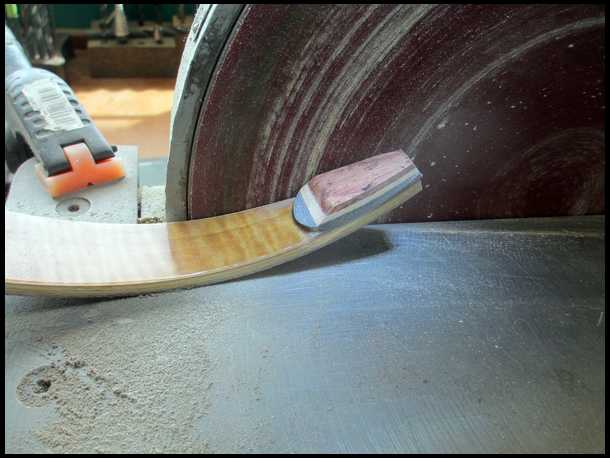
After walking the dogs, mowing the lawns, and going to town to run errands, I finally got to work on the bow! First, I used my 12" disc sander to trim the sides of the tips to match the sides of the limbs...
|
|
| From: Nemah
|
|
|
|
|
|
|
| Date: 11-Apr-17 |
|
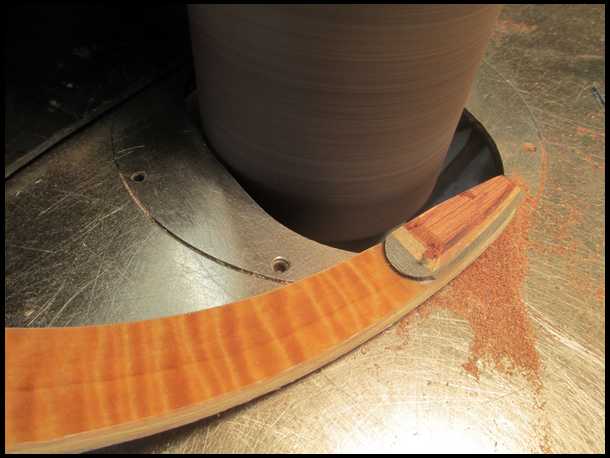
Then I used the spindle sander to continue shaping...
|
|
| From: Nemah
|
|
|
|
|
|
|
| Date: 11-Apr-17 |
|
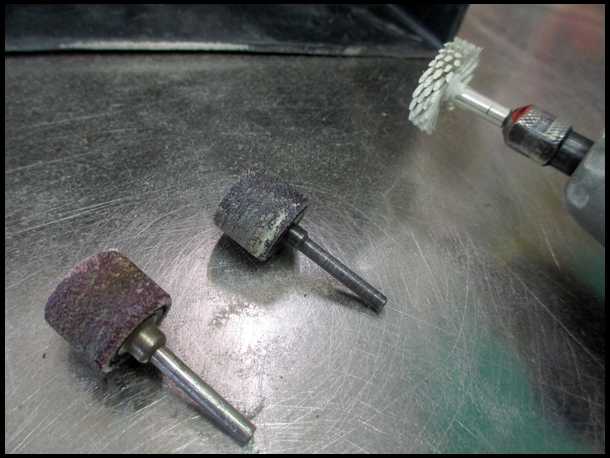
I used small drum sanders and a sanding wheel in my Dremel tool...
|
|
| From: Nemah
|
|
|
|
|
|
|
| Date: 11-Apr-17 |
|
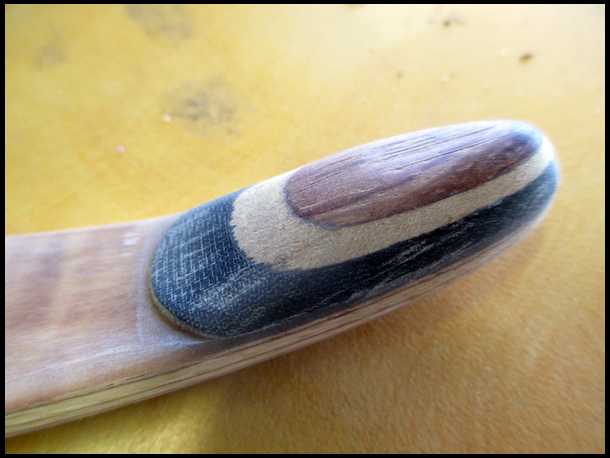
to get the tips to this shape. Then on to my Grizzly flap sander...
|
|
| From: Nemah
|
|
|
|
|
|
|
| Date: 11-Apr-17 |
|
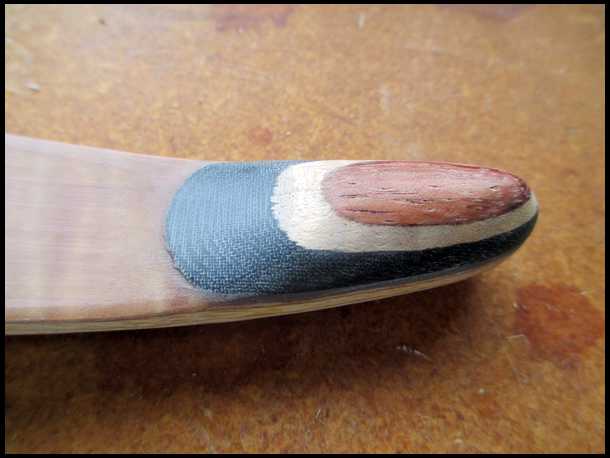
to get the tips to this stage. I'm not a fan of working with wood tips and overlays.
|
|
| From: Nemah
|
|
|
|
|
|
|
| Date: 11-Apr-17 |
|
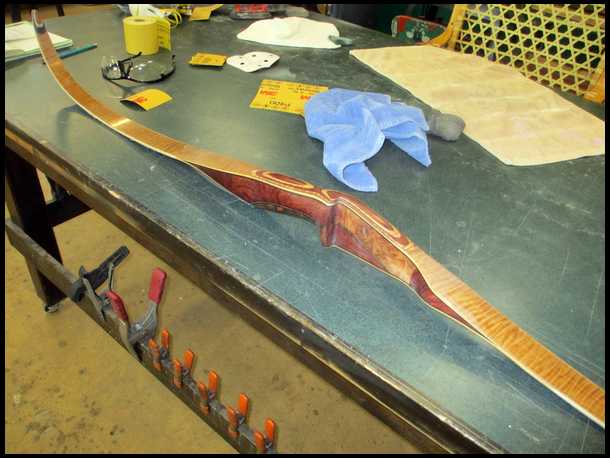
I'm always setting the bow down like this, and too often ended up with scratches on the limbs, so......
|
|
| From: Nemah
|
|
|
|
|
|
|
| Date: 11-Apr-17 |
|
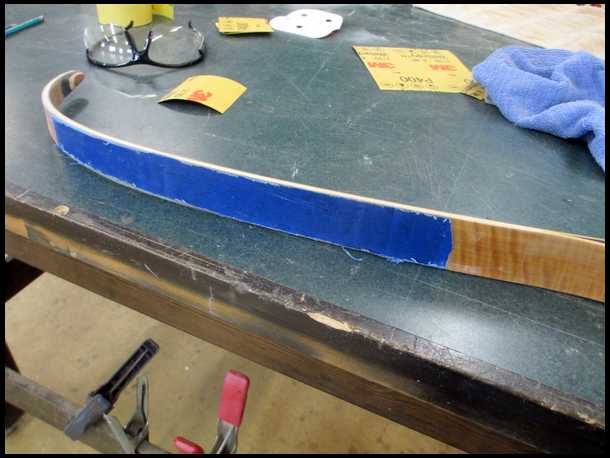
I leave the tape on the bow for protection until it's time to sand the limbs.
|
|
| From: Nemah
|
|
|
|
|
|
|
| Date: 11-Apr-17 |
|
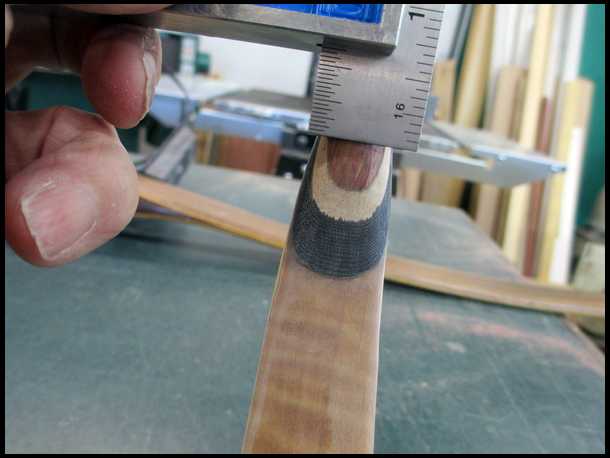
Tip Time! The original nocks are 5/8" down from the end of the bow, and mine will be too. Marked with a pencil...
|
|
| From: Nemah
|
|
|
|
|
|
|
| Date: 11-Apr-17 |
|
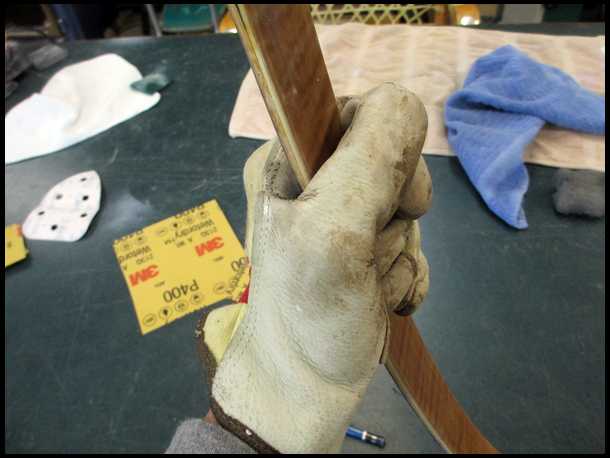
Since I haven't sanded the edges of the limbs yet, I wear sliver protection while holding the bows.
|
|
| From: Nemah
|
|
|
|
|
|
|
| Date: 11-Apr-17 |
|
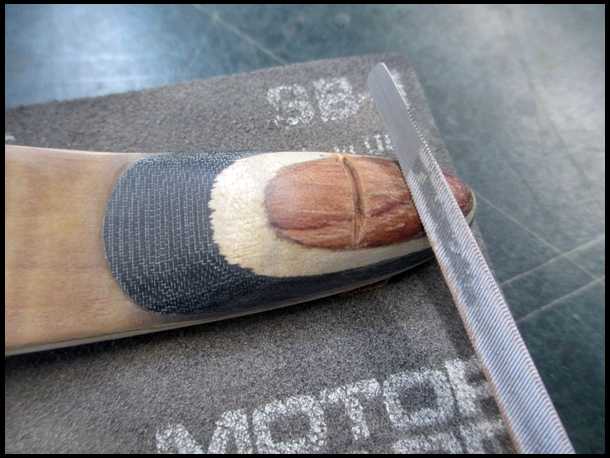
I use a triangular file to cut straight across the line and make a shallow groove for the round file to follow. The round file will slip, messing up the tip, if you don't.
|
|
| From: Nemah
|
|
|
|
|
|
|
| Date: 11-Apr-17 |
|

I use a new chain saw file for every 2 bows. The glass dulls them quickly. The rule here is," File from the glass to the wood, not from the wood to the glass." You may tear the glass fibers and mess up the limb edges if you don't obey this rule. (done that) By wood, I mean the core of the limb.
|
|
| From: Nemah
|
|
|
|
|
|
|
| Date: 11-Apr-17 |
|
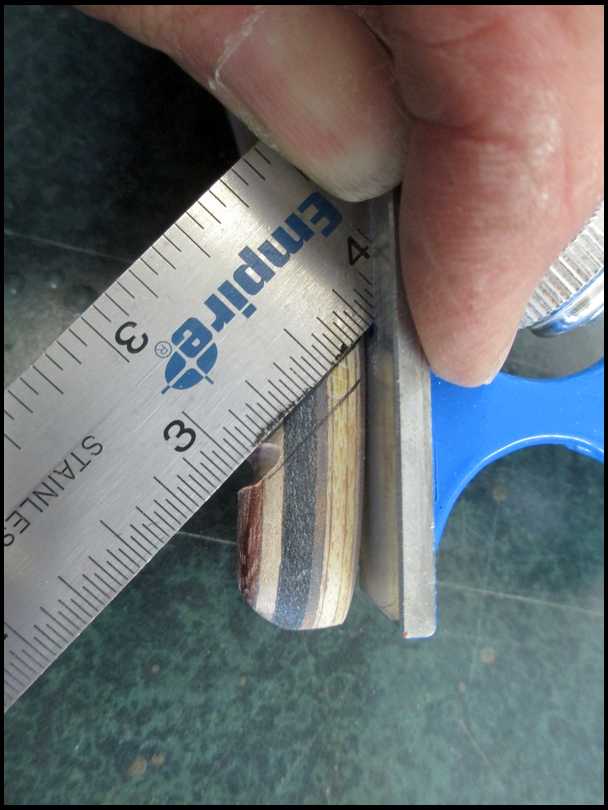
Now I use my little 45 degree angle to mark two lines. That's where you'll file.
|
|
| From: Nemah
|
|
|
|
|
|
|
| Date: 11-Apr-17 |
|
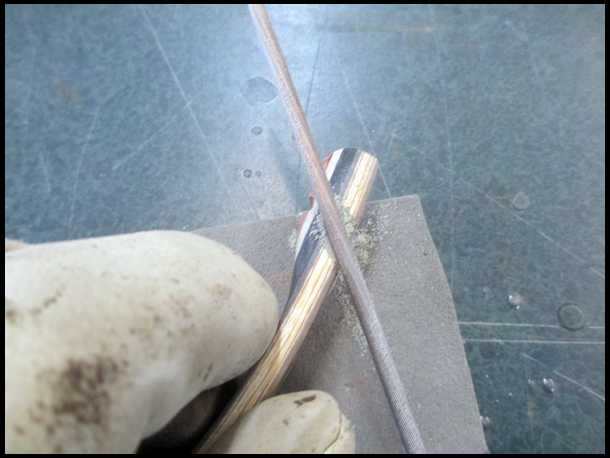
Once again I use the triangle file first, then the round file. When I'm through with one side, I check to see if the groove I just filed matches up with the lines on the other side of the limb. If things don't line up, change the pencil lines.
|
|
| From: Nemah
|
|
|
|
|
|
|
| Date: 11-Apr-17 |
|
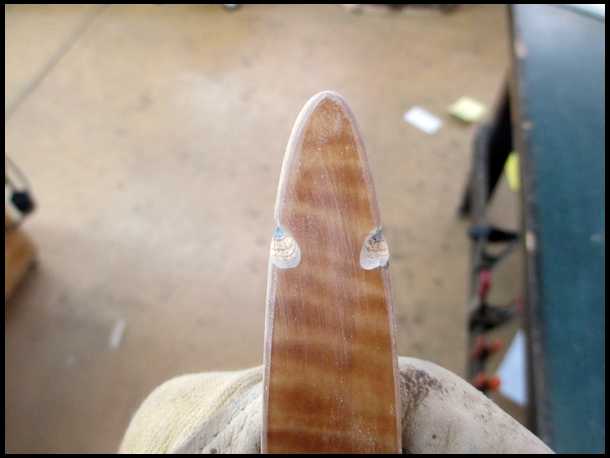
File-file-check-file-check-file-match 'em up as best you can! When you're done, use 220 grit sandpaper to smooth out the sharp edges of the fiberglass, and....STRING IT UP!! FINALLY!!
|
|
| From: Nemah
|
|
|
|
|
|
|
| Date: 11-Apr-17 |
|
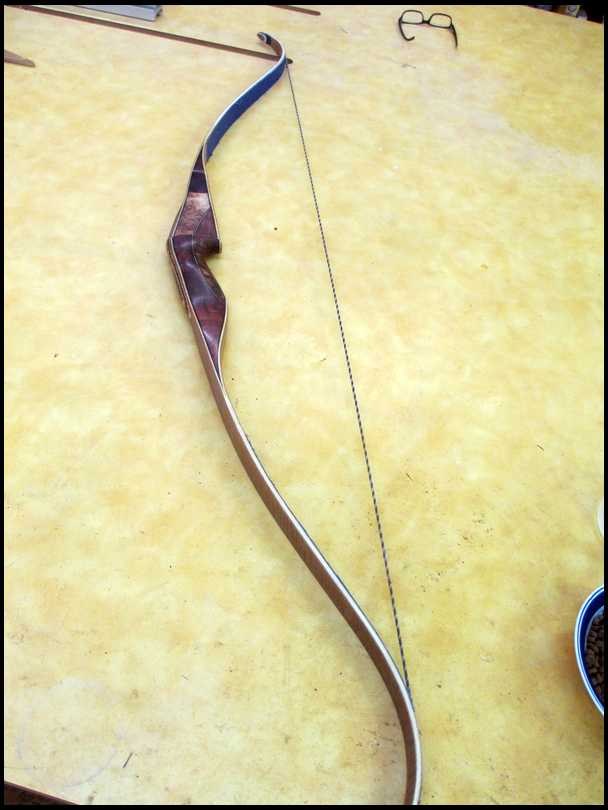
These grooves aren't perfect, but I'll clean them up later and they'll be just fine! Here it is, all strung up. 51# before sanding the edges of the limbs, very slight limb twist on the lower limb, lower limb 3/8+ " stronger than the upper limb. ALL IS VERY GOOD, AND I'M WELL PLEASED!! My wife is taking me out to dinner, so till tomorrow! RK
|
|
| From: Pointer
|
|
|
|
|
|
|
| Date: 11-Apr-17 |
|
Superb Work
|
|
| From: bodymanbowyer
|
|
|
|
|
|
|
| Date: 11-Apr-17 |
|
OOH Man, is this looking sweet or what. Oh YEAH :-) JF
|
|
| From: Dry Bones
|
|
|
|
|
|
|
| Date: 11-Apr-17 |
|
I'm with Jeff, OH YEAH!
-Bones
|
|
| From: CD
|
|
|
|
|
|
|
| Date: 11-Apr-17 |
|
Heck YEA!!!!! :)
Swwweeeeeettttt!!
|
|
|
|
| From: Wallski
|
|
|
|
|
|
|
| Date: 11-Apr-17 |
|
Nemah, I live in Black Diamond WA, and just started building bows, where did you get your bamboo floor materials and what brand or type?
|
|
| From: Longbow58
|
|
|
|
|
|
|
| Date: 12-Apr-17 |
|
Wow she's sweet!
|
|
| From: cedar shooter
|
|
|
|
|
|
|
| Date: 12-Apr-17 |
|
Can't wait to see it finished. Rick
|
|
| From: Nemah
|
|
|
|
|
|
|
| Date: 12-Apr-17 |
|
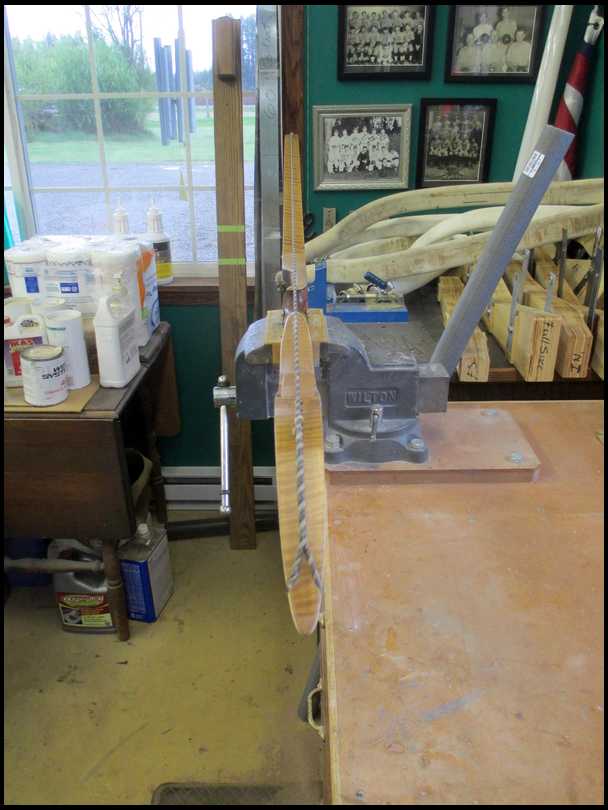
Back at it early this morning! First I worked on correcting a small limb twist by sanding the bow edges with my Mouse and 80 grit paper.
|
|
| From: Nemah
|
|
|
|
|
|
|
| Date: 12-Apr-17 |
|
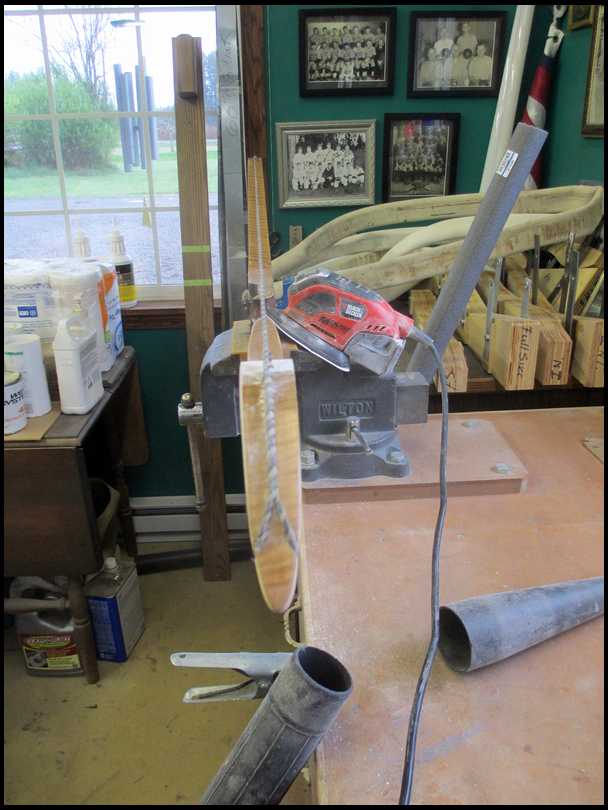
This takes patience......sand-check-sand-check-sand-check. There is a tendency to stop, leaving a tiny amount of twist, but keep at it. Sand-check-repeat. Those photos in the background are of my father...high school and town team baseball in South Dakota. He was a great pitcher-even had a try-out with the St. Louis Pro team, but his mother wanted him to finish college instead.
|
|
| From: Nemah
|
|
|
|
|
|
|
| Date: 12-Apr-17 |
|
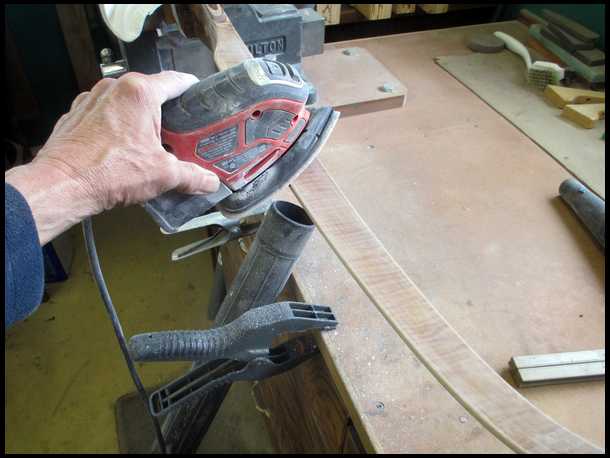
Not bad so far, but I'll keep checking it as I smooth out the edges of the limb. Mouse again plus 80 grit, trying not to touch the face of the glass. Wear your respirator!
|
|
| From: Nemah
|
|
|
|
|
|
|
| Date: 12-Apr-17 |
|
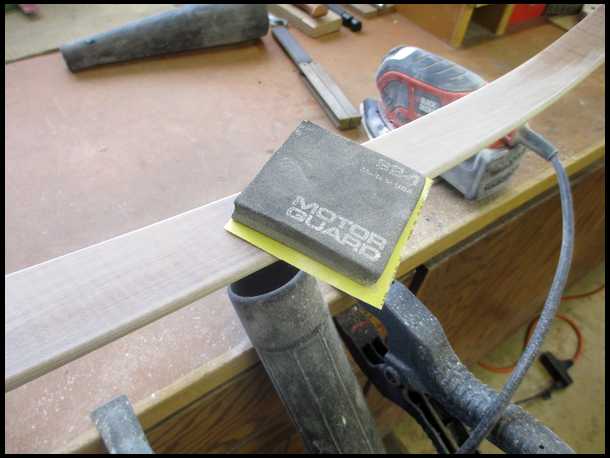
After using the Mouse, I begin to hand sand the limb edges with 220 grit paper and a pad. Keep checking for tiny gouges, smoothing them out. I often wear my magnifying goggles to make sure I get them all. Change paper frequently. Then I hand sand the limb faces with 220, smoothing things out and getting that uniform, dull finish. I string it up at this point and check everything: that pesky limb twist returned, just a fraction, so I'll attack that again. Tiller is dead-on...1/4" minus... bottom limb strong. 48# @ 28"...perfect for hunting! I could take it down a bit, but I'll leave it there. I'll take a break now....I have a few errands to run. RK
|
|
| From: Puma
|
|
|
|
|
|
|
| Date: 12-Apr-17 |
|
Richard-Fantastic thread, as so many others have stated!
Just to be clear, to correct the twist you're removing material from the side of the limb in the direction of the twist?
Are you removing material while the bow is strung, or do you have to keep stringing, sanding, un-stringing, checking...
Don
|
|
| From: manybows
|
|
|
|
|
|
|
| Date: 12-Apr-17 |
|
Its progressing very nicely and you should be proud of your work, you sir are an artist. It will be stunning when finished. You can would carry that bow with pride.
|
|
| From: Dry Bones
|
|
|
|
|
|
|
| Date: 12-Apr-17 |
|
Is it normal for newly built bows to have some limb issues such as twists or adverse tiller? If so, that makes mass produced bows even harder to imagine they all come out correct..
-Bones
|
|
| From: Nemah
|
|
|
|
|
|
|
| Date: 12-Apr-17 |
|
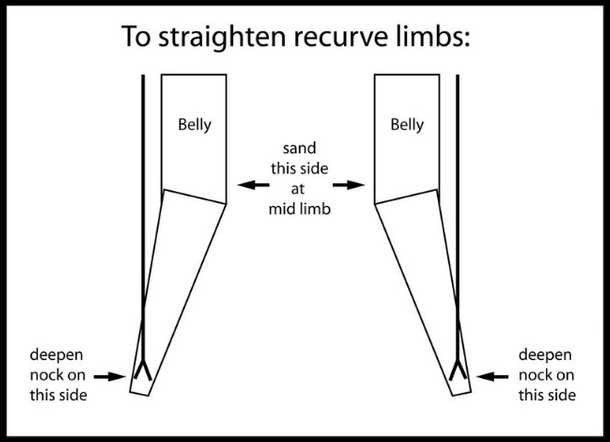
Puma--just for you.
|
|
| From: Nemah
|
|
|
|
|
|
|
| Date: 13-Apr-17 |
|
I remove the material from the sides of the limb while the bow is strung.
|
|
| From: Nemah
|
|
|
|
|
|
|
| Date: 14-Apr-17 |
|
Good morning! I took a day off and went on a road trip with my wife yesterday, but I'll be in the shop working on the bow this morning. Richard
|
|
| From: Nemah
|
|
|
|
|
|
|
| Date: 14-Apr-17 |
|
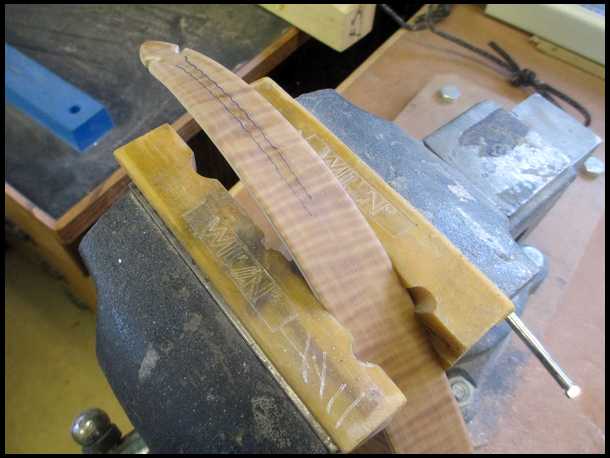
This morning, I cleaned up the bow tips and got them as even as I could. The limb twist is corrected, the tiller is perfect, and the edges of the limbs are sanded, so I began working on the string groove. I strung up the bow and positioned the string dead-center, always checking for signs of limb twist. Then I used a felt pen to mark on either side of the string. The padded vice jaws hold the bow nicely.
|
|
| From: Nemah
|
|
|
|
|
|
|
| Date: 14-Apr-17 |
|
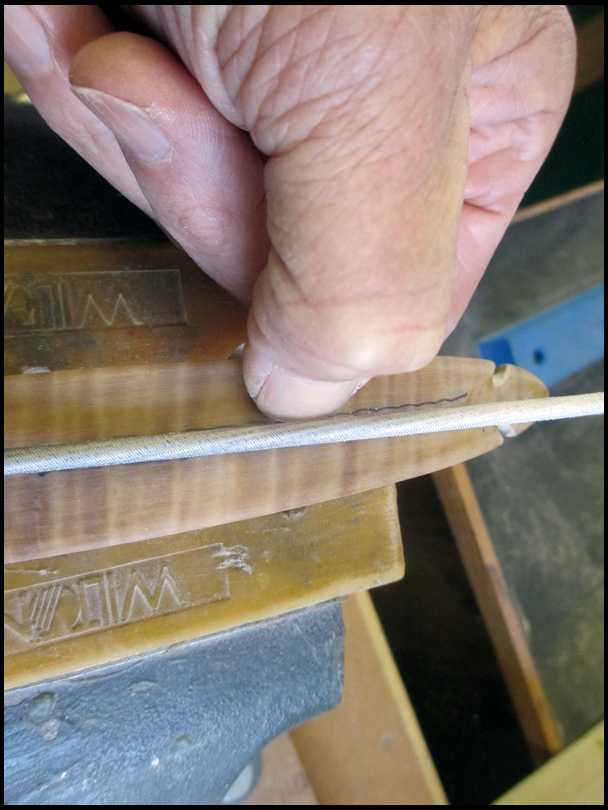
Using a new chain-saw file and my finger for a guide, I carefully begin filing the string groove. Keep your finger against the file, guiding it, otherwise the file will jump and scratch the glass. (done that a lot!)
|
|
| From: Nemah
|
|
|
|
|
|
|
| Date: 14-Apr-17 |
|
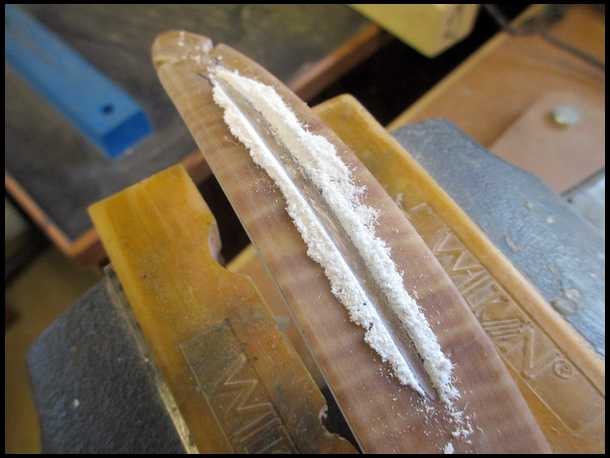
There will be nasty , sharp fiberglass particles floating around, so wear a dust mask or run your shop-vac near the limb.
|
|
| From: Nemah
|
|
|
|
|
|
|
| Date: 14-Apr-17 |
|

Decision time! Some bows have grooves the entire string lies in, as this new '59 Kodiak.......
|
|
| From: Nemah
|
|
|
|
|
|
|
| Date: 14-Apr-17 |
|
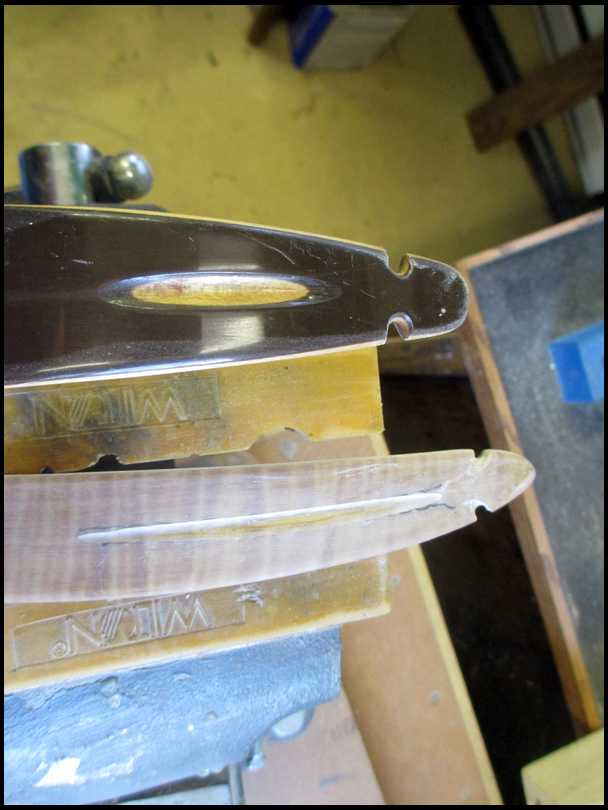
And some bows, like the earlier Grizzly, have a simple, straight groove. This is what I do on my bows, mainly because every string you get will have a different size loop which may not fit into the full grooves as on the Kodiak.
|
|
| From: Nemah
|
|
|
|
|
|
|
| Date: 14-Apr-17 |
|
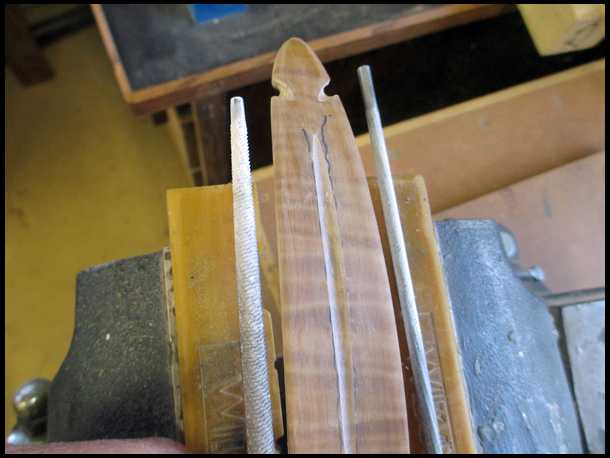
Now I switch to a rat-tail file, which is a little larger than the chain-saw file. Using ONLY the smaller end, I carefully enlarge the groove and make sure I cut, just a little, into the wooden lam beneath the glass.
|
|
| From: Nemah
|
|
|
|
|
|
|
| Date: 14-Apr-17 |
|
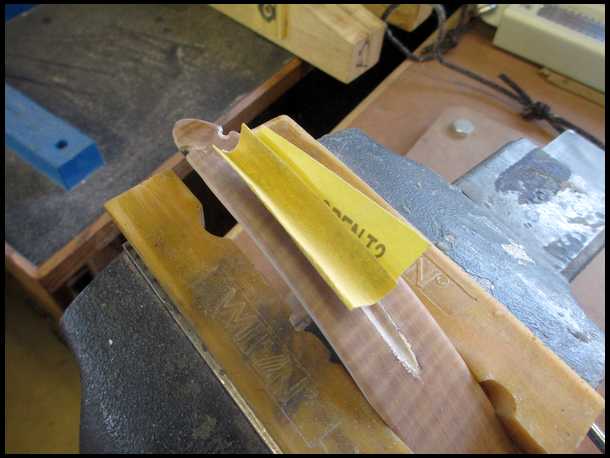
When I'm happy with everything, I sand the groove and the tip nocks with 320 grit paper to smooth out all sharp glass edges which may fray your bow string.
|
|
| From: Nemah
|
|
|
|
|
|
|
| Date: 14-Apr-17 |
|
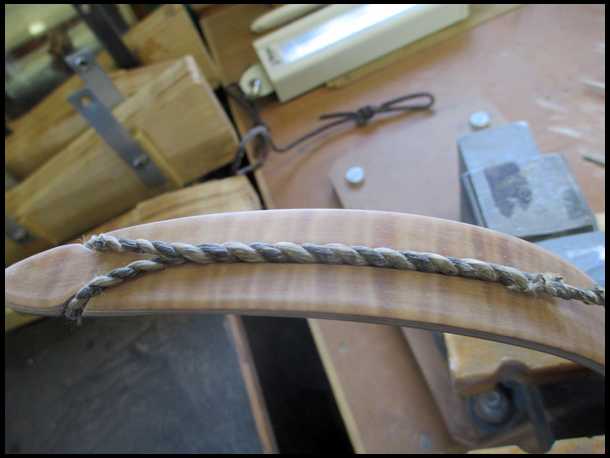
Now I string up the bow, checking to see if the string fits nicely and is centered. I pull the bow back several times, listening for any "click" as the string falls into the groove. That could be more pesky limb twist, or you screwed up and didn't perfectly center the groove. File the groove slightly larger on the side the string is hitting on. Try again. Fix it. Then move on!
|
|
| From: Nemah
|
|
|
|
|
|
|
| Date: 14-Apr-17 |
|
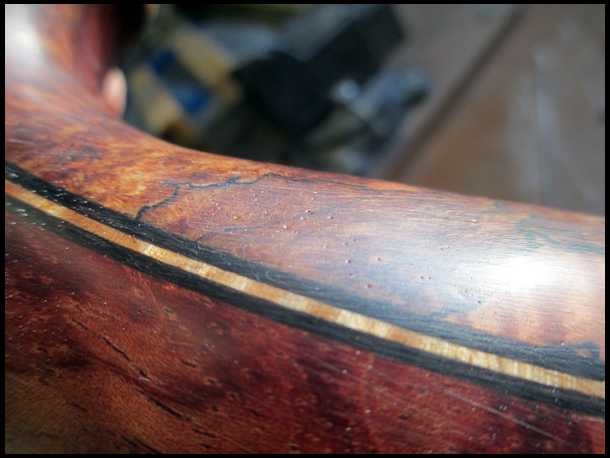
Sunshine is your friend in bow building, and it was nice and bright here earlier in the day. Hold your bow in the sunlight, and very carefully look for imperfections. There will probably be many. If you REALLY want to see how bad it is, wear magnifying goggles while doing this! Decision time again! If you find bad things on your bow, dings, scratches, pores, etc, you have your choice: leave them....or fix them. If it's YOUR bow, you can finish it as is, if you want. If it's for someone else, and mine usually are, you HAVE to fix them. I found several pores still showing in the spalted Maple grip area, and a few spots here and there. Even though you don't really want, have at it! So, I sanded everything with 320 paper, wiped the bow down with denatured alcohol, and gave the riser and limb edges a coat of epoxy.
|
|
| From: Nemah
|
|
|
|
|
|
|
| Date: 14-Apr-17 |
|
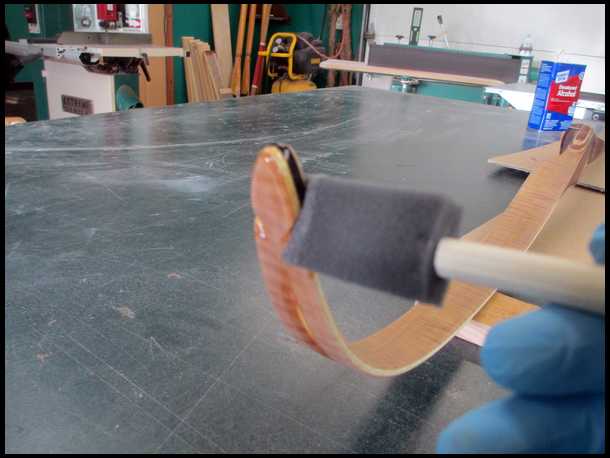
Make sure you cover all bare wood, like the string grooves and nocks, and the limb edges. I also hit the riser. Recoat when it's masking tape sticky!
|
|
| From: Nemah
|
|
|
|
|
|
|
| Date: 14-Apr-17 |
|
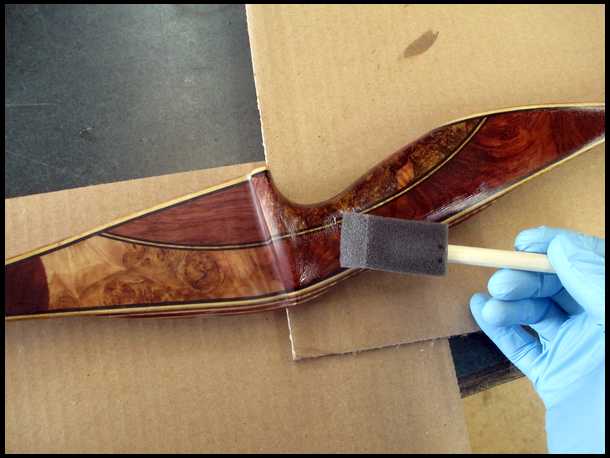
I'll put 2-3 coats on the limb edges and riser, let it cure a day or two, then sand everything again. Then I'll check again for imperfections, and repeat, if necessary.
|
|
| From: Nemah
|
|
|
|
|
|
|
| Date: 14-Apr-17 |
|
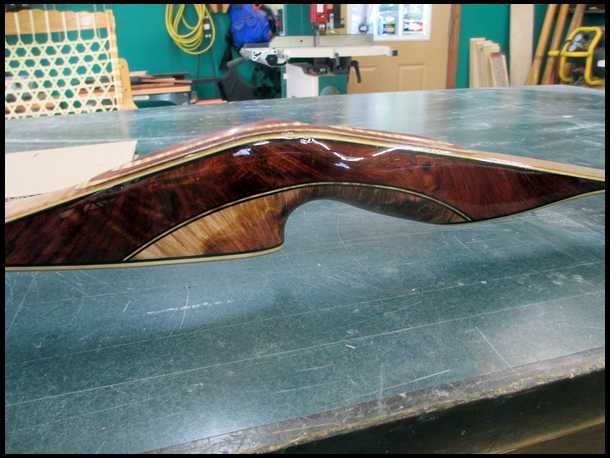
Waiting for epoxy to cure......
|
|
| From: mgerard
|
|
|
|
|
|
|
| Date: 14-Apr-17 |
|
Patience and talent. Great combination.
|
|
| From: Kodiak
|
|
|
|
|
|
|
| Date: 14-Apr-17 |
|
It's beautiful.
|
|
| From: M60gunner
|
|
|
|
|
|
|
| Date: 14-Apr-17 |
|
I really like the fact you addressed those pores. I have seen more than a couple "custom" bows with pores not filled. I know I am picky and somewhat "old school" ( remember the finishes on Browning Bows) but the finish is a maker or breaker for me.
With your attention to detail have you ever considered making bamboo fly rods?
|
|
| From: ca
|
|
|
|
|
|
|
| Date: 14-Apr-17 |
|
Real passion for superb quality.
|
|
| From: Lucas
|
|
|
|
|
|
|
| Date: 14-Apr-17 |
|
Wow, that looks great. Have you ever made a super K?
|
|
| From: Glunt@work
|
|
|
|
|
|
|
| Date: 14-Apr-17 |
|
I'm guessing there might be some folks who might have wondered why a handcrafted bow is so expensive, who are now wondering why they don't cost more.
|
|
| From: Bob Rowlands
|
|
|
|
|
|
|
| Date: 14-Apr-17 |
|
Finish makes the grain pop big time. Really nice looking bow nemah.
|
|
| From: bodymanbowyer
|
|
|
|
|
|
|
| Date: 14-Apr-17 |
|
Nice to see how someone else builds a bow. Similar to mine and a little different here and there. You definitely can see the details Richard. As Martha Stewart would say. That's a good thing. JF
|
|
| From: CD
|
|
|
|
|
|
|
| Date: 14-Apr-17 |
|
Gorgeous!
It's amazing what goes into building these these things and I absolutely love following the build-alongs. Thanks so much for posting and taking the time to share the process. I know it is very time consuming and I for one really appreciate it!
CD
|
|
| From: badshotdb
|
|
|
|
|
|
|
| Date: 14-Apr-17 |
|
Wish I had your talent and patience. I have followed along since the start. I now realize how much work goes into making a custom bow.
|
|
|
|
| From: kodiaklectomy
|
|
|
|
|
|
|
| Date: 15-Apr-17 |
|
Richard WE'VE SPOKEN IN THE PAST.. BRAVO. THIS POST IS INCREDIBLE AS IS YOUR WORK... I APPLUDE YOU! RICH LOPEZ (DROPTINETRADITIONS.COM)
|
|
| From: Bob Rowlands
|
|
|
|
|
|
|
| Date: 15-Apr-17 |
|
Yup the buildalong fits the work. So does the workshop. Some guys just have it together.
|
|
| From: Nemah
|
|
|
|
|
|
|
| Date: 15-Apr-17 |
|
Hello Folks, I took another day off to let the epoxy on the bow cure, and I had a ton of yard work to do. I did a little work on 3 risers, but then mowed and burned branches for 6 hours solid. I'm so pleased that so many of you have picked up a few ideas to help your bow building. Thanks to all of you for the kind words! They are very much appreciated! Hope you all have a blessed Easter! Richard
|
|
| From: Nemah
|
|
|
|
|
|
|
| Date: 16-Apr-17 |
|
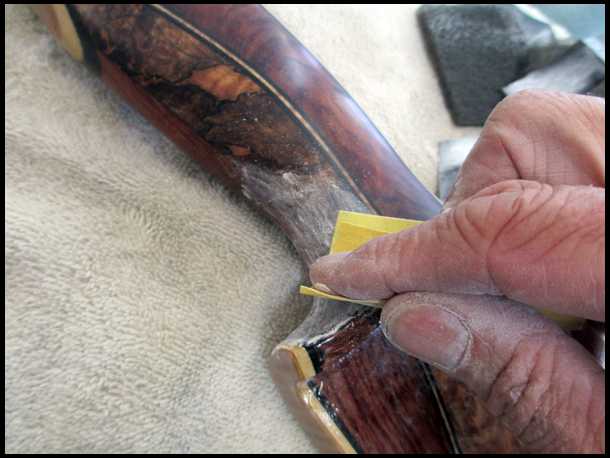
I started the final sanding of the entire bow at about 6am this morning and sanded for 3 hours. After church, I put in another 1-1/2 hours and finally reached a point where I'm satisfied! I did not use power sanders, as I did not want to cut through the epoxy into the wood. I started with 220, then 320, followed with 400. Then I used a fine Scoth-brite pad and finally 000 steel wool.
|
|
| From: Nemah
|
|
|
|
|
|
|
| Date: 16-Apr-17 |
|
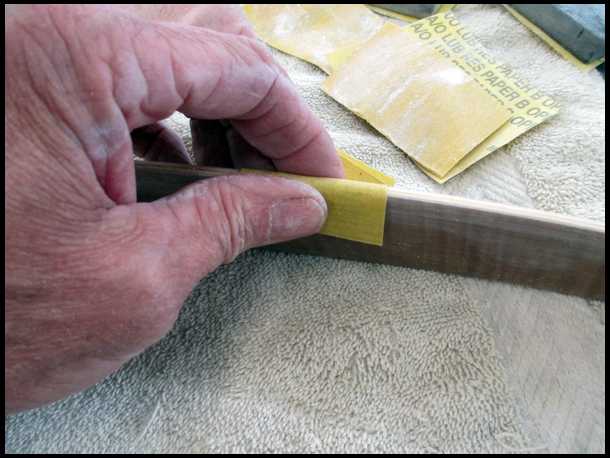
I gave the limb edges a few coats of epoxy also, so I had to smooth those out, and clean up any epoxy that got on the face of the fiberglass.
|
|
| From: Nemah
|
|
|
|
|
|
|
| Date: 16-Apr-17 |
|
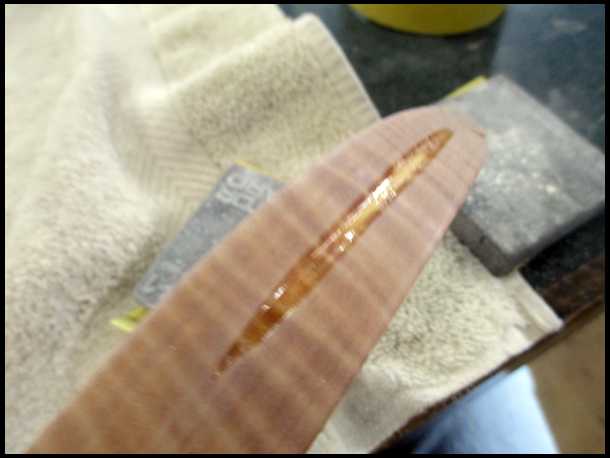
The string groove and the nocks were sanded with fine sanding wheels on my Dremel Tool, then hit with the steel wool.
|
|
| From: Nemah
|
|
|
|
|
|
|
| Date: 16-Apr-17 |
|
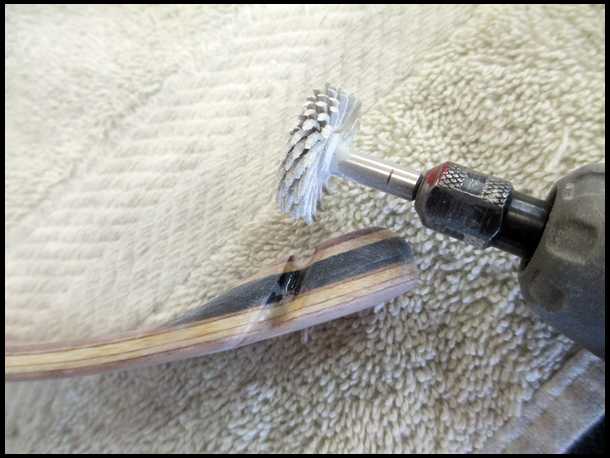
Sorry the photo is so blurry...
|
|
| From: Nemah
|
|
|
|
|
|
|
| Date: 16-Apr-17 |
|
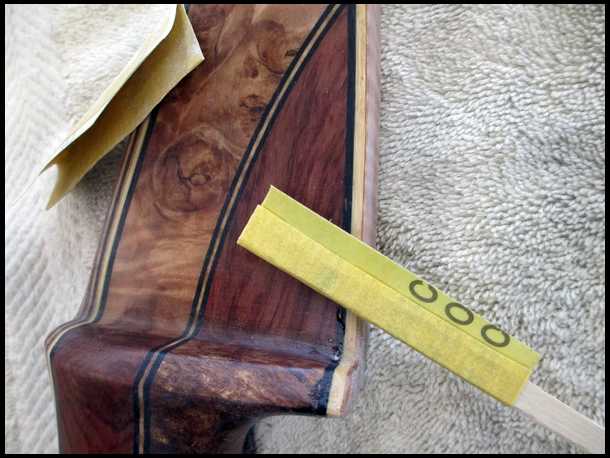
The arrow shelf is always tricky...Take extra time here.
|
|
| From: Nemah
|
|
|
|
|
|
|
| Date: 16-Apr-17 |
|
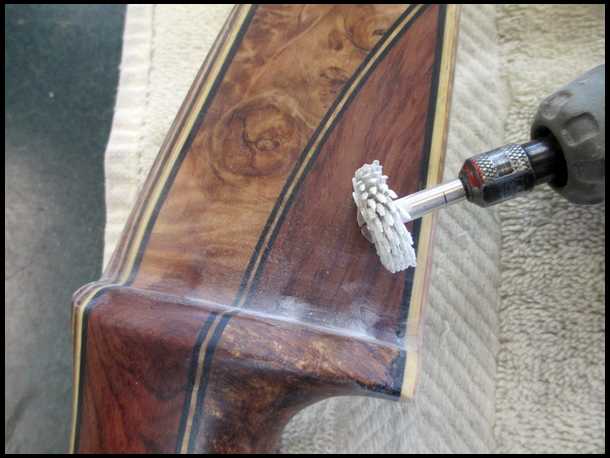
|
|
| From: Nemah
|
|
|
|
|
|
|
| Date: 16-Apr-17 |
|
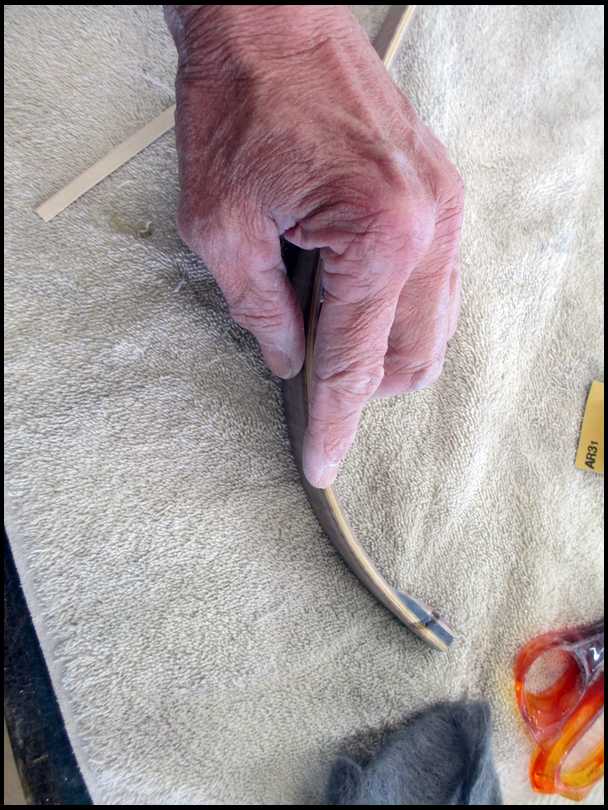
Did you notice how thick the nock is? I made them that way because of the wood layers. My glass nocks are much more stream-lined. I'm running my finger along the limb edge, feeling for rough spots or bumps of epoxy, which must be smoothed out.
|
|
| From: Nemah
|
|
|
|
|
|
|
| Date: 16-Apr-17 |
|
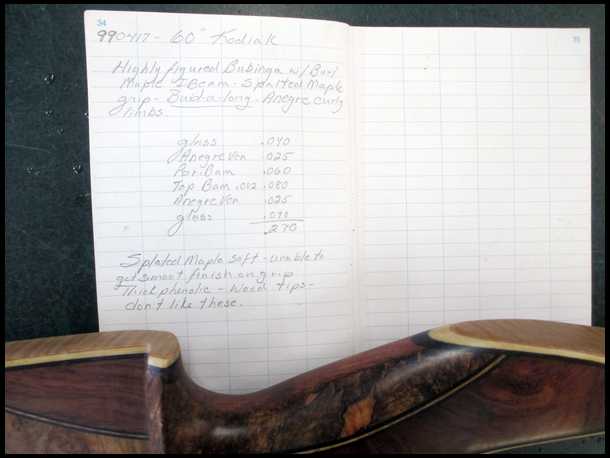
After sanding, I took the bow outside into the sunshine to look for areas I missed. There were only a few, and I quickly took care of them. I dusted the bow off and strung it up to a 7-1/4" brace height. No limb twist, no noise when the string settled into the groove, 1/4" minus-, lower limb strong, a fraction over 47# @ 28". I'll record all of that in my notebook, then write my name and other information on the bow.
|
|
| From: Nemah
|
|
|
|
|
|
|
| Date: 16-Apr-17 |
|
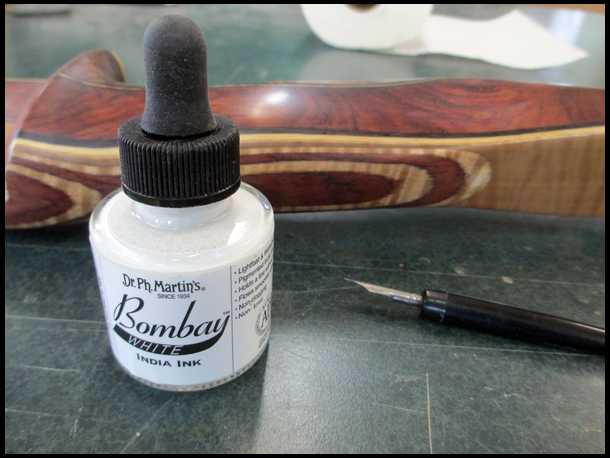
I know, it should read,"spalted". Give me a break. I use white India ink on the darker woods and a fine point nib. But first, I'll attach some fine wire to hang up the bow while spraying on the finish.
|
|
| From: Nemah
|
|
|
|
|
|
|
| Date: 16-Apr-17 |
|
|
|
| From: Nemah
|
|
|
|
|
|
|
| Date: 16-Apr-17 |
|
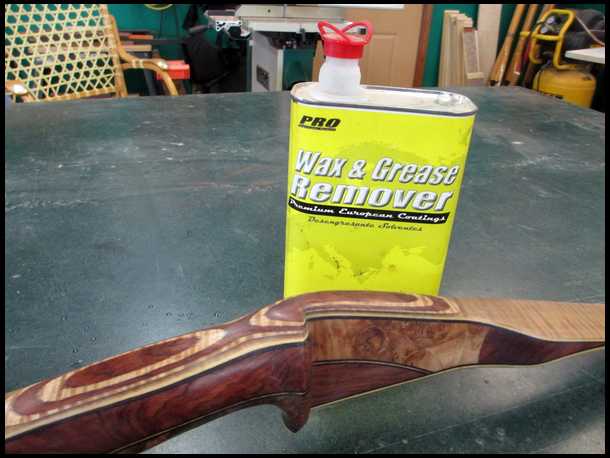
OOPPSS! I skipped a step. I use grease and wax remover first to clean any oil or bowstring wax off the bow. Available at auto paint stores. From now on, I wear rubber gloves when touching the bow.
|
|
| From: Nemah
|
|
|
|
|
|
|
| Date: 16-Apr-17 |
|
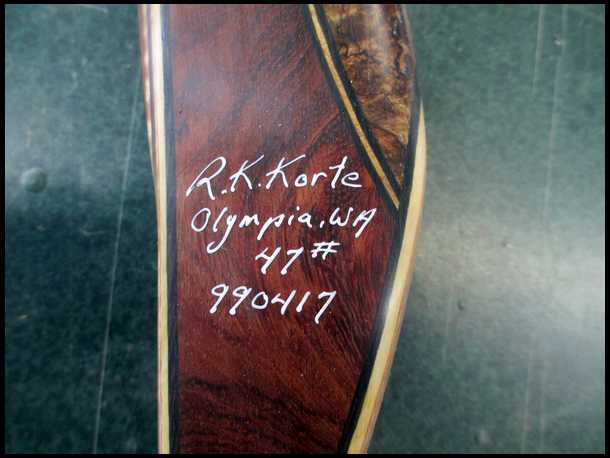
Practice on a scrap before writing on your bow. I sign all my bows the same except weight and serial number. This is the 99th bow I've made (although I've made several kids bows with no signature) , made in April(04) of 2017(17). If you don't like it, or make a mistake, spray it with 409 cleanser quickly and wipe it off. Let it dry and start again. I might have used gold ink, but I was out.
|
|
| From: Nemah
|
|
|
|
|
|
|
| Date: 16-Apr-17 |
|
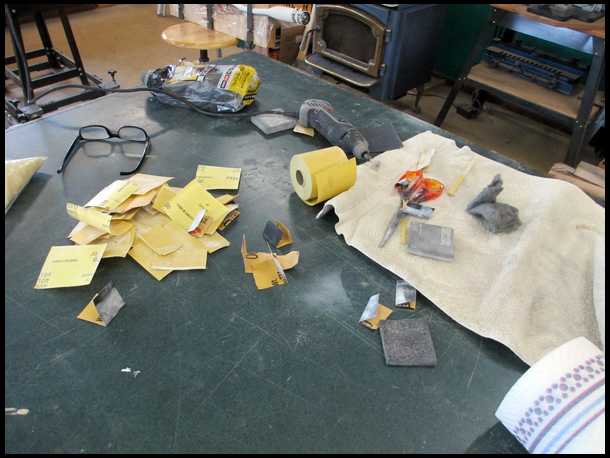
I hung the bow to let the ink dry and took time to clean up my mess. A clean shop is a happy shop.
|
|
| From: Nemah
|
|
|
|
|
|
|
| Date: 16-Apr-17 |
|
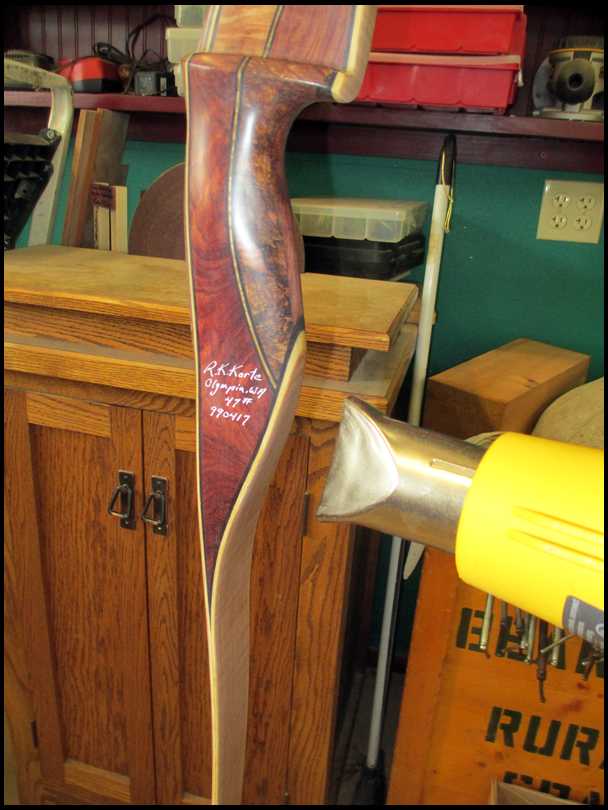
If you get anxious, use a heat gun or hair dryer-low setting only- to speed things along. I use Minwax Semi-Gloss Polyurethane in a spray can for all my bows. I've tried other finishes that require a spray gun, but I'll stick with Minwax. The average guy may want to repair some dings or scratches someday, and all he'll have to do is go over the bow with a Scoth-Brite pad and re-spray the bow at home. So simple. Works for me.
|
|
| From: Nemah
|
|
|
|
|
|
|
| Date: 16-Apr-17 |
|
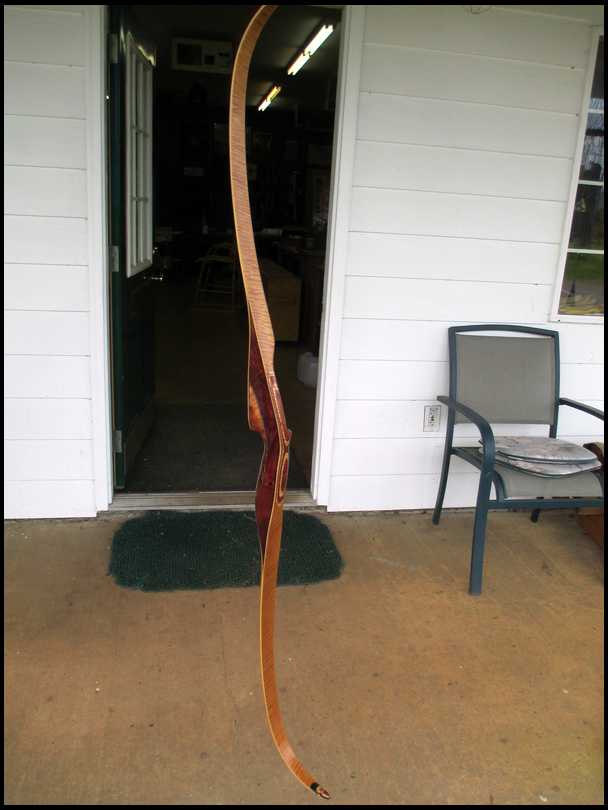
It's a nice day here, little wind, so I sprayed the bow outside. Wipe it lightly with a tack cloth, but do not wipe the signature! I hold the bow (rubber gloved hand)at the grip and first spray the tips, then the edges, then both sides of the glass but stop near my hand. Then I hang it up and spray the grip area-LIGHT COATS ONLY!!! I hang it up in my shop and wait to recoat. You have up to 2 hours, but I usually wait about 30 minutes between coats. I'll put on 4 coats and let the bow dry FOR 3 DAYS! Then check for runs-drips-errors. If you find some, sand and re-spray, usually 2-3 more coats. Repeat till your satisfied. Time for the 2nd coat!
|
|
| From: mgerard
|
|
|
|
|
|
|
| Date: 16-Apr-17 |
|
Masterful, from start to finish! Great wood choices too.
|
|
| From: bodymanbowyer
|
|
|
|
|
|
|
| Date: 16-Apr-17 |
|
That's awesome Richard. Hmm ,do I need another one of yours :-) I want or do I need ;-) super job on this buildalong. Thank you for doing this. JF
|
|
| From: Nemah
|
|
|
|
|
|
|
| Date: 16-Apr-17 |
|
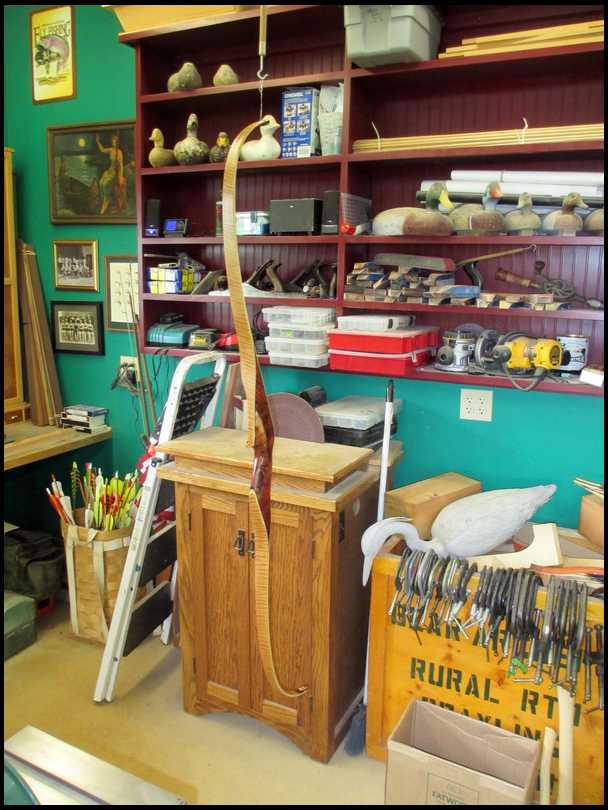
Drying between coats...
|
|
| From: Buzz
|
|
|
|
|
|
|
| Date: 16-Apr-17 |
|
Awesome looking bow.
Thanks for the build along.
|
|
| From: fishin coyote
|
|
|
|
|
|
|
| Date: 16-Apr-17 |
|
Neman, Very very nice. Thanks for the build along,it was very informative and well done. I'm sure there is a long line of admirers willing to take it off of your hands. I do have one question though, is that unfinished GBH deke solid wood one piece or laminated?
Mike
|
|
| From: Nemah
|
|
|
|
|
|
|
| Date: 16-Apr-17 |
|
Plastic lawn decoration...in for repainting. I had it mounted on my Barnegat Bay Sneakbox as a confidence decoy.
|
|
| From: Archre167
|
|
|
|
|
|
|
| Date: 16-Apr-17 |
|
That is a beautiful piece! Thanks for sharing. I am a longbow nut but I would definitely try one of yours. If you ever mess up and find you've made a lefty I would be honored to make use of it! Lol Great build!
|
|
|
|
| From: muddyIA
|
|
|
|
|
|
|
| Date: 16-Apr-17 |
|
Absolutely wonderful. Jeff you need it, that way I can shoot it.
|
|
| From: Dry Bones
|
|
|
|
|
|
|
| Date: 16-Apr-17 |
|
Thank you for doing the posts. Really awesome. and VERY nice bow.
-Bones
|
|
| From: Homey88
|
|
|
|
|
|
|
| Date: 17-Apr-17 |
|
Wow! That was awesome! Beautiful bow!
|
|
| From: Bob Rowlands
|
|
|
|
|
|
|
| Date: 17-Apr-17 |
|
This is 'THE' go-to thread on this subject, on this site. Congrats on a great thread and a great bow. And thanks.
|
|
| From: Kwikdraw
|
|
|
|
|
|
|
| Date: 17-Apr-17 |
|
Thanks Nemah, your work is magnificent, truly a work of art, not to mention exemplary craftsmanship! I'm really impressed w/ your intestinal fortitude and determination to get it right! Very rare these days! Wyatt
|
|
| From: Nemah
|
|
|
|
|
|
|
| Date: 18-Apr-17 |
|
Hello folks! Bow update: After drying for a few days, I was able to inspect it for any flaws, especially runs in the finish. I found none and the bow looks great, a soft, mellow, non-glare finish, perfect for hunting. A high gloss finish may have made the figured grain of the wood really pop, but it's too gaudy for my taste. My wife thinks I should keep it......"It's the prettiest bow you've ever made!".......but I offered it to a gentleman on my shop list who wanted a 47 pound bow. And.......I can always make a better one! There are 2 very minor depressions in the grip burl due to the softness of the wood, but I cannot feel them while holding the bow for a shot. The grip is also slightly larger that usual.......I didn't want to chance gouging or tearing the burl any more while shaping. I wear a large glove and it's very comfortable for me while holding for a shot, but it may feel a bit bulky while carrying it. I coated the burls with marine penetrating epoxy and 6 coats of regular epoxy, so it's rock solid now. I'll wait one more day till I apply the leather arrow plate and feather rest, and then it's ready to go. And I still have 18 risers glued up, waiting for limbs! I'll head out to the shop now and take a few photos. Thanks to all of you for your kind words and support! Now,........how do you get cured epoxy off a camera?? Richard
|
|
| From: wonderbowman
|
|
|
|
|
|
|
| Date: 18-Apr-17 |
|
Richard, Thanks again for all this. It was very informative. I never use hi gloss on a final coat on anything. Satin or satin polished is the way to go for me. MP
|
|
| From: bodymanbowyer
|
|
|
|
|
|
|
| Date: 18-Apr-17 |
|
I'm not sure how to safely remove cured epoxy from a camera :-\ it takes a lot of rubber gloves and alot more extra time. doing a buildalong. I'm sure it looks as nice as my RKK Bows :-) JF JF
|
|
| From: Nemah
|
|
|
|
|
|
|
| Date: 18-Apr-17 |
|
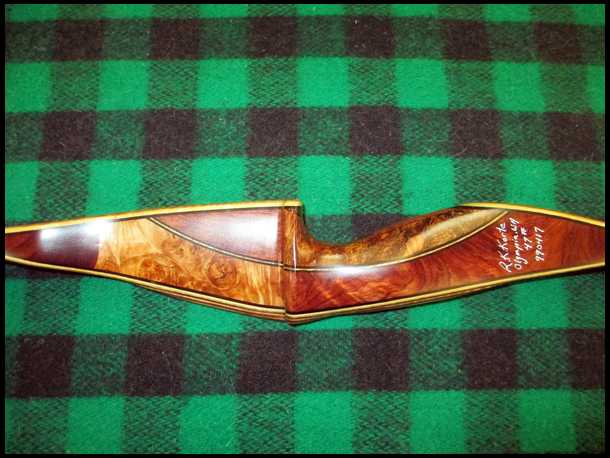
|
|
| From: Nemah
|
|
|
|
|
|
|
| Date: 18-Apr-17 |
|
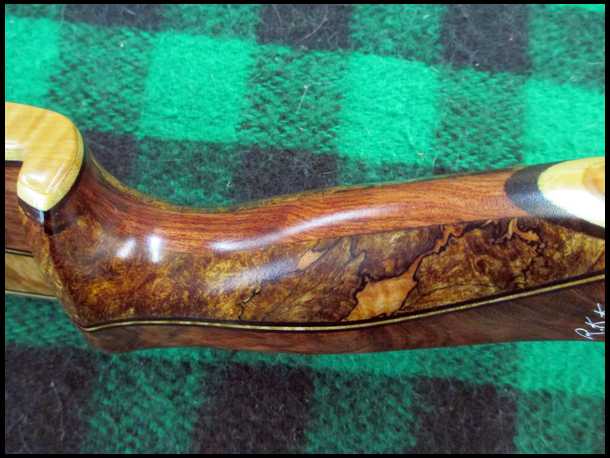
|
|
| From: Nemah
|
|
|
|
|
|
|
| Date: 18-Apr-17 |
|
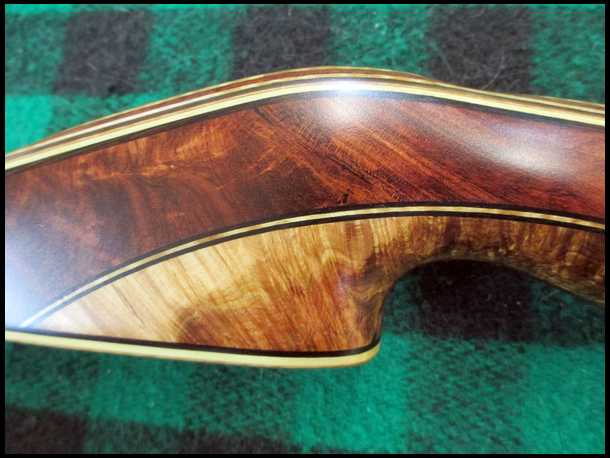
|
|
| From: Nemah
|
|
|
|
|
|
|
| Date: 18-Apr-17 |
|
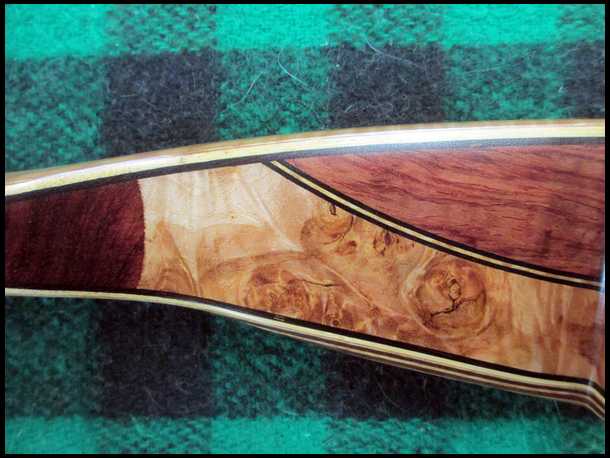
|
|
| From: Nemah
|
|
|
|
|
|
|
| Date: 18-Apr-17 |
|
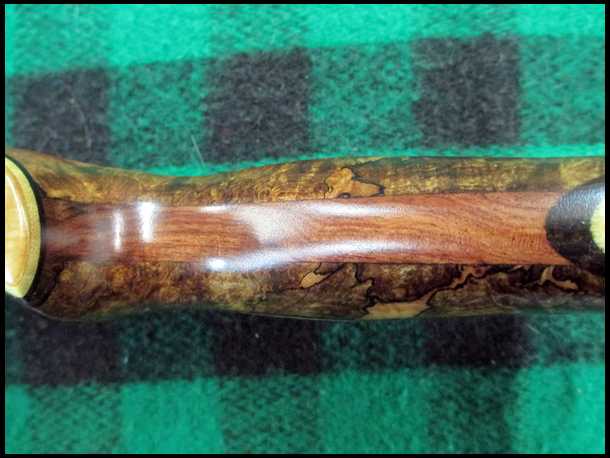
|
|
| From: joe vt
|
|
|
|
|
|
|
| Date: 18-Apr-17 |
|
WOW !!!!! A huge resounding WOW!!
|
|
| From: Nemah
|
|
|
|
|
|
|
| Date: 18-Apr-17 |
|
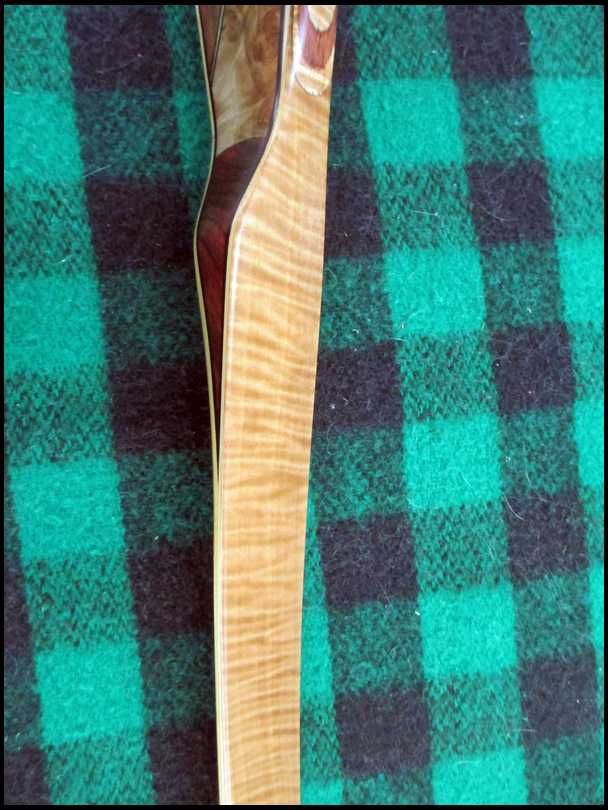
|
|
| From: Nemah
|
|
|
|
|
|
|
| Date: 18-Apr-17 |
|
|
|
| From: Nemah
|
|
|
|
|
|
|
| Date: 18-Apr-17 |
|
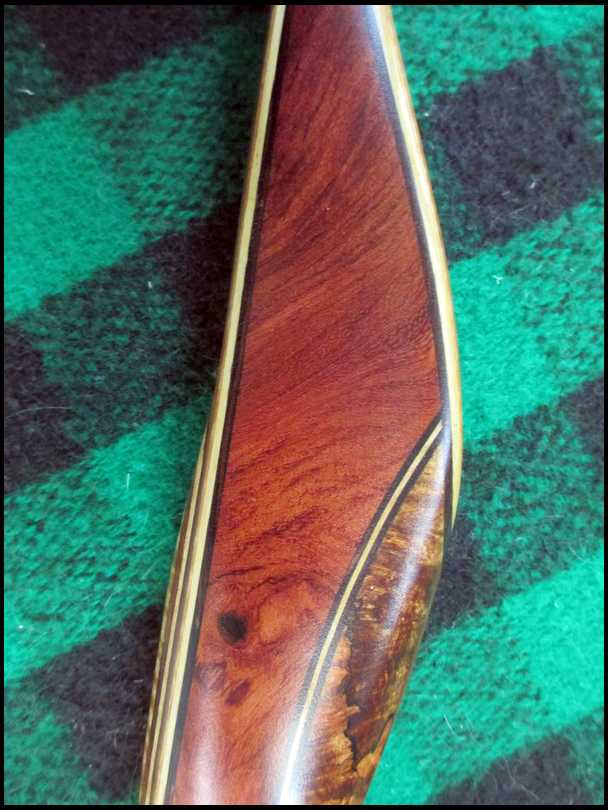
|
|
| From: Nemah
|
|
|
|
|
|
|
| Date: 18-Apr-17 |
|
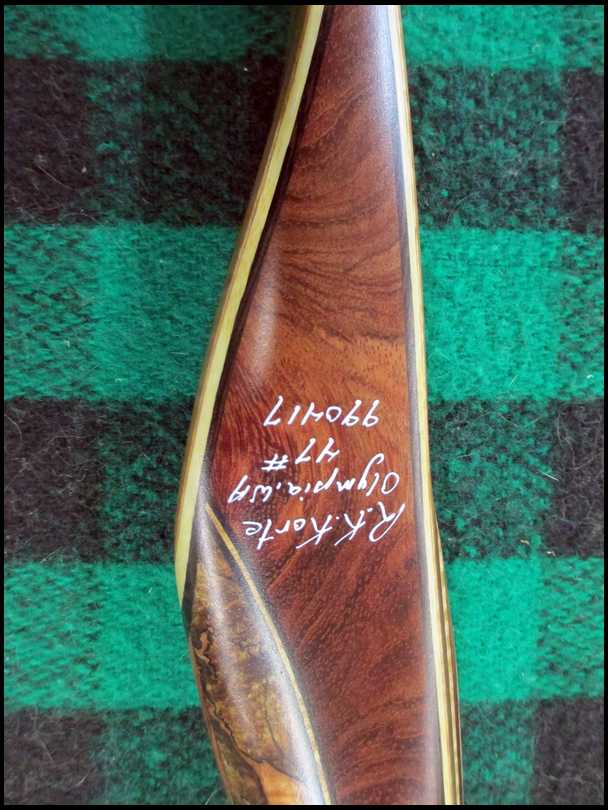
Sorry..up-side-down...
|
|
| From: Nemah
|
|
|
|
|
|
|
| Date: 18-Apr-17 |
|
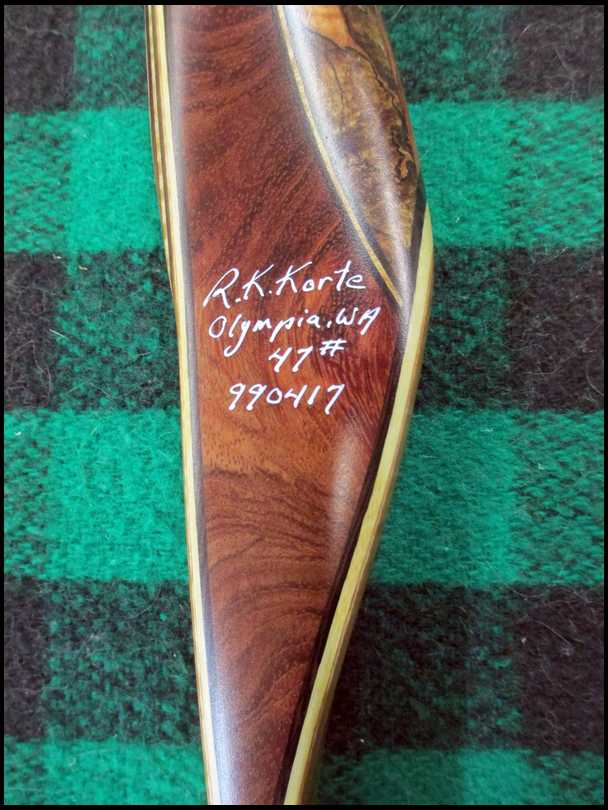
Now?
|
|
| From: Blackhawk
|
|
|
|
|
|
|
| Date: 18-Apr-17 |
|
Beautiful piece of work for sure. I've been following each day and it's been great.
Moses Lake shoot coming this weekend and will look for you...Lon
|
|
| From: BigB
|
|
|
|
|
|
|
| Date: 18-Apr-17 |
|
Nice bow!!!
|
|
| From: Dry Bones
|
|
|
|
|
|
|
| Date: 18-Apr-17 |
|
Absolutely BEAUTIFUL. I agree with Joe Vt. WOW.
-Bones
|
|
| From: Bob Rowlands
|
|
|
|
|
|
|
| Date: 18-Apr-17 |
|
Hope it wasn't your Hasselblad. lol
|
|
| From: Orion
|

|
|
|
|
|
|
| Date: 18-Apr-17 |
|
Ya done real good! Thanks for taking us along.
|
|
| From: mgerard
|
|
|
|
|
|
|
| Date: 18-Apr-17 |
|
Can't wait to see your next one! Beautiful work and what patience to include us. Thank you.
|
|
|
|
| From: Wohlf63
|
|
|
|
|
|
|
| Date: 18-Apr-17 |
|
Truly beautiful work of art!
|
|
| From: cedar shooter
|
|
|
|
|
|
|
| Date: 18-Apr-17 |
|
I looked forward to seeing the progress each day truly a work of art thanks for sharing. Rick
|
|
| From: neargeezer
|
|
|
|
|
|
|
| Date: 18-Apr-17 |
|
What an entertaining thread! I've been a builder all my life but find myself totally envious of your craftsmanship. You and a couple of others on here are just MASTER CRAFTSMAN!
|
|
| From: RymanCat
|
|
|
|
|
|
|
| Date: 18-Apr-17 |
|
Wow now I want one.
|
|
| From: Biathlonman
|
|
|
|
|
|
|
| Date: 18-Apr-17 |
|
Stunning, you've outdone yourself with that one.
|
|
| From: jk
|
|
|
|
|
|
|
| Date: 18-Apr-17 |
|
And he owes it all to "The Green Death".. Rainier Ale :-)
|
|
| From: Burnsie
|
|
|
|
|
|
|
| Date: 18-Apr-17 |
|
Thanks for taking the time to document the entire process - I'm sure that added another level of time and commitment to an already labor intensive project. Beautiful work!
|
|
| From: Knifeguy
|
|
|
|
|
|
|
| Date: 18-Apr-17 |
|
Nice work Richard, I knew it would be a beauty. Now if you'll just slide my name onto your list for a 48#-60" I'll have one of each. I'm looking forward to another visit. Lance.
|
|
| From: Chuck Simpson
|

|
|
|
|
|
|
| Date: 18-Apr-17 |
|
Richard, Thanks for taking us all on the build along. that has to be one of the prettiest bows I've seen.
|
|
| From: bowhunt
|
|
|
|
|
|
|
| Date: 19-Apr-17 |
|
Beautiful bow Richard!
Very impressive and thorough build along. Thanks for putting the time into it that you did and contributing to the forum.
I have a bow built by Richard and I enjoy shooting it very much.Its a looker as you would expect.I feel blessed to have it.It fits my style perfectly.
Go catch some smallmouth!
|
|
| From: Shoe
|
|
|
|
|
|
|
| Date: 21-Apr-17 |
|
Your bow is absolutely stunning. I love the maple, especially in the riser. Thank You for sharing your talent with us.
|
|
| From: ca
|
|
|
|
|
|
|
| Date: 21-Apr-17 |
|
Fantastic finish work.
|
|
| From: muddyIA
|
|
|
|
|
|
|
| Date: 21-Apr-17 |
|
Wonderful thread.
|
|
| From: Rotten:
|
|
|
|
|
|
|
| Date: 21-Apr-17 |
|
Wow....great looking bow!
|
|
| From: Rotten:
|
|
|
|
|
|
|
| Date: 21-Apr-17 |
|
Wow....great looking bow!
|
|
| From: mahantango
|
|
|
|
|
|
|
| Date: 22-Apr-17 |
|
Wow, that was one of the best threads ever. Your craftsmanship is stunning. I'm using Min Was poly on a refinish and am curious, did you buff/compound after the final coat?
|
|
| From: Nemah
|
|
|
|
|
|
|
| Date: 22-Apr-17 |
|
Nope. I like the dull finish for hunting. Buff it up if you like gloss. RK
|
|
| From: Wohlf63
|
|
|
|
|
|
|
| Date: 24-May-17 |
|
Richard, Have I moved up on the Shop list for a RH 45@28 60” Kodiak Deluxe? Thank you Jeff
|
|
| From: Jason D
|
|
|
|
|
|
|
| Date: 24-May-17 |
|
EPIC! EPIC! EPIC!
This HAS to be a LW TOP 10 thread!!!
Richard,
I DEEPLY APPRECIATE your extra time spent photo wing and documenting and posting this process along with your incredible expertise!
My departed friend Dave Paxton shared with me his formula for making his Remake of the 59/60 bear Kodiak. The press is made. The laminations are ground. I just need to get my act together and rebuild the riser because the feathered fadeouts were slightly damaged. Your thread has seriously MOTIVATED me To get back on the bow building horse!
Sincere gratitude! Jason DuLac
|
|
| From: vintage-bears
|
|
|
|
|
|
|
| Date: 26-Jun-17 |
|
Magnificent bow in every way. Bravo!!!
|
|
| From: Dry Bones
|
|
|
|
|
|
|
| Date: 26-Jun-17 |
|
Said it earlierin the thread, say it again. BEAUTIFUL bow and thanks for taking the time to show the process.
-Bones
|
|
| From: Keefers
|
|
|
|
|
|
|
| Date: 25-Aug-18 |
|
TTT for my friend Cal and just to show folks "How Much Blood, Sweat and Tears go into Richards bows! What Richard and his wife recently done for my oldest daughter Ande really touched my heart by sending her a youth bow he made and the bow case his wife made . Awesome folks to do such a generous, unselfish act of kindness! I truly can't say "Thank You Mr. & Mrs. Korte" enough for bringing a smile to our soon to be teenager daughter Ande. God Bless you in all you do and for your Talent that you share with others. Keefer's <')))><
|
|
| From: Smokin Joe
|
|
|
|
|
|
|
| Date: 25-Aug-18 |
|
Wow. I am VERY impressed. That is one beautiful bow. Anyone would be lucky to own and shoot one like it.
|
|
| From: 2020md
|
|
|
|
|
|
|
| Date: 25-Aug-18 |
|
Stunning craftsmanship. I am truly impressed at the attention to detail required at each step. Masterfully done!
|
|
| From: Knifeguy
|
|
|
|
|
|
|
| Date: 25-Aug-18 |
|
Richard and Janis are top notch in my book too. When I was there last Monday to purchase my bow I mentioned the gesture made to Keefer’s daughter Ande and he said that there was no way he wasn’t going to send her a bow. He’s a very humble man.
|
|
| From: Keefers
|
|
|
|
|
|
|
| Date: 25-Aug-18 |
|
Lance , You letting me know that makes this even more "Awesome". My girls have all three been Blessed beyond measure from kind folks like the Kortes and not sure how I could ever repay anyone for their kindness!
|
|
| From: Dubber
|
|
|
|
|
|
|
| Date: 25-Aug-18 |
|
I am impressed .you are an artist. Thank you for the posts. Incredible
|
|
| From: Brad Lehmann
|
|
|
|
|
|
|
| Date: 25-Aug-18 |
|
Incredible work and it shoots as good as it looks.
|
|
| From: Andy Man
|
|
|
|
|
|
|
| Date: 25-Aug-18 |
|
Dam, no wonder nice bows aint cheap one heck of a lot of work there, not counting the materials and equipment
IMPRESSIVE
|
|
| From: pondscum2
|
|
|
|
|
|
|
| Date: 25-Aug-18 |
|
that is ALMOST too pretty to carry into the woods. but, it looks like too fine of a bow to not hunt with it. if i scratched it, i would probably cry, but it would just be a "beauty mark"... an incredible piece of work/art. thank you so much for taking us on the journey with you.
|
|
| From: Dry Bones
|
|
|
|
|
|
|
| Date: 18-Apr-20 |
|
To the top for our lock-in needs.
Hope you don't mind Nemah.
-Bones
|
|
| From: CD
|
|
|
|
|
|
|
| Date: 19-Apr-20 |
|
Thanks for bringing it forward... That is an absolutely gorgeous bow and the process was very educational!
|
|
| From: papadeerhtr
|
|
|
|
|
|
|
| Date: 19-Apr-20 |
|
That is a prettiest bow as ive seen wow excellent job!!!!
|
|
If you have already registered, please sign in now
For new registrations Click Here
|
|
|
|