Traditional Archery Discussions on the Leatherwall


Homemade tools, jigs, etc...

Messages posted to thread:
Buzz 03-May-13
Thin Man 03-May-13
osr144 03-May-13
Stoner 04-May-13
TheArrowSlinger 04-May-13
Buff 04-May-13
Jeff Durnell 04-May-13
Thin Man 04-May-13
Buff 05-May-13
Gaur 05-May-13
reddogge 05-May-13
reddogge 05-May-13
Thin Man 05-May-13
Sailor 06-May-13
Sailor 06-May-13
Sailor 06-May-13
Sailor 06-May-13
Eric Krewson 06-May-13
Sailor 06-May-13
PaPa Doc 06-May-13
m60gunner 06-May-13
Jim B 06-May-13
Stoner 07-May-13
Stoner 07-May-13
Buzz 08-May-13
Eric Krewson 08-May-13
squirrelslayer 08-May-13
Stikbow 08-May-13
V-Archer 08-May-13
Droptine 08-May-13
JohnBoy 08-May-13
D.J. @work 09-May-13
Zbone 09-May-13
Dan In MI 09-May-13
TOXOPHILITE 14-May-13
squirrelslayer 14-May-13
hendo64 14-May-13
hawkeye in PA 14-May-13
Jeff Durnell 14-May-13
aromakr 14-May-13
Jeff Durnell 14-May-13
Chemsolder1 17-May-13
D.J. @work 17-May-13
badger 17-May-13
DavidV 17-May-13
Drewster 17-May-13
buckbow 18-May-13
badger 18-May-13
TRADARCHER 19-May-13
badger 19-May-13
osr144 19-May-13
Lowcountry 19-May-13
Buzz 24-May-13
patrick569 24-May-13
RonL 24-May-13
DaveP 24-May-13
Drewster 24-May-13
Toxophilite 09-Jul-13
string wax 09-Jul-13
George Tsoukalas 09-Jul-13
ephphatha 09-Jul-13
Buzz 10-Jul-13
LOST DORSAI 10-Jul-13
Fritz 11-Jul-13
Fritz 11-Jul-13
Peleg 11-Jul-13
North Mountain 11-Jul-13
ephphatha 11-Jul-13
1Longbow 11-Jul-13
Fritz 11-Jul-13
Fritz 11-Jul-13
From: Buzz
Date: 03-May-13

Buzz's embedded Photo


After reading Lowcountry's thread, I though about my homemade feather sanding jig.

Please post pic's or vid of your homemade tools for archery.

From: Thin Man
Date: 03-May-13

Thin Man's embedded Photo


Here's my spine tester courtesy of another Leatherwaller's description of the same.

A couple of bucks and worth its weight in gold.

From: osr144
Date: 03-May-13


Are you for real I got some really weird jigs and am still inventing more. Just my fletching jig is weird.All it is a bunch scrap off cuts of wood glued together.I used to make an indexed wooden dial to give me the 120 degree s.The last one I made uses a block that is of equalateral triangle shape.I just turn it around to the next feather position.My straight clamps are 2 pieces of hack saw blades with a couple of wooden clothes pegs glued to them and two connecting pieces glued on.I also have helical clamps as well but these are made aluminum strips and pegs again.Grooveing jigs used with hand made wood planes for doing 4 wing splices for footing arrows.Spring loaded feather trimmers.Special router jigs for footings and router jigs for producing round shafting.Arrow tapering jigs.knock reinforcing jigs and knock cutting jigs. Drilling jigs for making horn knocks.Various arrow straightening tools.sander attachments for tapering for arrow heads and knocks Drill jigs for making brass field and target points.I can make all these jigs but will need my daughters help to post pictures.Hope to post some soon. OSR Cheers.

From: Stoner
Date: 04-May-13


Nessesity is the mother of invention. I will take some pics & post. John

From: TheArrowSlinger
Date: 04-May-13


Thin man how to measure the deflection on the spine tester? I can see a nail that looks like you use to measure it but can't tell exactly.

From: Buff
Date: 04-May-13


Thin man you have plans for that

From: Jeff Durnell
Date: 04-May-13


By the point of the nail's position on the combination square, I'm bettin'.

From: Thin Man
Date: 04-May-13


http://leatherwall.bowsite.com/tf/lw/thread2.cfm?forum=23&threadid=224960&messages=15&CATEGORY=2

Neilbilly here on Leatherwall presented the spine tester design upon which I based mine. All thanks to him for the concept. I had my version up within half an hour of reading his post. Brilliant!

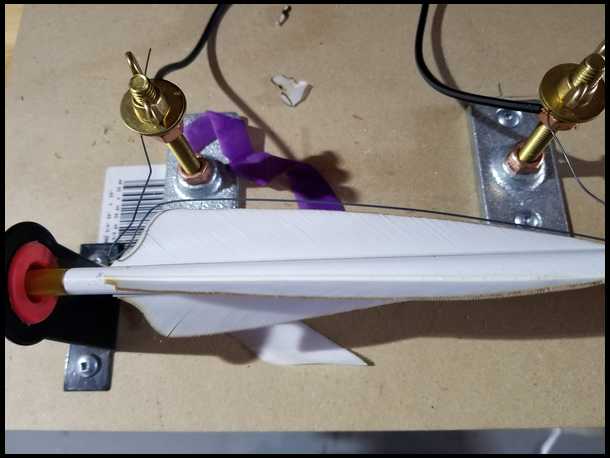
It is as simple as it looks in the picture. Two hooks hung 26" apart under the shelf (or whatever). A hole drilled at the center (be careful to account for the hook's offset from its own drilled hole). A nail long enough to lay upon the shaft and up through the hole (I use a 4"). The stand-alone adjustable square to allow for a convenient "zero point" calibration.

I grabbed a two pound dumbbell ... not industry spec, but consistent within all my personal shafts. (I guess you measure an existing known spine, calculate the formula versus your findings with your "not-quite-exactly-two-pound" weight, and convert to taste. I don't bother since all I want is to know my own personal match-ups.)

Stick nail through hole, lay shaft across hooks, adjust square to a zero-point, hang weight and observe. I measure by sixteenths of deflection, and if between sixteenths, I'll note a + or - when I mark the shaft.

I put the shaft on the tester. If the deflection is 8/16" (.500), I'll take a pencil and mark the end of the shaft with an "8". If the deflection is a hair more than 8/16", I'll mark the shaft as "8+". I don't weigh them, but if you do you could mark the weight there, also.

Next time I make a batch, I simply grab the mates and have at it.

Go for it, lads and lassies!

From: Buff
Date: 05-May-13


Thanks

From: Gaur
Date: 05-May-13


That's cool. Much better for a guy like me than spending $170 or whatever they want these days for a spine tester.

From: reddogge Professional Bowhunters Society - Qualified Member
Date: 05-May-13


Spine tester.  photo IMG_0575.jpg

Arrow making rack  photo IMG_0606.jpg

Point alignment jig  photo IMG_0960.jpg

Wood arrow straightener and alcohol lamp  photo IMG_0611.jpg

From: reddogge Professional Bowhunters Society - Qualified Member
Date: 05-May-13


To me flex is flex. Doesn't matter to me what material is as long as I measure flex but I tend to use mine to test wood arrows more than others.

From: Thin Man
Date: 05-May-13


Flex is indeed flex. Actual flight of varying materials (from an identical bow) would also depend upon recovery from flex, shaft diameter, length of shaft, weight of shaft, arrow weight in ratio of point to length (FOC, etc.), fletching, and probably other things I can't think of at the moment.

I lean towards wood, and tend not to mix shafting materials on a particular bow. Identical spine as well as identical other factors may well present a fairly similar flight pattern.

Tuning probably always must happen.

I'll leave that to someone else to discuss.

From: Sailor
Date: 06-May-13

Sailor's embedded Photo


Spine tester

From: Sailor
Date: 06-May-13

Sailor's embedded Photo


Crester

From: Sailor
Date: 06-May-13

Sailor's embedded Photo


Doweler

From: Sailor
Date: 06-May-13

Sailor's embedded Photo


Nock and point grinder.

From: Eric Krewson
Date: 06-May-13

Eric Krewson's embedded Photo


Everyone knows about the infamous selfbow Tilering Gizmo but here is a picture none the less.

From: Sailor
Date: 06-May-13

Sailor's embedded Photo


Shaft taper grinder

From: PaPa Doc
Date: 06-May-13

PaPa Doc's embedded Photo


A seat!

From: m60gunner
Date: 06-May-13


I like those spine testers. If I remember right wood shafts are measured at 26in. and alum.and carbons at 28in? I saw that somewhere on this site?

From: Jim B
Date: 06-May-13

Jim B's embedded Photo


Tip alignment jig.

From: Stoner
Date: 07-May-13

Stoner's embedded Photo


Well I went to make a string the other day and my string jig is gone. After our move out west, all the rummge sales, auction, and pitching, who knows? Soooo.... why just make a new one with a plank. Had some pallet wood that some stone came in on (Puduka & Beech) Here's the end result. John

From: Stoner
Date: 07-May-13

Stoner's embedded Photo


From: Buzz
Date: 08-May-13


Great looking tools and jigs Gents.

From: Eric Krewson
Date: 08-May-13

Eric Krewson's embedded Photo


A couple more, this is an arrow tapering jig, tapers the last 9" of the arrow. Put the tapered nock in the hole and spin with a drill. It took me several holes to get the nock height just right to produce a 5/16" diameter on the nock end.

From: Eric Krewson
Date: 08-May-13

Eric Krewson's embedded Photo


A footnote on the picture of the shaft taper jig pictured above; I have a 36 grit belt in the picture which I found to be too aggressive. I found a 150 grit is about right.

Here is a simple taper jig, perfect nock and point tapers every time.

From: Eric Krewson
Date: 08-May-13

Eric Krewson's embedded Photo


I glued on a piece of wood to fit the miter slot on my disc sanding table so it can be perfectly positioned every time should I remove it.

From: squirrelslayer
Date: 08-May-13


heres a home made tillering tree i made, this one took about 45 mins with the correct tools. it cost me less than £5 to make this. SS

From: Stikbow
Date: 08-May-13


outstanding jobs.

From: V-Archer
Date: 08-May-13

V-Archer's embedded Photo


Here is my pre-tiller tool for the lams I use for my bows. I clamp 2 lams in a block in the top and pair them when they match.

From: Droptine
Date: 08-May-13

Droptine's embedded Photo


Just finishing a stave vise from scraps at work. I have a piece of Osage waiting to be a bow.

From: JohnBoy
Date: 08-May-13


Adding this thread to my favorites list...lots of good stuff. Need to get some pics of my own crude DIY tools.

From: D.J. @work
Date: 09-May-13

D.J. @work's embedded Photo


Feather chopper I made.

From: D.J. @work
Date: 09-May-13

D.J. @work's embedded Photo


scraper and bow bench

From: Zbone
Date: 09-May-13


Thanx for sharing.

From: Dan In MI
Date: 09-May-13


DJ your chopper is very similar to an idea I have.

From: TOXOPHILITE
Date: 14-May-13


TTT

From: squirrelslayer
Date: 14-May-13


DJ could you do a buildalong for that. looks cool. SS

From: hendo64
Date: 14-May-13


Impressive work everyone, I might just borrow some of these ideas myself.

From: hawkeye in PA
Date: 14-May-13


Don't have pics. But the leather sewing horse my granddad made for dad is 70 years old. And I made a bowstring jig that is now over 40 years. It has 8ply plywood for the arms that came out of a TV. Them days are gone!

From: Jeff Durnell
Date: 14-May-13

Jeff Durnell's embedded Photo


This is my lamination sled for grinding lams and cores for bamboo backed bows and such. It was my idea, but not entirely homemade since I had a machinist do some of the work.

It's aluminum, hinged on one end, with aligment pins on the opposite end which also act as shim keepers. It's 4" wide and adjustable from parallel to as much taper as I'll ever need.

The bottom is skeletonized to reduce weight, and the top is also largely hollowed out, it just wasn't machined the whole way through like the bottom.

Since this picture was taken, I added 3 keeper plates to each side to eliminate flexation as it's run through the thickness sander.

It works gooooood :)

From: aromakr Professional Bowhunters Society - Qualified Member
Date: 14-May-13


Jeff: That's very nice, do you get any flex though the middle? I would guess only if trying to cut too much at a time. Bob

From: Jeff Durnell
Date: 14-May-13


Originally Bob, there was some slight flexing, but since that picture, I've added little plates to the sides to keep it perfectly rigid.

From: Chemsolder1
Date: 17-May-13

Chemsolder1's embedded Photo


So many cool jigs and tools...have to make more now...these are simple to make and work better for me than my store bought ones, simply cut circles on bandsaw to desired size enlarge hole for bolt drill small secondary hole for a pin, gasket etc, this will hold paper. I put the loop part of velcro over the wood and put sandpaper on. All the sudden my drill press is a spindle sander. Most used tool I make by far, and beats having to buy special rolls etc. Forgot I sand it true in the press before adding second hole.

From: D.J. @work
Date: 17-May-13


SS When I first made it I did one. If you want to see it you can look under my handle or feather chopper build along. They work pretty well and are easy to make. This place is just full of great ideas. Thanks everyone for posting. David

From: badger
Date: 17-May-13


I wish I had a picture but I built a simple jig for cutting 4 point splices on arrow footings with my table saw. If anyone is interested in it I will try and draw up and post some plans. It is extremely simple.

From: DavidV
Date: 17-May-13


Sailor's dowelor works amazingly well and you don't need alot of tools to do it. great for making shafts if you don't have a router setup.

From: Drewster
Date: 17-May-13


Hey Badger, yeah, I'm definitely interested in seeing how you did that four point jig. Thanks for taking the time to show it off.

From: buckbow
Date: 18-May-13


Badger I would be interested as well... thanks in advance

From: badger
Date: 18-May-13


I will do a drawing in the morning.

From: TRADARCHER
Date: 19-May-13

TRADARCHER's embedded Photo


Some wood straightener shafts I made.

From: TRADARCHER
Date: 19-May-13

TRADARCHER's embedded Photo


Some wood straightener shafts I made...and flemish string jig

From: badger
Date: 19-May-13


I could not get my scanner working. I will try and describe it 4 point footing Jig for table saw. Build a wedge about 12" long that tapers from zero to 1". The taper can vary depending on how long you want your tapers. set the wedge down facing you and mark a line about 1" from the right side the full length of the wedge (12") Now take the piece you cut off, turn it up on its edge with the surface you cut facing down, now just lift it back on top of the remaining piece of wedge and glue it in place. The Jig is finished. This gives you an equal double mitre. To use the jig, the side with the glued on pice will go against the fence on your table saw and your still square arrow footing will fit into the mitre area, adjust the saw blade depth and the fence distance from the blade so that they are perfectly centered and then slide it through the blade, make a 1/4 turn each time you slide it through. On the arrow shaft you will simply have to make an x shaped cut and slide this into your arrow shaft.

From: osr144
Date: 19-May-13


Hey there just keep them comming.I contemplated the table saw idea and would be very curious to see what others ideas are.I am a carpenter ad joiner and worked exclusively in doing detailed restotation and reproduction work.All my jigs are along the lines of what I learned by diong this sort of work.I watched a video on composite horn and sinew bow construction.This impressed me as the tools being used were the same as what the Chinese,Koreans and ancient Turks used.There were a couple of special tools that the bower made himself and newer techniques adopted as well.I may never need these types of tools but it is good to know about them.The more we share the wealthier we become with knowlege.I can do most things and come up with a good result but evry now and again I learn to do the job easier and more efficiently.Just keep them comming once again. OSR

From: Lowcountry
Date: 19-May-13

Lowcountry's embedded Photo


My feather grinding tool. $14 sheet metal vise grips from amazon and 2-12" flat wood trim pieces. Somebody mentioned that they "welded" 2 thin flat metal pieces to their vice grips with J.B. Weld. That sounded to me like a really good improvement to what I came up with.

From: Buzz
Date: 24-May-13


ttt

Keep them coming Gents.

From: patrick569
Date: 24-May-13

patrick569's embedded Photo


Here is my $10.00 drum sander! 2" PVC pipe fitting, Pressure Test Valve, 5/16 Hex bolt. I had the Belt from a belt sander and the contact cement. Works like a charm for grinding feathers.

From: RonL
Date: 24-May-13

RonL's embedded Photo


Cut off Saw using HF saw. I have since added a tape measure.

From: DaveP
Date: 24-May-13


I just made a arrow cut-off saw as showwn in TBM mag. Works great.....DaveP

From: Drewster
Date: 24-May-13

Drewster's embedded Photo


Just finished my walnut and brass Flemish string jig.

From: Toxophilite
Date: 09-Jul-13

Toxophilite's embedded Photo


I added my little idea to my tillering tree. At each notch I drilled a hole behind it that fits a golf tee. Now I can just put the tee where I left off and come back to it later and not have to think about where I stopped. You can see the tee at the 9" mark.

From: Toxophilite
Date: 09-Jul-13


How dou make a picture go right side up?

From: string wax
Date: 09-Jul-13

string wax's embedded Photo


these are my feather grinding jigs I used old framing square and jb welded some large paper clips from office depo with 220 sand paper on the inside

From: George Tsoukalas
Date: 09-Jul-13

George Tsoukalas's embedded Photo


Here's my point taper jig which is made for a belt sanderwith a fence. Jawge

From: ephphatha
Date: 09-Jul-13


Here's a lam grinder I made out of a belt sander.

You can see more about that here

Here's a jig I use to cut curves in risers.

I can get different radii depending on where I put that dowel. Here it is in action.

I collected a whole bunch of different DIY spine testers and posted them here.

From: Buzz
Date: 10-Jul-13


Thanks for the spine tester link ephphatha.

From: LOST DORSAI
Date: 10-Jul-13


FANTASTIC IDEAS! MORE PLEASE! TTT LD

From: Fritz
Date: 11-Jul-13

Fritz's embedded Photo


DIY Dipper

From: Fritz
Date: 11-Jul-13

Fritz's embedded Photo


From: Peleg
Date: 11-Jul-13


Always wanted an arrow saw but they all seem so chintzy and hate the high pitched whine. With a new set of AMG GT20 tapered carbon shafts in hand and wanting to tune from the original length I decided to build my own. A quick look through TSC's abrasive blades section and I was able to find a 6" blade that is .040 thick for $2.99. I then remembered my cabinet saw has a miter gauge with 1/4" holes with thumb screws for repetitive cross cuts so picked up a piece of 1/4" cold rolled.

Mounted the blade and made up a stop block for the 1/4" rod. Makes a perfect cut every time and can roll the end of shaft against the side of blade to make them perfectly square. All this for under $8 using one of my unused table saws. Dust free and 7800 rpm's of smooth cutting pleasure ;^)

From: North Mountain
Date: 11-Jul-13


any jigs or tools for making limb wedges?

From: ephphatha
Date: 11-Jul-13


I really dig that dipper.

From: 1Longbow
Date: 11-Jul-13


Please, More info on that dipper ,such as materials ,very interesting

From: Fritz
Date: 11-Jul-13


Here's my build-along on a German trad-bow board:

http://www.archers-campfire.de/index.php?topic=5280.msg99602#msg99602

You need two plastic bottles with bulby necks. Cut of the neck of one bottle just above the equator of the bulb. Cut of the neck of the other bottle at the lower end of the bulb. Glue the shorter bottle neck onto the llonger bottle neck. Take a 22 mm copper pipe and put it into the lower bottle neck. Put a cork into the lwer end of the pipe. Drill a 18 mm hole into the upper bottle cap. Cut a 25 mm washer with a 5 mm hole at the centre from a bike tube. Put the washer inside the upper botzle cap.

From: Fritz
Date: 11-Jul-13


Sorry for all those typos - ipad in bed ain't no good


If you have already registered, please

sign in now

For new registrations

Click Here


Visit Bowsite.com A Traditional Archery Community Become a Sponsor
Stickbow.com © 2003. By using this site you agree to our Terms and Conditions and our Privacy Policy