| From: MikeT
|
|
|
|
|
|
|
| Date: 24-Mar-20 |
|
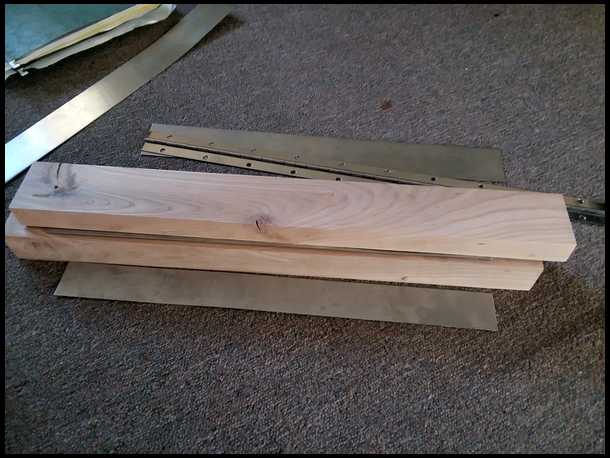
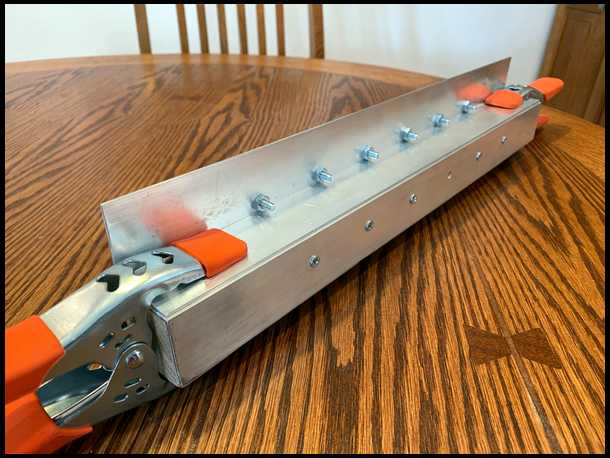
With the lockdown in place in Mich., working on some archery projects. Ive had some great help from a couple members on here, and decided to try making one combining others ideas.
Will it work? I have no idea, but worth a try. I opted for a back side hinge, and I`ll put 2 latches on it, thinking the frt corners instead of the ends.
I started with a pc of ash that I had. I dont recommend anyone using ash, its as hard as steel, hard to work with. Got some stainless strips from work, .0345 thick.
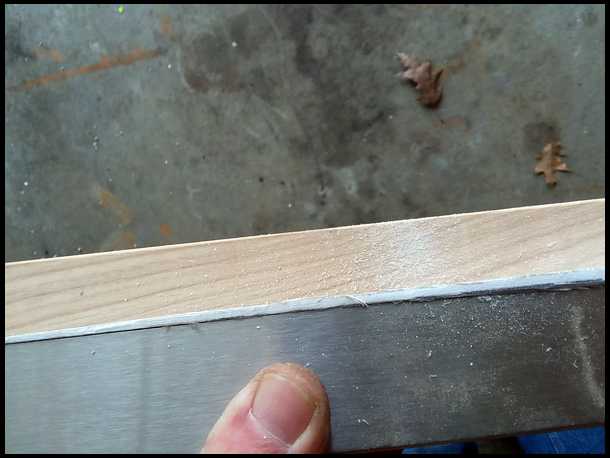
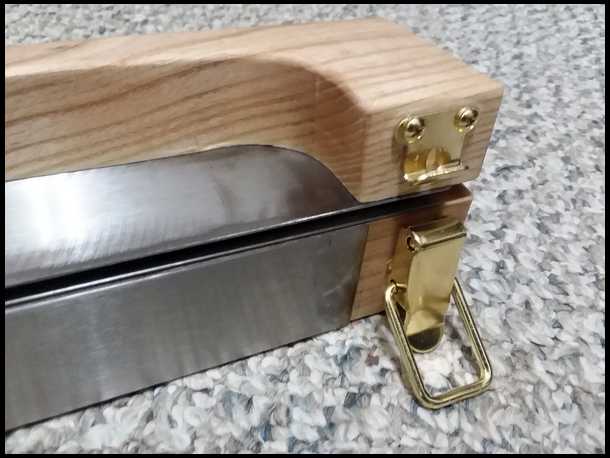
Looking at the jig on 3Rivers, they left a space at the top corner on the frt edge. For those that have used it, or one similar, is that gap left for a space reason or can the frt metal pc be flushed out at the top corner with the clamp metal? I`ll post a pic showing the corner with a gap and flush. Thanks for any advice
|
|
| From: MikeT
|
|
|
|
|
|
|
| Date: 24-Mar-20 |
|
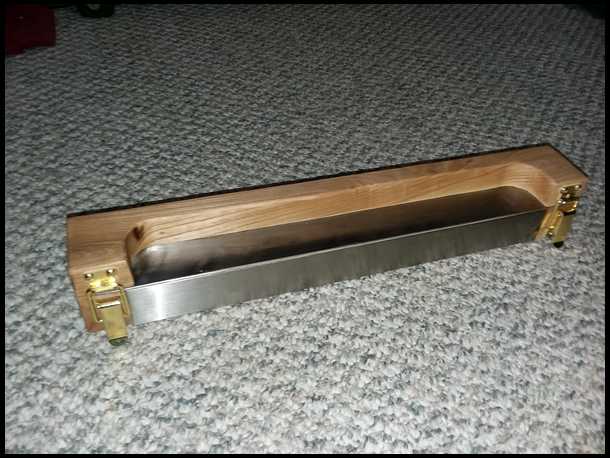
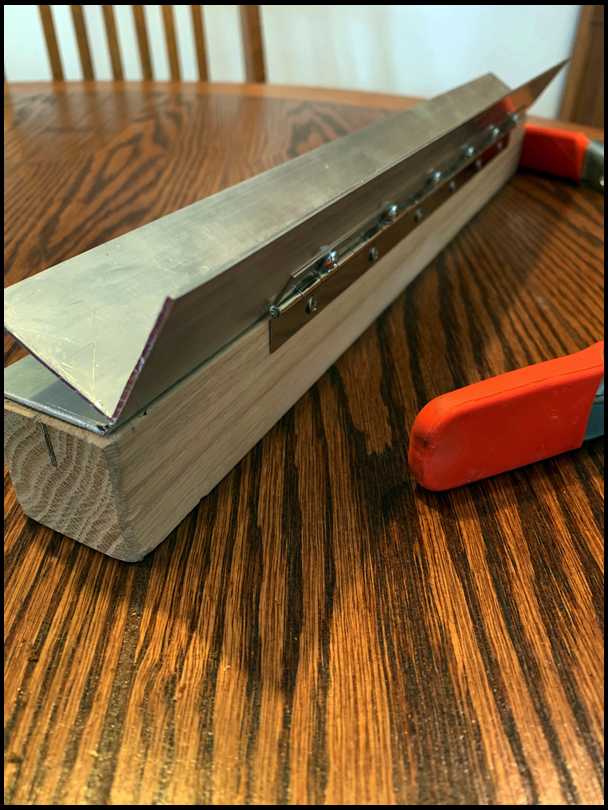
I recessed the hinge so the jig can slide on a table on the back side
|
|
| From: MikeT
|
|
|
|
|
|
|
| Date: 24-Mar-20 |
|

not sure where that pic came from
|
|
| From: MikeT
|
|
|
|
|
|
|
| Date: 24-Mar-20 |
|
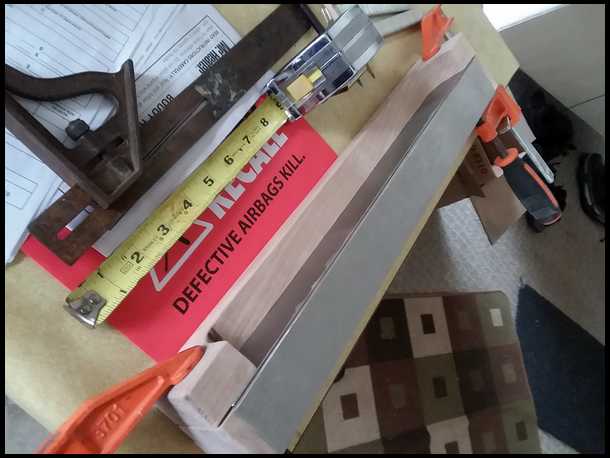
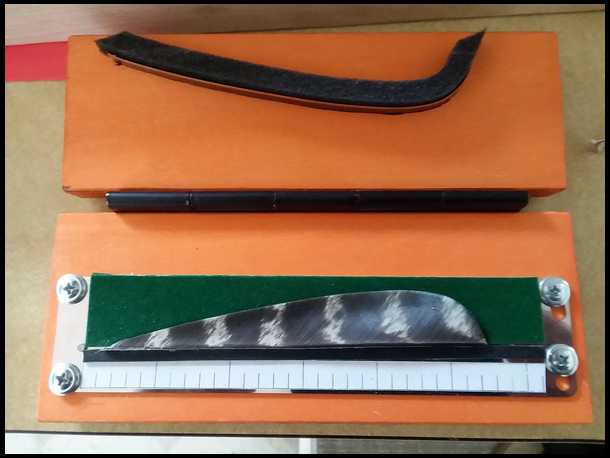
heres that strip laying flush at the top frt corner
|
|
| From: MikeT
|
|
|
|
|
|
|
| Date: 24-Mar-20 |
|

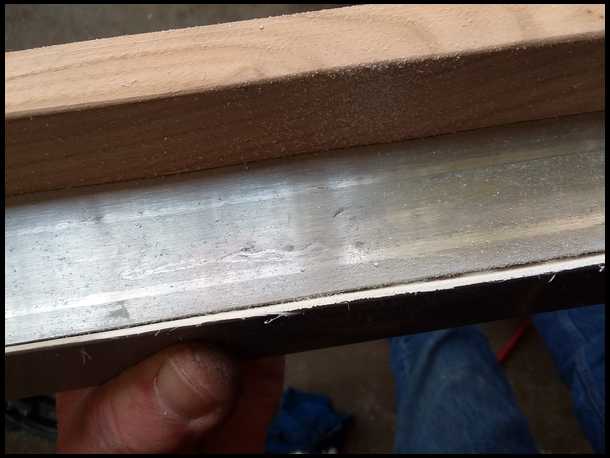
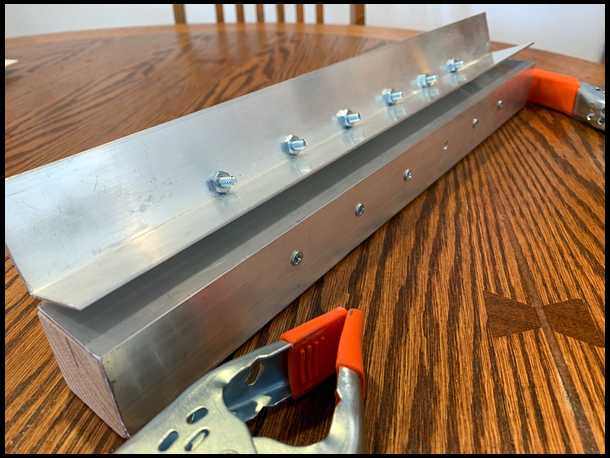
heres the gap I`m wondering about
|
|
| From: MikeT
|
|
|
|
|
|
|
| Date: 24-Mar-20 |
|
I might try a dry run before glueing the metal to the wood. I need to find a drum sander, the set I have doesnt have a bolt that I can add a spacer, guess I need to get that made to try a dry run. With the lockdown in place, not sure if I can find somewhere open to get one. I think Home Depot is staying open.
|
|
| From: BATMAN
|
|
|
|
|
|
|
| Date: 24-Mar-20 |
|
Hi MIKE, Good DUST prevention ia a MUST!!! Got enuf kung-flu! Don't nee any FEATHER FLU! BE SAFE / WELL / BLESSED BE!
|
|
| From: MCNSC
|
|
|
|
|
|
|
| Date: 24-Mar-20 |
|
Just noticing your tools, could you not use the router table and a straight bit instead of sanding. I don’t know if it would work but don’t see why not. May have to redesign the clamp though.
|
|
| From: 2 bears
|
|
|
|
|
|
|
| Date: 24-Mar-20 |
|
Mike, No gap there. That is for the drum washer to run on just the same as the cut out you have in the top. A nice square edge there at the opening supports the quill when grinding the side and the bottom of the quill. You just about have it complete now. Nice job.>>>----> Ken
|
|
| From: MikeT
|
|
|
|
|
|
|
| Date: 24-Mar-20 |
|
It would be a little scary running a router bit near the metal strips, thats some high rpms. A sanding drum running slower will be easier on the dust too.
I`m holding it tight right now with the woods clamps, checking it out, it will get 2 small latches on it.
I clamped a feather in it, and I`m not seeing where leaving that gap is needed, in theory would make the quil that .0345 less in the thickness + spacer on sanding wheel. I guess theres no way to tell other than a test run.
|
|
| From: Stoner
|
|
|
|
|
|
|
| Date: 24-Mar-20 |
|
Git after it Mike. Looking forward to your build. John
|
|
| From: mahantango
|
|
|
|
|
|
|
| Date: 25-Mar-20 |
|
Watching this carefully. On my list.
|
|
| From: MikeT
|
|
|
|
|
|
|
| Date: 25-Mar-20 |
|
Thanks Ken. The stainless metal strips I`m using seem pretty thin and it bends easy. I straightened them out best I could, laying flat and clamped between the wood they seem ok. I`m gonna venture out today and see if I can find some latches and a different drum sander than what I have. I have some thicker steel strip (.059) but most think the thinner (.0345) will be better.
I`m gonna try to do a dry run and if it looks good, then I`ll glue the strips to the wood with some contact cement.
|
|
| From: MikeT
|
|
|
|
|
|
|
| Date: 25-Mar-20 |
|
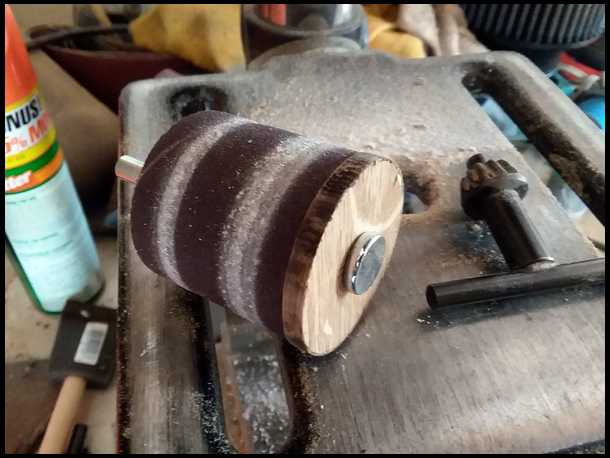
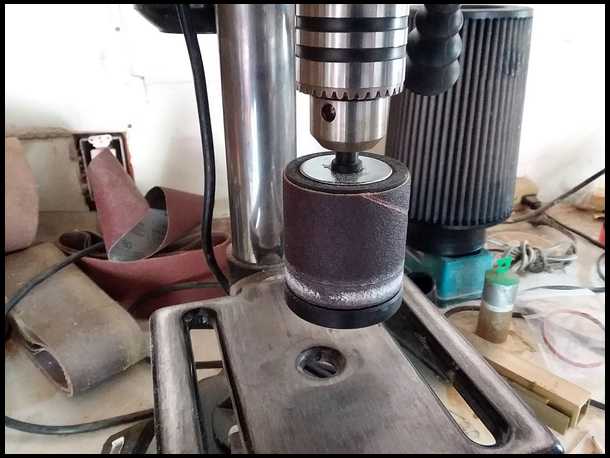
Found a 1 1/2" drum sander at Menards. It doesnt have a threaded bottom, but there was enough space after removing the metal washer on the bottom to replace it with a thin pc of oak I had. The spacer is a little under 1/4" thick, but I think that would work too.
Took a couple trys to make the spacer. First one I forgot to mark the center for my hole, 2nd try, dont forget to add the sanding sleeve to trace around (or add to a compass)I allowed for extra dia. but I ran it in the drill press using a file and went to thin, 3rd try I cut it a good 1/16" over, mounted it to the sander drum and free handed it on the bench grinder till I got close then touched it off with a file in the drill press.
The hole size turned out to be .317" I used a letter size drill bit after a pilot hole.
|
|
| From: MikeT
|
|
|
|
|
|
|
| Date: 25-Mar-20 |
|
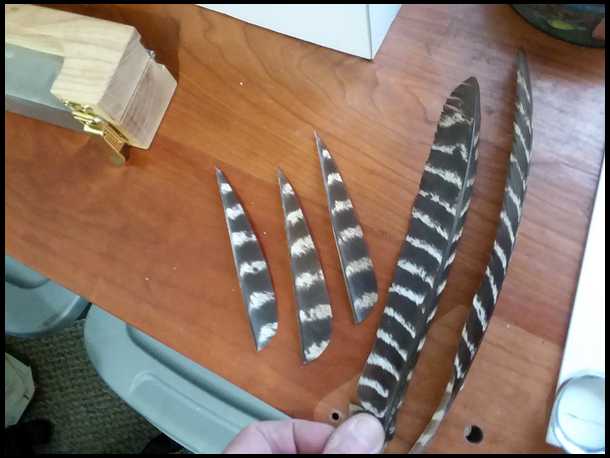
I kinda struck out with latches, I have a couple but I think they are too big, I might have to wait to find a smaller size.
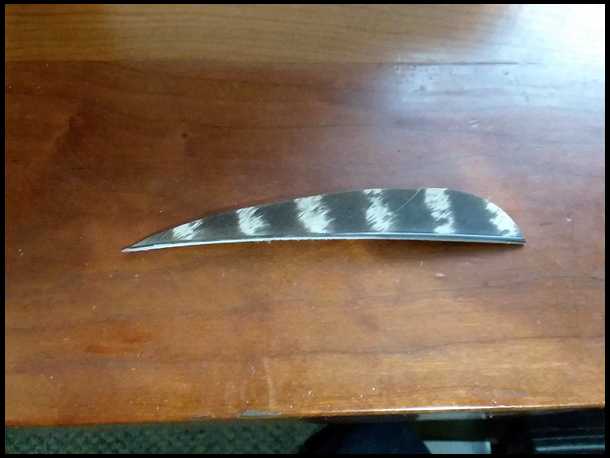
For the dry run, I had a old feather I found in the woods in a jar and used it for testing. I clamped it in using the wood clamps on the ends, they got in the way of working the jig on the table, but still had enough room to get a good spot to make a feather. I just held the frt pc of metal in place to run that edge. I`m gonna glue the metal on tonight.
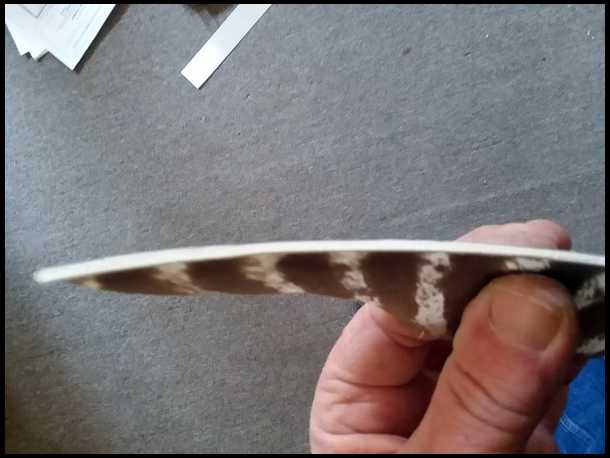
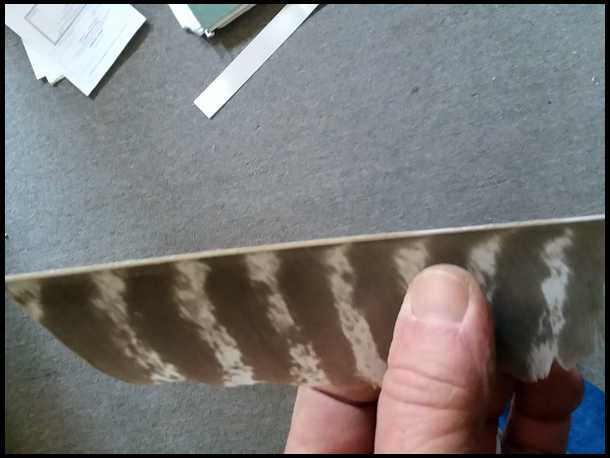
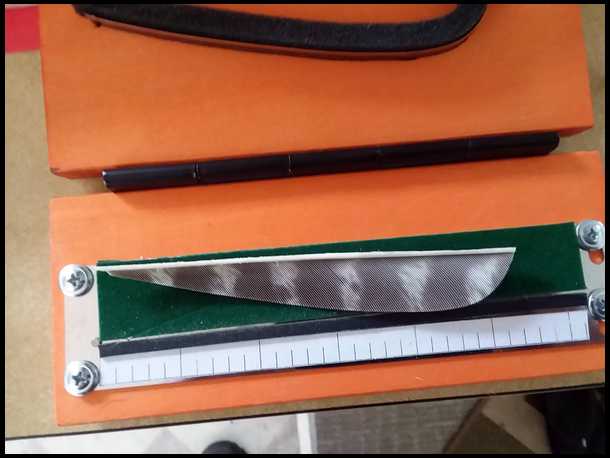
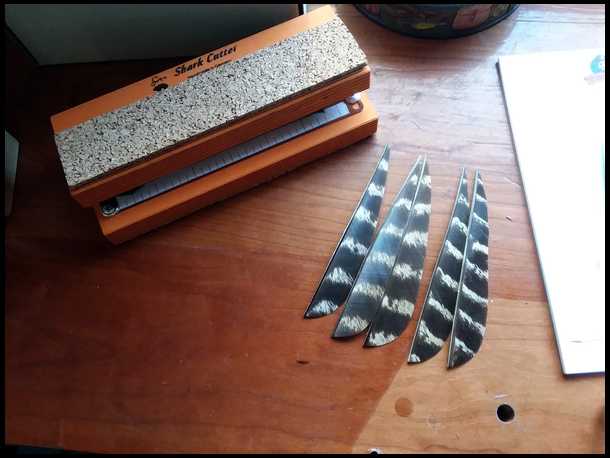
My test was sorta hap-hazzard but I got a good idea how its gonna work. heres a couple edges in the jig after the drum sander.
2 Bears, I could clearly see how the frt pc of metal supports that quil to press that edge against the drum sander. I`m flushing those corner edges of metal.
|
|
| From: MikeT
|
|
|
|
|
|
|
| Date: 25-Mar-20 |
|
|
|
| From: MikeT
|
|
|
|
|
|
|
| Date: 25-Mar-20 |
|
I did touch it up a little with a sanding block (very little) but I think once everything is solid (metal strips and latches)its gonna work pretty good (and fast, which I dont care about) I saw a flu flu feather in the works, but I wanted to try out the feather chopper bad,lol
|
|
| From: MikeT
|
|
|
|
|
|
|
| Date: 25-Mar-20 |
|
|
|
| From: MikeT
|
|
|
|
|
|
|
| Date: 25-Mar-20 |
|
Now for the fun part,even though I really dont have a clue what I`m doing yet, a little practice to figure things out and I`ll be rockin my own feathers and trying the dying stuff. Pretty excited.
|
|
| From: Hutch
|
|
|
|
|
|
|
| Date: 25-Mar-20 |
|
Looks good!!
Hutch
|
|
| From: MikeT
|
|
|
|
|
|
|
| Date: 25-Mar-20 |
|
Wow, my very first feather :)
Headed out to put the rest of the screws in the piano hinge, sand it up a little,maybe start gluing the metal strips on. Still need to figure out the latches.
|
|
| From: MikeT
|
|
|
|
|
|
|
| Date: 25-Mar-20 |
|
|
|
| From: 2 bears
|
|
|
|
|
|
|
| Date: 25-Mar-20 |
|
Very nice. feather is very smooth and uniform. Check out latches for suitcases,brief cases etc. hardware or arts and crafts stores.>>>--->Ken
|
|
|
|
| From: neuse
|
|
|
|
|
|
|
| Date: 25-Mar-20 |
|
Very nice finished feather.
|
|
| From: MikeT
|
|
|
|
|
|
|
| Date: 25-Mar-20 |
|

Thanks guys,The feather looks ok, but with some practice, and learning will be pretty cool. Ive got these latches but might be too tall. I know Ive seen a size smaller. All the craft stores are closed down with the stay at home order, but I`ll find some. Put the rest of the hinge screws in and sanded it up a little, getting ready to glue the metal. I knew the first time I saw guys on here making and using these jigs, I had to make one. Not sure there wont be room to improve though, time will tell.
Got the word out to a bunch of turkey hunters, hope to get some wings. :)
|
|
| From: 2 bears
|
|
|
|
|
|
|
| Date: 25-Mar-20 |
|
If you remember from my pictures, I had the same problem. Latches too long. I just added a little block of wood on both ends to make room to fasten the latches. Kind of ugly but works fine. >>>>-----> Ken
|
|
| From: MikeT
|
|
|
|
|
|
|
| Date: 25-Mar-20 |
|
Ya Ken, I`ll see if these will work, figure something out. Special thanks to you and Stoner for helping me out with all your tips and examples of your jigs. I also referenced to a old LW post with a link and even 3Rivers to see how it works and what they had for sale. If I had money, I would buy the jig they have. Ive had to learn to be a DIY`r in my lifetime. Lots of people with lots of methods, all good.
|
|
| From: Stoner
|
|
|
|
|
|
|
| Date: 26-Mar-20 |
|
Way to go Mike. Glad to to help a fellow waller. Now I have to refine mine so the quill will grind a fuzzinsky shorter. John
|
|
| From: twostrings
|
|
|
|
|
|
|
| Date: 26-Mar-20 |
|
Feather dust, sounds like something Tinkerbell might carry, sorry to see it as a new peril. So, how about running a razor along the mouth the that jig instead of grinding?
|
|
| From: MikeT
|
|
|
|
|
|
|
| Date: 26-Mar-20 |
|
Just doing that one feather made a little dust, but if I was gonna grind a bunch, and I hope to in the near future, It wont be too hard to make a dust collector hood on the drill press with some duct work sheet metal and a shop vac to suck it up. I`ll post a pic of that when I get it hooked up. Wouldnt want the kung feather foo flu!
I dont think using a razor would work good, just going by cutting the quil in half to begin with with a razor knife, they are hard and a little brittle so getting a decent cut would be really hard. The sanding works very very good.
Ive only tried one feather, I`ll have to see how it goes when I get bunch to do. If the feathers come out like the first one its gonna be awesome having the real deal feathers.
|
|
| From: hookman
|
|
|
|
|
|
|
| Date: 26-Mar-20 |
|
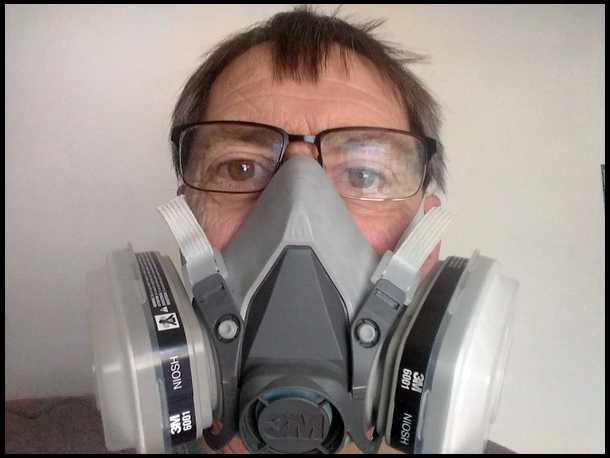
I use a face mask with the cartridges on it and hook up a dust collector while grinding.
|
|
| From: Caughtandhobble
|
|
|
|
|
|
|
| Date: 27-Mar-20 |
|
Nice job my friend... I made a jig years back that was not nearly that nice. I ended up buying the GN jig with the intention of making one like it and selling, but I never did make one. If I ever get around to making one it will be longer than the GN jig.
When I grind I do it on the patio with a fan blowing the dust away but I still wear a mask.
|
|
| From: MikeT
|
|
|
|
|
|
|
| Date: 27-Mar-20 |
|
That might be a drawback to mine. First pcs of metal I cut were 18" long, but then after talking to people I think the metal was too thick (.0475), so I found some .0345 stainless but I could only get 16" for a length. It looks like it will work ok for the most part, but if it turns out its too short, I`ll make another one. And I`ll use some other wood besides ash.
With the hinge on the back, if I had a 20" feather, I could grind most of it then slide it down in the jig and grind the rest.
|
|
| From: MikeT
|
|
|
|
|
|
|
| Date: 28-Mar-20 |
|
So here it is, found some smaller latches and mounted them so they are really tight. I mounted the hinge and new there was enough slop to where 1 pc of metal on the inside took up that slop perfect. The adding the 2nd pc of metal gave it just a little spring open action when the latch is opened. It really worked out good.
I glued the metal strips in with some brush on contact cement. They could be heated up and removed, but I think its working great. I found another old feather I had and tried another one. Still cleaned up the edge just a tiny bit with a block while in the jig, but not bad at all. Even the length might be ok, after removing the ends of the feather.
Gave it a coat of true oil just to seal the wood.
|
|
| From: MikeT
|
|
|
|
|
|
|
| Date: 29-Mar-20 |
|
|
|
| From: MikeT
|
|
|
|
|
|
|
| Date: 29-Mar-20 |
|
This is gonna be fun stuff!!
|
|
| From: MikeT
|
|
|
|
|
|
|
| Date: 29-Mar-20 |
|
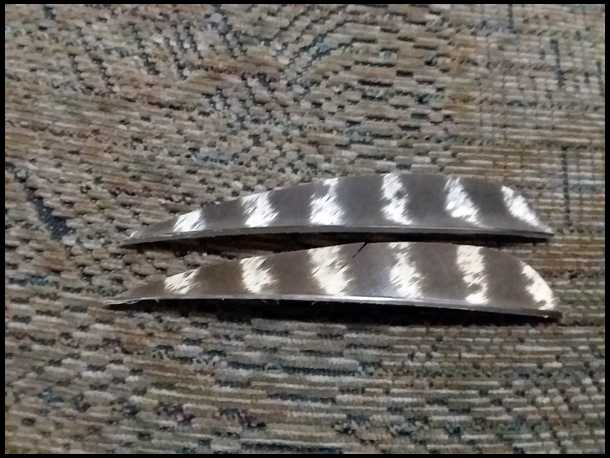
Just sitting here looking at my very first 2 feathers, 1 old one and 1 very old one. Whats the chance that the bars came out about the same!
|
|
| From: 2 bears
|
|
|
|
|
|
|
| Date: 29-Mar-20 |
|
It is perfect. Better than the bought one. Makes me want to build another one to correct my mistakes. Mine is not near as nice looking as yours but works perfect. >>>>------> Ken
|
|
| From: MikeT
|
|
|
|
|
|
|
| Date: 29-Mar-20 |
|
Working pretty good is all that matters. If I did it again, I would not use ash, and stainless is hard to work with too. A little longer would be good. Now, I need to come up with feathers!
|
|
| From: elkslayer4x5
|
|
|
|
|
|
|
| Date: 29-Mar-20 |
|
"Now, I need to come up with feathers! "
|
|
| From: elkslayer4x5
|
|
|
|
|
|
|
| Date: 29-Mar-20 |
|
Opps, sticky key..
"Now, I need to come up with feathers! "
Finding the bird with the 20" feathers will be tough..
|
|
| From: MikeT
|
|
|
|
|
|
|
| Date: 29-Mar-20 |
|
This is where using 5" feathers is a bummer, but I might be able to get a 5" and a 3" (for the grandkids) out of one feather. I wont know till I can get some to work with. Not counting on any 20 inchers :)
|
|
| From: Archre167
|
|
|
|
|
|
|
| Date: 29-Mar-20 |
|
What length did you make yours?
|
|
| From: elkslayer4x5
|
|
|
|
|
|
|
| Date: 29-Mar-20 |
|
You can also splice the remainders into another 5"er. Not a convential splice, but watch the angle of the barbules, cut them so they match, the barblues and barbs will want to knit (even inter species) tape 'em together with painter masking tape, when glued in place it's solid. See my red n white cedars in the First shot threads.
|
|
| From: MikeT
|
|
|
|
|
|
|
| Date: 29-Mar-20 |
|
Archre, my jig is 17" and the cutout on the top is 14". I could grind the base of the fletch up to 16" (the length of my metal) but theres only 14 I can grind on the side. With the 2 feathers I had, once the ends were trimmed off, they fit good in the jig. The feather tips were way too thin to use, and the base end is not real nice for a little bit.
|
|
| From: MikeT
|
|
|
|
|
|
|
| Date: 29-Mar-20 |
|
elkslayer I`m going to look now. Ive wondered about splicing like that. I cut up a couple gateways to try it, but they didnt fit good.
|
|
| From: Archre167
|
|
|
|
|
|
|
| Date: 29-Mar-20 |
|
Thanks for the reply. I was thinking 18" long.
|
|
| From: MikeT
|
|
|
|
|
|
|
| Date: 29-Mar-20 |
|
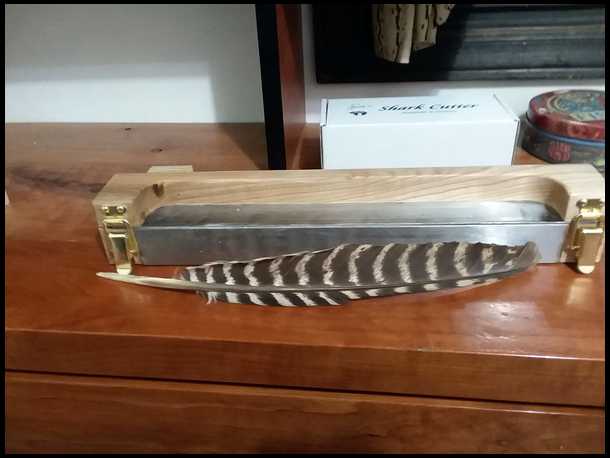
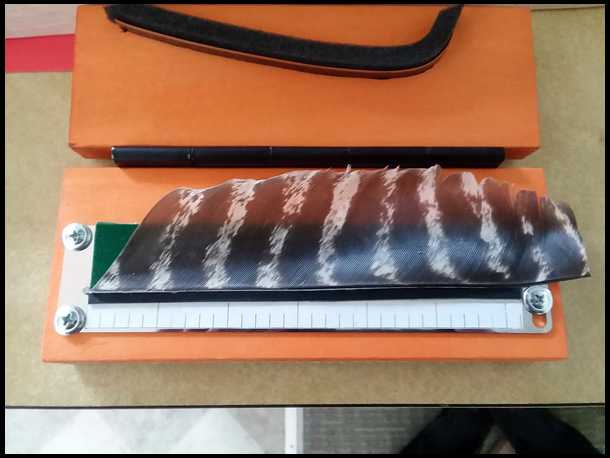
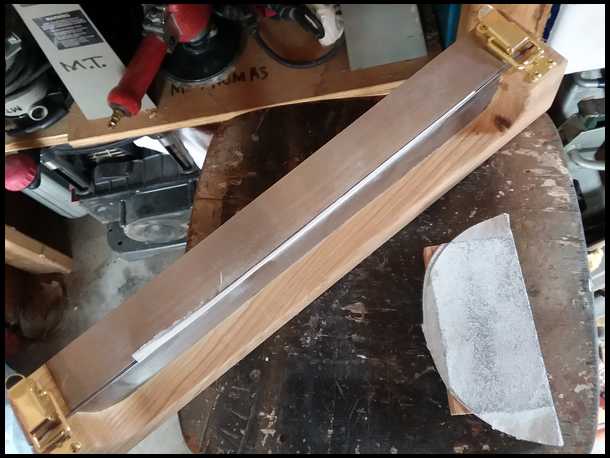
The length I have is actually pretty good. I found another old feather, its a big feather. Laid up against the jig, you can see how much has to be trimmed off, jig is plenty big.
|
|
| From: Archre167
|
|
|
|
|
|
|
| Date: 03-Apr-20 |
|
Mike, I don't intend to steal your thread here, but you got me feeling ambitious so I got to working on a jig. Your efforts look MUCH nicer than my jig too! Let's say my wood working tools are very limited so my first attempt was sad! I also ran into the issue with getting clamps to fit. Round two went much better and I used 1 1/2" angle stock of aluminum. Thank you all for the tips and sharing.
|
|
| From: 2 bears
|
|
|
|
|
|
|
| Date: 04-Apr-20 |
|
Archre167 You have to have the relief in the top like MikeT's picture just above yours. You can't grind the side of the feather without it. >>>>-----> Ken
|
|
| From: MikeT
|
|
|
|
|
|
|
| Date: 04-Apr-20 |
|
Hey Archre, no problem, the topic is up for grabs. Maybe elaborate a little with your design. Whats the 6 bolts and nuts on the angle? I found one more old big feather and made one more for a total of 3 so far. Ive got the word out to a few hunter I know that most often do good, so I`m counting on those guys to hook me up with some wings.
I have a couple more old feathers, but they are much thinner than the ones I used. Looking at a you tube by Clay, I`m a little confused about the wing feathers. If I took it right, the narrow feathers are the ones to use first? and the wider feathers are 2nd choice?
I was thinking the big wide feathers are the primary and the thinner ones were secondary, but maybe I dont have that right?
|
|
| From: MikeT
|
|
|
|
|
|
|
| Date: 04-Apr-20 |
|
Ken it looks like he has plenty of room, the bolts are using the space my cutout wood is using. The screws in the frt edge might be in the path of the sanding drum?
|
|
| From: Archre167
|
|
|
|
|
|
|
| Date: 04-Apr-20 |
|
The bolts were all I had to fasten the hinge to the metal. There is lots of room there. I may change the screws out front as you mentioned but for now they aren't in the way for the sanding drum.
|
|
| From: Orion
|

|
|

|
|
|
|
| Date: 04-Apr-20 |
|
Mike. Not sure what you mean by wide feathers vs thin feathers. In the picture above, the two full length feathers you have are left wing primaries. The quill is split down the center and the larger half on the left side of the quill is used to make fletching. The feather on the right side of the quill is waste.
Secondary feathers tend to be larger side to side, but softer. They, too can be made into fletching, but they don't hold up as well.
Some people also make fletching out of tail feathers. In that case, either side can be used, but again, the feather is softer and doesn't hold up as well.
|
|
| From: Archre167
|
|
|
|
|
|
|
| Date: 04-Apr-20 |
|
I have some friends back home and in Ohio I hope have some good luck and get out. They have sent me wings in the past. I used to guide turkey hunters back in IL and WI and had thousands of feathers after a few years but my supply has dwindled. I used to trade out to get them ground but now I like doing them.
|
|
| From: Archre167
|
|
|
|
|
|
|
| Date: 04-Apr-20 |
|
Actually the primary feathers are the wider ones and the narrower feathers are secondaries. The secondary feathers are closest to the bird and are stiffer. Both will make a good feather.
|
|
| From: Archre167
|
|
|
|
|
|
|
| Date: 04-Apr-20 |
|

Here are some I made up and used both. You can see in the profile the difference in thickness between them too. They will be noticeably louder if you shape your feather with a high back. They are fun to experiment with different shapes and sizes.
|
|
| From: MikeT
|
|
|
|
|
|
|
| Date: 04-Apr-20 |
|
Nice setup with the angles. Ahh, showing the back cleared that up. You could add a wood block on the ends of the top angle with epoxy and mount a latch on the ends of your jig? Or..maybe drill a hole through the top angle at the end, into the bottom angle on the wood block, tap the bottom angle or use a thread insert in the bottom block and use a threaded knob. loosen the knob enough to slide the feather in and tighten down?
|
|
| From: Orion
|
|
|
|
|
|
|
| Date: 04-Apr-20 |
|
Not quite so, Len. The primaries are the last 8-10 feathers at the farthest tip of the wings, and though they are fairly wide, they are not generally wider than the secondaries, though some may be as wide. They are longer than the secondaries.
Secondaries are closer to the body, as you note, and their barbs/vanes are longer, making them wider, but softer, than the barbs/vanes on primaries. The greater stiffness of the primary vanes is the main reason most folks fletch only with primary feathers, often using the softer secondaries for flu-flu fletching.
|
|
| From: Orion
|
|
|
|
|
|
|
| Date: 04-Apr-20 |
|
Oops. That's Mark, not Len. Was a Len Wehrman who was pretty active in Wisconsin Trad archery, but I haven't seen him around lately. Might you be related?
|
|
| From: Stoner
|
|
|
|
|
|
|
| Date: 04-Apr-20 |
|
Mark, if you had the angle iron and hinge offset/inset flush in the wood. Then you could kill two birds with one stone. Grind the bottom of the quill flat, then turn the jig 90 degrees on the hinge side. Then grind the side of the feather quill. Just my two cents. John
|
|
| From: Archre167
|
|
|
|
|
|
|
| Date: 04-Apr-20 |
|
Jerry, I think we are intending the same but I may have misspoke. Both feathers will make a good fletch. Not related sorry, where is he from? Most of my family was from Kohler and Sheboygan areas and the southern state line.
|
|
| From: MikeT
|
|
|
|
|
|
|
| Date: 04-Apr-20 |
|
Hey Stoner, I`m thinking that angle set up will work the same as mine, with the only question might be the thickness of the metal on the angle. I would think it will make for a thicker quil after grinding, which could be sanded right in the jib to make it thinner
|
|
| From: MikeT
|
|
|
|
|
|
|
| Date: 05-Apr-20 |
|
ahh, I see what hes saying. He is talking about the hinge on the back of the angle, you cant lay the jig on a flat surface to sand the side edge of the feather.
Though it is nice to use the flat surface for the jig, I guess you could hold it up and free hand it?
I think early turkey season starts in a couple weeks! I need cool aid and I`m in business!
|
|
| From: Aeronut
|
|
|
|
|
|
|
| Date: 05-Apr-20 |
|
I made one about a dozen years ago then I learned how to strip feathers. Haven't used the grinder since.
|
|
| From: Stoner
|
|
|
|
|
|
|
| Date: 05-Apr-20 |
|
I was thinking about the hinge side of Mark's jig. Without taking it all apart, a guy could add/glue a spacer a fuzz thicker than the roll pin of the hinge. Then make a large platform for the jig to sit on so it will sit flat and not fall off the edge. John
|
|
| From: MikeT
|
|
|
|
|
|
|
| Date: 05-Apr-20 |
|
Yep, good idea Stoner. I`m pretty happy with how mine works. I`m checking on a robo drum sander with the real nice spacer. Might get one..Now I`m up to 5 feathers,lol..I think thats all the old single feathers I had laying around from fly tying.
|
|
| From: Orion
|
|
|
|
|
|
|
| Date: 05-Apr-20 |
|
Mark: I believe Len was/is from the north central part of the state, around Wausau or Antigo. If he's still around, he would be in his mid-70s, I believe.
|
|
| From: Archre167
|
|
|
|
|
|
|
| Date: 05-Apr-20 |
|
I use the robo drum and it works great. I don't have any problem grinding both edges of the feather the way it is. I adjust the height of my platform and it slides across and allows you to free hand it if needed. I did remove the lower plate and flipped it, then epoxied it to the block to avoid the screws being in the way. Thanks for the tips everyone.
|
|
| From: Archre167
|
|
|
|
|
|
|
| Date: 05-Apr-20 |
|

I hope guys can get out and get some birds. Good luck to all and be safe!
|
|
| From: MikeT
|
|
|
|
|
|
|
| Date: 28-Apr-20 |
|
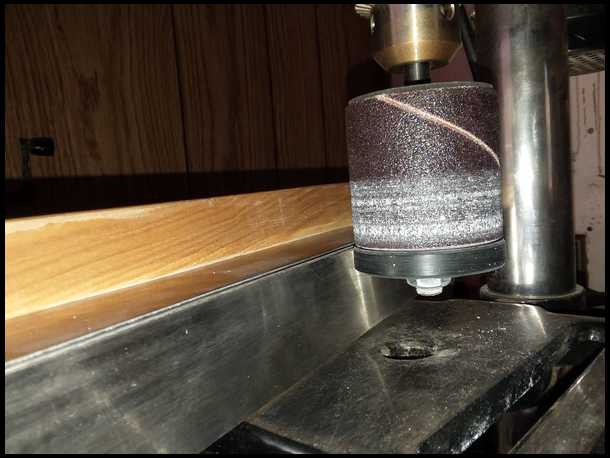
Got the 2" Robo drum sander to replace my 1 1/2" with the wood spacer I made. Way better. One thing to note is, I got a spacer 1/16" over size (of the 2" drum) and a flush spacer (the size of the 2" drum), Having the 1/16" over spacer is not good with my jig. The flush spacer works great. Even using it, the quil still needs to be sanded just a tiny bit.
The jig works great to grind 95+% of the feather. A small sanding block takes down the last little bit and smooths things out. These drums have a nice thick arbor, and a bushing in the spacer let it free wheel like a router bit bearing. The 2" dia. takes material off alot faster then the 1 1/2" drum. The Robo drums are around $21.
|
|
| From: MikeT
|
|
|
|
|
|
|
| Date: 28-Apr-20 |
|
|
|
| From: cobra
|
|
|
|
|
|
|
| Date: 06-May-20 |
|
Well, this thread sure is a SAVER! Nice job!!
|
|
| From: MikeT
|
|
|
|
|
|
|
| Date: 06-May-20 |
|

Thanks cobra. If you fletch your arrows, this is a very worthwhile project. Sure just a clamp and trial and error method on a belt sander will work too, but the jig is consistent with every feather with size and flatness, and easy to use.
The jig I made is working out real well. If I was gonna make a change, the bottom pc of wood needs to be thicker, so it sits taller on the drill press table. Easy fix for mine, I`ll just add a 1/2" block to the bottom. The reason is because there is a big nut on the bottom of the Robo drum that has to clear the wood with the cutout. At that table setting as low as it will go, when I turn the jig to do the other edge, I need to adjust the table up to raise the jig. A couple pics might help explain.
I`m getting alot of wings from local hunters, I`m waiting for a rotary cutter in the mail as suggested, then I can start some real production.
I`m planning on using real wild turkey feathers from here on out. Got a doz shafts just waiting on me.
|
|
| From: MikeT
|
|
|
|
|
|
|
| Date: 06-May-20 |
|
|
|
| From: MikeT
|
|
|
|
|
|
|
| Date: 06-May-20 |
|
Moving the table is easy, but not having to move it would be better.
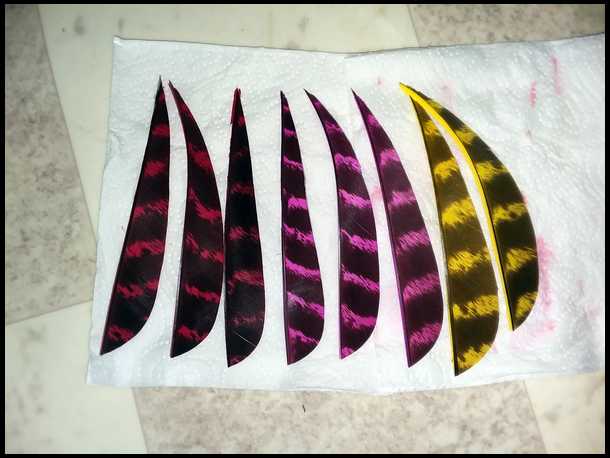
To go along with the grinding and chopping, Ive touched on doing some dying, I tried a few secondary feathers using a acid dye. Wow, fast and easy, I think its does a great job.
If it wasnt for this great site, with all the tip, ideas, and support, I probably would have never got into this. I`m so glad I did
|
|
| From: MikeT
|
|
|
|
|
|
|
| Date: 06-May-20 |
|
Hi MIKE, Good DUST prevention ia a MUST!!! Got enuf kung-flu! Don't nee any FEATHER FLU! BE SAFE / WELL / BLESSED BE!
|
|
| From: Bucknut
|
|
|
|
|
|
|
| Date: 06-May-20 |
|
Thanks Mike, This has been a really informative post. Gonna have to build one.
|
|
| From: Archre167
|
|
|
|
|
|
|
| Date: 06-May-20 |
|
I like the dyed feathers too, going to try some green and orange. Nicely done Mike
|
|
|
|
| From: hookman
|
|
|
|
|
|
|
| Date: 09-May-20 |
|
When grinding my feathers I use a shop vac to suck up the dust while grinding and also a face mask like MikeT uses in that picture.
|
|
If you have already registered, please sign in now
For new registrations Click Here
|
|
|
|


