This is from Mickey "The Ferret" Lotz. The links no longer work cause the site is gone but It's some really good info. Like Jawge, Mickey made some good bows.
THE FERRET'S BOARD BOW BUILDING METHOD I’ve been getting lots of requests from leatherwallers asking me how I build those good looking bows from boards, capable of harvesting big game animals. Most of the bows I build run 45#-55# in bow weight, and are capable of harvesting deer, turkey, black bear, wild hog, Javelina etc. Others have built board bows up to 74# in draw weight, heavy enough to hunt the largest of big game animals such as caribou, elk and moose.
I’ll try and explain the method I use, which has worked well for me. I must mention that besides my “Brother Randy” many leatherwallers have provided me with invaluable information and assistance in my quest to build durable board bows, like Dean Torges, Tim Baker, Dale Yessak, John Scifres and many others. A board is, in effect, a decrowned stave, and is capable of being made into a bow just as good, just as efficient as any stave bow. After building a few board bows, after honing your rasping and tillering skills, you’ll want to tackle building a stave bow from osage or hickory. The steps taught here will work equally well on your stave bow. Are you ready? Let’s do it!
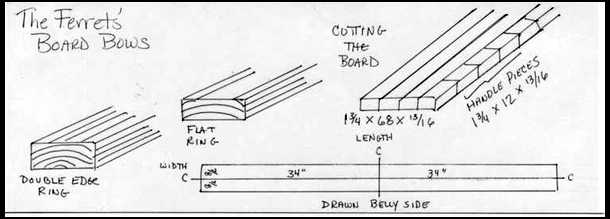
Start by looking at this drawing of a board SET UP See Graphic Step 1) BOARD SELECTION: I prefer to use FLAT RING or DOUBLE EDGE RINGED boards to make my bows out of. Both of these types of boards should exhibit grain lines that are straight from one end to the other on the big flat surface of the board (which will be our bow’s back) AND down at least one side of the board. I prefer hickory, but red oak, ash, maple and others will make good bows too. I find better quality boards at stores where they cut their own wood for area cabinetmakers such as Paxton Lumber, rather than at regular hardware stores like Home Depot or Lowe's. The boards I look for are generally 7 to 8 inches wide, 13/16” thick and 72” long.
Step 2) once home I set up a fence on the bandsaw and rip the board into strips 1 ¾” wide, and trim them to 68” long. (These pieces should now measure 1 ¾” wide by 68” long by 13/16” thick)
Step 3) cut one of the 1 ¾” boards into sections 12” long. Will make 5 pieces plus some scrap. (Set aside the one short scrap piece). These will be glued on later as handle sections. (These pieces should measure 1 ¾” wide by 12” long by 13/16” thick)
Step 4) choose 1 side to be the belly of the bow and measure and mark both the length and width centerlines on that side of the board. Do the same thing on 1 of the short boards. Extend these lines down the sides/ends of the boards. All lines drawn on the bow will be drawn on this (the belly) side of the bow. TO GLUE ON HANDLE SECTION Step 5) from length centerline (the short line) measure 6” in each direction and draw a line across board, or simply align centerlines of the short board sitting on top of the long board and trace ends.
Step 6) using rasp, lightly rough up (cross hatch…like this #) belly side of board between the 2 lines in step 5 and put on a thin coat of Tite Bond 2 and let dry.
Step 7) repeat step 6 on the side of the short board that does not have centerlines marked on it.
Step 8) after glue has dried on both surfaces; moderately reapply Tite Bond 2 to both surfaces. Put those two surfaces together and apply C clamps, keeping all centerlines aligned. Use 4 or 5 C clamps and tighten snugly. Do not over tighten, this will cause glue starvation. Just firmly.
* Note: Be sure and put thin a wooden pad under feet of C clamps especially on the surface that will be the back of the bow so as not to crush wood fibers. Wipe off excess glue that is pushed out. Set aside for 24 hours. Bottle says 1 hour…don’t believe it…wait 24, then remove C clamps.
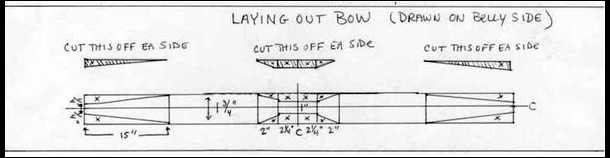
At this point your handle section will be 1 ¾” wide by 12 “ long by 1 5/8” thick. LAYING OUT BOW See Graphic (Again, do this on belly side of bow) First lay out your handle and fades. I use a 4 ½” long by 1” wide handle, and 2” fades.
To lay this out: from your length centerline (the short line - which should be visible if you glued the correct side of the boards together) measure 2 ¼” in each direction and draw a line across handle board. (Extend these lines down the sides of board). This will give you a 4 ½” long handle. Now, at each of those lines, measure out ½” in each direction from your width centerline (the long line) and make a pencil mark. Take your straight edge and connect the marks on each side of the width centerline. This should now give you a box 4 ½” long by 1” wide, which will be your handle. Next measure out 2” on each side of your handle box and draw a line across board. (Extend these lines down the sides of board). Take your straight edge and draw lines from the “corners “of your handle box to the point where your fade lines meet the edge of the board. These will be your fadeouts. Basically it will now look like a tube with a cheerleader’s megaphone on each end. Put a big X in anything outside of handle box and fades that will be cut off later.
Step 10) from each end of the long board measure up 15” on each edge (belly side) and make a pencil mark
Step 11) from each end measure out ¼” from the width centerline (the long one) and put a pencil mark (belly side)
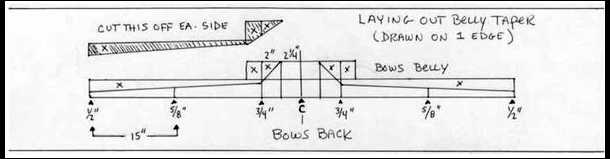
Step 12) using your straight edge draw a line connecting the marks on each side of the board creating 2 large triangles. Put a large X inside each of these triangles. These will be cut off later to form our bow limb shape. The bow should measure 1 ¾” wide (exclusive of handle area) up to 15 “ from each end, then taper to ½” at tips. Check your measurements. LAYING OUT BELLY TAPER See Graphic At this point there should be five lines extending down both sides of the board. The centerline (which we don’t really need anymore) and two more pairs of lines ... the lines which frame your handle, and the lines which frame your fadeouts. The last 2 lines (the fadeout lines) are very important to laying out our belly taper.
Step 13) at one end of board measure up 1/2” from the bows back and put a pencil mark. Repeat at other end.
Step 14) at one end of board measure in 15”(mid limb) and put a pencil mark 5/8” from the bows back. Repeat at other end.
Step 15) at fade out line on 1 side of board put a pencil mark ¾” from the bows back. Repeat at other end.
Steps 16) with your straight edge connect the 3 pencil marks on each edge/end of the board.
This will give us a smooth belly taper going from ¾” at the fades to 5/8” at mid limb to ½” at the tip. (There will still be pretty much material to remove before you get down to actual limb thickness, and after a few bows you may change those measurements to 5/8 at fade, ½” at mid limb and 3/8” at tip, but better safe than sorry at this point).
Step 17) From your ¾” mark at the fadeout line, (Step 15) take your straight edge and draw a line up to the belly side edge of your handle box. This outlines your dips. The dips are the section on the bow where the handle "dips“ down to meet the limbs. It can't be a real abrupt drop off, because that would make a weak point. For strength that area is basically triangulated. The wood angles or dips from the belly side end of the handle section down to the belly side of the limbs (at the fadeout line) on about a 45-degree angle. CUTTING OUT YOUR BOW With your board laying on it’s back you should be able to visualize the shape of your bow, and with it lying on 1 side you should be able to visualize its profile.
If you have a bandsaw:
Step 18) Lay bow on edge so that the belly taper lines are visible and slowly cut on line all the way to the handle. This cut must be smooth and even. Try not to wander in and out from the line. Turn around and repeat on the other side. (Tim Baker holds the wood on an angle and cuts down to line on each side of the wood creating a peak in center of limb, and then comes back and removes the peak.) Because our wood is still “square” I cut it all at once which is a recipe for disaster (BE WARNED) but I like doing it this way.
Step 19) Lay bow flat on its back and cut tapers at end of limbs. Move up and cut out handle/fade area. Once again, cut up to the lines, and try not to wander in and out. Cut slowly and smoothly.
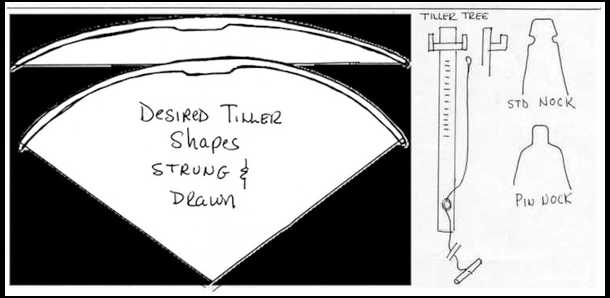
* NOTE If you do not have access to a bandsaw, use a drawknife or a rasp and remove wood down to the lines. TILLERING (WHERE THE RUBBER MEETS THE ROAD) See Graphic
Put one end of the bow on the floor and holding onto the handle with one hand and the upper limb with the other hand, lean into it to see if the limbs start to bend. This is called floor tillering.
Step 20) Using a rasp (a ferriers rasp or #50 Nicholson rasp works well here) reduce belly thickness on each limb until the limbs start to bend when floor tillering. Remember, keep taper smooth and even. *** This is very important. *** This is a good time to start using your calipers to verify wood thickness every 4” to 6” from limb tip.
Step 21) if you measure a thick spot, use your pencil to draw lines diagonally across that area and rasp off the pencil lines and then re-measure. Example: if your limb measures .540 (18” from limb tip), .560 (12” from limb tip), and .520 (6” from limb tip). The .560 measurement is too thick and needs to be marked and reduced to .530. Then your taper would read .540…>. 530…>. 520… for a smooth and even taper. Conversely if your middle measurement is smaller than the ones on each side of it, then you have a low spot and must leave that area alone and remove wood on each side of it until you get your taper back in order. I write my measurements right on the belly with a pencil and put little marks on the edge of the limb at 6, 12, 18, and 24” from the limb tip so I don’t have to keep measuring those marks. Make sure both limbs measure roughly equally at their corresponding stations. They don’t have to be mirror images of each other, but you don’t want one significantly thicker than the other one.
Step 22) once bow is bending pretty well at the floor tillering stage it’s time to move to the tiller tree. The tiller tree I use is a tall 2X4 with a couple of cupped ears screwed on to hold the bow. There is a small pulley screwed into the 2x4 a couple inches up from the bottom with a rope that has a handle at one end and a snap connection at the other end threaded through the pulley. You can use a static tiller stick also but the tiller tree is better for watching the wood actually working. You are also safely away from the bow on a tiller tree should the bow decide to break. (I learned this lesson the hard way, getting smacked in the head pretty severely by the limb tip of a cherry stave bow that was way too dry.) A tiller stick is simply a board about 4 feet long with a cradle cut in one end to hold your bows handle, and a series of notches cut in one edge every inch to hold string while you step back and observe the bend of the limbs.
Step 23) set the bow in the ears of your tiller tree (belly down) or in your tiller stick. Use a leather cup type bow stringer as your tillering string at this point, fitting one cup on each limb tip of the bow. Snap the snap connection on in the center of the bowstringer’s string. Walk back about 6 feet and pull on the handle of your rope causing the limbs to bend. Don’t bend them very far, until the limb tips bend maybe 3 or 4 inches, just enough to see if any parts of the limb are not bending or look flat. If using a tiller stick pull stringer down until limbs tips bend about 3 or 4 inches and put string in the next closest notch. Stand the tiller stick against a wall and walk back a few steps to observe. If you see a section that isn’t bending properly, mark it with diagonal pencil lines. Remove bow from tiller tree or tiller stick, and using a scraper, the edge of a pocket knife held at a 90 degree angle to the limb surface, or very light rasping, remove those pencil marks.
Step 24) return bow to tiller tree, re-attach bow stringer and snap connection and using rope & handle bend bow a few inches 20-30 times. You’ll want to do this every time you remove wood. Even if you’re only removing slight amounts. Observe limbs again for flat spots. Repeat step 24, as often as necessary, until limbs are bending smoothly and in a nice, even arc. Slowly increase length of draw (distance the limbs are bent) always keeping an eye on the bending of the limbs. Anytime you see a section that looks flat or isn’t working, mark with diagonal pencil lines and scrape there, removing the pencil lines.
Step 25) once you get the limbs bending in a nice even arc and all of your limb measurements indicate a smooth and even taper it’s time to cut some nock grooves or fashion your pin nocks.
For standard nock grooves: measure down ½” to ¾” down on each side of one limb, and put a pencil mark. Using a chain saw file, file some grooves on a 45-degree angle down towards the handle on the edge/belly side of the bow. Not too deep at this point, just enough to hold onto a bowstring. Try to ensure they are equidistant from the limb tip on each side. Repeat on opposite limb.
For a pin nock: measure out 1/8” on each side of the limb width centerline (the long one-belly side) and put a pencil mark. Measure down ½” down from limb tip on edge of limb and put a pencil line across limb. With straight edge draw line from previous limb tip marks down to this line. Cut or file off the little triangular edges leaving a rectangular nub (or pin – hence the name pin nock) ¼” wide by ½” long. Repeat on other end. Slightly round off edges on belly side, to ensure you don’t cut your bowstring. Also slightly round shoulders of nocks so string will be easier to slip on and off.
Once nocks are cut into your bow, you can switch to a conventional double looped bowstring. I usually start with a 66” string and string the bow. If that string does not clear the handle I switch to a 65” string. At this point you only want a brace height of 3 or 4 inches. It’s also at this point that I start measuring my draw weight. If you are looking to make a (our example) 50 # bow, NEVER draw your bow past 50# no matter where in the draw it hits that weight. Do not hold it at this weight any longer than necessary. If it measures 50# @ 12”, you do not draw the bow further than 12” without removing wood. As you remove wood, do so from both limbs as evenly as you can, keeping an eye on the tiller looking for flat spots or stiff spots. Measure with the calipers often. Every time you remove wood be sure to exercise the bow (*see Step 24 above). You will find the desired bow weight changing to longer draws as you remove wood. Go Slowly, this is where patience pays big dividends. Get impatient here and your 50# bow turns into a 30# bow for your kid (not entirely a bad thing, but not our desired result). Tillering is a constant exercise in observing, measuring, removing wood, exercising it and starting the process all over again. Eventually you’ll find your bow measuring 50# at a point an inch or so shorter than your desired draw length. From here on in, you only want to remove minute’s amount of wood using a scraper, always keeping an eye on the tiller.
Step 25) This is a controversial step but I believe in it. At this point, string the bow to a brace height of 5 ½ inches by twisting up your bowstring, and set the bow aside for several hours. You may find your bow weight drop by several pounds at this point. Also the tiller may change. That’s why we stopped short of our desired draw length. Now we have some leeway to straighten out the tiller, without dropping below our target weight. Final sanding and shooting in may lose another couple of pounds and the tiller may yet change.
Step 26) Take your bow outside and launch a couple of dozen arrows out of it. 1st at half draw, then at ¾ draw then finally at full draw. You can just point your bow at the ground a few feet in front of you. We’re not trying to hit anything, just trying to get the limbs used to shooting arrows and letting our wood relieve any final pressures. After shooting say 2 dozen arrows check the tiller once again. If everything looks good it’s time to final shape our handle and dips.
Step 27) using a rasp or 4 cornered file, shape handle to your liking and smooth out & shape your fades and dips. Verify that your bowstring runs through the center of the handle. Also very slightly round edges of your limbs both belly and back.
Step 28) if you are satisfied with how your bow looks, how the handle feels, etc you can sand it down with progressively finer sandpaper until it is very smooth. You can stain the bow if you want or leave it its natural color. You can install a leather shelf and strike plate, or shoot it off your knuckle. You can leather wrap the handle, or leave it bare. That is up to you.
Step 29) Seal your bow to keep excess moisture out. I spray mine with 5 to 6 coats of Helmsman clear satin spray urethane.
Step 30) install a 64” string and set the brace height at +- 6”, install some silencers and a string nock point.
Step 31) enjoy your new bow.
Step 32) Go back to Step 1 and start another bow, either for yourself or for a friend..
I highly recommend you pick up copies of Paul Comstock’s “The Bent Stick”, all three editions of the “Traditional Bowyer’s Bibles” as well as Dean Torges’s book “Hunting the Osage Bow”. The more you read and learn about building bows, the more you’ll enjoy the sport.
I hope these instructions were somewhat understandable and that they helped you build your own wooden bow. Please, if you get the opportunity, help someone else get started in building his or her own bows. As the saying goes “Pass it on!”
See you in the woods,
Mickey Lotz aka The Ferret Send Ferret an Email Copyright Ferret and John Scifres - 2000
John's Home Page Send John an Email