| From: PEARL DRUMS
|
|
|
|
|
|
|
| Date: 26-Nov-17 |
|
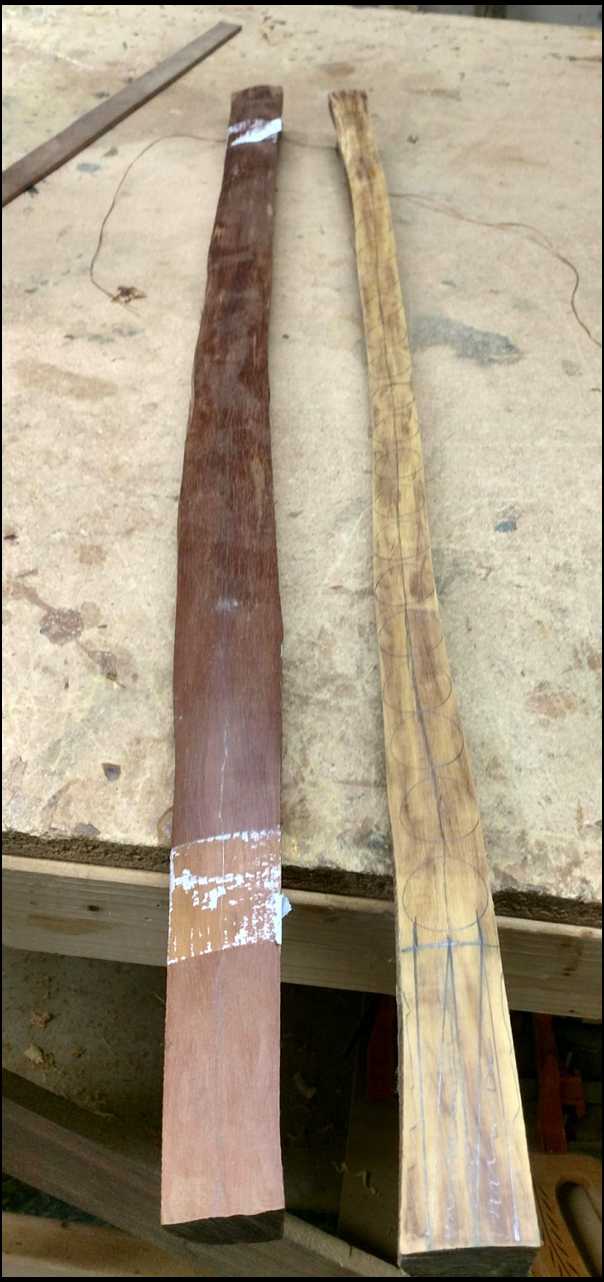
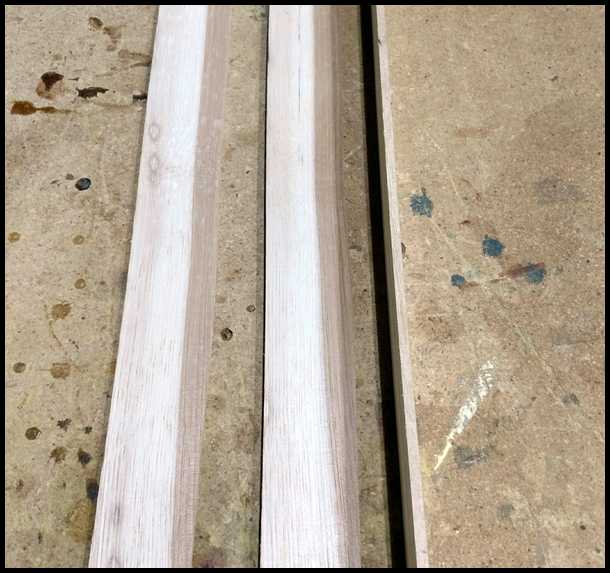
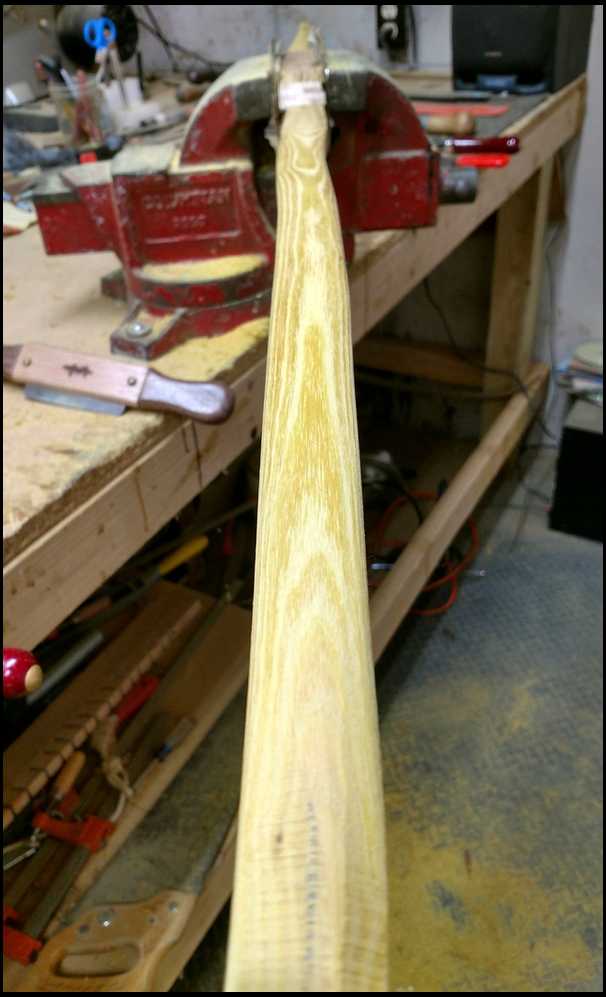
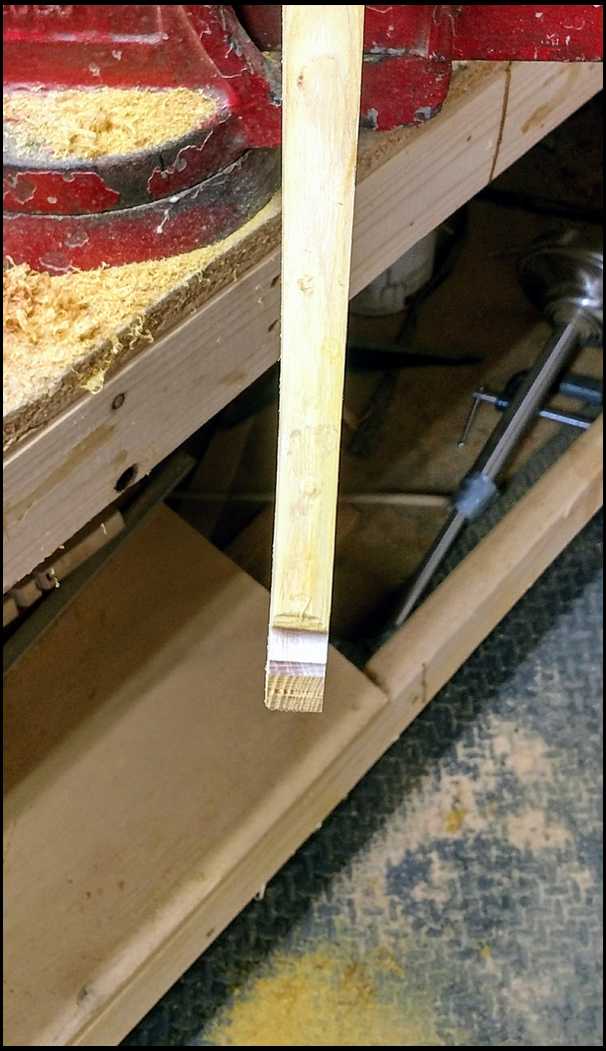
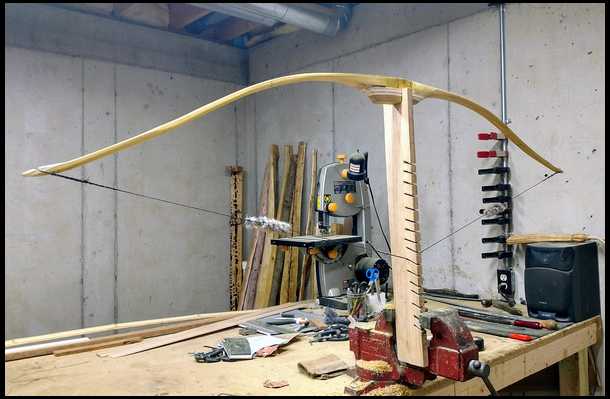
I was given these very old osage billets about a year ago. One was quite narrow and from what I can see wont finish at more than 1 3/16" wide. So, I have to match the opposing billet.
|
|
| From: PEARL DRUMS
|
|
|
|
|
|
|
| Date: 26-Nov-17 |
|
I was given these very old osage billets about a year ago. One was quite narrow and from what I can see wont finish at more than 1 3/16" wide. So, I have to match the opposing billet.
|
|
| From: PEARL DRUMS
|
|
|
|
|
|
|
| Date: 26-Nov-17 |
|
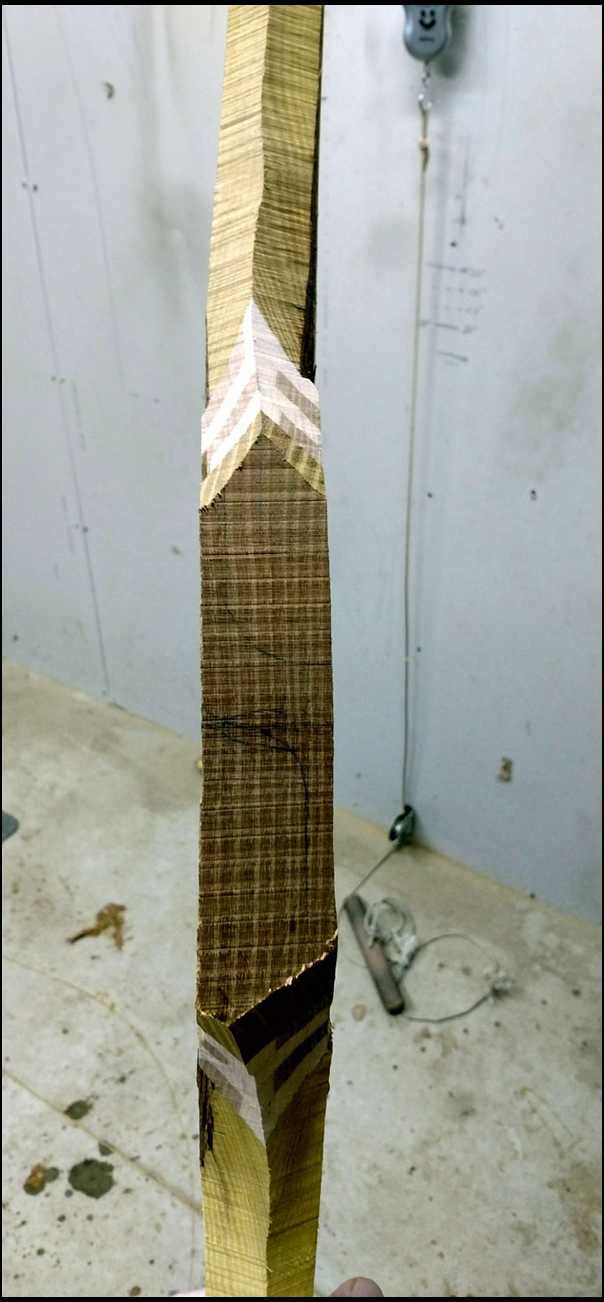
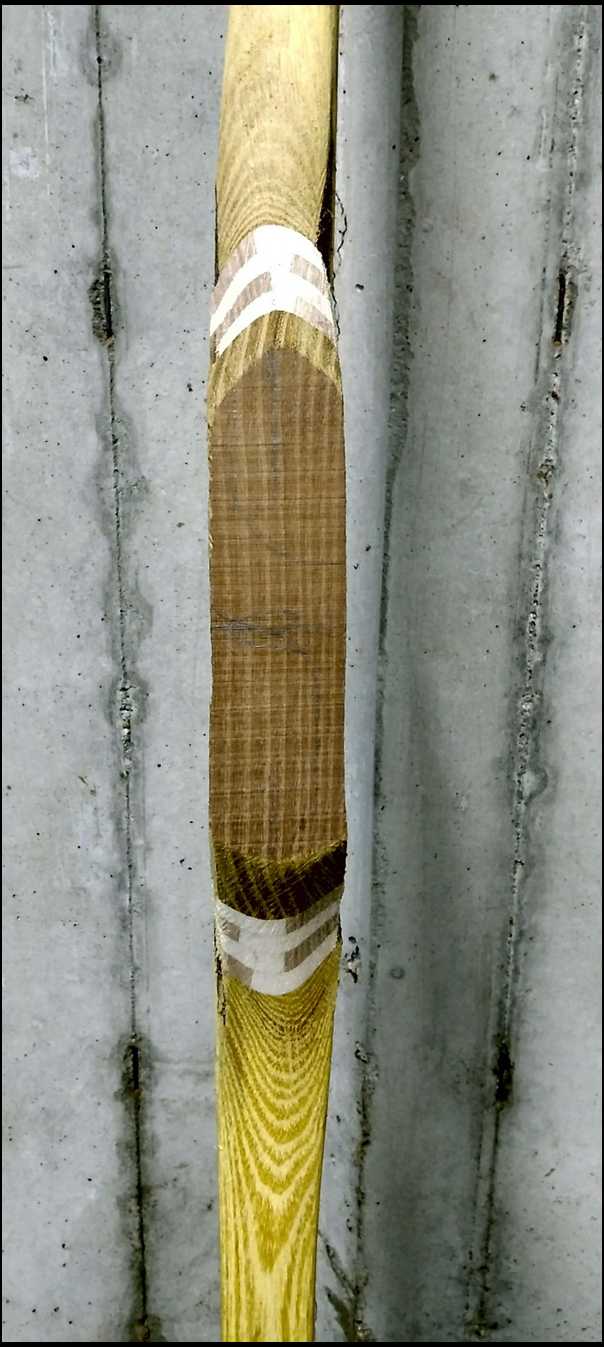
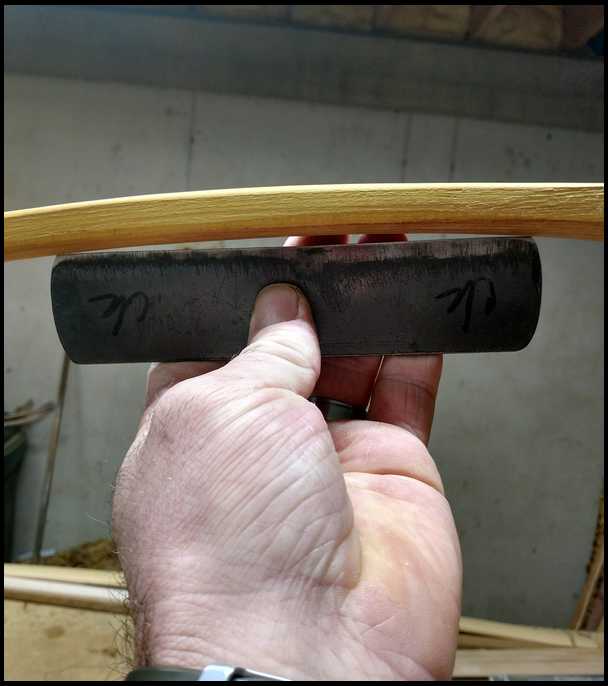
One billet has a perfect RD profile already and the other is straight. I cut my 1" x 4" splice in each.
|
|
| From: PEARL DRUMS
|
|
|
|
|
|
|
| Date: 26-Nov-17 |
|
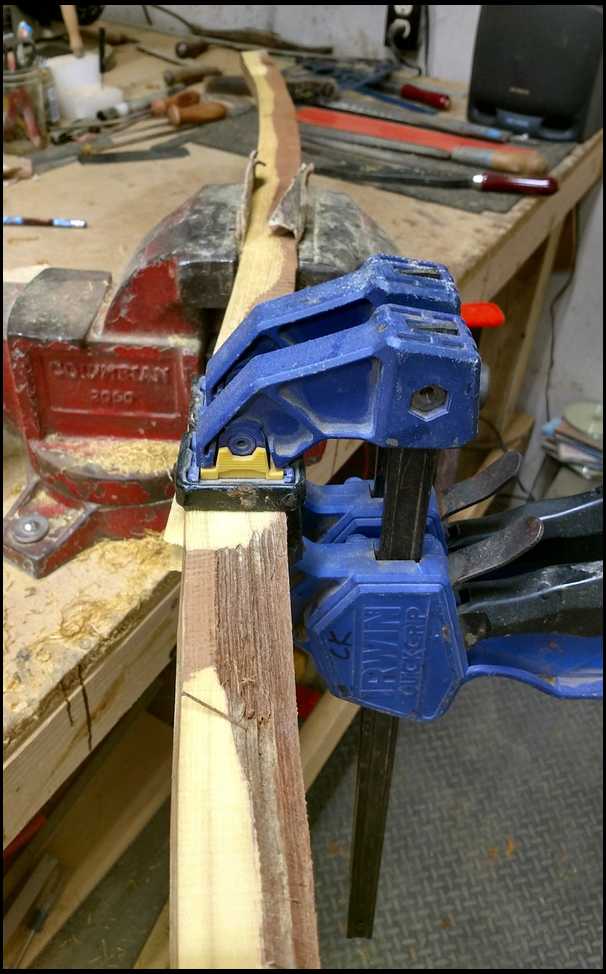
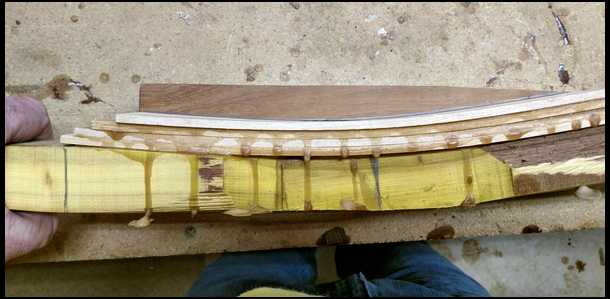
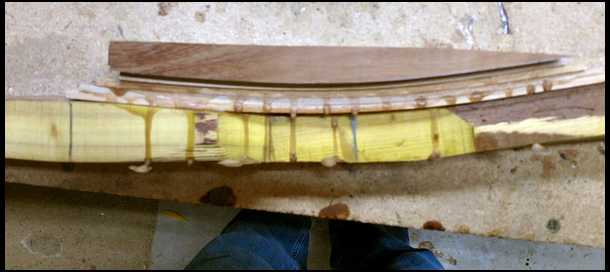
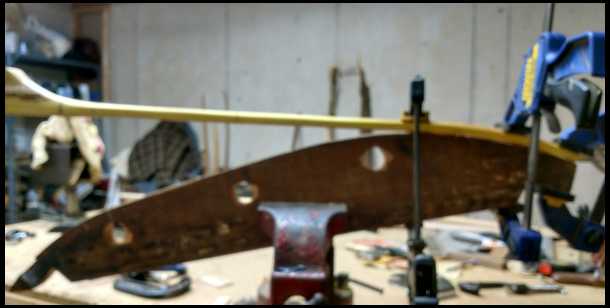
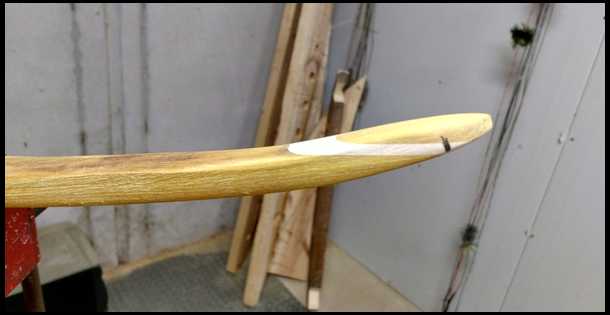
I want an RD bow, so while I'm gluing the splice I will add deflex in at that joint to make my straight limb match my naturally deflexed limb. I use dry heat and a few clamps to get my mating surfaces perfectly fit.
|
|
| From: PEARL DRUMS
|
|
|
|
|
|
|
| Date: 26-Nov-17 |
|
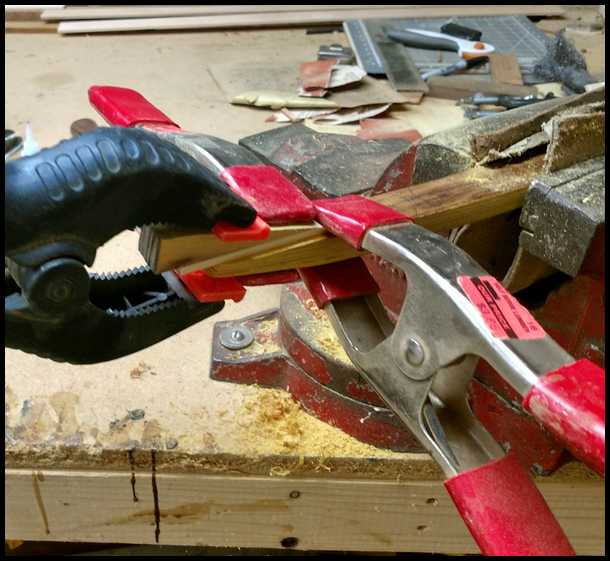
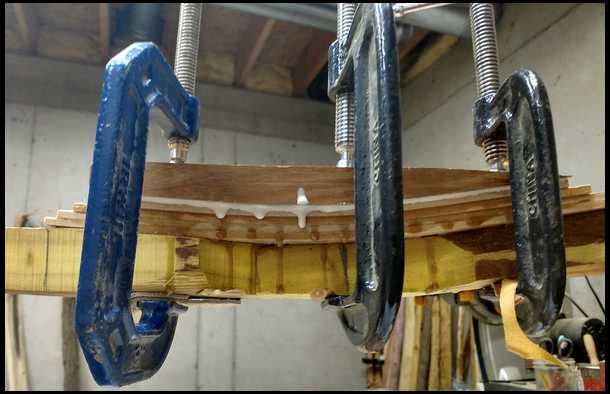
The joint looked great after heat fitting it. I glued it up and clamped it down with C clamps and hickory slats to get an even squeeze, not too much squueze, you want glue left in the joint.
|
|
| From: PEARL DRUMS
|
|
|
|
|
|
|
| Date: 26-Nov-17 |
|
Normally I wouldn't advocate white wood glue for splice joints. This fit is very good and I plan to make a back side laminated grip area from thin hickory slats. Once the joint is dry I will shape the deflexed area to an even arc and laminate the hickory into place. This will solidify the joint further and make the glue used a non-issue. If this bow had no backside grip filled in I would have certainly used an epoxy glue.
|
|
| From: badger
|
|
|
|
|
|
|
| Date: 26-Nov-17 |
|
Looks Good pearl, I use tightbond on splices all the time if the fit is good.
|
|
| From: SB
|
|
|
|
|
|
|
| Date: 26-Nov-17 |
|
I attempted a bow from a pair of old billets once myself. The whole project ended in total failure. I saved the scraps for other projects!
|
|
| From: ron w
|
|
|
|
|
|
|
| Date: 26-Nov-17 |
|
Can't wait to see the progress........
|
|
| From: Jeff Durnell
|

|
|
|
|
|
|
| Date: 26-Nov-17 |
|
Got my beer and jerky. Git er done, bud :^)
|
|
| From: throwback
|
|
|
|
|
|
|
| Date: 26-Nov-17 |
|
You have my attention, Chris. I can't wait to see your progress and thanks for teaching me along the way.
|
|
| From: PEARL DRUMS
|
|
|
|
|
|
|
| Date: 26-Nov-17 |
|
I'm pretty excited about this one for a few reasons. One, RDs are the best shooting bows ever created. And two, I've made enough bows from super old osage to know what to expect. These billets are clean and solid. The rings are minute at best, but I don't mind that one bit.
|
|
| From: Ken Williams
|
|
|
|
|
|
|
| Date: 26-Nov-17 |
|
Thanks for taking us along Chris, I'll be watching and learning.
|
|
| From: Dry Bones
|
|
|
|
|
|
|
| Date: 26-Nov-17 |
|
In for the follow along. Thanks for posting.
-Bones
|
|
| From: mgerard
|
|
|

|
|
|
|
| Date: 26-Nov-17 |
|
9 squirrels! I'd rather watch the 9 squirrels in my backyard right now, than watch glue dry. Do some time-lapse magic and speed this up for your ADD/OCD friends Pearly. :>)
|
|
| From: woodinhand
|
|
|
|
|
|
|
| Date: 26-Nov-17 |
|
These are my favorite build-a-longs! Keep it coming.
|
|
| From: Steve Milbocker
|
|
|
|
|
|
|
| Date: 26-Nov-17 |
|
We are in for a treat, this man builds beautiful bows! Ask me how I know:)
|
|
| From: RonG
|
|
|
|
|
|
|
| Date: 26-Nov-17 |
|
I'm joining Jeff on the jerky and beer, Pearl, can't wait and I already have learned a bunch from this post already.
Thank You, ..... RonG
|
|
| From: RonG
|
|
|
|
|
|
|
| Date: 26-Nov-17 |
|
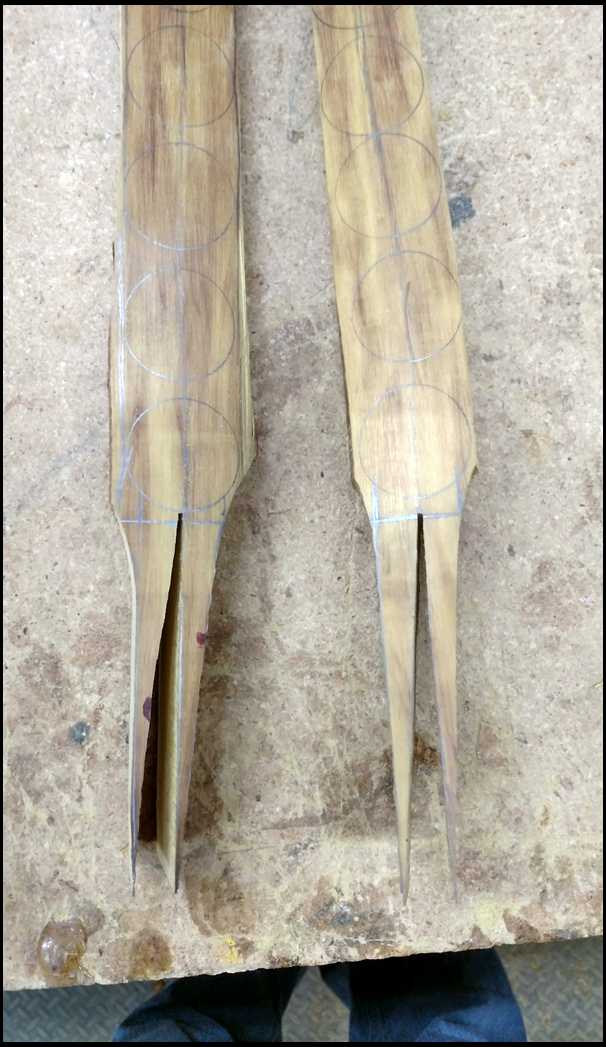
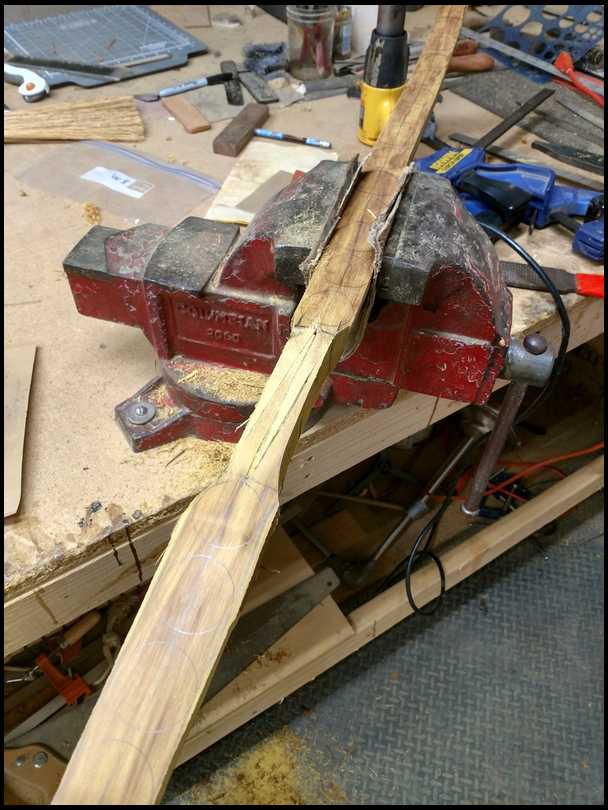
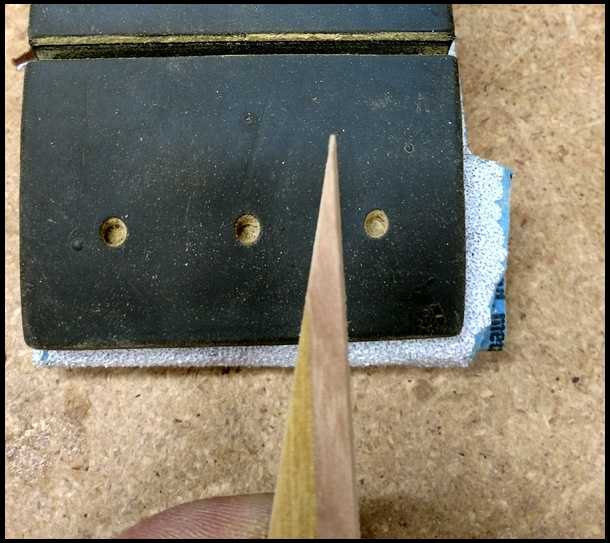
Pearl Drums, OK first question, "sorry" but what are the circles for? It looks to me like you are marking out from where the center of the grain runs equally on each side.
|
|
|
|
| From: Danzn Bar
|
|
|
|
|
|
|
| Date: 26-Nov-17 |
|
Got my eye on this one.....Pearly DBar
|
|
| From: Gaur
|
|
|
|
|
|
|
| Date: 26-Nov-17 |
|
Looking good Chris . I like old wood and I like billets
|
|
| From: PEARL DRUMS
|
|
|
|
|
|
|
| Date: 26-Nov-17 |
|
You got it, Ron. I find the natural center on the staves back and then trace the circles on from fade to tip, starting at mid limb I progressively make smaller circles slightly farther apart as I jump down a size. Then by hand just connect TDC of each to create an even taper line that follows the grain. Just keep in mind that the end quality of the bow hinges on how accurate that starting center line is. The more wood bows you look at and build the more you will notice some that appear perfectly straight unbraced, but put a string on an they twist 45 degrees and the string isn't on center anymore. That can often time be the result of a poor centerline layout which changes the "spine" of the bows back, amongst a few other reasons.
|
|
| From: RonG
|
|
|
|
|
|
|
| Date: 26-Nov-17 |
|
Thank you for that detailed explanation, That bow is going to be a beauty.
|
|
| From: bodymanbowyer
|
|
|
|
|
|
|
| Date: 26-Nov-17 |
|
Awesome I'm ready. To learn more about selfbows. JF
|
|
| From: Knifeguy
|
|
|
|
|
|
|
| Date: 26-Nov-17 |
|
PD, I'm looking forward to follow this one. Lance.
|
|
| From: Archre167
|
|
|
|
|
|
|
| Date: 26-Nov-17 |
|
You have my attention for sure. Thanks for sharing this!
|
|
| From: Pappy 1952
|
|
|
|
|
|
|
| Date: 27-Nov-17 |
|
Looking good so far Chris. Pappy
|
|
|
|
| From: PEARL DRUMS
|
|
|
|
|
|
|
| Date: 27-Nov-17 |
|
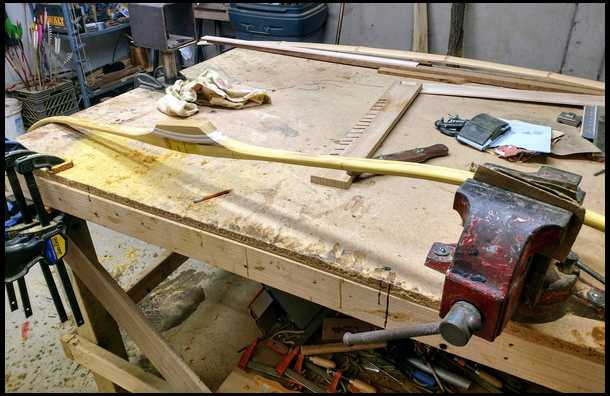
I used a Shinto saw rasp and gently cleaned up and evened out the back of the splice. I didn't let the rasp work beyond the 4" handle length.
|
|
| From: PEARL DRUMS
|
|
|
|
|
|
|
| Date: 27-Nov-17 |
|
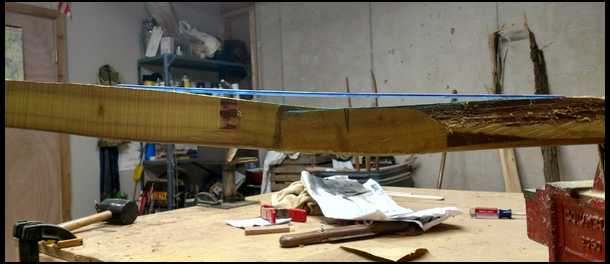
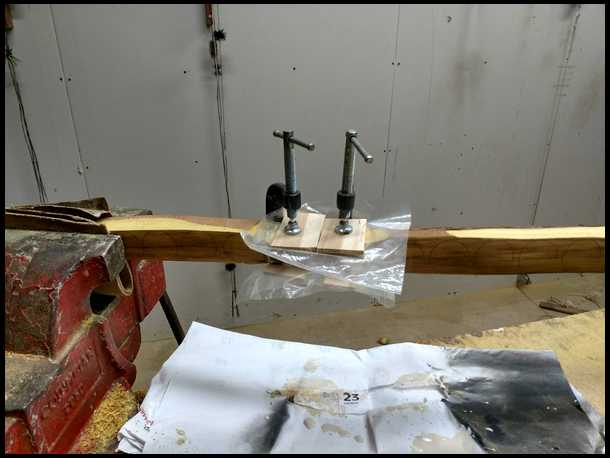
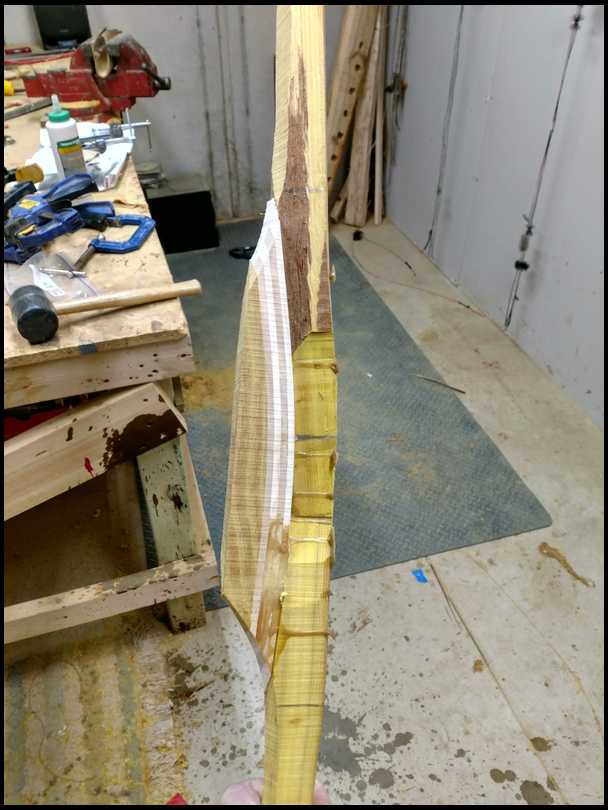
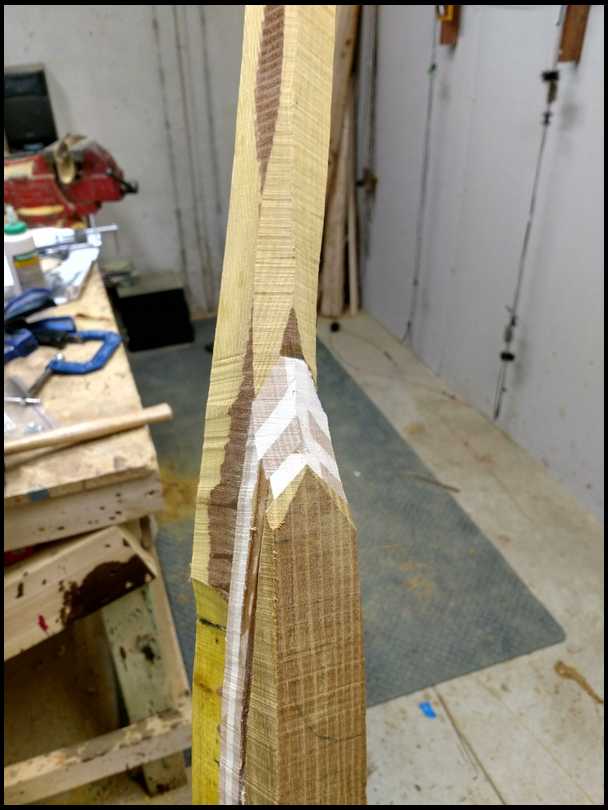
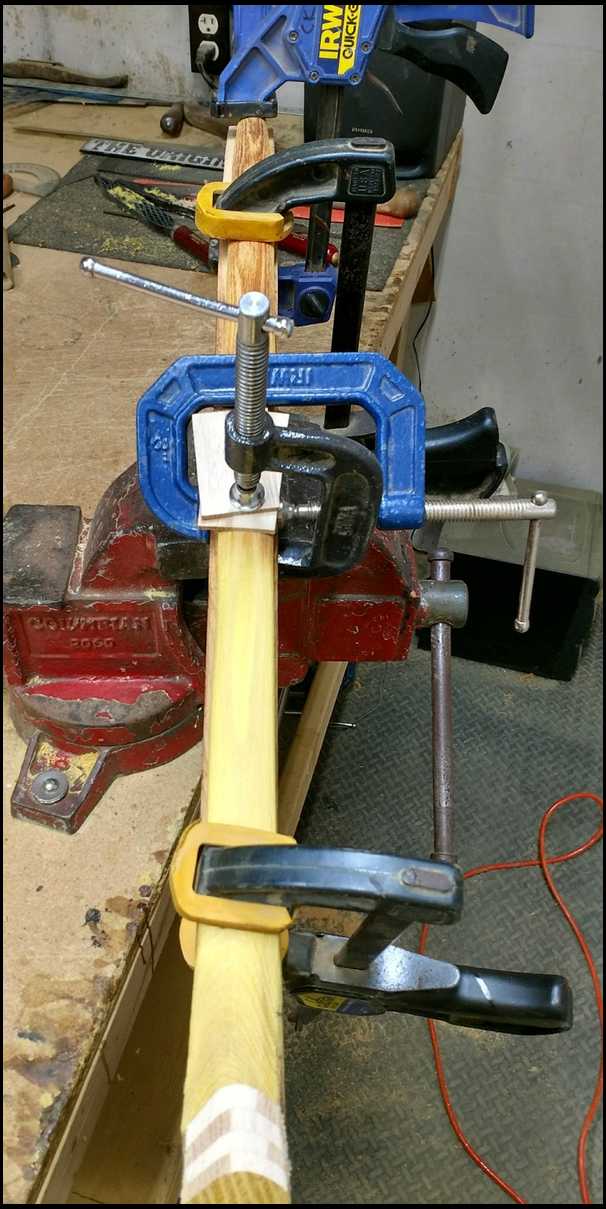
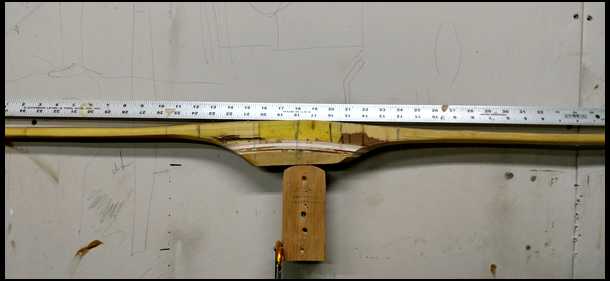
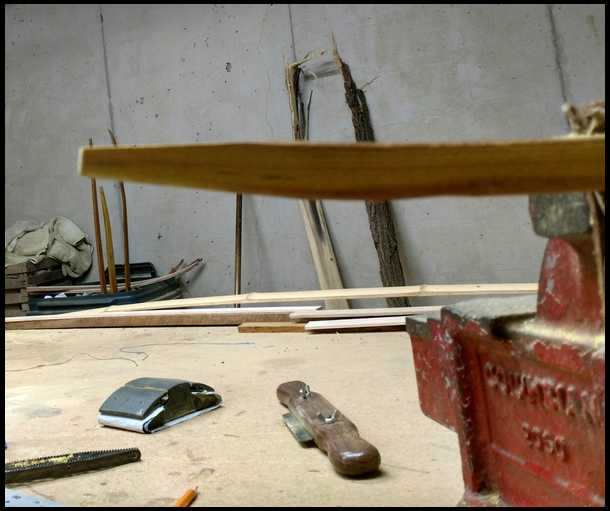
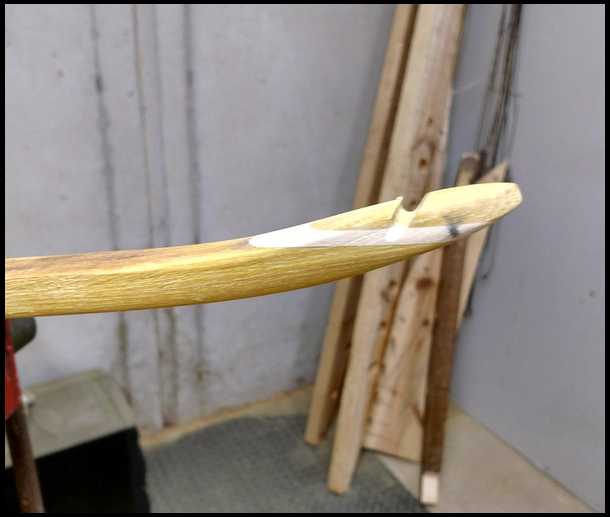
I used that same rasp as well as a sanding block with 60 grit on it to radius out the belly side where I will eventually fill in with a laminated riser block. I found center and measured out 6" each way, then laid the ruler on those lines. This helps me keep the area I'm rasping away even and symmetrical. The straight edge helps my eye see radius variances from side to side. This pic also gives a better view of the deflex I glued in the splice.
|
|
| From: PEARL DRUMS
|
|
|
|
|
|
|
| Date: 27-Nov-17 |
|

I always do a dry run anytime I do a glue up. I don't want any air gaps and I want to know how it will all go together, or if it will at all. I wanted to glue all four hickory slats in place, but when I did my dry run I realized the only way to get enough clamp pressure to close the gap was also too much to keep adequate glue in the joint. So, I decided to glue in two slats tonight and two tomorrow night.
|
|
| From: PEARL DRUMS
|
|
|
|
|
|
|
| Date: 27-Nov-17 |
|
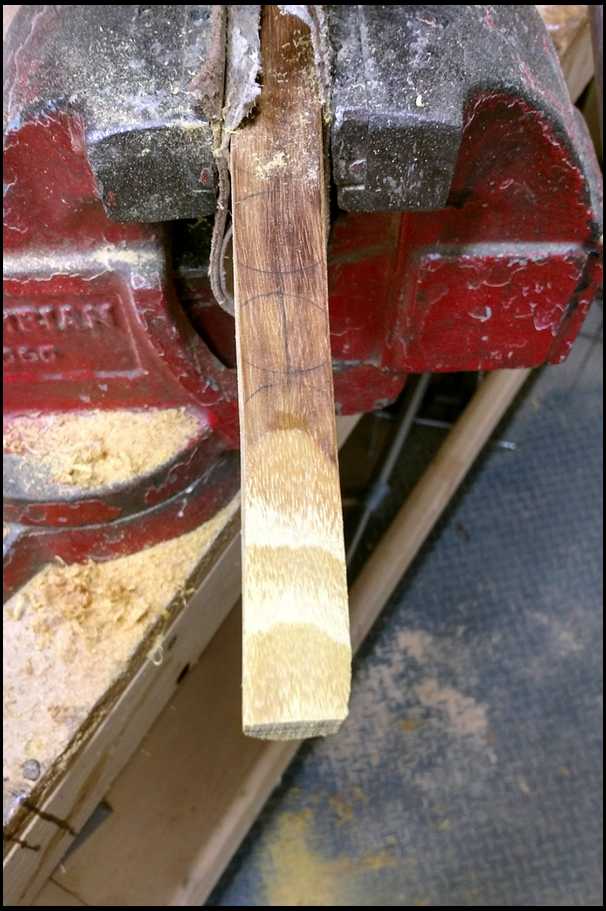
Each slat is 1" shorter than the slat under it. I alternated sapwood/heartwood on each so as to get a checkerboard effect when I work the fades in.
|
|
| From: PEARL DRUMS
|
|
|
|
|
|
|
| Date: 27-Nov-17 |
|
No idea where that pic came from. But whoever they are, thank you sincerely for your service.
|
|
| From: PEARL DRUMS
|
|
|
|
|
|
|
| Date: 27-Nov-17 |
|

Each slat is 1" shorter than the slat under it. I alternated sapwood/heartwood on each so as to get a checkerboard effect when I work the fades in.
|
|
| From: Bob
|
|
|
|
|
|
|
| Date: 28-Nov-17 |
|
Always enjoy a good build along. I will be following for sure.
|
|
| From: RonG
|
|
|
|
|
|
|
| Date: 28-Nov-17 |
|
Pearl Drums, I can already see where you are going with this one, I love it!!! I check this post at least five times a day, it is definitely my favorite one. That is going to be a beauty.....OH! I think I already mentioned that.....Ha!Ha!
|
|
| From: PEARL DRUMS
|
|
|
|
|
|
|
| Date: 28-Nov-17 |
|
Thanks guys. I got up early this morning before work and added the last two slats to the stack. It should be dry tonite when I get home. If I have time I will do the 3rd installment :).
|
|
| From: Osage Outlaw
|
|
|
|
|
|
|
| Date: 28-Nov-17 |
|
Looks like an interesting project Pearly.
|
|
|
|
| From: PEARL DRUMS
|
|
|
|
|
|
|
| Date: 28-Nov-17 |
|
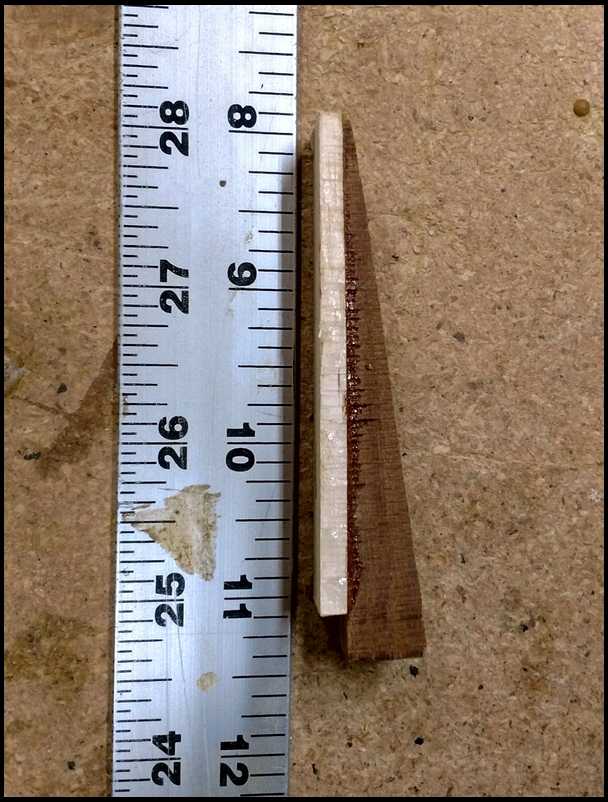
The last set of two slats glued up nice. I don't see any gaping gaps. That's always good when it comes to glue lines :)The next thing I need to do is fill that arched surface flat with a custom fit piece. I chose osage for that. I stood the osage filler piece on edge and then traced my arch on it.
|
|
| From: PEARL DRUMS
|
|
|
|
|
|
|
| Date: 28-Nov-17 |
|
Then I took it out to my band saw and cut just outside the line. Then I touched it up with my belt sander and got it right on line. The fit was close.
|
|
| From: PEARL DRUMS
|
|
|
|
|
|
|
| Date: 28-Nov-17 |
|
I used my trusty sanding block and 120 grit to fine tune the fit. I held it up to the lights to see any seams. Once that looked good I glued it up. Right now it probably looks like a mess of wood piled up with glue all over, and it is. My next installment will have it looking more familiar. Sure seems like a lot of work for a "bow" that can just as easily not be. But hey, that's what drives us wood bow wierdo's. Right, guys?
|
|
| From: PEARL DRUMS
|
|
|
|
|
|
|
| Date: 28-Nov-17 |
|
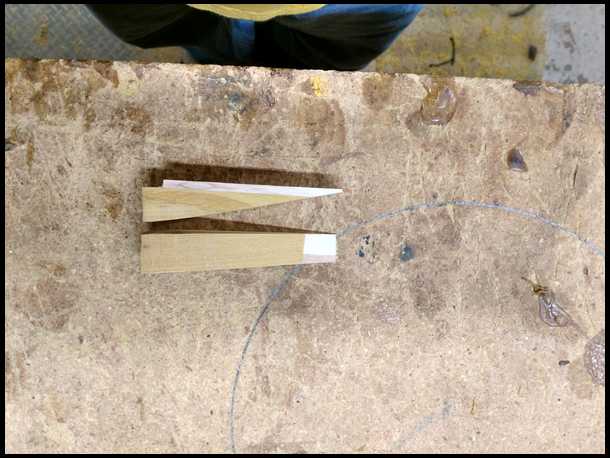
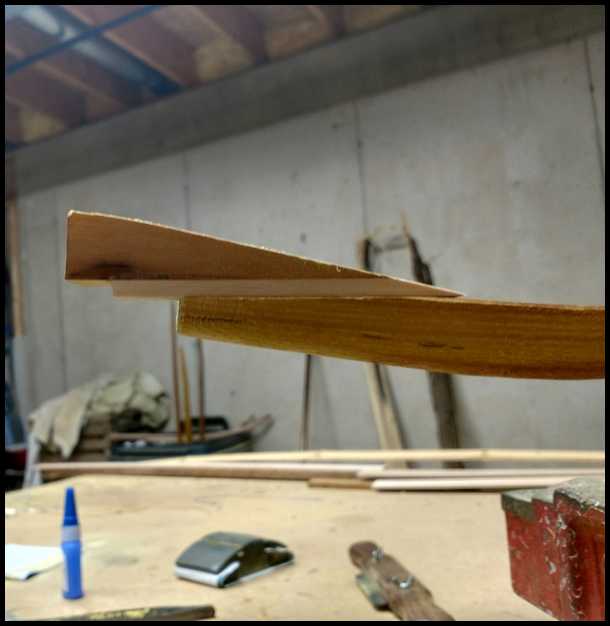
The reason that osage filler is higher on one side and tapered to a point on the other is because I have chosen the left side to be my bottom limb and as such that will be the heel of my eventual grip. My best advice has always been to think no less than three steps ahead of yourself before you make your next move, one that cant be undone. Such as gluing or heavy wood removal.
|
|
| From: Jeff Durnell
|
|
|
|
|
|
|
| Date: 28-Nov-17 |
|
Dude I see where you're going... this thing is gonna be sweet.
"Always think at least three steps ahead". That's been my mantra for decades. The wife hates it.... because it works so well, and she can't DO it!
Brothers of a different mother. It's a shame we ain't neighbors.
You're doing a lot of laminating there... might as well make a glass bow :^)
|
|
| From: RonG
|
|
|
|
|
|
|
| Date: 28-Nov-17 |
|
Right on Chris, Glass bow, glass bow,..... did someone say glass bow.......UUUUUUUGH!!! Glass is for holding beer, not for bows.
Now you two, see what you turned me into.........LOL!
|
|
| From: PEARL DRUMS
|
|
|
|
|
|
|
| Date: 28-Nov-17 |
|
And PVC is for herding turds! Yee haw!
|
|
| From: Bob W.
|
|
|
|
|
|
|
| Date: 29-Nov-17 |
|
Yee Haw! Looking good Pearl, always nice to see someones talents and methods on display!
|
|
| From: RonG
|
|
|
|
|
|
|
| Date: 29-Nov-17 |
|
Jeff, we are all brothers.
Pearl Drums, That is the best description of PVC I have ever heard. LOL!
|
|
| From: PEARL DRUMS
|
|
|
|
|
|
|
| Date: 30-Nov-17 |
|
Im happy with my glue job. I have one small gap between the bow and the first hickory slat, but nothing that will hurt the bow and it will be covered with leather.
|
|
| From: PEARL DRUMS
|
|
|
|
|
|
|
| Date: 30-Nov-17 |
|
The next few pics just give you an idea of where I was going when I staggered the hickory slats.
|
|
|
|
| From: PEARL DRUMS
|
|
|
|
|
|
|
| Date: 30-Nov-17 |
|
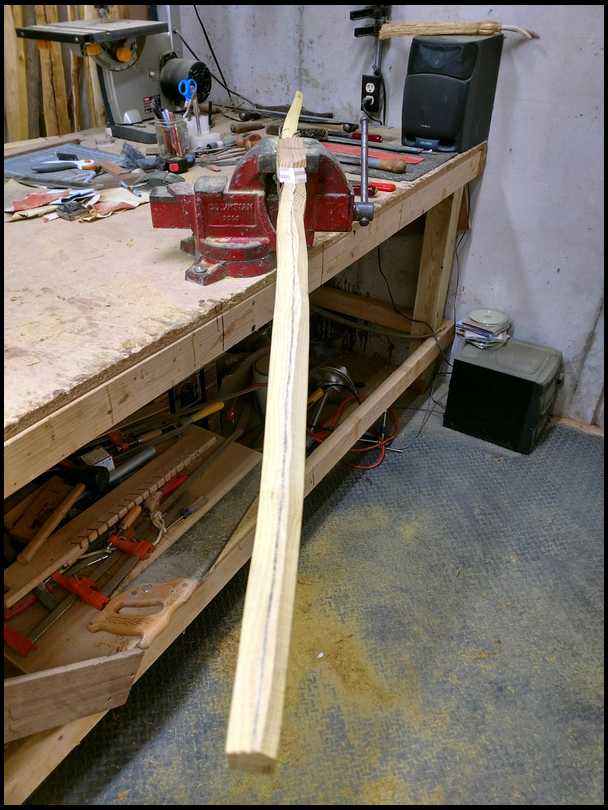
Next step is to get the bulk of the wood off with my band saw, then its all hand tools from here on out. I lay out my thickness parallel at this point. I use a ruler with a super small V cut in it that pencil led rides in. This particular bow is very narrow, so I ran my line at a .500".
|
|
| From: PEARL DRUMS
|
|
|
|
|
|
|
| Date: 30-Nov-17 |
|

This sketch shows the handle design I have in mind. Next up is floor tillering and then heat temper and shaping.
|
|
| From: Dry Bones
|
|
|
|
|
|
|
| Date: 30-Nov-17 |
|
Really coming along. Will you go back and fill the void in between the first hickory slat and the osage?
-Bones
|
|
| From: PEARL DRUMS
|
|
|
|
|
|
|
| Date: 30-Nov-17 |
|
Yes sir, any voids I run into as I work it down will be filled with Loctite Pro for the night. I do that just for moisture blocking. Structurally, tiny gaps will never hurt anything in this area, on a limb I wouldn't want any gaps.
|
|
| From: Ken Williams
|
|
|
|
|
|
|
| Date: 30-Nov-17 |
|
It is really coming along, Chris. Thanks again for taking the time to post all of this. We need more threads like this.
Ken
|
|
| From: PEARL DRUMS
|
|
|
|
|
|
|
| Date: 30-Nov-17 |
|
My pleasure, Ken. I try to do one every few years. Its my way of showing folks on the edge that it is really quite simple to do. Hopefully a few have taken the plunge as a result.
|
|
| From: ron w
|
|
|
|
|
|
|
| Date: 30-Nov-17 |
|
Really neat.........
|
|
| From: mgerard
|
|
|
|
|
|
|
| Date: 30-Nov-17 |
|
Nice work Chris. Chuck would be proud of you :>)
|
|
|
|
| From: Chance
|
|
|
|
|
|
|
| Date: 01-Dec-17 |
|
I love these How to threads.. They are so entertaining and educational.
|
|
| From: Stoner
|
|
|
|
|
|
|
| Date: 02-Dec-17 |
|
PD, thanks for the ride, Love these build-a-longs.
Question - Do you always put the centerline in the middle of the handle?
Just curious, I have been building one inch up from center and three inches down (per TBB I). I read Twisted Limbs book "Building the snakey osage' and he puts the handle two inches up & two down. Now I am reconsidering my design, I always have to make the one limb bend 1/4" more because the bottom limb comes out shorter. John
|
|
| From: PEARL DRUMS
|
|
|
|
|
|
|
| Date: 02-Dec-17 |
|
Not always. Sometimes staves will have a knot or something else that would be best suited in the grip. In that case I shift the centerline accordingly. Its all about the tiller. You can make any limb length combo work with a proper, even tiller that balances in your bow hand. I know Jeff prefers a shorter lower limb because he likes the way the bow carries, it balances nice for him.
|
|
| From: Jeff Durnell
|
|
|
|
|
|
|
| Date: 02-Dec-17 |
|
That's one reason, Chris. It also keeps the bow's center(the static balance point), my string hand fulcrum, and my preferred dynamic fulcrum all in closer proximity to each other throughout the draw... and I like the products of that as well.
|
|
| From: osage
|
|
|
|
|
|
|
| Date: 02-Dec-17 |
|
I also just finished reading " building the snakey osage ". He describes laying out the center grain line on the back and following the edge grain about one inch either side, in order to avoid violating the grain with edge runout. Then tapering the last 8 inches or so. It seems that by using the ever decreasing circles it would create somewhat of a pyramid shape with edge runout. Not being critical, but just trying to understand the process better.
|
|
| From: Jeff Durnell
|
|
|
|
|
|
|
| Date: 02-Dec-17 |
|
Osage, yes, but ever so slightly.
If we follow the grain precisely as we lay out a snakey centerline, and then take our width measurements off of either side of it, with circles or otherwise, the bow doesn't have to be parallel for any length of limb... we can taper the width from dips to tips if we like... and the grain will be no more violated than it is on a straight grained bow done the same way.
I haven't read that book, but I don't think I'm understanding his 2" wide thing. I've never made a snakey osage bow that was 2" wide. I keep the stave about 2" wide end to end while it's drying, but the finished bow is something less than 1 1/2" wide at the widest point.
Maybe I should just get the book. Might learn something :^)
|
|
| From: osage
|
|
|
|
|
|
|
| Date: 02-Dec-17 |
|
The 2" wide was at the roughing out stage, so I assume its taken down a bit more during finishing. He also says to chase a ring on the belly side, then dropping down another ring at the 1/3 limb length, then down another ring at the 2/3 length, and feather in between. Perhaps this happens at the same time on the sides also. He further explains that if the rings are very thin it may require a 5 or 6 ring step down. Any further thoughts or explanation would be much appreciated.
|
|
| From: Jeff Durnell
|
|
|
|
|
|
|
| Date: 02-Dec-17 |
|
Ok, that's kind of what I suspected on the 2" thing.
I don't go by growth rings on the belly because that can be unreliable, especially in character bows. I've made osage bows with rings so thick there were only two rings in the limbs, and made a super snakey one with 34 rings per inch, with growth ring 'islands' here and there.
Instead, first, I'm careful about accurate width tapering, then equally careful with thickness tapering, and then establishing facet proportions, taking as much time as needed... all prior to any bending. It sets the stave up for a straightforward tillering and shaping process, and I don't like backtracking or bad surprises.
|
|
| From: PEARL DRUMS
|
|
|
|
|
|
|
| Date: 03-Dec-17 |
|
Jeff explained it wonderfully. Don't believe everything you read in books, any of them. Some is good and some isn't. Experience will be your best teacher. Everything Jeff countered your book excerpts with was real experience talking.
|
|
| From: Eric Krewson
|
|
|
|
|
|
|
| Date: 03-Dec-17 |
|
Osage, I have made a lot of snakey osage bows and have to say what you read is incorrect as well.
I lay out a straight centerline on a snakey stave, use circle a circle template to lay off the width, off setting it right and left to accommodate the curve.
After I get the basic curves laid out I take the stave out into the sun (a setting sun is best), hold it at an angle so the snakey grain shows up and pencil in the exact outline to follow the snake with no runout.
Trying to feather the belly grain on any osage stave will cause you more heartbreak than successes, even on what appears to be a perfect stave.
|
|
| From: Jeff Durnell
|
|
|
|
|
|
|
| Date: 03-Dec-17 |
|
I'd often rather make snakey osage bows than straight ones. I cut my bowyer teeth on them because that's the only wood I had... nasty, crooked, snakey, wild west-Pa osage. I just love the look, they amaze me that they can shoot so well, and they require a little more time, effort, and understanding, which combined, connects me to them on a deeper level. Every once in a while though, I like to relax and make a straight bow or two to regain some sanity ;^)
|
|
| From: mgerard
|
|
|
|
|
|
|
| Date: 03-Dec-17 |
|
Isn't the feathers on the belly a by-product of proper thickness tapering?
|
|
| From: Kwikdraw
|
|
|
|
|
|
|
| Date: 03-Dec-17 |
|
This is wonderful, I'm super curious anyway, so these type threads are a blessing! Just finished my 1st osage, fun wood to work, easier than the hickory was for me. Benevolent people like Jeff and Chris and many others posting their pics and tutorials are the reason the LW is the best site on the internet, for me anyway! Thanks guys, we're really appreciative of your talent and efforts! Wyatt
|
|
| From: osage
|
|
|
|
|
|
|
| Date: 03-Dec-17 |
|
O.K. I think I understand what you guys are saying, or maybe I'm just confused at a higher level. Also, I don't believe everything contained in books. If I did I might have become a preacher.
|
|
| From: PEARL DRUMS
|
|
|
|
|
|
|
| Date: 04-Dec-17 |
|
Hopefully my comment about believing everything you read wasn't taken as an insult. That wasn't my intent. I just meant that experience will trump anything you read. The more you do, experience and learn firsthand the more you start to question some things you read previously.
|
|
| From: PEARL DRUMS
|
|
|
|
|
|
|
| Date: 04-Dec-17 |
|
Mike I use the belly grain early on just so I can hog off wood. Once I get the limbs flexing on the floor nicely I will start running my forefinger and thumb up and down each side to ensure even thickness from side to side. But for me, 8 out of 10 bows will follow the belly grain when I'm finished. That ALL goes back to what I started this thread with, that ever important first step centerline. If your grain starts to look crazy and your thickness is even, odds are you missed the true center line a bit. But not always. Some staves just wander.
|
|
| From: badger
|
|
|
|
|
|
|
| Date: 04-Dec-17 |
|
I do the same thing Pearl, the great majority will follow but once in a while you run into an oddball. A few months back I ran into one and didn't notice cause I was in the hogging off wood stage. I had about 3/8 on one side and over 5/8 on the other side 1/3/8 inches apart.
|
|
| From: PEARL DRUMS
|
|
|
|
|
|
|
| Date: 04-Dec-17 |
|
That always startles me when I catch stuff like that Steve, my thoughts go straight to "How much potential weight did I just lose!!!!"
|
|
| From: mgerard
|
|
|
|
|
|
|
| Date: 04-Dec-17 |
|
Did you lose your camera Pearly?
|
|
| From: PEARL DRUMS
|
|
|
|
|
|
|
| Date: 04-Dec-17 |
|
Its time to remove some bulk off these limbs and at least get them bending enough to start floor tillering the bow. I make facets when I do this. The picture below shows the centerline I drew on the bows belly.
|
|
| From: PEARL DRUMS
|
|
|
|
|
|
|
| Date: 04-Dec-17 |
|
Next I drew a line paralleling the limbs back, 3/8" wide. I did this on both sides of the limb. Now its just a matter of evenly rasping wood away until I hit the line on the side and the centerline. When I've done this on both sides I have house shaped cross section. Once I have an evenly shaped limb with even thickness' from side to side and a ridge running right down Broadway on my belly, its to time to put the limb on the floor and flex it. I flatten out the ridge as I even the bending out. Once I'm satisfied with that limb I repeat the same thing on the other limb.
|
|
| From: PEARL DRUMS
|
|
|
|
|
|
|
| Date: 04-Dec-17 |
|
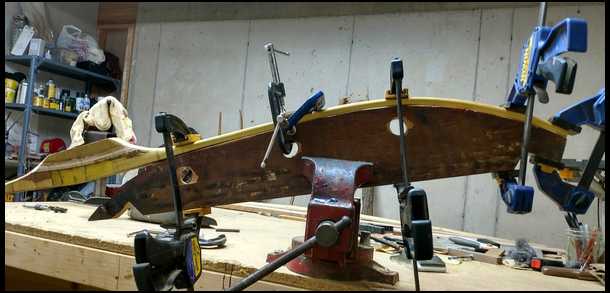
I have a lot cauls shaped in a lot of configurations. They are cheap and easy, plus fun to experiment with. I decided to not only heat shape, but also temper this bow at the same time. Normally I will always heat from the fade to the tip. But this limb has a dogleg off the handle and I wanted more clamps in place when I got to that area, I knew I would need some torque to bend it. That goes back to the thinking 3 steps ahead thing I mentioned earlier.
|
|
| From: PEARL DRUMS
|
|
|
|
|
|
|
| Date: 04-Dec-17 |
|
Can you believe this s**t? My heat gun died. A guy cant even get 300 bows out of a gun anymore. I got the limb plenty hot enough to bend, but its not tempered in the obvious yellow spot. I don't like heating it back up later to finish the temper, but I have no choice. Sections of limb that don't get tempered evenly will bend much differently and wear much differently. Consistency is king with.
|
|
| From: PEARL DRUMS
|
|
|
|
|
|
|
| Date: 04-Dec-17 |
|
I like the shape alot. Tempering helps hold unto much more after the clamps are set free. This was the straight limb, not the limb that has natural reflex. I always start with the hardest one first. That way if it doesn't work out I don't have time invested in the "good" limb.
|
|
| From: PEARL DRUMS
|
|
|
|
|
|
|
| Date: 04-Dec-17 |
|
This is a pic just to show how the checkerboard effect is coming along. It will change dramatically as I shape it away.
|
|
| From: PEARL DRUMS
|
|
|
|
|
|
|
| Date: 04-Dec-17 |
|
I have already noticed how much stiffer this osage is than almost any I've worked, cant wait to see what the heat brings. Aged wood is certainly better than simply dried wood. I have played with 15-20 year old wood. But I'm thinking this is much older than that based on its color and resilience.
|
|
|
|
| From: RonG
|
|
|
|
|
|
|
| Date: 04-Dec-17 |
|
Thanks Chris, I have learned a couple things.
|
|
| From: mgerard
|
|
|
|
|
|
|
| Date: 04-Dec-17 |
|
The master at work. Thanks Chris.
|
|
| From: badger
|
|
|
|
|
|
|
| Date: 04-Dec-17 |
|
Chris I bought an old osage bee keeper signpost from a guy that was said to be 100 years old. Too crooked to make a serious bow but I just wanted to feel for a difference. It was stiffer than hell.
|
|
| From: Jeff Durnell
|
|
|
|
|
|
|
| Date: 05-Dec-17 |
|
The first selfbow I made was with a small, standing dead osage, about 5". Knowing osage how I do now, it must have been dead there for many, many years. Not only was it by FAR the hardest piece of wood I've ever dealt with, I haven't seen osage that color since. I wish I could get a do-over with that piece.
|
|
| From: Pappy 1952
|
|
|
|
|
|
|
| Date: 05-Dec-17 |
|
Looking good Chris, yes I love old Osage also. Pappy
|
|
| From: PEARL DRUMS
|
|
|
|
|
|
|
| Date: 05-Dec-17 |
|
Looking at that limb in the caul a guy would think he has about a 60-65# limb, nope that sucker is probably closer to 75-85# with that little bit of wood left. Keep in mind the widest part of the limb is maybe 1.125". That make sit even more incredible.
|
|
| From: RC
|
|
|
|
|
|
|
| Date: 05-Dec-17 |
|
How long does it take to build this bow? Heck I could've had it done in 3 days. This your first bow build boy?
|
|
| From: PEARL DRUMS
|
|
|
|
|
|
|
| Date: 05-Dec-17 |
|
Go back to sleep old man and tell that smokin' hot wife of yours I said, "whats up buttercup".
|
|
| From: RC
|
|
|
|
|
|
|
| Date: 05-Dec-17 |
|
LOL
|
|
| From: PEARL DRUMS
|
|
|
|
|
|
|
| Date: 06-Dec-17 |
|
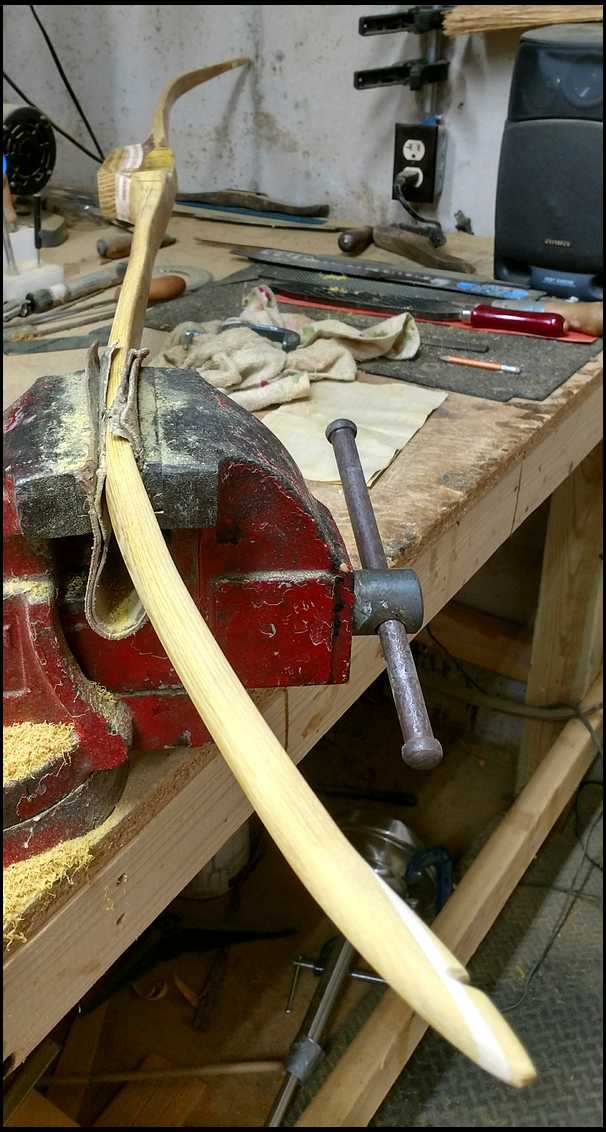
Getting closer to making this ol' gal bend. I replaced my heat gun with the new model, Wagner Furno. Great gun if anybody is looking for one. They added a feature to the handle that keeps the gun standing up on its own. Hot heat guns hitting the shop floor kills a lot of them. And they put a shroud around the nozzle end to keep from scorching your fingers and hands. The picture added shows one limb done.
|
|
| From: PEARL DRUMS
|
|
|
|
|
|
|
| Date: 06-Dec-17 |
|
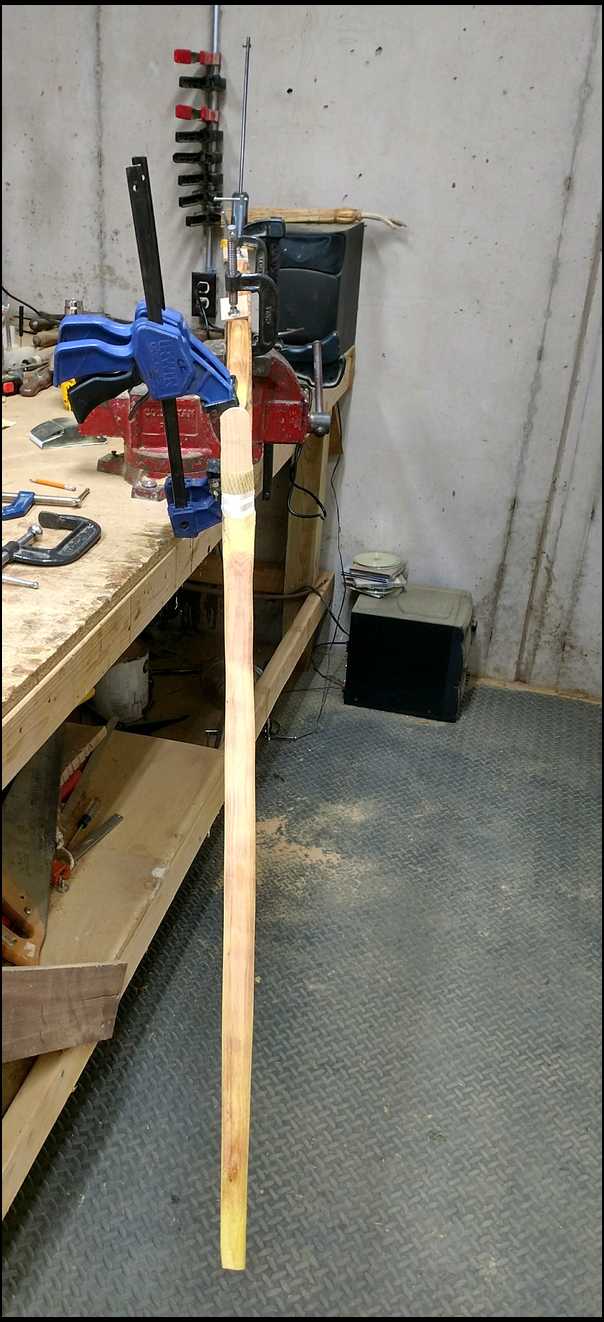
It appears my alignment will be close enough to work with. If not, I can always go back with more heat and tweak an area. You always want to over-bend when making heat corrections to account for spring back. The bigger or more difficult the bend needed the more over-bend it gets.
|
|
| From: PEARL DRUMS
|
|
|
|
|
|
|
| Date: 06-Dec-17 |
|
The second limb is now shaped and tempered. Normally I would wait a day or so and then continue on with the build. However, I will be unable to work on this over the next few days.
|
|
| From: PEARL DRUMS
|
|
|
|
|
|
|
| Date: 06-Dec-17 |
|
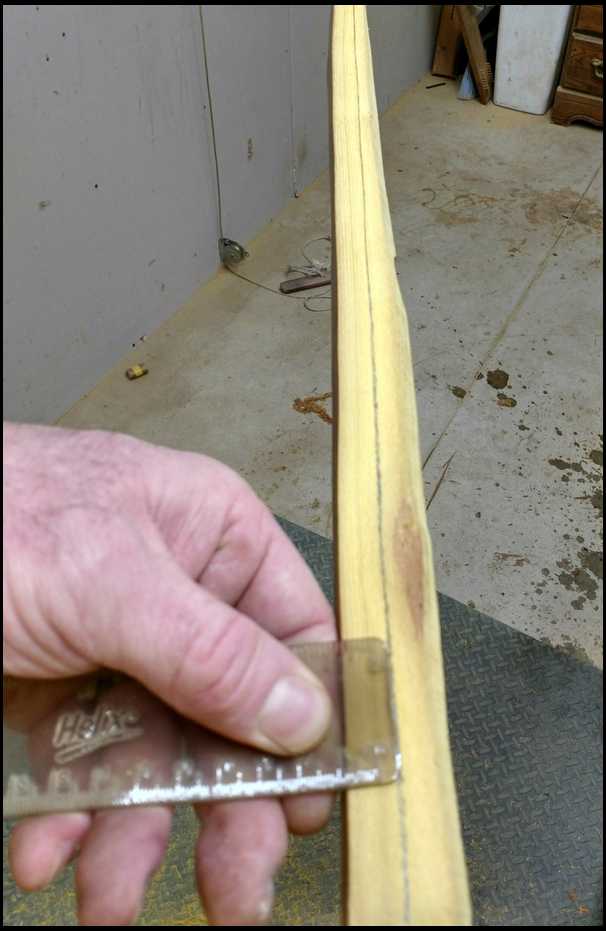
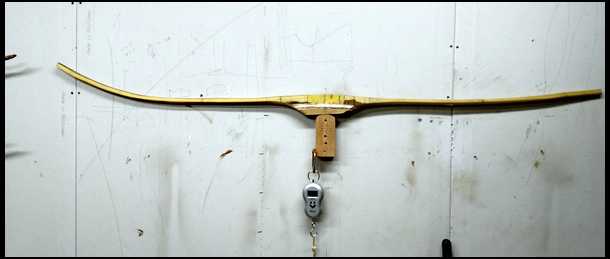
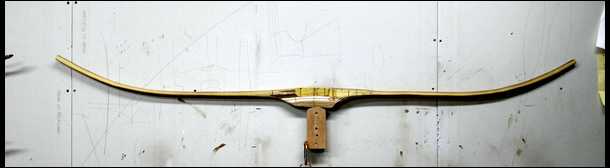
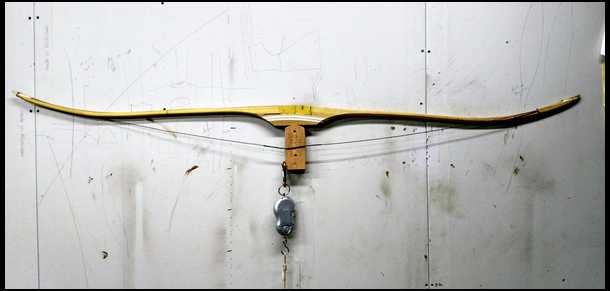
This picture shows the delfex in the bow as it comes off the centerline. Its not much, but its all I wanted. That is a 36" ruler and the gap at the ends is about 5/8" each. Plenty for me.
|
|
| From: Danz Bar
|
|
|
|
|
|
|
| Date: 06-Dec-17 |
|
Chris How wide is it at this point?
|
|
| From: PEARL DRUMS
|
|
|
|
|
|
|
| Date: 06-Dec-17 |
|
1.125" at its widest. I left it 70" ttt for that reason.
|
|
| From: Jeff Durnell
|
|
|
|
|
|
|
| Date: 06-Dec-17 |
|
That's enough for good osage... and a great bowyer :^)
|
|
| From: George Tsoukalas
|
|
|
|
|
|
|
| Date: 06-Dec-17 |
|
It is looking really good, PD. I am enjoying the buildalong. Jawge
|
|
| From: ron w
|
|
|
|
|
|
|
| Date: 06-Dec-17 |
|
Coming along nicely.........
|
|
| From: PEARL DRUMS
|
|
|
|
|
|
|
| Date: 06-Dec-17 |
|
You're too kind, Jeffy
Glad a few of you are enjoying this. I haven't over saturated it with info, but hopefully it helps a handful of folks.
|
|
| From: Jeff Durnell
|
|
|
|
|
|
|
| Date: 06-Dec-17 |
|
The only possible narrow limb issue that comes to mind now is alignment, and with the tips out in front of the handle a ways, they can be a little squirrely, but you got yourself a new heat gun so...
|
|
| From: Orion
|

|
|
|
|
|
|
| Date: 06-Dec-17 |
|
Good thread. I understand heating the wood to make it more pliable for bending, but what is tempering when applied to wood?
|
|
| From: PEARL DRUMS
|
|
|
|
|
|
|
| Date: 06-Dec-17 |
|
Jeff I totally agree. I have thought about it quite a bit. If I have to, I'll back off a bit the reflex, or move it closer to mid-limb a few inches.
|
|
| From: PEARL DRUMS
|
|
|
|
|
|
|
| Date: 06-Dec-17 |
|
Jerry the tempering plasticizes the woods cells. In essence it stiffens it up and makes the wood react much quicker when the bow is shot and it will hold its intended shape much better. Tempering has been in archery for thousands of years. Arrows with fire hardened tips is one example.
|
|
| From: Kwikdraw
|
|
|
|
|
|
|
| Date: 06-Dec-17 |
|
Great build along, learning some stuff! Thanks PD, nice to see an expert at work! Wyatt
|
|
| From: osage
|
|
|
|
|
|
|
| Date: 06-Dec-17 |
|
What are the pros and cons of dry heat bending as opposed to steam or boiling? Is steam heat bending followed by dry tempering something that is recommended?
|
|
| From: PEARL DRUMS
|
|
|
|
|
|
|
| Date: 06-Dec-17 |
|
I use steam for static recurves or extreme lateral moves. Other than that I prefer dry heat. Its faster, cleaner and easier on the wood in my opinion. Some folks "set" the steamed bend in with dry heat. I never do and never had a static pull out. Building bows and the beliefs that go with it is very much like purchasing insurance. If you never had a static pull out then why steam and dry heat? For some its because they did have them pull out. Which opens another can of worms. Why did it pull out? Because it wasn't set with dry heat after steaming? Or, because it wasn't steamed long enough?
|
|
| From: Phil
|
|
|
|
|
|
|
| Date: 06-Dec-17 |
|
Can I make a suggestion Pearl Drums? ....
.... seriously ... you and Jeff Durnell ought to get together and write a book on bow building. You both have the skill and the knowledge,but, best of all, you both have an extraordinary talent for explaining complex things with simplicity and precision.
This is a truly wonderful thread ... thanks
|
|
| From: PEARL DRUMS
|
|
|
|
|
|
|
| Date: 06-Dec-17 |
|
Maybe some day we can think about that, Phil. If I could work with anybody on a book, it would be Jeff.
|
|
| From: Jeff Durnell
|
|
|
|
|
|
|
| Date: 06-Dec-17 |
|
You're too kind, Pearly :^)
Phil, aren't there enough books out there already? lol
You guys already know this, but for the uninitiated following along... Wood bow crafting is special, not only because of the extensive history, the amazing display and ability of a simple stick of wood well designed and tillered, and the personal challenges and rewards that await us there, but because even after all of this time, some say tens of thousands of years that they've been made and used for sustenance, defense, and play... there's still a little room for discovery in them, and us.
|
|
| From: Phil
|
|
|
|
|
|
|
| Date: 06-Dec-17 |
|
Jeff .. there's always room for quality .
I'm not kidding ... you and PD ought to get together and talk about it.
|
|
| From: RonG
|
|
|
|
|
|
|
| Date: 06-Dec-17 |
|
I agree with Phil, there are a lot of bow builders out there, but getting across with the instructions so even I can understand it takes a couple of special people. Both these gentlemen have given me a lot of info on my first stave and I didn't have a problem following their teachings.
I'm loving this build and the cross conversations that Jeff and Chris are having, I'm taking it all in.
|
|
| From: Danzn Bar
|
|
|
|
|
|
|
| Date: 06-Dec-17 |
|
I think a book is a great idea...Chris... I think this has been talked about before if I remember right at a certain Marshall gathering. Since the TBB 1-4 was written a lot of things have been found or refined. Go for it Chris. I'll definently buy the book. I think a lot can be brought to light about a lot of things including different woods and such. DBar
|
|
| From: Paul Newton
|
|
|
|
|
|
|
| Date: 07-Dec-17 |
|
I'll also agree a book would be a great idea. You can never have enough information available or different ideas/theories.
Great build-along Chris.
|
|
| From: PEARL DRUMS
|
|
|
|
|
|
|
| Date: 07-Dec-17 |
|
I took the bow off the caul last night. Both limbs came out wonderfully and very balanced side to side. My alignment looks close. One limb tip fades to the right a pinch and the other to the left a bit. I'm hoping that will make the string line up. We shall see over the next handful of days. I didn't take a pic, but will tonite. Next up is a fine tuned floor tiller, then tip overlays.
|
|
|
|
| From: Orion
|
|
|
|
|
|
|
| Date: 07-Dec-17 |
|
OK, I'm getting closer to understanding tempering. Does heating the wood enough to bend it and have it keep the set constitute tempering, or do you need to heat the wood hotter, longer to plasticize the wood cells. If it's the latter, I suppose that's more art than science.
|
|
| From: PEARL DRUMS
|
|
|
|
|
|
|
| Date: 07-Dec-17 |
|
Heat shaping alone wont do anything more than "loosen" the wood up enough to move it around. Tempering the wood is heat at a whole other level, I can only assume about twice the heat is required for a good temper. This entire is hobby is much more art than science or math. And experience is about the only way to learn and figure out that art portion.
|
|
| From: PEARL DRUMS
|
|
|
|
|
|
|
| Date: 07-Dec-17 |
|
I've probably made 300 bows now and have messed up at least 30-40 more. I was mad at the time, but its truly the only way to learn certain things that require intuition and feel. Neither of them can be taught or read about. A guy just has to do it and learn. People often ask me, "how long do you heat the limb up before you bend it?". I have no idea how to answer that, I just know when its time to bend and clamp based off doing it hundreds and hundreds of times in the past. Generally speaking if it burns my finger to touch the area then it is probably hot enough. Too hot cracks the wood as it tries to stretch and too cool cracks the wood as it tries to stretch. You just have to feel it out on each bow and each bend.
|
|
| From: George Tsoukalas
|
|
|
|
|
|
|
| Date: 07-Dec-17 |
|
PD, sounds like you are making good progress. Keep up the good work. Jawge
|
|
| From: RC
|
|
|
|
|
|
|
| Date: 07-Dec-17 |
|
Ya want me to come out there and finish it for ya Pearly Boy?
|
|
| From: Randy
|
|
|
|
|
|
|
| Date: 07-Dec-17 |
|
This is a great thread. Any chance you guys will have the book finished by Christmas so I can tell my wife what to get me?? Just kidding. But put me on the list to order one.
|
|
| From: PEARL DRUMS
|
|
|
|
|
|
|
| Date: 07-Dec-17 |
|
I would, but I'm afraid I'm looking for a touch over 32# on this one. So you better bring Chris along to draw it for you. I know she is retired now, so I'm sure she has time for a ride :)
|
|
| From: Jeff Durnell
|
|
|
|
|
|
|
| Date: 07-Dec-17 |
|
HahaPffft, dang... spit some coffee.
|
|
| From: PEARL DRUMS
|
|
|
|
|
|
|
| Date: 07-Dec-17 |
|
Ol' Roy is just a sissy anymore, Jeffy. Pretty soon he'll be shooting 20# turd herding PVC "bows" :)
|
|
| From: RC
|
|
|
|
|
|
|
| Date: 07-Dec-17 |
|
I pulled a 70 pounder last night in bow shop:)
|
|
| From: Jeff Durnell
|
|
|
|
|
|
|
| Date: 07-Dec-17 |
|
Yeah, on the tree with both hands and 8 pulleys maybe.
|
|
|
|
| From: RonG
|
|
|
|
|
|
|
| Date: 07-Dec-17 |
|
I love it, keep it up guys.
|
|
| From: PEARL DRUMS
|
|
|
|
|
|
|
| Date: 08-Dec-17 |
|
I let the clamps go and it came off wonderfully. I like the over-all shape and I like the balance from limb to limb that I see. Time for a fine tune floor tiller job and tip overlays.
|
|
| From: PEARL DRUMS
|
|
|
|
|
|
|
| Date: 08-Dec-17 |
|
The overlays are made in the same style as the grip. Hickory on the bottom and 1/4 sawn osage on the top. Both the hickory and the osage are cut-offs from the grip job. Keeping it in the family :)
|
|
| From: PEARL DRUMS
|
|
|
|
|
|
|
| Date: 08-Dec-17 |
|
I use Loctite Pro for all my overlay needs. I use it to laminate pieces together and I use it to fasten them to the bow. I like to make my overlays big so I can work them down. Again, its always easier to take material away, adding it can be tough. The pic shows both overlays ready to go on the bow.
|
|
| From: PEARL DRUMS
|
|
|
|
|
|
|
| Date: 08-Dec-17 |
|
The second most important part of any overlay is the leading edge. If you make it razor sharp before you glue it on you can avoid digging dips into the back of your bow as you try to blend it all together. I like my bow lines to flow unimpeded. Abrupt lines aren't for my eyes.
|
|
| From: PEARL DRUMS
|
|
|
|
|
|
|
| Date: 08-Dec-17 |
|
I don't have any measurements to give on this next step. Just use your head thinker and some feel here. I use my Shinto to make a flat spot on the back to accept the overlay. I like that flat spot to correlate with the back of my grip more than the belly. Meaning when I rasp that flat on the back of the bow it is relation with the back of the handle and not the belly of the bow.
|
|
|
|
| From: PEARL DRUMS
|
|
|
|
|
|
|
| Date: 08-Dec-17 |
|
I treat this union just like I do the handle laminations. I make sure the two pieces fit together perfectly with zero air gaps or seams. Once I'm satisfied with what I see, I apply glue to both pieces and clamp them down.
|
|
|
|
|
|
| From: PEARL DRUMS
|
|
|
|
|
|
|
| Date: 08-Dec-17 |
|
If I can hold it all together this bugger should be a rocket ship, craig.
|
|
| From: wooddamon1
|
|
|
|
|
|
|
| Date: 08-Dec-17 |
|
Great build along, gonna be a nice looking bow. I'd like to learn someday, cool skill to have.
|
|
|
|
| From: badger
|
|
|
|
|
|
|
| Date: 08-Dec-17 |
|
I am curious how you are going to handle those almost mid limbs curves. This is going to be interesting.
|
|
| From: PEARL DRUMS
|
|
|
|
|
|
|
| Date: 08-Dec-17 |
|
I plan to make most of that area work, Steve. I considered a shorter reflexed area that would be left stiff, but decided otherwise.
|
|
| From: RC
|
|
|
|
|
|
|
| Date: 09-Dec-17 |
|
LOL
|
|
| From: PEARL DRUMS
|
|
|
|
|
|
|
| Date: 09-Dec-17 |
|
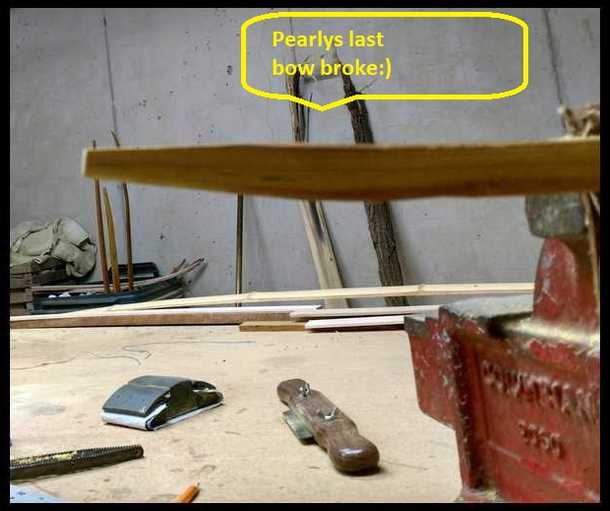
I have broke a lot of bows in my days, but that haint one of em! That is locust bark and sapwood I split off a stave with a screw driver and hammer, I hate yanking a draw knife. It hurts.
|
|
| From: PEARL DRUMS
|
|
|
|
|
|
|
| Date: 09-Dec-17 |
|
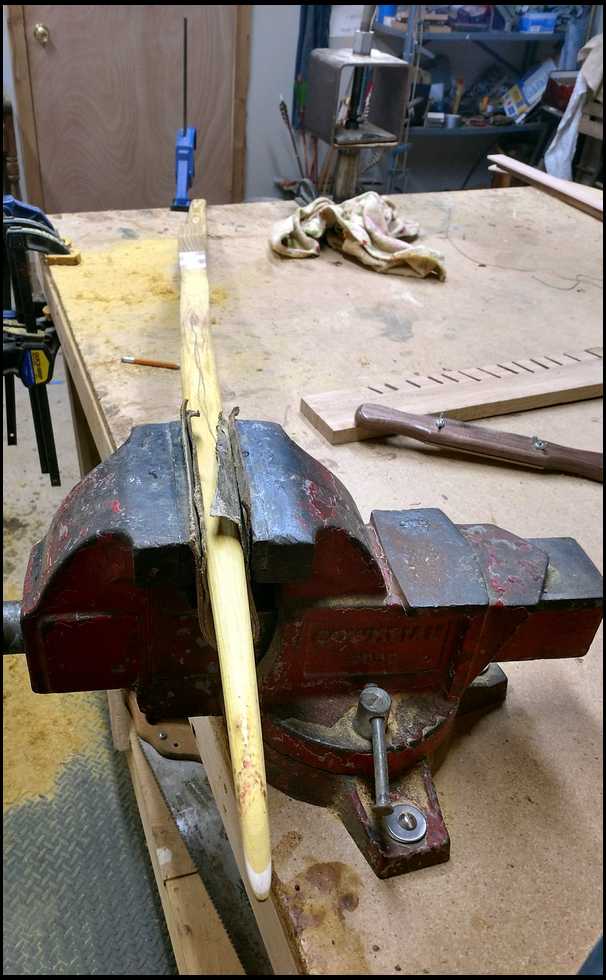
I got my overlays shaped last night and just a bit of floor tillering. The first thing I do on overlays is get the sides cleaned up and even with the bow. Then I put the limb in my vice belly side up. You always want to work your tools towards the tip of the bow in one way strokes, Don't let it work s you pull it back. If try to work up the limb your tools will chatter on the growth rings and make waves. Waves are ugly :)The pic below shows how I hold the bow in my vice to do this.
|
|
| From: PEARL DRUMS
|
|
|
|
|
|
|
| Date: 09-Dec-17 |
|
After lightly stroking my saw rasp towards the tips I get a shapely overlay and bow tip. Watch the grain lines here, they will tell you where to shape the tip.
|
|
| From: PEARL DRUMS
|
|
|
|
|
|
|
| Date: 09-Dec-17 |
|

When blending in the top side with the back of the bow you want to always stroke off the overlay unto the bow. This keep the mating surface smooth and flat.
|
|
| From: PEARL DRUMS
|
|
|
|
|
|
|
| Date: 09-Dec-17 |
|
One I get the tips shaped to my liking I add the string groove. I don't often use a groove that extends around the limb tip, often times I use just a top groove. Its easier, more quiet, and better on the string. The pencil mark is where the osage ends, I want my groove about 1/4" inward from that line.
|
|
| From: PEARL DRUMS
|
|
|
|
|
|
|
| Date: 09-Dec-17 |
|
And here it is with a groove. The more reflex the limb has the more angle I cut the groove in. If this was a straight limb bow I would file them straight in, these are angled just a bit to compensate fro the expected string angle.
|
|
| From: RC
|
|
|
|
|
|
|
| Date: 09-Dec-17 |
|
Very nice, Chris.
|
|
| From: PEARL DRUMS
|
|
|
|
|
|
|
| Date: 09-Dec-17 |
|
This just a cool pic that gives the best perspective of the bows profile. Its been hard to see in most pics I've posted. But this pic shows you best what my eyes see in person.
|
|
|
|
| From: RonG
|
|
|
|
|
|
|
| Date: 09-Dec-17 |
|
Wow!! Shaping up, I love those tips and handle, neat idea.
You have a bow almost completed in a couple of weeks part time and it took me a year,.....Ha!Ha!
I would like to try some reflex in my Osage billets when I get to it, not quite that much.
|
|
| From: Danzn Bar
|
|
|
|
|
|
|
| Date: 09-Dec-17 |
|
Look'n good Pearl, DBar
|
|
| From: ron w
|
|
|
|
|
|
|
| Date: 10-Dec-17 |
|
Graceful lines........outstanding!!!
|
|
| From: Dry Bones
|
|
|
|
|
|
|
| Date: 10-Dec-17 |
|
Really looking good. Getting serious. :-)
-Bones
|
|
| From: Pappy 1952
|
|
|
|
|
|
|
| Date: 11-Dec-17 |
|
Looking good so far Chris. Pappy
|
|
| From: TrapperKayak
|
|
|
|
|
|
|
| Date: 11-Dec-17 |
|
Watching intently, but looks pretty complicated and don't have the tools. Not sure I can do this. Can't I just use a rasp and a draw shave to make a one piece?? :)
|
|
| From: PEARL DRUMS
|
|
|
|
|
|
|
| Date: 11-Dec-17 |
|
Calvin other than rouging the stave out on my band saw. Every thing I do for the rest of the build is done with four hand tools. A Shinto saw rasp, a half round Nicholson #50, ferries rasp and a scraper. That's less than $100 total for all four tools and they will make about 35-40 bows before they need replaced.
|
|
| From: TrapperKayak
|
|
|
|
|
|
|
| Date: 11-Dec-17 |
|
Pearl, what about all the bending clamps and vises, or don't you need those? Is it a requirement to put bends in the bows? Or just build a longbow for the first one without the bends?
|
|
| From: PEARL DRUMS
|
|
|
|
|
|
|
| Date: 11-Dec-17 |
|
That's all stuff that can come later. Your first bow would be best suited as a straight bow. You may need to heat up an area or two to line up the string, but that's it.
|
|
| From: TrapperKayak
|
|
|
|
|
|
|
| Date: 11-Dec-17 |
|
I can do that...Looking forward to your and any others' advice once I start the project. What is a good length to shoot for, 70"? Don't have a band saw but have been wanting one for some time now (I have done antler work, but all by hand tools, and want a band saw for large numbers of cuts I plan on doing). I think a rasp/file is my favorite wood working tool. Thanks. TK
|
|
| From: PEARL DRUMS
|
|
|
|
|
|
|
| Date: 11-Dec-17 |
|
The most solid recipe for bow length is draw length x two plus 10". Then adjust the width of the bow based on the species used. When you get a few under your belt you can start tweaking those numbers and shortening the bow if you choose. I still like a longer bow than I need. I think they shoot the best, behave the best and are the most durable.
|
|
| From: TrapperKayak
|
|
|
|
|
|
|
| Date: 11-Dec-17 |
|
That only makes sense, less overall strain on the limbs if longer, energy distributed along longer limbs. Plus more nice looking wood to look at... You're formula would make mine 68".
|
|
| From: Jeff Durnell
|
|
|
|
|
|
|
| Date: 11-Dec-17 |
|
There ain't much I disagree with you about Chris. You give good advice.
I like pushing the limits on bows. I suppose that's how I learn what I should and shouldn't do to a given piece of wood, or succeeding pieces, but when I decide to make the best hunting selfbow I can for myself, a bow that I know will be efficient, durable, predictable, shootable, trust worthy, hunt worthy, and likely outlive me, first I grab the best piece of osage I have, then I make it a couple inches longer than I think the wood HAS to be... and THAT usually ends up very handy to the 'draw length X2 + 10" rule'.... and then like you said, adjust the width according to what we suppose that individual piece of wood can handle.
Cal, what's your draw length? The last Hophornbeam selfbow I made, I pushed it a bit. I did to it what I often do to osage just to see how it stacked up. It did well. I made it 64" ntn, my draw is 28.5", which, according to 'the rule' means that bow should have been 67". It took about an inch or a fraction more of set, not bad, but if I would have followed the 2xD+10" rule, it would have been 67" and would have probably taken very little if any set. Not that 1" is anything at all to worry about, I'm quite happy with that, just saying... that 'rule' is a good guideline to remember.
|
|
| From: badger
|
|
|
|
|
|
|
| Date: 11-Dec-17 |
|
Most of my bows are going to 67 and 68 inches anymore, I just finished a 72" and I love the way it shoots.
|
|
| From: Greyfox
|
|
|
|
|
|
|
| Date: 11-Dec-17 |
|
Very nice, looking forward to seeing it finished. Good luck.
|
|
| From: RonG
|
|
|
|
|
|
|
| Date: 11-Dec-17 |
|
Being a beginner, I'm keeping mine to 68" plus. I love the longer bows anyway. Your formula states that mine should be 66" that would be bare minimum, I have a 60" longbow and it shoots great, but is very uncomfortable shooting more than five arrows.....Finger pinch.
Love your design Chris, anxious to see the next step.
|
|
| From: SB
|
|
|
|
|
|
|
| Date: 11-Dec-17 |
|
The formula would put me at 66"...which I have found to be too short of a bow for me in a self bow or longbow.
|
|
| From: badger
|
|
|
|
|
|
|
| Date: 11-Dec-17 |
|
Looking good!
|
|
| From: PEARL DRUMS
|
|
|
|
|
|
|
| Date: 12-Dec-17 |
|
Steven why does 66" seem too short for you? What are you noticing in your self bows that makes you feel that way?
|
|
| From: TrapperKayak
|
|
|
|
|
|
|
| Date: 12-Dec-17 |
|
Jeff, my draw length is 29". So the formula would make a 68" bow right for me.
|
|
| From: PEARL DRUMS
|
|
|
|
|
|
|
| Date: 12-Dec-17 |
|
Keep in mind that length is nock to nock and not O/A length.
|
|
| From: Arvin
|
|
|
|
|
|
|
| Date: 12-Dec-17 |
|
Looking good Pearl! I like the tips and overlays. Going to be a fast one. Arvin
|
|
| From: unhinged
|
|
|
|
|
|
|
| Date: 12-Dec-17 |
|
Very impressive. I could not dream of crafting a Bow with that profile and handle without hinging one or both limbs! Excited to see it work. Thanks for sharing!
|
|
| From: H Rhodes
|
|
|
|
|
|
|
| Date: 14-Dec-17 |
|
I have been following along on this one from the beginning. It isn't often that you get to see a build along from a real master. I like the lines on this one. I bet it will be a sweet shooter.
|
|
| From: PEARL DRUMS
|
|
|
|
|
|
|
| Date: 15-Dec-17 |
|
Thanks a lot, Howard. I had to take a break from tillering. The humidity in the house is about gone. I've been getting recordings of 30-35% average. That's to dry for me and a great way to pop a splinter that wouldn't otherwise.
|
|
| From: Steve Milbocker
|
|
|
|
|
|
|
| Date: 15-Dec-17 |
|
Take a shower with it and get back to work!!:)
|
|
|
|
| From: PEARL DRUMS
|
|
|
|
|
|
|
| Date: 15-Dec-17 |
|
I've kept a humidifier going in our bedroom for a few weeks trying to keep my wife's nose from bleeding all day, chemotherapy is a b*tch. In the meanwhile I have been moving that bow from there to the bathroom and back to the bedroom. She thinks I'm crazy(er):)That poor woman has watched me do all kinds of wacky stuff with my bow projects.
|
|
| From: PEARL DRUMS
|
|
|
|
|
|
|
| Date: 22-Dec-17 |
|
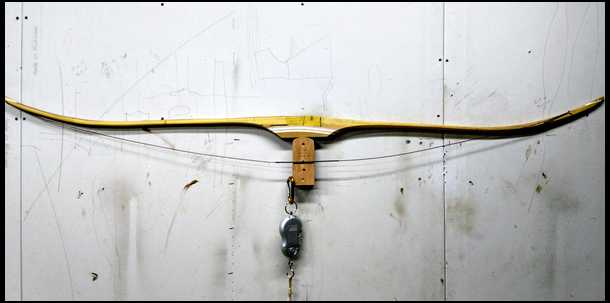
Sorry for the delay, it was simply too dry for my tastes. I did take an hour last night on got the bow on a long, but tight, string. My tiller stick is nothing but a chunk of hickory with grooves cut in.
|
|
| From: PEARL DRUMS
|
|
|
|
|
|
|
| Date: 22-Dec-17 |
|
I use a straight edge to check tiller and know exactly where to scrape and where to leave alone. In this case I used my 7" scraper. Its a very good way to get a very good tiller, once your eyes get used to watching that gap open and close as you slide it down from fade to tip.
|
|
| From: PEARL DRUMS
|
|
|
|
|
|
|
| Date: 22-Dec-17 |
|
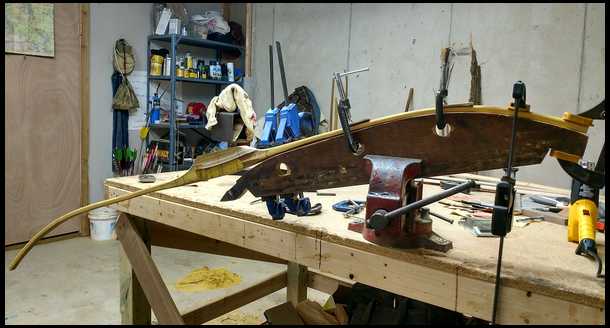
My string is just a fuzz off center, normally that would just fine by me. But a bow with a lot of reflex, like this one, is much better off with the string right down center. In this case the lower limb drifted to the passenger side a bit. The following pics show how I correct that.
|
|
| From: PEARL DRUMS
|
|
|
|
|
|
|
| Date: 22-Dec-17 |
|

Believe it or not, I took this pic with my nose on the camera "button" :)Heat only a few inch section just off the vice jaws for about 2-3 minutes, or until you cant touch the wood.
|
|
| From: PEARL DRUMS
|
|
|
|
|
|
|
| Date: 22-Dec-17 |
|
Then simply push the opposite limb over and make the bend, I use a bar clamp to hold it in place. Ill put the string back on tonite and find out if my correction was enough.
|
|
| From: RonG
|
|
|
|
|
|
|
| Date: 22-Dec-17 |
|
Chris, what do you consider the best moisture range for Osage.
My goodness, I love the looks of that bow it's a beauty, you make it look so easy.
|
|
| From: PEARL DRUMS
|
|
|
|
|
|
|
| Date: 22-Dec-17 |
|
Ron I prefer anything between 40-60% humidity. Our house was in the very low 30s for weeks.
It is that easy, Ron. Its all about smooth even bends that match the profile of the bow at rest. The other details are all frosting on the cake. I have always said one good day with an experienced bowyer in his shop is worth the same as 5 books worth of reading.
|
|
| From: RonG
|
|
|
|
|
|
|
| Date: 22-Dec-17 |
|
You are definitely correct on that one.
I always thought you guys had special vices and equipment to do all this and what to my surprise, your work shop looks like mine columbia vice and all, I was using soft aluminum as jaw covers, but that didn't work, I can't tell for sure it looks like leather you are using for padding. It's taking me longer, but I am learning.
Thank you Chris.
|
|
| From: Knifeguy
|
|
|
|
|
|
|
| Date: 22-Dec-17 |
|
Man Chris, just got back from the grocery store and Starbucks and found this waiting for me when I hit the LW! The bow looks great. I hope that you and your wife manage a Merry Christmas wrapped with overdue joy. Lance.
|
|
| From: Pa Steve
|
|
|
|
|
|
|
| Date: 22-Dec-17 |
|
Thanks for the build along Chris. Lots of very useful information. I've made a few straight selfbows years ago and want to try one with recurved tips. I have a 20 year old osage stave that's 60" long. Luckily, my draw length is only 25 1/2 Should I use steam to bend it or will dry heat suffice? Also, does humidity effect the bending process? Thanks, Steve
|
|
| From: Danzn Bar
|
|
|
|
|
|
|
| Date: 22-Dec-17 |
|
That last pic shows what a short or island bench and a vice that swivels can do. My shop is a vice in the middle of a 12ft long bench. Oh if I could set up a shop to build bows what I'd do now different. DBar
|
|
| From: KyPhil
|
|
|
|
|
|
|
| Date: 22-Dec-17 |
|
On the straight edge, is it supposed to be flat against the limb or if you start seeing a bigger gap then you know it's bending too much? I guess you are wanting an even gap all the way down? Looks like a good idea.
In the past I would mark intervals down the string and then measure from it down to the limb making sure there was any jumps in distance that were not supposed to be there. It works but is not the easiest method.
|
|
| From: PEARL DRUMS
|
|
|
|
|
|
|
| Date: 22-Dec-17 |
|
Ron that is heavy leather. Its two layers cemented together. Yew is the only wood I have to watch it on. The rest I can crank on it and its fine.
Lance, same to you and your entire family. Hope you have a great one and enjoy every minute of it.
Steve, recurves I always bend using steam. 30-35 minutes is plenty of steaming. Make the bend in one fluid motion with intention behind it. If you want to simply add some tip reflex, then I would always use dry heat. Remember, dry heat or steam both dry the wood out, steam being the most harsh, IMO. That being said if you tried to heat up wood that wasn't dry enough to build a bow with, your chances of checks when heat is applied goes up substantially. If the wood is dry enough to make a bow, its dry enough to heat up.
Big guy, now you know why I don't do a lot of "away" bow work. I like my 4 x8 bench and I like my vice just how it is. It feels awkward to me otherwise. Merry Christmas to the entire Katzman clan. Especially that ol' man of yours :)
Phil, the scraper edge is situated exactly as it would if I was actually using it in the picture. On a mostly straight limbed bow you want that gap to maintain until the leading end of the scraper gets to about 8-10" from your tip. That's when the gap should nearly be closed, hence stiffer tips. The same cant be said for a bow like this one I'm building. A bow with that much early reflex is already bending a lot just to appear look flat. In that situation I'm actually looking for my gap to maintain only 8-10" off the end of the fades. After that I want the gap to gradually and consistently lessen towards the tip until it flattens right out about 12" from the tip. If you can visualize that you will see how that tiller will match the profile of the bow unbraced. What appears flat is actually bending equal to the rest of the limb because its being pulled out of its held reflex.
Hopefully I didn't confuse he "H" out of anybody. I try to do things simply.
|
|
| From: Onehair
|
|
|
|
|
|
|
| Date: 23-Dec-17 |
|
I am late to the show but love it. 40-60% ! You must live in the desert. I have never seen it below 80 in my neck of the woods. To close to Louisiana I guess.
|
|
| From: osage
|
|
|
|
|
|
|
| Date: 23-Dec-17 |
|
Not to confuse things, but how does a tillering gizmo work? Is it similar to your straight edge scraper technique with a pencil to mark the high spots? Have never seen one but are they of any value or just another gadget?
|
|
| From: throwback
|
|
|
|
|
|
|
| Date: 23-Dec-17 |
|
This is awesome. Thanks again for doing the build a long Chris, I'm learning a lot.
|
|
| From: badger
|
|
|
|
|
|
|
| Date: 23-Dec-17 |
|
The gismo can be of great value, it really speeds things up and takes the guess work out. Different techniques to using it such as how far do you want it bent when you take your readings etc. They work best on a straight profile bow or at least the area of the limb you want bending the same.
|
|
| From: PEARL DRUMS
|
|
|
|
|
|
|
| Date: 24-Dec-17 |
|
Eric's Gizmo can be handy as well. It works the same as my gap does, except it marks the wood at high spots. This bow could be done using one. I would just have to watch the pencil marks gradually shorten and use some judgment. No different than a straight edge. I don't use one because I don't need to and because I don't like to fiddle around with moving parts when I'm in a tillering mood. If a person isn't good at eyeball tillering, then I would highly suggest trying one. Eric knows the nuances of the tool more than I and will probably be on to explain how he uses it, if he catches these posts.
|
|
| From: Bob Rowlands
|
|
|
|
|
|
|
| Date: 24-Dec-17 |
|
Just opened this thread. Thumb up on this. Thanks PEARL.
|
|
|
|
| From: RonG
|
|
|
|
|
|
|
| Date: 31-Dec-17 |
|
If you are thinking, what a nice bow, go back to the first picture of this post and look at what Chris started with, do you see a bow there. I see fire wood, these folks who make bows out of just about anything are amazing. Great job and Happy New Year!.....Pearl Drums
|
|
| From: Eric Krewson
|
|
|
|
|
|
|
| Date: 31-Dec-17 |
|
Gizmos are great for newbies who haven't developed the "eye" to access proper tiller. Once you know the the proper way to use it it can really help you fine tune the tiller for a perfect bend.
I use mine to 20" with same setting used on both limbs then leave the tips stiff and the fades starting to bed as I reach the final draw length.
The main thing is not to readjust the gizmo until you have already corrected both limbs and the pencil is not marking anymore. Increase your draw and readjust.
The main thing is to believe what the gizmo is telling you, different lighting may make a limb look stiff or weak and show tillering anomalies, the gizmo never lies.
Here is more;
http://www.primitivearcher.com/smf/index.php/topic,61422.msg862 049.html#new
|
|
| From: Eric Krewson
|
|
|
|
|
|
|
| Date: 31-Dec-17 |
|
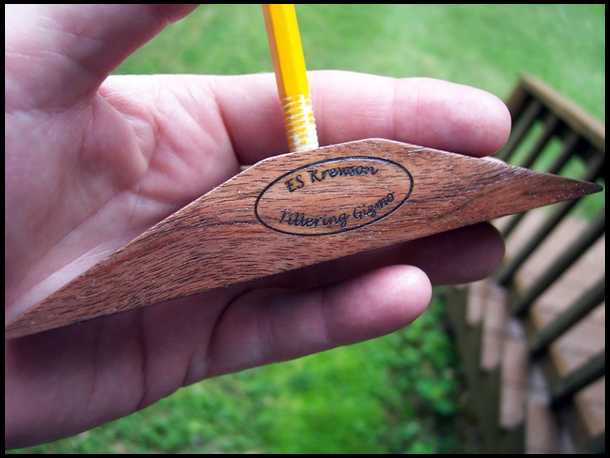
I guess I should put up a picture for those of you who have never heard of this contraption.
|
|
| From: badger
|
|
|
|
|
|
|
| Date: 31-Dec-17 |
|
I started using the gizmo late in life after I had already been making bows for 17 or so years. It can really help to reduce set in a bow and even speed the process up considerably. Like Eric says, you may use it out to 20" or 24" whatever depending on the style of bow you are making. I think a good thread on the gizmo would be in order with those of us who use one chiming in with our own experience using them. I didn't like it at first because I noticed the bows I used it on had some handshock. I just needed to modify how I used it a bit.
|
|
| From: Jeff Durnell
|
|
|
|
|
|
|
| Date: 31-Dec-17 |
|
I think the Gizmo is a useful tool, but there are concerns with its use on staves with irregularities and folks should have a thorough understanding of this prior to taking it to task on them.
|
|
| From: Eric Krewson
|
|
|
|
|
|
|
| Date: 31-Dec-17 |
|
I should also add this disclaimer; No, I don't sell gizmos, they are too easy to make. I have given away over 200 of them and donate some real fancy ones like the one in the above picture to the St Jude auction over at the Trad gang every year.
|
|
| From: RonG
|
|
|
|
|
|
|
| Date: 31-Dec-17 |
|
That is very nice of you Eric, especially for the St Jude Hospital.
|
|
| From: bboaldin
|
|
|
|
|
|
|
| Date: 03-Jan-18 |
|
Hey Chris, any updates? Love following this thread.
|
|
| From: PEARL DRUMS
|
|
|
|
|
|
|
| Date: 03-Jan-18 |
|
Its ready to be finished tillered Bobby, but I haven't been able to spend any free time on it lately. If I can get an hour of peace I can finish it up.
|
|
| From: PEARL DRUMS
|
|
|
|
|
|
|
| Date: 06-Jan-18 |
|
I found last night that magic 90 minutes I needed to tiller this bow in peace. This pic shows the profile before tillering. Its important to always closely watch the bows shape, both braced up and at rest. Look for any abrupt changes, hinges, un-even limb shape from side to side and so on. Watch the bows shape closely. It will always tell you what's going on.
|
|
| From: PEARL DRUMS
|
|
|
|
|
|
|
| Date: 06-Jan-18 |
|
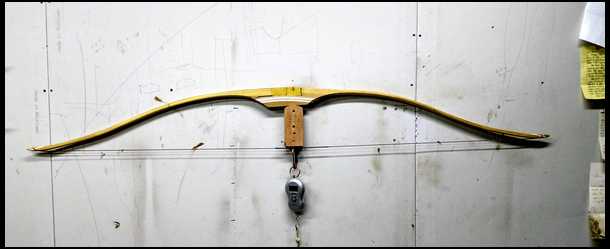
Up until this point I had the bow on a string only tight enough to create tension. This pic shows first brace up near what I believe will be its final brace height. Its a bit uneven, I can fix that and hopefully ya'll can see what I'm seeing. No clues :)
Jeffy, you cant guess. :)
|
|
| From: PEARL DRUMS
|
|
|
|
|
|
|
| Date: 06-Jan-18 |
|
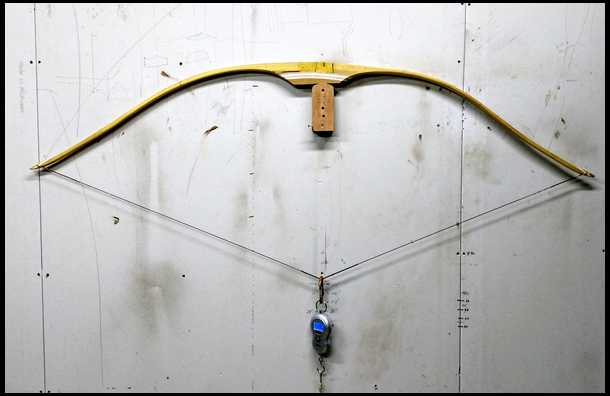
Here it is drawn 18" after a slight correction. The right side twists belly towards and the left limb twists belly away. Little things like that can REALLY challenge the tiller eye. Generally speaking, when a limb twists towards it will look weaker. When a limb twists away from the viewer it appears flat. Trust your straight edge/Gizmo. Neither will lie.
|
|
| From: badger
|
|
|
|
|
|
|
| Date: 06-Jan-18 |
|
Not bad, the string looks to have a little more limb contact on the right side than the left side.
|
|
| From: PEARL DRUMS
|
|
|
|
|
|
|
| Date: 06-Jan-18 |
|
I said its drawn 18", its actually 22". I'm very happy with the shape, the tiller and the draw weight I have left to remove. I like having 5-8# left after the tiller is spot on. It gives me the chance to drop right on the final poundage I'm after. This pic shows the bow at rest after tillering. If you compare it to the first pic I posted today, you will see very little change. I like that. It means every bit of limb is working evenly and that the recipe matches the wood and design.
|
|
| From: PEARL DRUMS
|
|
|
|
|
|
|
| Date: 06-Jan-18 |
|
I'm hoping to rough shape the grip and shoot it in today. Fingers crossed.
Steve the right side looks that way. Its because of that damn opposing twist that was in the billets and because the right has just a fuzz more reflex at the tip. Heat got most of it out, but not all of it. The alignment issue I worked on last installment came out great. The string is right down the middle and the string shows no sign of jumping off.
|
|
| From: Danzn Bar
|
|
|
|
|
|
|
| Date: 06-Jan-18 |
|
Look'n good Chris DBar
|
|
| From: Knifeguy
|
|
|
|
|
|
|
| Date: 06-Jan-18 |
|
Looks good Chris. Looking forward to seeing more. Lance.
|
|
| From: Pa Steve
|
|
|
|
|
|
|
| Date: 06-Jan-18 |
|
Looking really good. Chris, do you tiller a RD bow any different than a straight limbed bow? Is any section of the limb left a little stiffer such as the area near the tips? Also, are the width of the limbs gradually tapered after the fades towards the tips or left parallel after the fades for some distance then tapered towards the tips? I was curious as to how you decide on the dimensions on a particular style bow. Thanks for all the info you have provided along with your build.
|
|
| From: PEARL DRUMS
|
|
|
|
|
|
|
| Date: 07-Jan-18 |
|
Steve, On a mostly straight limbed bow you want the straight edge gap to maintain until the leading end of the scraper gets to about 8-10" from your tip. That's when the gap should nearly be closed, hence stiffer tips. The same cant be said for a bow like this one I'm building. A bow with that much early reflex is already bending a lot just to appear flat. In that situation I'm actually looking for my gap to maintain only 8-10" off the end of the fades. After that I want the gap to gradually and consistently lessen towards the tip until it flattens right out about 12" from the tip. If you can visualize that you will see how that tiller will match the profile of the bow unbraced. What appears flat is actually bending equal to the rest of the limb because its being pulled out of its held reflex.
As far as limb profile, that's a long answer I'll try to shorten up. I like my limbs to be full width in the portion that works the most and every bow is just a little different than the next, however, that is usually the first half of the limb. This particular bow starts to taper to the tips at about mid limb where the reflex starts. I have made and shot bows that had little width taper until they got about 8-10" from the tip, and you know what? They shoot just fine with no more hand shock than any well built bow has. I don't think they look great shaped like a boat paddle, but they can shoot great.
|
|
| From: Arvin
|
|
|
|
|
|
|
| Date: 07-Jan-18 |
|
Pearl that's looking great. I like the caul in the vise. Mine is screwed to my bench. I get a sore neck looking over my caul looking for gaps. Arvn
|
|
| From: throwback
|
|
|
|
|
|
|
| Date: 07-Jan-18 |
|
Beautiful work Chris. I learn something every time I check in, thank you.
|
|
| From: Dry Bones
|
|
|
|
|
|
|
| Date: 07-Jan-18 |
|
Looking good. And waiting on the next step.
-Bones
|
|
| From: PEARL DRUMS
|
|
|
|
|
|
|
| Date: 08-Jan-18 |
|
Thanks a lot guys, I appreciate you reading along. Hopefully it benefits a few of you. Our weather turned from bitter cold to wet and nasty this week. So, I should have a few hours shop time to get my grip mostly shaped and tweak the tiller/balance. I don't use a tiller tree for much after I get it close. After that point the grip gets shaped and the bow is drawn by hand. I want to know it feels good in my hand.
|
|
| From: Jeff Durnell
|
|
|
|
|
|
|
| Date: 08-Jan-18 |
|
Looking good Chris.
???-------->
|
|
| From: PEARL DRUMS
|
|
|
|
|
|
|
| Date: 08-Jan-18 |
|
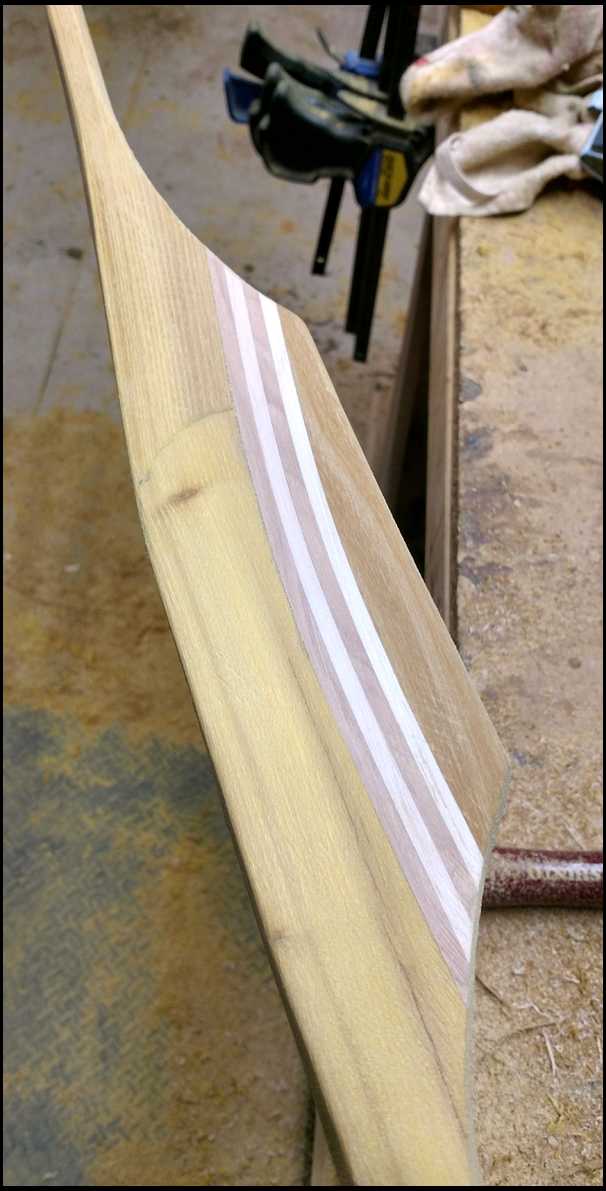
I finished off the tiller. The bow is 51# @ 28". Should finish around 48-49#. Below is a picture of the grip after I cleaned the sides up. I used a half round #49 and a scraper for that job. I like to always clean up to a minimum. Just enough to see good glue lines. I can always take more off later.
|
|
| From: PEARL DRUMS
|
|
|
|
|
|
|
| Date: 08-Jan-18 |
|
For a pistol type grip I use a large off brand USA made half round. I locate exactly where I want the throat of the grip to me and rasp down to a predetermined line. The hog off wood evenly to the heel.
|
|
| From: PEARL DRUMS
|
|
|
|
|
|
|
| Date: 08-Jan-18 |
|
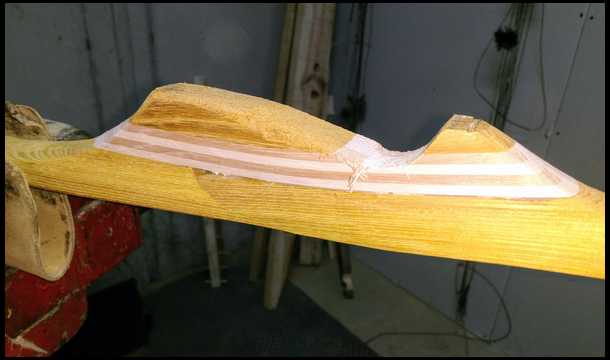
Forgot the roughed in pic I just described.
|
|
| From: PEARL DRUMS
|
|
|
|
|
|
|
| Date: 08-Jan-18 |
|
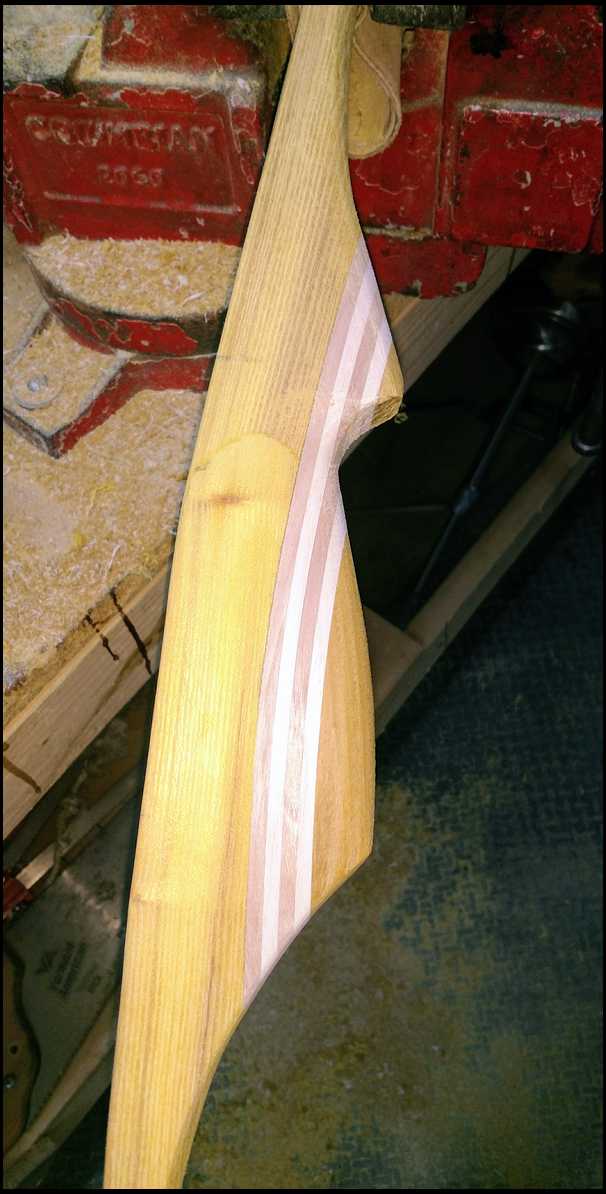
Here it is rounded off and shaped enough to get a good feel while I shoot it and adjust the bow hand balance, if need be. I use my #49 and 50 grit on a rubber block to get to this point. Some scraper use is handy on the passenger side of the grip where it's "dug" out.
|
|
| From: PEARL DRUMS
|
|
|
|
|
|
|
| Date: 08-Jan-18 |
|

I can get 17 yard shots in the basement. I'll shoot it at least a few hundred times while I watch for changes in the tiller, braced shape and un-braced shape. Its also a good time to tweak the grip as I go. Too many times I sealed a bow only to wish I would have adjusted the grip a bit here and there.
|
|
| From: PEARL DRUMS
|
|
|
|
|
|
|
| Date: 08-Jan-18 |
|
Next time I check-in I will show you my way of adding an arrow rest to a self bow.
|
|
| From: RonG
|
|
|
|
|
|
|
| Date: 16-Jan-18 |
|
Thanks Pearl Drums, watching and learning.
|
|
| From: Knifeguy
|
|
|
|
|
|
|
| Date: 16-Jan-18 |
|
Looks better every time I see it. Way to go. Lance
|
|
| From: Bob Rowlands
|
|
|
|
|
|
|
| Date: 16-Jan-18 |
|
Lookin good. Thanks for the photos.
|
|
| From: RC
|
|
|
|
|
|
|
| Date: 16-Jan-18 |
|
Very nice, Chris.
|
|
| From: Archre167
|
|
|
|
|
|
|
| Date: 16-Jan-18 |
|
Thank you for sharing with us. You have some real talents there! Impressive
|
|
| From: bboaldin
|
|
|
|
|
|
|
| Date: 16-Jan-18 |
|
VERY NICE...
|
|
| From: Greyfox
|
|
|
|
|
|
|
| Date: 16-Jan-18 |
|
Beautiful work.
|
|
| From: Mike E
|
|
|
|
|
|
|
| Date: 17-Jan-18 |
|
Yes very nice, thanks for sharing.
|
|
| From: RonG
|
|
|
|
|
|
|
| Date: 17-Jan-18 |
|
Chris,
Thanks on the Wagner heat gun tip, I was looking for a new one and you saved me a lot of research, I looked at four different brands this one was by far the best. I got the 750 model
|
|
| From: badger
|
|
|
|
|
|
|
| Date: 17-Jan-18 |
|
Ron, that Wagner is hard to beat, easy to repair and part readily available.
|
|
| From: George Tsoukalas
|
|
|
|
|
|
|
| Date: 17-Jan-18 |
|
Mighty fine, PD. Enjoyed the buildalong. Jawge
|
|
| From: PEARL DRUMS
|
|
|
|
|
|
|
| Date: 17-Jan-18 |
|
Thanks a lot guys. I'm glad you are enjoying it and some of you are learning a bit here and there. I learn a little something every bow myself.
Ron I have only used Wagner guns. This is my 3rd. I cant complain as I'm getting near 300 bows built and that's a lot of run-time.
Hopefully I will have a few minutes to add an arrow rest this weekend. It needs shot a lot more before I sand and seal it.
|
|
| From: PEARL DRUMS
|
|
|
|
|
|
|
| Date: 27-Jan-18 |
|
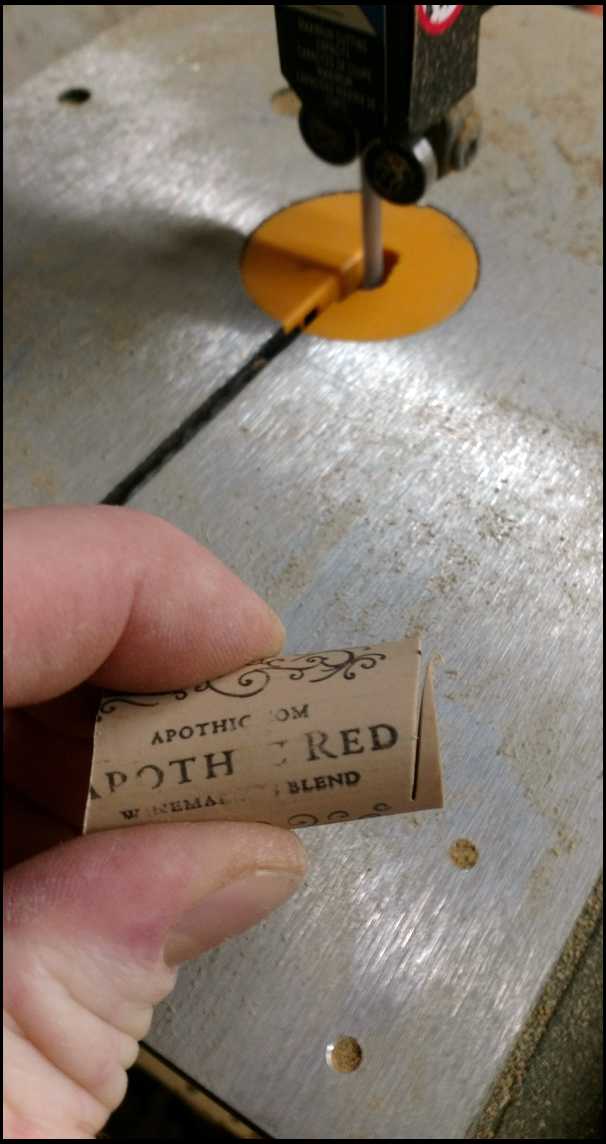
Finally got some time to attach an arrow rest. I make bows in various styles. But my serious shooters get a pistol grip and rest. The following pics show how I make one from foam wine corks.
|
|
|
|
| From: PEARL DRUMS
|
|
|
|
|
|
|
| Date: 27-Jan-18 |
|
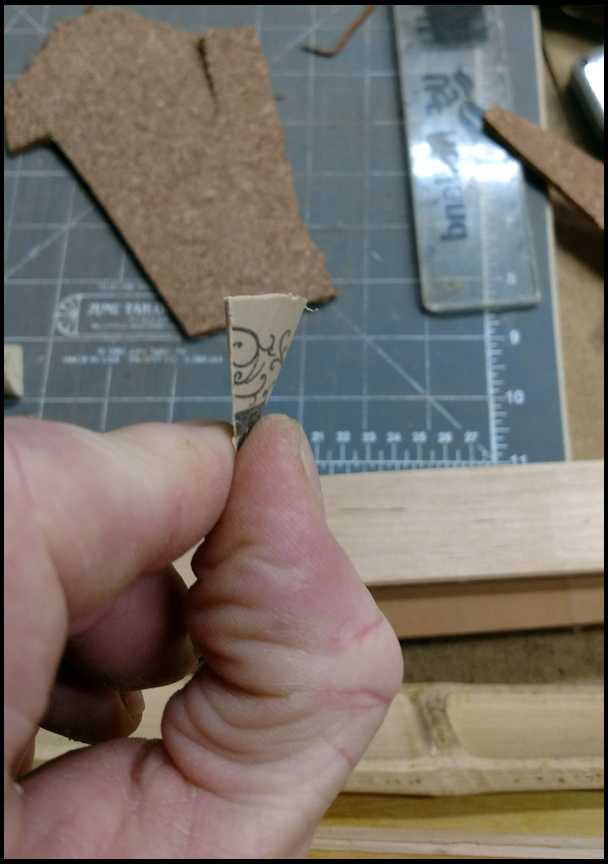
And the finished product. Next step is to glue in it place with loctite pro.
|
|
| From: Dry Bones
|
|
|
|
|
|
|
| Date: 27-Jan-18 |
|
HA, That's genius. I always thought there had to be another use for those foamy things. Now I know of at least one more. They make good concentration points on targets too. Looks good, any thoughts on the draw weight as of now?
-Bones
|
|
| From: throwback
|
|
|
|
|
|
|
| Date: 27-Jan-18 |
|
Beautiful Chris and thanks again for the schooling.
|
|
| From: PEARL DRUMS
|
|
|
|
|
|
|
| Date: 28-Jan-18 |
|
It is going to end up at 48#, bones. Perfect for me. Most of the sanding is done. I like to finish down to 0000 steel wool when i use an oil type finish. 220 grit is where I stop if I use a rattle can finish. This bow will be finished with a lemon oil-bees wax concoction. I will rub in 5-6 coats of it, then follow it up with 5-6 coats of Johnsons paste wax. Its not as water proof as a poly, but it makes the wood look amazing and quite frankly, I dont hunt in down pours or rain forests and have never had to refinish a bow due to weather damage.
|
|
| From: Paul@thefort
|
|
|
|
|
|
|
| Date: 28-Jan-18 |
|
Chris, Hand built bows and arrows. The sweet smell and feel of wood in one's nose and hands. The sculpting and formation of an object into a tool. Motivation for sure to build skyscrapers as well as a bow. A masterful combination of talents you have. I have enjoyed the process very much and looking forward to seeing the end results. my best, Paul
|
|
| From: PEARL DRUMS
|
|
|
|
|
|
|
| Date: 24-Feb-18 |
|
Just a heads up. The bow is doing well, I just had to veer away from it for a bit. Ill have it wrapped up in a week or so.
|
|
| From: Knifeguy
|
|
|
|
|
|
|
| Date: 24-Feb-18 |
|
What an inspiration. Thanks and I'm looking forward to see it when you have it finished. Lance
|
|
| From: Bob W.
|
|
|
|
|
|
|
| Date: 24-Feb-18 |
|
Excellent build Pearl! Your absolutely right about shooting and adjust the grip before sealing, I'm still going back and adjusting grips and narrowing tips or taking a little more off the outer third yada yada, it also saves on sandpaper and your finish of choice.
|
|
| From: fdp
|
|
|
|
|
|
|
| Date: 24-Feb-18 |
|
Good Looking bow PD. I though I was the only one using wine corks though. :)
|
|
| From: Bjrogg
|
|
|
|
|
|
|
| Date: 06-May-18 |
|
Very good build along Chris. I've started to do a build along a couple times and it sure does complicate the whole process trying to take pictures and document everything. Know that taking a picture with your nose shot. I think it's as much or more work than building a selfbow. You did good. Thanks for taking the time to share your experience with everyone. Bjrogg
|
|
If you have already registered, please sign in now
For new registrations Click Here
|
|
|
|