Hey fellas. This is feedback on EasyWay Duracoat kit… and lessons learned from painting ILF limbs. I see that painting of limbs has been addressed a few times but this one focuses on duracoat and the Easyway kit.
The bride AND kids are out of town for two weeks and so… I decided to paint my Black Max limbs. I used the Laurer Custom Weaponry EasyWay duracoat kit (I’m not affiliated with… with anybody). The kit is 74 bucks on Amazon. There’s a YouTube video that’s very explanatory on how to use the kit. https://www.youtube.com/watch?v=RFn0NaHcavc&t=874s
Watch the it once with your kit in front of you and you’ll have it. The kit probably can be used several times. That said, I would recommend breaking out all your projects and knocking them out during one session. One set up, one clean up. When you order the kit you get to pick which pattern (stencil) and color combination you want. They didn’t really have the color combinations I wanted so I got the closest one and went with that. Getting started. I had previously done the ol’ laundry bag spray can job on my black limbs. The reducer and the little scrub sponge in the kit took that old paint right off. I had ordered a Kryptek stencil set and did that one first. I painted all four limbs desert tan. There was plenty of paint for the job. I did three coats. Lesson learned – even if it takes a while – spray light, let it dry, spray light, repeat. I got a small run on my first limb trying to coat it too thick. I quick dabbed it and it was okay. Once I figured that out – no problems. Putting the Kryptek stencil on the limbs was not a super easy task. That said the stencil material is tough (vinyl) … so when you peel it off the stencil can stick to itself and wad up. That said, it didn’t tear when I would have to un-peel it from itself. You had to really pull it and try to tear it. Montactical has a good video on how to both use the stencil AND spray duracoat.
https://video.search.yahoo.com/search/video;_ylt=A0SO8y1tOXVZzwgAYF1XNyoA;_ylu=X3oDMTE0OG5ubWFiBGNvbG8DZ3ExBHBvcwMxBHZ0aWQDQjQwMzdfMQRzZWMDcGl2cw--?p=duracoat+kryptec&fr2=piv-web&fr=yfp-t#id=1&vid=dcd65ab455c8e51e44c1ad056ba83a1e&action=view
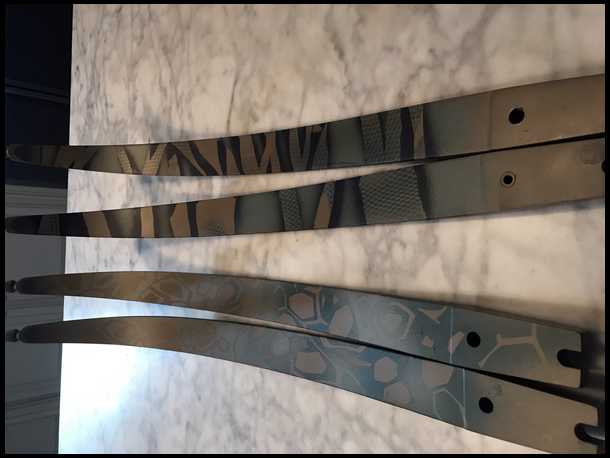
For the Kryptec pattern to show up you need two things – one is a larger surface area and two is more contrasting colors. I had what I had for colors. So like I mentioned, I did tan base. Then put on the stencil, then did green, took about half the stencils off, then did light green and took the rest of the stencils off. You can see how it turned out – not too exciting. While I was looking though youtube for help-clips I saw one called “DIY Riptile.” Montactical came up with this I think – and they do sell a stencil. I didn’t have the stencil but I did have masking tape. After going through the project I think blue painters tape would be just as good or better. The edges look better if they are torn (rough) vs. cut with scissors. Anyway – for this one I tan coated the entire limbs with desert tan base. The instructions in the video suggested using nylons to “rough up the look.” I used a laundry bag. If I do it again – I will skip this phase OR I’ll use nylons! I didn’t think the green laundry bag pattern turned out that well. After that I taped the pattern, tearing the tape to keep the edges rough. Then green. Then black. Then take the tape off.
Doing it again – I probably won’t do the Kryptek. My pattern didn’t really turn out Kryptekey. I’m sure someone with more skill could do it. Also next bow my plan will be to paint coat with louder colors. Was thinking about rust red near the riser and then fade to yellow at the tips. Something that lets the deer know you’re a hunter with swag. Back to the kit. I was worried that the little air canister wasn’t going to last. It did. It sprayed the paint way better (finer) than a spray can does. My final take is – if you like the color combinations offered – the kit delivers. Also – if you just have ONE project the kit’s the way to go as well. You can buy paint in almost any color under the rainbow. The problem is (and this is why I didn’t) they don’t sell individual colors in 2 oz bottles – they only sell it in 4 oz… which is a lot of paint. And it just wasn’t worth the extra cost for me. I’m sure you can get 2 oz. duracoat from somewhere – I was just scared to mix kits or brands etc. I knew everything in the kit would work. Hope this helps – good luck.