| From: RonG
|
|
|
|
|
|
|
| Date: 02-Mar-17 |
|
Well folks, you know that my red oak board bow broke near its completion.
So I have a Hickory stave that Jeff Durnell sent me.
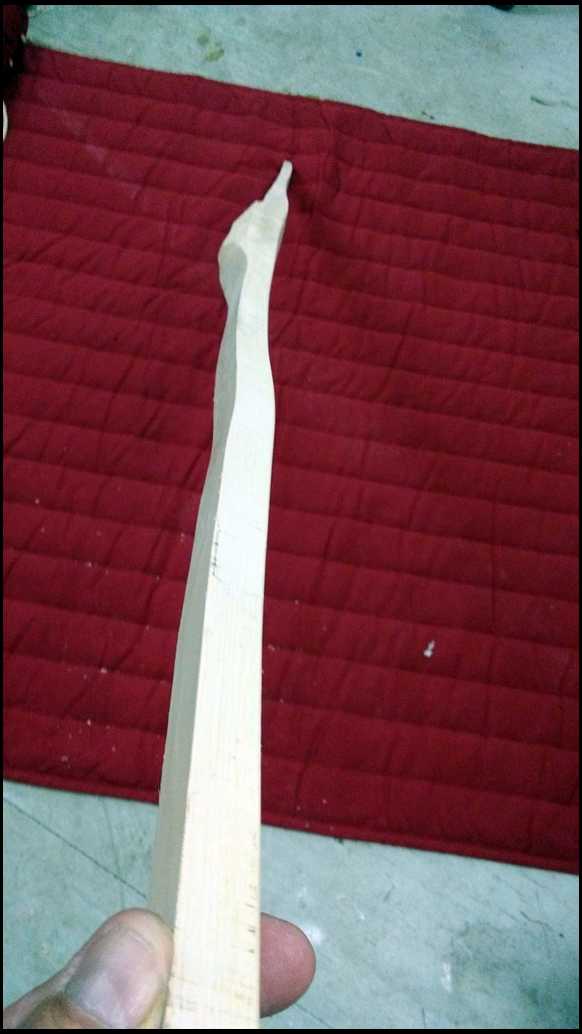
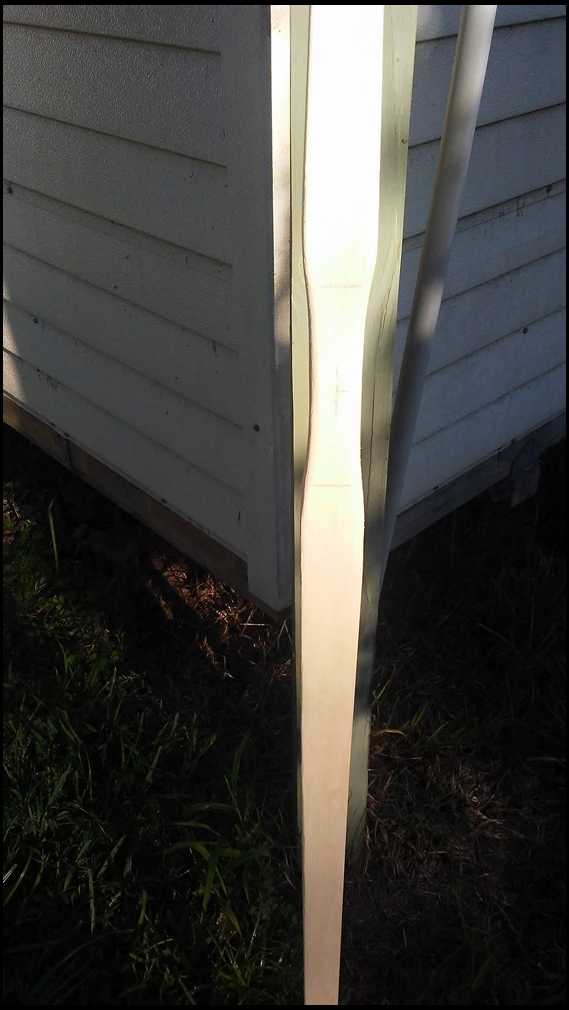
I was debarking it with my draw knife and doing well I thought, was cutting the inner bark layer off and the knife must not have been sharp enough as it tore out a chunk of wood, about five growth rings....(OUCH!!!!!)
I am in the process of removing those rings and get to a usable layer, Jeff was kind enough to offer to send me another, but I refused explaining that I messed it up I will try to use it.
I will post picks when I get to a usable layer and start shaping and tillering, thank you all for your support.
By the way when that happened, I'm glad I don't cuss....Ha!Ha!
|
|
| From: PEARL DRUMS
|
|
|
|
|
|
|
| Date: 02-Mar-17 |
|
Well Ron, I always say oak makes great trim and cabinets :)
Glad you started on a stave. Worse case, you can always slap some rawhide on it if the ring issue isn't solved.
|
|
| From: MStyles
|
|
|
|
|
|
|
| Date: 02-Mar-17 |
|
Hickory is tough and forgiving. Where on the stave did you take out a chunk?
|
|
| From: Jeff Durnell
|

|
|
|
|
|
|
| Date: 02-Mar-17 |
|
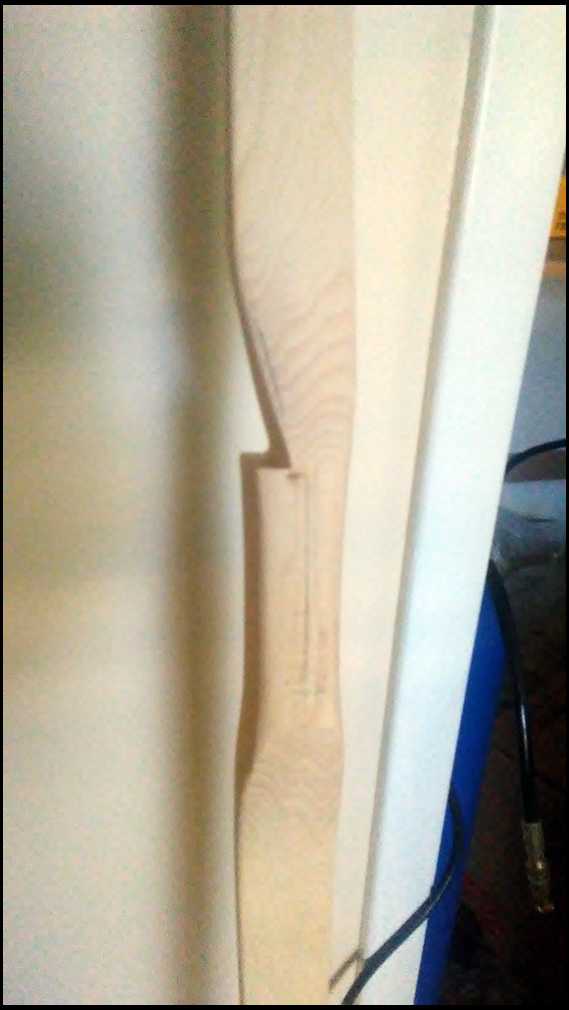
He showed me pictures a few days ago. The deepest part of the violation is off to one side, fairly isolated, and he has a little width to play with. If it were me, I'd drawknife down until I loosely revealed the 3rd ring end to end, lay it out toward the good side and see if I could avoid the oops in that limb. If so, clean up the remnants of ring #2 with a scraper. If not, I'd go down one more and try again, and so on, until I found a good back for the bow. Still a good selfbow in there.
Bringing a winter-cut hickory stave to a single unviolated ring, the FIRST ring, the first time, by a first timer without someone over his shoulder? ..isn't a cakewalk. Don't sweat it Ron. It's easy enough to do. I know seasoned bowyers who would find issue with it. This is a good exercise for you. It'll pay off.
|
|
| From: Jeff Durnell
|
|
|
|
|
|
|
| Date: 02-Mar-17 |
|
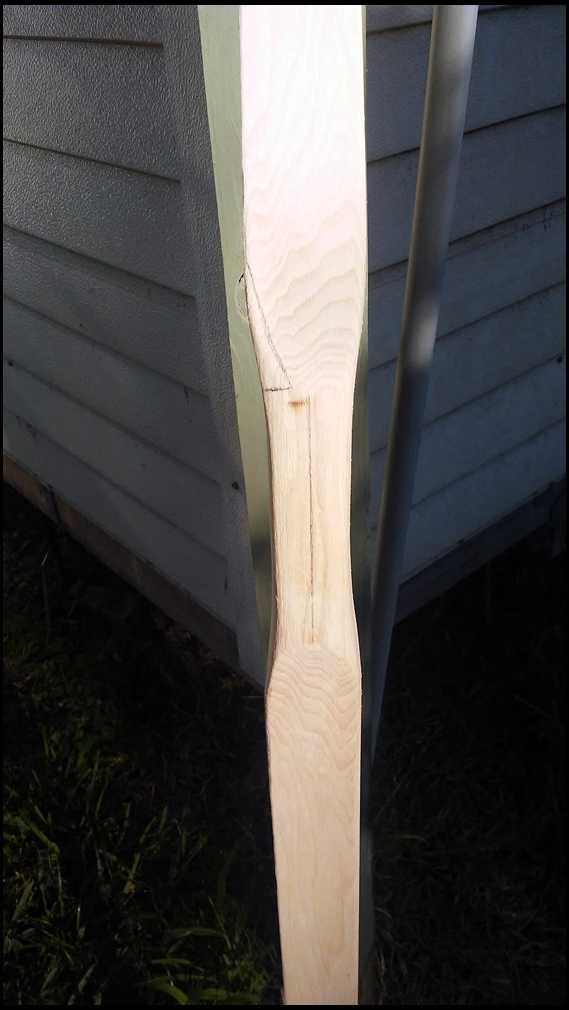
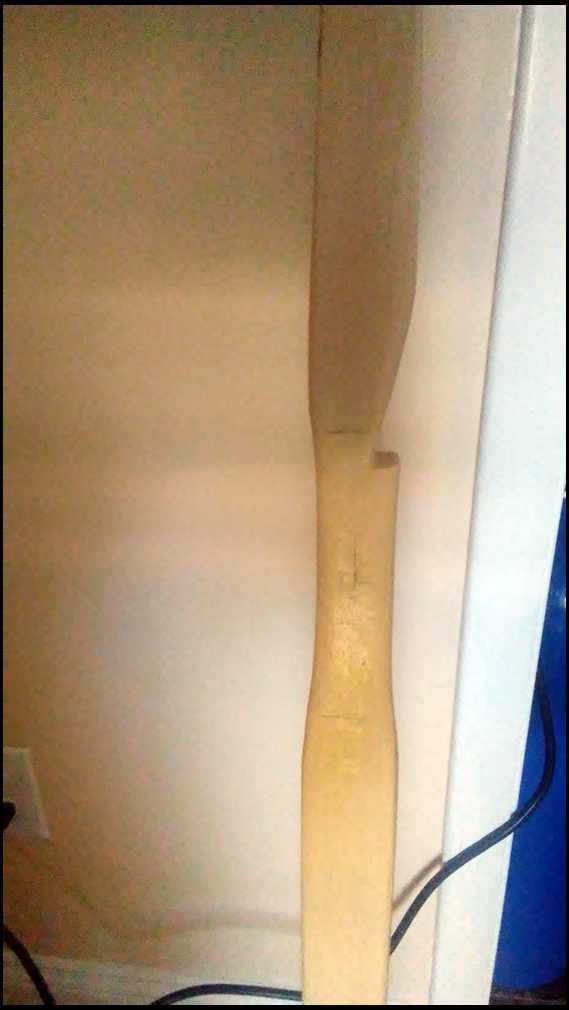
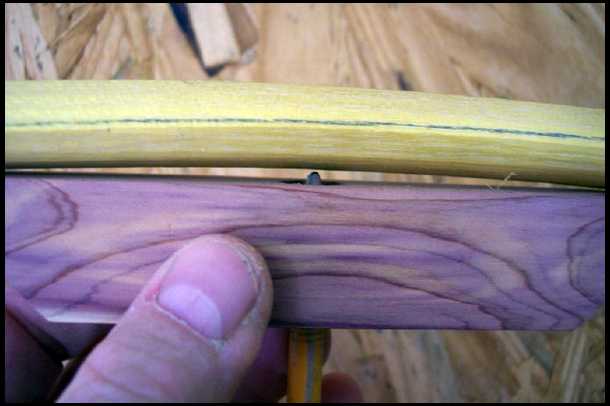
I dug up a picture. Looking at it now, I would initially try to make ring #4 the bow's back, laying the bow out to the right side... go to #3 relatively quick, finessing #4 with a gooseneck scraper because these staves do have quite a bit of shallow ridges and valleys in them.
This area is approximately midlimb.
|
|
| From: Steve Milbocker
|
|
|
|
|
|
|
| Date: 02-Mar-17 |
|
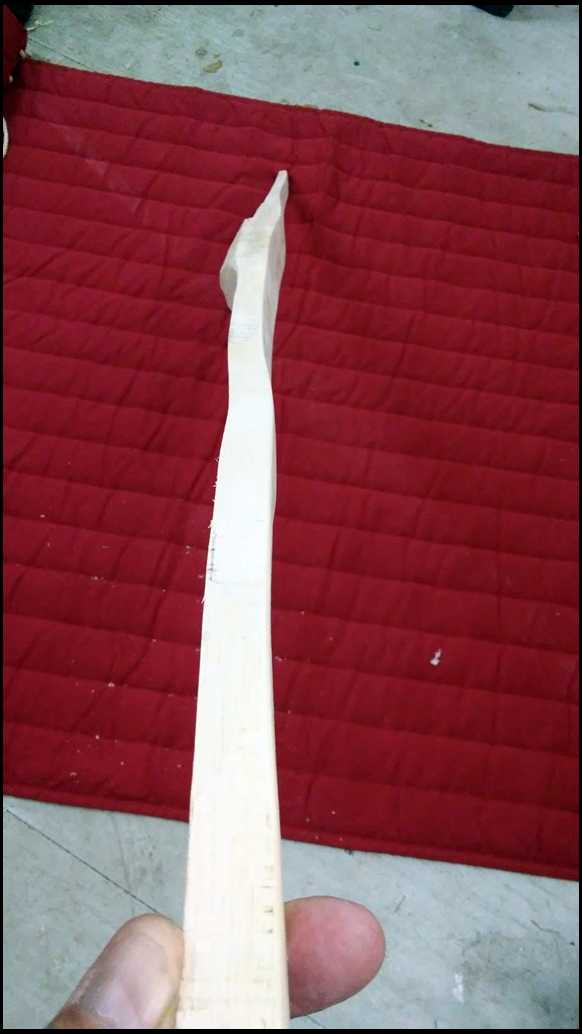
Looks like chatter from the draw knife runner
|
|
| From: RonG
|
|
|
|
|
|
|
| Date: 02-Mar-17 |
|
It's my spoke shave, the weight of the tool is not heavy enough to cut without chatter. That piece tore out and I tried to clean it up with my spoke shave so I could see how deep it was.
Runner, I'm pretty tough for a 70 year old I can still throw double bit axes, easily throw 80lb bags of salt over my shoulder and screw up hickory staves.....LOL!
|
|
| From: Jeff Durnell
|
|
|
|
|
|
|
| Date: 02-Mar-17 |
|
Ron, I wouldn't use the spokeshave much, if at all, on this stave, but when you DO run one on a stave, varying angles of the tool to the workpiece after several passes will help eliminate the washboarding effect. Sometimes you may even have to pick up a rasp or coarse file to smooth things out a bit, then continue with the spokeshave... blade set for very shallow cut. But usually, changing the skew angle of the tool is enough.
|
|
| From: RonG
|
|
|
|
|
|
|
| Date: 02-Mar-17 |
|
What I have figured out is to use a sureform rasp lightly and follow up with 80 grit sandpaper, when I get close to the last ring I will convert to my cabinet scrapers, I have one that is my favorite.
After I file it and run a steel over the edge that rascal will hold that edge for 1000 scrapes and it will peel off a piece of wood like a hand plane.
I have never had one quite like it.
If this is not the way to do it please let me know.
I even had trouble with the spoke shave on the red oak bow, it just isn't heavy enough, cheap junk.
Thanks for the help guys, I am learning, hopefully faster because this is a lot of work for not accomplishing anything..Ha!!Ha!
|
|
| From: George Tsoukalas
|
|
|
|
|
|
|
| Date: 02-Mar-17 |
|
Take your time, Ron. You can do it. Some of those rings look tiny. I don't think the surform is the right tool. Not enough control. Do you have a rasp? Get to the ring above it and then use a scraper. For years I used an old meat cleaver as a scraper. Jawge
|
|
| From: RonG
|
|
|
|
|
|
|
| Date: 02-Mar-17 |
|
Will do Jawge, Thank you.
|
|
| From: RonG
|
|
|
|
|
|
|
| Date: 12-Mar-17 |
|
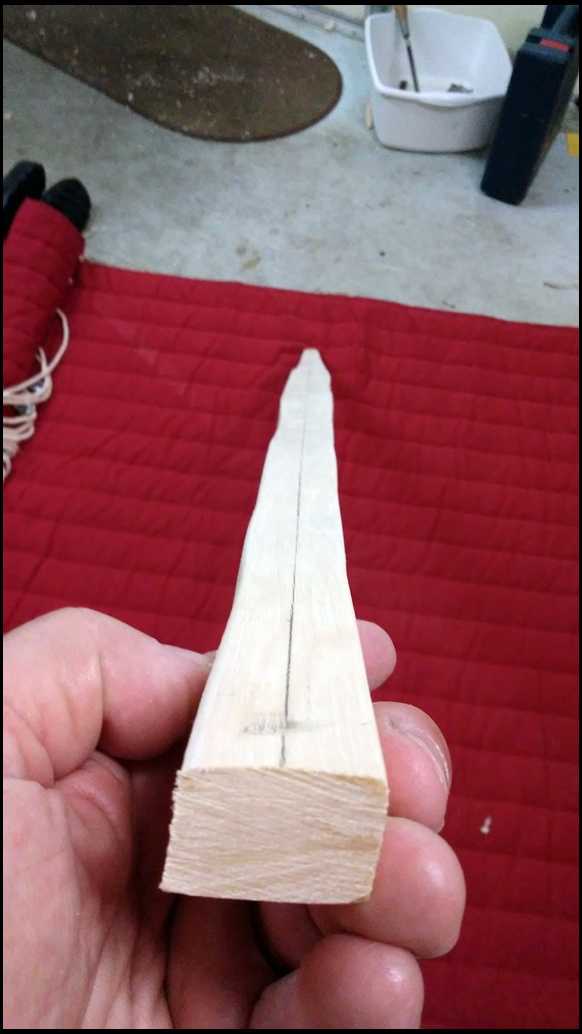
Ok folks, I have scraped on my messed up hickory stave and the wood looks the same all over I have some grooves from the scraper, but don't see any brown rings, do I sand it down smooth and check again before shaping the belly?
What if I haven't gone far enough, will the bow split when I try to flex it?
Thank you for your time and help.....RonG
|
|
| From: RonG
|
|
|
|
|
|
|
| Date: 12-Mar-17 |
|
I also meant to ask if I'm not certain about the growth rings should I just put a backing on the bow?
Thank you again for your time and help RonG
|
|
| From: H Rhodes
|
|
|
|
|
|
|
| Date: 12-Mar-17 |
|
I would say sand it smooth and start roughing it out. Hickory is very tension strong and will usually handle some ring violations if you aren't shooting for some extreme design. How long is your stave and what draw weight do you have in mind? Once it is sanded smooth, you will be able to see what kind of shape your bow's back is really in. Then you can make a more informed decision on whether to back it or not.
|
|
| From: RonG
|
|
|
|
|
|
|
| Date: 13-Mar-17 |
|
Howard, the bow should be 68 inches minimum could possibly get 70.
Just a standard longbow, hopefully will be my first successful in many years. I broke two, a yew and a red oak board bow.
I'm shooting for 45lbs.
|
|
| From: H Rhodes
|
|
|
|
|
|
|
| Date: 13-Mar-17 |
|
Those dimensions sound reasonable to me and unless the back is pretty badly violated, I bet she will hold together without a backing. Good luck with it. A good piece of hickory is hard to beat.
|
|
| From: MStyles
|
|
|
|
|
|
|
| Date: 15-Mar-17 |
|
My favorite rasp, the Nicholson Magic cut Rasp.
|
|
| From: RonG
|
|
|
|
|
|
|
| Date: 30-May-17 |
|
I meant to thank you guys for your help and expertise, shortly after I started this bow I had some family medical problems and that took all my time, then I became very tired and my cardiologist said that my heart was beating way too slow that we need to do an ablation or change meds, I go in for a 5 hour nuclear stress test this Friday, we will see if I can continue with my bow making.
Mike, thanks for the info on the rasps
|
|
| From: mangonboat
|
|
|
|
|
|
|
| Date: 31-May-17 |
|
Get the heart back on track..the stave will wait for you!
|
|
|
|
|
|
| From: ranger3
|
|
|
|
|
|
|
| Date: 31-May-17 |
|
Take a pair of scissors apart, they work great for scrappers.
|
|
| From: wmb238
|
|
|
|
|
|
|
| Date: 31-May-17 |
|
Hey Ron, I'm praying for you. I live right up the road in Daytona Beach, and I'm retired. Let me know if there's something that I can do for you. Martin
|
|
| From: RonG
|
|
|
|
|
|
|
| Date: 31-May-17 |
|
Thank you Gentlemen, your concern is overwhelming, Thank you for your prayers that makes me feel a whole lot better because I know they work. Martin, Thanks brother, I should be alright, I hope! my cardiologist wants to get a view of everything and proceed from there. He might be able to take care of it with a heart ablation or possible med change, I have been on the minimum dosage for many years so going up is a good possibility. Thanks again for the support and will let you know when I do.
Sincerely Ron G
Ranger3, that is a great idea, scissors are stiff and you can probably control them better than a cabinet scraper on a flat surface.
|
|
| From: RonG
|
|
|
|
|
|
|
| Date: 02-Jun-17 |
|
MStyles, I just ordered a Nicholson Magic cut Rasp last night, I like the looks of it, should help with my shaping.
I went for my nuclear stress test and 10 minutes in, my heart beat half pulses, it wasn't pumping enough to keep me conscious at the rate I was walking, the technicians got a hold so I wouldn't fall and stopped the machine. I did recover fairly quickly and they proceeded with the rest of the test which was just a scan. I am totally exhausted, will take it easy this weekend probably finish up a couple arrows, should know within a couple of days what the results will be. I should be alright, I think my doctor will do the right thing and I will be here making bows. I may do another Hickory just for practice and then maybe an osage, then a Yew. I'm going to start doing my arrows in the semi primitive style also just to see if I like them. I wish I had started this earlier in life, I really like doing this stuff as a lot of new self-bow makers are finding out.
Thank you for your interest and help to us new guys.....RonG
|
|
| From: RonG
|
|
|
|
|
|
|
| Date: 05-Jun-17 |
|
Gentlemen, since I'm going to install a rawhide backing on this Hickory bow do I still need to leave the back of the bow wavy or can I just go ahead and make it symmetrical, flat or what ever term I need to use, or should I still follow the grain.
Thank you for your help.
I went for my tests Friday and haven't heard yet, so I guess they are working up the courage to tell me or I may live for a little while yet........LoL!!!!!....Regardless I'm working on my bow until I get the word.
I was surprised with this Hickory, I have never worked hickory before, when I drew my draw knife along the length it actually pulled out a chunk about a quarter of an inch deep and six inches long.
I have never seen hard wood do this, it pulled a chunk out like balsa wood, is this normal for Hickory, it was like the wood was punky or lacked a grain.
I did the same with a small block plane that was beyond razor sharp and it did the same thing, so I need to use a coarse wood rasp and scraper to shape this bow.
Congratulations to Kwikdraw on his finished bow......RonG
|
|
| From: PEARL DRUMS
|
|
|
|
|
|
|
| Date: 05-Jun-17 |
|
I don't use a draw knife for anything but right chasing. Its a slippery slope trying to remove bekky wood with it. It requires a lot of experience and feel to keep it from tearing big chunks out. A heavy duty rasp is best.
Keep the back as is, don't do anything to it. The damp rawhide will finds its way into all the dips and divets.
|
|
|
|
| From: PEARL DRUMS
|
|
|
|
|
|
|
| Date: 05-Jun-17 |
|
That is supposed to say ring chasing and belly wood, sorry.
|
|
| From: RonG
|
|
|
|
|
|
|
| Date: 05-Jun-17 |
|
Thanks Pearl Drums, I have the back of the bow sanded very smooth so I will start on the front to shape it. Of course I will rough it a little before I install the hide.
I received my Nicholson magic cut rasp in the mail today, wow!! it should do the job in a hurry I will use it till I get close enough for using a scraper.
Jeff Freeman (bodymanbowyer) sent me some rawhide to back it with, what a great guy.
Thanks everyone. RonG
|
|
| From: RonG
|
|
|
|
|
|
|
| Date: 08-Jun-17 |
|
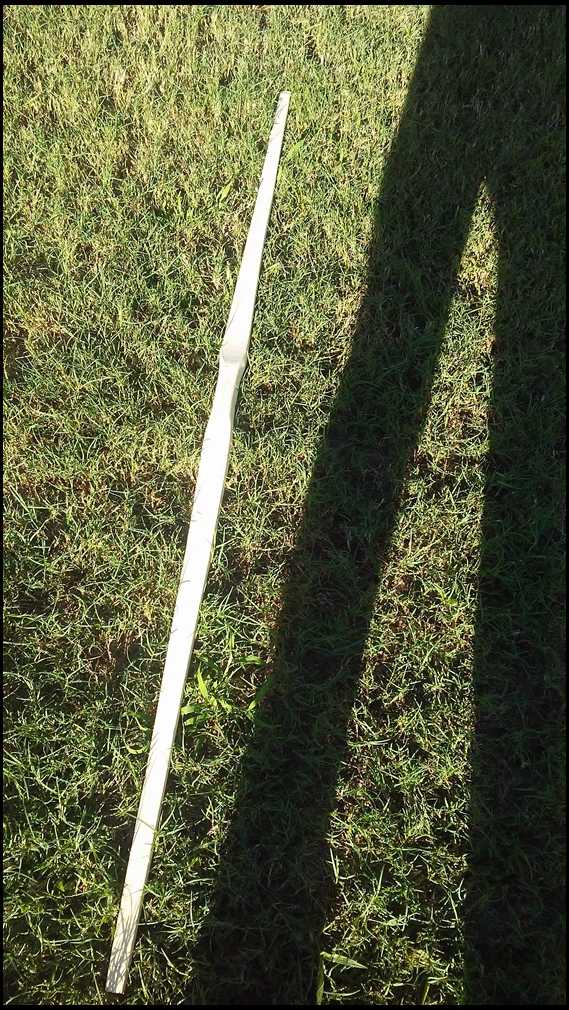
been working on the hickory, a lot of wood to remove, this is going to be one lumpy bow.....LOL!
I have the tips lined up pretty good over the grip, but the limbs go in all different directions, I'm trying to maintain the limbs parallel through the length, if I'm doing it wrong, another lesson under my belt.
I'm using my draw knife turned up 90 degrees to the wood and used as a scraper, this really curls off a nice smooth layer of wood.
I will send pictures sometime today as soon as I'm able to get to the out building.....Rain.....
|
|
| From: RonG
|
|
|
|
|
|
|
| Date: 08-Jun-17 |
|
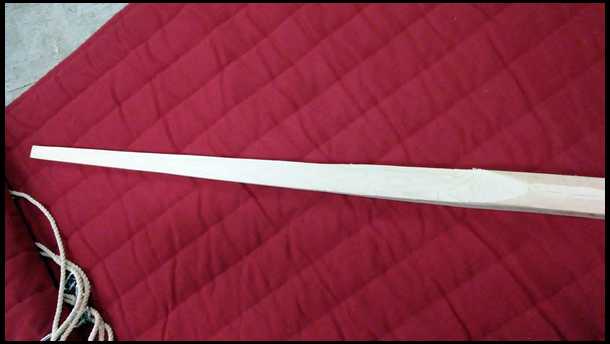
Got wet, but got some photos, it's difficult to tell the wood is so white you can hardly tell what you have.
|
|
| From: RonG
|
|
|
|
|
|
|
| Date: 08-Jun-17 |
|
|
|
| From: RonG
|
|
|
|
|
|
|
| Date: 08-Jun-17 |
|
|
|
| From: RonG
|
|
|
|
|
|
|
| Date: 08-Jun-17 |
|
|
|
| From: RonG
|
|
|
|
|
|
|
| Date: 08-Jun-17 |
|
|
|
| From: RonG
|
|
|
|
|
|
|
| Date: 08-Jun-17 |
|
|
|
| From: RonG
|
|
|
|
|
|
|
| Date: 08-Jun-17 |
|
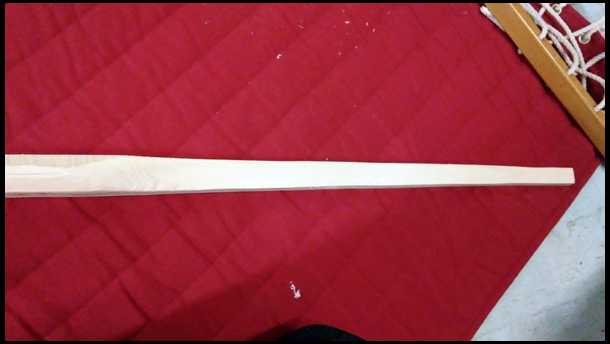
The bow is 70" and I had to move the grip over to center on the tips that is why the grip looks a little rough at this time, not really trying to get a grip on it....pun intended.
The farthest limb on the fourth and fifth photo's looks like it is real thin, but that is just a optical illusion. Got plenty to remove yet. no more tapering, will work on thickness until I can floor tiller it, obviously it is way too thick to even attempt to bend it.
I tapered the limbs according to Jawges web site on hickory bows and went a little wider than called for, you can't see the taper in the last photo, but you can see it in the first two, that is why photo's are misleading. Trying to follow the grain as far as the thickness, working the thickness so I can floor tiller.
If I'm doing anything wrong please, someone let me know....Thank you, Ron the stave destroyer.
|
|
|
|
| From: RonG
|
|
|
|
|
|
|
| Date: 08-Jun-17 |
|
Wow Jeff, didn't expect an answer so fast, thank you buddy.
Between going to the hospital for testing and the doctors office for me and my wife, plus our daughter is on her third treatment of radiation and chemo. I am having a difficult time concentrating on this, but I'm determined, I have learned a lot by taking a break and watching other folks do their bows.
Now I will take a pencil and mark a taper in the side following the grain so I can follow this down so I won't go so far.
Thank you Jeff.
|
|
| From: Mountain Man
|
|
|
|
|
|
|
| Date: 08-Jun-17 |
|
Looking good Ron!
Prayers for the family too brother
|
|
| From: Jeff Durnell
|
|
|
|
|
|
|
| Date: 08-Jun-17 |
|
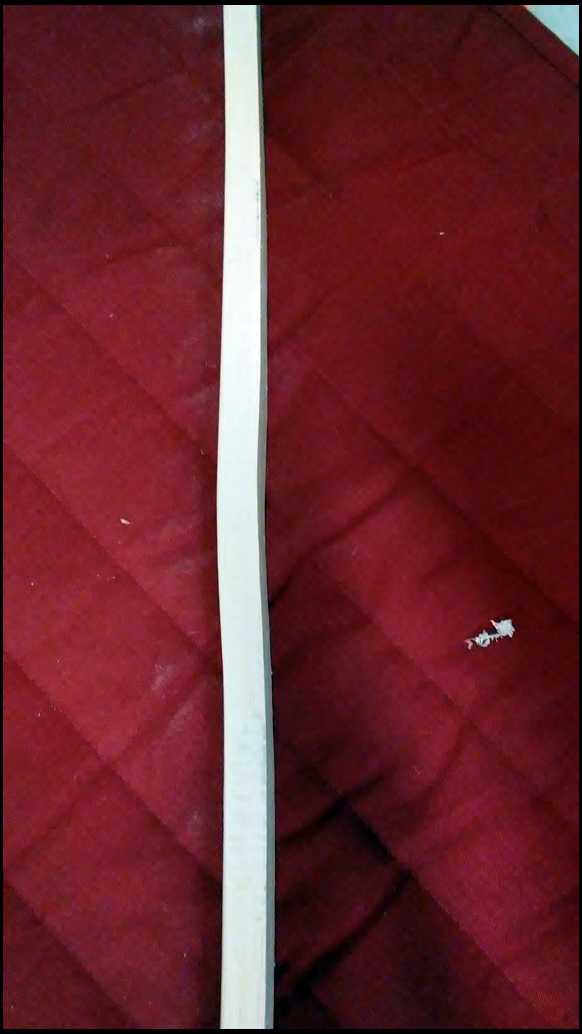
Ron, I probably don't have to tell you, but sometimes bow making/woodworking can be a welcome distraction from life's trials. In those times when you're 'one with the wood' all else melts away. Such moments of therapy help us maintain our mental fortitude, on which we and our family members rely. Wishing you all the best with your family's health.
About the bow. It's always difficult to make concrete determinations by way of pictures here, and it may be an optical illusion, but do you see in your last picture looking down the bow's back? ...how the sides/edges look wavy? I don't know if it merely seems that way because of the humps and dips rising and falling on the back, or because the sides indeed aren't straight. But from where you're at now, I always bring the sides/width profile to very accurate dimensions, sides perfectly straight if indeed it's a straight sided bow, BEFORE lines are scribed down the sides in order to expedite thicknessing or thickness tapering. Otherwise, your thicknessing won't be accurate. It saves backtracking and tillering struggles down the road. Just something to check or keep in mind.
p.s. I'm thinking it might be the camera angle because it looks better in some of the other pics.
By the way, you're doing a good job maintaining a consistent thickness following the undulations of the back.
|
|
| From: RonG
|
|
|
|
|
|
|
| Date: 08-Jun-17 |
|
Jeff, I think it's the way the back rises and falls to keep with the grain, if you look at the last picture the limb looks like it has no taper, but look at the first two and you will see the sides are straight and tapered.
I know it's difficult to tell by photo's, I will check the sides and make sure they are straight before continuing.
I did a lot more tonight I reduced the limb thickness down about an eighth of an inch another two nights and I should start floor tillering, when I get to that stage Jawge told me that I need to go ahead and put my rawhide back on before I continue.
Yes Jeff, when I get involved scraping off wood I think a tornado could go by and I wouldn't notice.
I hope I'm going about this correctly the tips are 1 inch wide and the limbs at the fades are 2.25 inch wide should I do something different, I'm looking for a 45 to 50 lb bow, I would guess it's at over 100 lbs now it's pretty darn stiff.
This one is difficult to explain, but to maintain equal thicknesses the front side of the limbs are angled off from the handle cutout, after I get the limbs equal thickness across the face I will have to change the angle of the grip, not a problem I have plenty of wood to do that with.
By the way we got the wife's results and she is fine no sign of any cancer, our daughter is progressing fine as could be expected and I haven't heard about my heart condition, either they are flipping coins for who is going to tell me, or I will be fine for a while yet.....Ha!Ha!
Thanks Mountain Man.
|
|
| From: George Tsoukalas
|
|
|
|
|
|
|
| Date: 08-Jun-17 |
|
Ron, looks like you are well on your way. It's all about the journey. Jawge
|
|
| From: RonG
|
|
|
|
|
|
|
| Date: 09-Jun-17 |
|
Thanks Jawge, I'm kind of taking advise from everyone who will give it, so I feel very confident with this one even though I have to put a backing on it, I still had to scrape out a bow from a stave and to me that is a self-bow even though I tore out a chunk to reveal five layers of rings, the wood is so white I lost track of chasing the rings, that is the reason for the backing as Pearl Drums suggested. If it wasn't for you folks I would not have gotten this far.
Thank you everyone and I will continue.....Ron
|
|
| From: RonG
|
|
|
|
|
|
|
| Date: 13-Jun-17 |
|
Hey guys, I'm still here, taking me longer than I expected, these limbs are a little weird, I could cut off a lot with a saw and save time, but I don't want to take the chance of cutting too much so I will just keep on shaving a little at a time until I get it. it's looking good, can't wait to shoot it.
I tried to find a moisture meter around these parts, but no one had one will have to order from Amazon, until it gets here no flexing of limbs.
Jeff, I straightened up the sides a little, most was optical illusion, but not all.....Thanks.
|
|
| From: Ghost308
|
|
|
|
|
|
|
| Date: 13-Jun-17 |
|
Next time don't use anything sharp to remove the bark, just drive a old screwdriver in to the end between the bark and the wood the bark will pop off real easy.
|
|
| From: Jeff Durnell
|
|
|
|
|
|
|
| Date: 13-Jun-17 |
|
Ghost, no it wont. That bark was on tight. It was on tight when I cut it in late winter last year and got even tighter and harder as it dried since. It's not when I would choose to cut hickory, but I couldn't pass it up.
|
|
| From: George Tsoukalas
|
|
|
|
|
|
|
| Date: 14-Jun-17 |
|
RonG, I use my moisture meter all the time. I have the Mini LIgno. it is a pin type which just gives surface readings. I just keep using it right to the stave's first stringing which gets around that.
3Rivers (sponsor) carries them.
Jawge
|
|
| From: Ghost308
|
|
|
|
|
|
|
| Date: 14-Jun-17 |
|
Jeff I lived in Missouri and cut my hickory in the winter , split it and stored it for 9 months the bark came right off driving a screwdriver into it. It was shag bark hickory.
|
|
| From: RonG
|
|
|
|
|
|
|
| Date: 19-Jun-17 |
|
Ghost Thanks for the info, but I got this one from Jeff, and you need dynamite and a good chainsaw to get this bark off....LOL!!!!
For my first stave it was a little difficult, but I'm glad I did encounter this, because now I learned something more.
Jeff, I have been under the weather now for two weeks, seems like always something to interfere with my progress. I am excited and still working towards a successful bow.
Jawge, I got a good moisture meter and checked calibration then I checked the bow and it read 11.3% if my memory is working, that is a little high, so I will keep shaping the bow and when I get ready to bend it I will take it in the house for a few days and monitor the moisture until I get it down, my out building is air conditioned, but I leave the door open a lot because I work in and out of the building, that will change when I get ready to tiller.........Thank you everyone, I love you guys, you all are very nice to me.
|
|
| From: RonG
|
|
|
|
|
|
|
| Date: 21-Jun-17 |
|
Fellow stave shapers, I got my stave down to where it bends fairly easy, but not to far, I'm still trying to balance the shape because this is a twisty piece of hickory, I'm sure it wouldn't be a problem for most of you, I want to get it right as I can. My stave measures 11.2% moisture so I'm taking it in the house in between shaving wood.
I measured some unfinished pine that I had in the house and it was 6.3% so that will help bring it back down, in the mean time I'm going to cut up some plywood to make a drying box.
Thanks for reading and the great advise......Ron
|
|
| From: RonG
|
|
|
|
|
|
|
| Date: 09-Jul-17 |
|
First thing is that I'm sorry for taking so long to continue with this build, but life gets in the way sometimes.
Alright now, I was following instructions and I got the bow shaped up pretty good, I need to take off a little more near the fades, I was so proud of myself that I was getting stuff together to install my rawhide to the back before I started tillering, I measured to the center of the bow and formed my grip 2 1/2 inches on each end of center to give me a 5" grip, everything looked great, then it came to me, shouldn't the arrow rest be in the center of the bow instead of my hand.
OHHHHH NOOOOO!!!! I ran and grabbed my longbow and measured, the arrow rest, it is one inch above center, then I measured my re-curve and found the arrow four inches above center.
I may be able to save it because the grip is still wide and deep.
I need advice Please, if I continue the way it is my arrow will be 2" above center, will this be alright.???
Excuse the dramatics, but I thought some of you folks could relate......Ha!Ha!
Another question please, what would you recommend for glue to attach the rawhide backing.?? it looks like Titebond is a favorite or carpenters white glue, titebond II glue is water resistant and titebond III is water proof, I'm going to put a finish on the bow so it may not make a difference, just was wondering how white glue will bind to rawhide.
Thanks again for your help, and especially for your prayers, I know they worked because I am feeling a lot better.....Ron
|
|
| From: PEARL DRUMS
|
|
|
|
|
|
|
| Date: 09-Jul-17 |
|
Arrow rest position doesn't matter, for the most part. An even tiller and perfect balance in your bow hand is all that matters.
TB3 is my favorite for rawhide. Size the back of the bow with TB3 the day prior to gluing rawhide down with the same glue. It makes for better adhesion.
|
|
| From: RonG
|
|
|
|
|
|
|
| Date: 10-Jul-17 |
|
Thank you Chris, The arrow rest somehow I never thought about.
I will get some of that glue, Thank you
|
|
| From: PEARL DRUMS
|
|
|
|
|
|
|
| Date: 10-Jul-17 |
|
90% of what I build is symmetrical. Meaning the center of my bow is the actual center and my arrow pass is 2" above that, I use a 4" grip most often.
|
|
| From: RonG
|
|
|
|
|
|
|
| Date: 10-Jul-17 |
|
Thanks again Pearl Drums, I made the grip a little longer just in case I needed to modify, mine will end up 4" also with the arrow 2" above center, now I feel a whole lot better, I will be glad to get this one finished so I won't have to bug you guys so much. I will feel very confident starting the next one after this.
The wood only came down to 10.2% moisture so I will put it in a drying box to bring it down to 7 to 8% before tillering.
I still have to remove a bunch above and below the grip, it doesn't Flex at all there.
I noticed when floor tillering that this Hickory really bends smoothly, when I was doing the Red Oak board bow, that stuff resisted bending, it just wasn't the same.
Well back to removing some large pine tree limbs that came crashing down in the storm yesterday.
I just can't thank you enough for the support...........Ron
|
|
| From: PEARL DRUMS
|
|
|
|
|
|
|
| Date: 10-Jul-17 |
|
My pleasure, Ron. I don't consider myself a good teacher as I generally point folks in a direction and let them go. If I told you every detail every step of the way you would never learn on your own what matters and what doesn't matter. Yah its slower, but better for the "student" in my opinion.
|
|
| From: RonG
|
|
|
|
|
|
|
| Date: 10-Jul-17 |
|
I agree, If someone stood over me and showed me how to do it I would forget most of it in about a week, but by running with the information and researching further, I won't forget. That is why I made that statement that I feel confident on the next one.
Plus, I still made the bow myself.
|
|
| From: RonG
|
|
|
|
|
|
|
| Date: 15-Jul-17 |
|
Well Gentlemen, it has taken me forever to get to this point, but I'm on a roll, the bow is very close to stringing it up for tillering, I floor tillered it and both limbs seem to bend similar, I removed a bunch yesterday from above the grip to get the bow to bend slightly in that area, now I need to cut in the nocks, install the rawhide backing and let it dry for a week then carefully check it out on my tillering station to see where I'm at.
Pictures are difficult to see because that Hickory is so white.
|
|
| From: RonG
|
|
|
|
|
|
|
| Date: 15-Jul-17 |
|
Penciled in approximately where the shelf will be
|
|
| From: RonG
|
|
|
|
|
|
|
| Date: 15-Jul-17 |
|
|
|
| From: RonG
|
|
|
|
|
|
|
| Date: 15-Jul-17 |
|
|
|
| From: RonG
|
|
|
|
|
|
|
| Date: 15-Jul-17 |
|
one more
|
|
| From: H Rhodes
|
|
|
|
|
|
|
| Date: 15-Jul-17 |
|
Looking good.
|
|
| From: RonG
|
|
|
|
|
|
|
| Date: 15-Jul-17 |
|
Thank you Howard!!!...Believe me, my next one won't take this long.......First time a little gun shy....Ha!Ha!
|
|
| From: George Tsoukalas
|
|
|
|
|
|
|
| Date: 16-Jul-17 |
|
No need to shape the handle yet. Also leave the nocks an inch wide. Do both until full draw to track the string better in the handle need arises. Jawge
|
|
| From: H Rhodes
|
|
|
|
|
|
|
| Date: 16-Jul-17 |
|
Nothing wrong with savoring a build. I am enjoying it more these days by taking my time on a bow. Early on, I would tear into a stave like a kid on Christmas morning and finish it in a day or two... My bows are better since I slowed down. Jawge is right on the money as usual. I save the handle thinning till the final stages. I have come to enjoy a cut in arrow pass, but I will say that is where a lot of new bowyers experience a broken bow. I try to make sure not to cut into a staves width anywhere near a bending part of the fade. That is where they want to fail. Arrow pass has to be in a place thick enough not to flex at all. Hard to tell from your pics, but I think yours is good.
|
|
| From: RonG
|
|
|
|
|
|
|
| Date: 16-Jul-17 |
|
I cut the arrow pass before I read this, I cut the minimum I thought would work and it isn't in the bending part of the bow..........I Hope!!!
I haven't finished the grip, but it's pretty close Jawge
I put a string down the length of the bow and tried to take a photo without shadows throwing things off, very difficult...Ha!Ha!
The string does go down the middle, I have been working on getting that string in the middle for two weeks now, I made sure the limbs were parallel the length then I had to move the grip over 3/16th, I got it in the center, was sweating that part.
I spent a bit of time today evening up the limbs and I had a hinge point in one of the limbs where the grain took a detour, so I came back to above the fades and removed some wood so the whole limb bends more evenly.
I will send more photo's please let me know in your honest opinion if I messed up on the arrow rest.
|
|
| From: RonG
|
|
|
|
|
|
|
| Date: 16-Jul-17 |
|
|
|
| From: RonG
|
|
|
|
|
|
|
| Date: 16-Jul-17 |
|
|
|
| From: RonG
|
|
|
|
|
|
|
| Date: 16-Jul-17 |
|
On the arrow rest I copied the one on my yew and actually didn't take it as far plus this bow is a lot thicker in that area than the yew. You can see my pencil line, I thought that was too much, by the time I put a piece of leather for the side plate and a rug rest or what ever, it should not be too large an opening.
I floor tillered it a few times and it doesn't seem to bend or feel weak.
|
|
| From: H Rhodes
|
|
|
|
|
|
|
| Date: 16-Jul-17 |
|
It looks great. I don't think it will cause you any trouble.
|
|
| From: RonG
|
|
|
|
|
|
|
| Date: 16-Jul-17 |
|

|
|
| From: RonG
|
|
|
|
|
|
|
| Date: 16-Jul-17 |
|

|
|
| From: RonG
|
|
|
|
|
|
|
| Date: 16-Jul-17 |
|
Bad picture but it shows that the rest is in the thickest part of the bow.....1.5" deep 1.25" wide. I don't plan on making the grip much smaller, I have pretty big hands.......Thank you for all the help.....Ron
|
|
| From: H Rhodes
|
|
|
|
|
|
|
| Date: 16-Jul-17 |
|
You did it right. Looks really good.
|
|
| From: grizz
|
|
|
|
|
|
|
| Date: 16-Jul-17 |
|
Looks good Ron. But you put the shelf on the wrong side. ;^)
|
|
| From: RonG
|
|
|
|
|
|
|
| Date: 16-Jul-17 |
|
Grizz, sorry brother, but maybe I will make the next one for you I just won't put a rest on it and anyone can use it....Ha!Ha!
Lets see how this one works out.
Thanks Howard, I'm relieved, I was sweating that part also, but used a little common sense which that is what I have, a little sense.....LOL!
Jawge, I had to make the tips 3/4 to help center the limbs, they were 1"
|
|
| From: RonG
|
|
|
|
|
|
|
| Date: 16-Jul-17 |
|
I forgot to mention the bow is 70" but the nocks are 68" so Is the bow a 70 or 68.
|
|
|
|
| From: RonG
|
|
|
|
|
|
|
| Date: 16-Jul-17 |
|
Thanks Bob
|
|
| From: BowAholic
|
|
|
|
|
|
|
| Date: 16-Jul-17 |
|
thank you... I'm enjoying your thread... :) Bob
|
|
| From: MStyles
|
|
|
|
|
|
|
| Date: 16-Jul-17 |
|
Me too.
|
|
|
|
| From: bodymanbowyer
|
|
|
|
|
|
|
| Date: 17-Jul-17 |
|
Good job, keep on scraping :-) and making bows Ron. JF
|
|
| From: RonG
|
|
|
|
|
|
|
| Date: 17-Jul-17 |
|
Thank you everyone, WOW! did you folks make my day or what.
I am trying to give all the info I can to let everyone know what is going on with this build.
I am going to apply the rawhide next then let it set for about a week because of the high humidity in FL. I'm not sure if I should put it in the hot box as I call it, I don't know if that will affect the rawhide or glue before it's fully cured.
Thank you again everyone for your wonderful support......Ron
|
|
| From: RonG
|
|
|
|
|
|
|
| Date: 19-Jul-17 |
|
I sanded the back of the bow with 60 grit sandpaper and worked on rounding the edges, then I cleaned it several times with de-natured alcohol and let dry, then mixed up some Titebond III with a little water to just make it flow and coated the back of the bow wiping any excess off the edges, now I will wait for it to dry thoroughly and sand it down and then I can determine if I need a second coat.
I am wanting to dye the rawhide maybe brown or black to just contrast with the rest of the bow, I am thinking about using RIT dye anyone have a better process I will certainly be grateful for any info.
I also took my scraper and curled off 15 shavings the length of both limbs, it bends a lot easier than it did. but still a lot of wood to take off, don't worry I'm not taking anymore off till I get the backing on and set up in my tillering station to check out the poundage.
|
|
| From: PEARL DRUMS
|
|
|
|
|
|
|
| Date: 19-Jul-17 |
|
One coat of sizing is plenty. By tomorrow you can wipe a coat on the limb and the rawhide and glue it down. It will never come back up. I use leather dye. Love the stuff. Rawhide can take dye in very cool patterns. Blotchy usually and it looks great. But I wouldn't worry about that until you have shot it a few hundred times.
|
|
| From: PEARL DRUMS
|
|
|
|
|
|
|
| Date: 19-Jul-17 |
|
Oh, and don't sand that back again. Leave it be and wipe the next coat right on and apply the hide.
|
|
| From: George Tsoukalas
|
|
|
|
|
|
|
| Date: 19-Jul-17 |
|
That's ok, Ron. You can cut temporary nocks and shape them better later. Jawge
|
|
| From: RonG
|
|
|
|
|
|
|
| Date: 19-Jul-17 |
|
Thanks fellas
|
|
| From: RonG
|
|
|
|
|
|
|
| Date: 24-Jul-17 |
|
Well folks I successfully installed the rawhide to the back of my bow, couldn't send pictures, hard drive in computer burned out, typing this on new computer and program, will take me a while to get everything set back up.
|
|
| From: Jeff Durnell
|
|
|
|
|
|
|
| Date: 24-Jul-17 |
|
Congrats on another success, Ron.
|
|
|
|
| From: PEARL DRUMS
|
|
|
|
|
|
|
| Date: 24-Jul-17 |
|
Getting really close now. You will have a very durable rig when you're wrapped up.
|
|
| From: bodymanbowyer
|
|
|
|
|
|
|
| Date: 24-Jul-17 |
|
That's awesome Ron. I can't wait to see it. JF
|
|
| From: RonG
|
|
|
|
|
|
|
| Date: 25-Jul-17 |
|
Thank you for staying with me, I took a bit more wood off the limbs in different places and got it to bend more evenly, that one place where the grain in the limb curves is a little difficult to see how its bending on floor tillering.
I did put it on my tillering station and pulled 40 lbs. on it, I can see where I need to remove more wood.
A little more near the tips and near the grip, it's bending in the middle of the limbs very well, don't want to over do.
Should be able to string it after a few more sessions with it and a time in the drying box, moisture is 10.2%
I'm still shooting for 45 lbs. @ 28"..........going slow here.
|
|
| From: PEARL DRUMS
|
|
|
|
|
|
|
| Date: 25-Jul-17 |
|
10.2% isn't too shabby for this time of year. Maybe drop it another point and finish tillering.
|
|
| From: RonG
|
|
|
|
|
|
|
| Date: 26-Jul-17 |
|
Thank you Chris, will do
|
|
| From: RonG
|
|
|
|
|
|
|
| Date: 15-Aug-17 |
|
Sorry folks, I have drug this out five months, my wife and I were discussing that this year was the worse in our entire life time with two daughters in peril and my wife and I having the worse year health wise and the weather in this area being so wet and windy. We hope the rest of the year will be much better, I still have some visits with the cardiologist and urologist and daughter has four more weeks of chemo and then five weeks, five days a week radiation. Not whining or complaining, just letting everyone know because I'm usually a go-getter, I did my board bow in two weeks, but unfortunately my red oak broke.
I appreciate everyone staying with me and giving fantastic advise, but I know it must be getting old, when is he going to finish......Ha!Ha!
I can say that I have it floor tillered nice, I have two nicely curved limbs when I floor flex it, I have not had the time to finish my drying box, but will need to in order to finish this bow.
I will get it done, been studying and reading up on limb design to get the most from this bow, mountain man has sent me some deer bone to put on the tips, it is overwhelming the support from so many nice folks....Thank You.
OK, I'm done complaining back to scraping.
|
|
| From: Jeff Durnell
|
|
|
|
|
|
|
| Date: 15-Aug-17 |
|
Ron, thanks for touching base, but you don't need to feel bad or anything. Family comes first with all of us. We all have times we need to put bowyery or archery on hold when responsibilities call or we need to fight our way back to good health. Take care of yourselves down there. Wishing all the best for you folks.
|
|
| From: RonG
|
|
|
|
|
|
|
| Date: 15-Aug-17 |
|
Thanks Jeff, I just wanted you all to know that I haven't given up, actually I went out to my building and made a long string and just strung the bow with 2.875 brace height to check center of the string and to check the limb arc.
one limb was arcing trough most of it's length and the other was stiff at the last 10 inches of the limb so I removed a little from that area, I'm getting 10.2% moisture in the grip and 9.5% through the rest of the bow, I think I need to dry it a little more before putting it on the tillering station.
I was drawing back on the string a little, about two inches, and I think I don't need to remove a whole lot more, just enough to even out the arc of the limbs, that hickory draws smooth. Thanks for checking back with me.
I'm really anxious to get the scales on this one and see where I'm at, that hickory is white and smooth, I love it, a very dense wood.
I may just clear coat this with staining the backing black, that would be a strong contrast, a long way to that part of the completed bow, suggestions appreciated.
Thanks Jeff...........Ron
|
|
| From: RonG
|
|
|
|
|
|
|
| Date: 17-Aug-17 |
|
I put the bow on my tillering station and with a long string pulled it five inches from the unstrung position and got 40lbs. so I have a lot further to go than I thought unless I want a 200lb bow....Ha!Ha!
I looked at a few hickory bows and am a little gun shy of making the limbs that thin, I will proceed cautiously and it will take me a bit longer.
looking at my photos would anyone make the limbs narrower in width or should I continue thinning them.....Thank you in advance
|
|
| From: PEARL DRUMS
|
|
|
|
|
|
|
| Date: 17-Aug-17 |
|
Don't worry about any other bows thickness', Ron. Matter of fact, don't worry about your bows thickness. Just keep at it until you hit your desired draw weight and length.
Your fades look great, next to tillering that is one of the most difficult things for new folks to wrap their mind around.
|
|
| From: RonG
|
|
|
|
|
|
|
| Date: 17-Aug-17 |
|
Thanks Chris, forging ahead. I have plenty of information stored in the old noggin, I shouldn't have anymore questions until I get half way through my tillering, don't you guys wish I took up swimming....Ha!Ha!Ha!Ha!
|
|
| From: PEARL DRUMS
|
|
|
|
|
|
|
| Date: 17-Aug-17 |
|
Keep at it! Swimming? NO! Building bows is much more fun than swimming.
|
|
| From: RonG
|
|
|
|
|
|
|
| Date: 17-Aug-17 |
|
Ain't that the truth
|
|
| From: RonG
|
|
|
|
|
|
|
| Date: 17-Aug-17 |
|
Rounded my grip as pearl drums suggested and made it narrower, feels pretty good won't know until I string it up and actually shoot it.
I pulled the bow six inches from the unstrung position and was 40 lbs. I figured that would be a good brace height to start with, I scraped on the limbs in various places and got them bending pretty darn equal, at the six inches now it's down to twenty five pounds, should be able to string it and proceed from here after I reduce the moisture a little more. It's going faster than I thought, I'm still being careful not to get carried away.
Thanks for reading my bow build, it won't be long between entries now as I have the bow shaped and symmetrical, mainly now it's tillering, shooting then finishing....YAHOOOO!!!!!!!
|
|
| From: throwback
|
|
|
|
|
|
|
| Date: 17-Aug-17 |
|
I don't know how I missed this, Ron. Looking good, buddy!
|
|
| From: badger
|
|
|
|
|
|
|
| Date: 17-Aug-17 |
|
Ron how long was your long string when you pulled it 5". Your bow will read about the same on the long string as it does when it is braced, so if you long string was hanging loose down to 12" and you pulled it 5 more inches your are likely pulling about 40# at 17". You don't go by tip movement when on a long string, it changes depending on how long your string is.
|
|
|
|
| From: MStyles
|
|
|
|
|
|
|
| Date: 17-Aug-17 |
|
Hey Ron, your bow is coming along nicely. I hope you were able to use that magic cut rasp, I didn't read all the posts. I admire you hanging in there with this bow, in the face of all that you have going on plus what's going on in your family. You have grit and great inner strength.
|
|
| From: Kwikdraw
|
|
|
|
|
|
|
| Date: 18-Aug-17 |
|
Ron, it's really great to see you bow building again! And it's lookin' really good, buddy! And sorry to hear about the family health problems, that's a real bummer! But it looks and sounds like you're hangin' in there! Prayers for your wife and daughters complete recovery and good health, and for you in your support for them. Congratulations on your new "build", and keep up the good work, I really enjoyed seeing your buildalong, and makes me want to head home and start my next, an osage longbow, and a mesquite native American style short bow, which should be a real challenge from what I understand. Finally my summer campsite has some dependable internet, for a while. Anyway, keep up the good work and attitude, and I'll keep checkin' in. Can't wait to see the finished hickory "Ron" bow! Wyatt
|
|
| From: RonG
|
|
|
|
|
|
|
| Date: 18-Aug-17 |
|
Badger, If that is the case I hope I didn't take too much off, I will string it up with a brace height of six inches and recheck. the string I used hung down more than 12 inches. Another lesson learned, thanks Badger.
Thanks Throwback.
Thank you Jeff.
MStyles, yes and thank you for the info, I have used the heck out of that rasp, even the coarse side if used lightly will remove a lot of wood easily without making deep groves. It was a little intimidating when I first received it because of the size, I could file down timbers with that thing...Ha!Ha!
Wyatt, Thank you for your concerns and good words, it looks like everything may come out alright, the good lord has a plan for each of us and we must accept the outcome, but it doesn't mean we can't fight against the problems. I have been strong all my life, but getting older takes away a lot, when I get support like all you folks have given me I bounce back, I will not whimper down, unless I mess this bow up....Ha1Ha! Wyatt, I will definitely be looking forward to see your next build, the first one came out fantastic. I'm looking to do a yew or osage myself.
I'm headed out to the shed to make a string the right length and check my poundage, I hope I didn't take too much off. Will let you know and show pictures of the grip and maybe the arc of the limbs on the tillering station making sure I don't draw it over 45lbs.
|
|
| From: PEARL DRUMS
|
|
|
|
|
|
|
| Date: 18-Aug-17 |
|
Get that string length so it just tightens up when you slip it over the nocks. You are far from too much removal either way. You have 30# to go, or more. I'm not a long string fan, it doesn't prove much. The limbs bend much differently when pulled down and in rather than just down. I like to floor tiller and go right to a 1-2" brace, then finish the tiller job increasing the brace as I get it evened out and lower in draw weight.
|
|
| From: RonG
|
|
|
|
|
|
|
| Date: 18-Aug-17 |
|
I shortened the string to just fit tight over the nocks without 'drawing the bow.
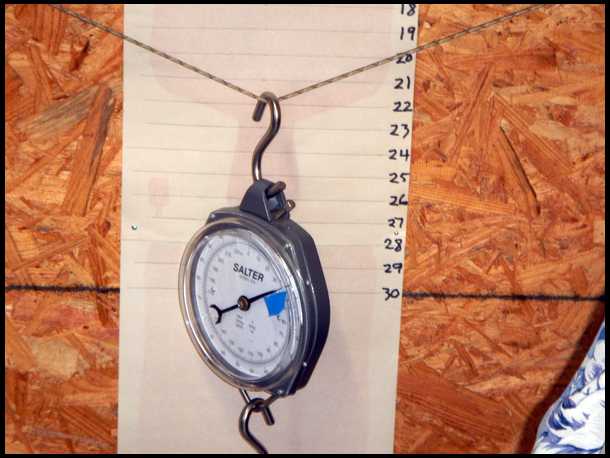
Drew the bow to 22" and had 40lbs, the tape on the scale is at the forty pound mark, I know I'm using the scale wrong, but couldn't find my cable extension that goes to the bow string, I will make another.
I have a string the correct length but was afraid to string, it felt like too much poundage and I would have been right.
It's difficult holding poundage and taking pictures so the accuracy in the photos may be different.
I haven't studied the photo's yet, will take any and all perusing on the limbs.......Thanks everyone
|
|
| From: Knifeguy
|
|
|
|
|
|
|
| Date: 18-Aug-17 |
|
Ron, Nice to see that you are back at it with the bow. Slow and easy does it! I'm still praying for your family, that's a lot to deal with. Take care and i like your build along. Lance.
|
|
| From: RonG
|
|
|
|
|
|
|
| Date: 18-Aug-17 |
|
|
|
| From: RonG
|
|
|
|
|
|
|
| Date: 18-Aug-17 |
|
|
|
| From: RonG
|
|
|
|
|
|
|
| Date: 18-Aug-17 |
|
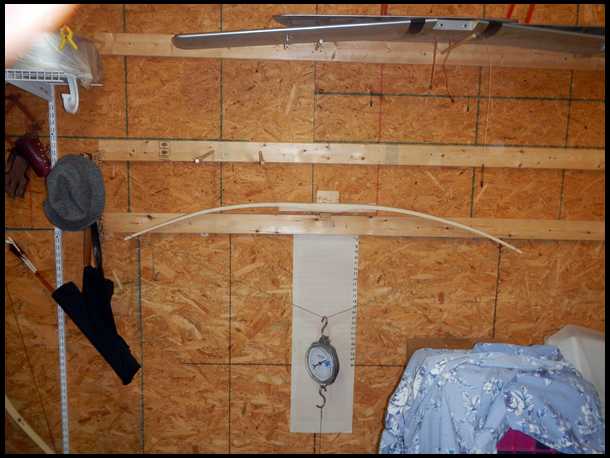
After looking at the photo's it looks like the limb on the left needs a bit more at the last 10 inches.
That part that looks like a hinge forming in the left limb is where the grain took a detour, it's more of an optical illusion, I am staying away from that section until something shows me I need to remove wood from that area.
I will set up my scale like it should be and continue, I just wanted to show everyone where I'm at.
You folks are right that hickory really bends nicely very smooth.
|
|
| From: PEARL DRUMS
|
|
|
|
|
|
|
| Date: 18-Aug-17 |
|
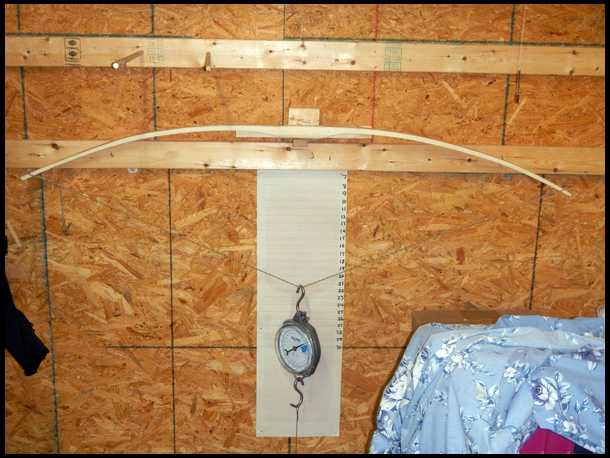
I agree. And the right limb is flat in the center 10". Use a gizmo Ron, they will help teach your eyes what to see.
|
|
| From: RonG
|
|
|
|
|
|
|
| Date: 18-Aug-17 |
|
I see that now that you mentioned it, you have trained eyes Chris
Gizmo????? I'm sorry I must have been sleeping when we went over that part......I will stand in the corner for a half hour....Ha!Ha!
|
|
| From: PEARL DRUMS
|
|
|
|
|
|
|
| Date: 18-Aug-17 |
|
I'm told I'm a tiller Nazi :) Perhaps I am. But, if the tiller aint right, aint nothin' right!
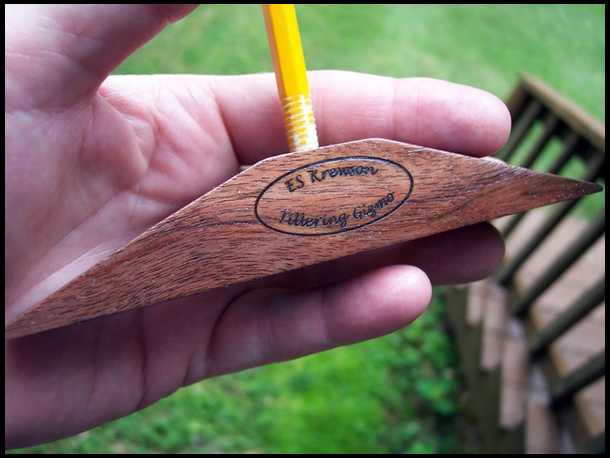
Eric Krewson named it a tillering Gizmo. Super easy to make and even easier to use. Google it and you will see what I mean. Get one made before you go farther. It will ALMOST ensure a perfect tiller.
|
|
| From: PEARL DRUMS
|
|
|
|
|
|
|
| Date: 18-Aug-17 |
|
https://www.3riversarchery.com/.../how-to-make-and-use-eric-krewsons-tillering-giz...
|
|
| From: RonG
|
|
|
|
|
|
|
| Date: 18-Aug-17 |
|
Thanks Pearl, I need to dry that stave a little more anyway so this will give me time. Thank you
|
|
|
|
| From: RonG
|
|
|
|
|
|
|
| Date: 18-Aug-17 |
|
Thanks Scott, wait till I get the tips on it.
|
|
|
|
| From: RonG
|
|
|
|
|
|
|
| Date: 19-Aug-17 |
|
I had the bow in the shop out back which is air conditioned but obviously not humidity controlled, moisture content went back to 11.4%
Brought it back in the house and put it in a warm closet, it should get back down to 9% in a couple weeks, then I will put it in a drying box at a very low temp to get it lower.
I have been reading stories about over drying the wood and causing cracks using drying boxes, so will have to be careful.
Pearl Drums, I am building a gizmo, I can see where it would help.
I'm going to get a building sequence set up to where I don't have to keep going back and forth and get a humidifier for the shed.
|
|
| From: RonG
|
|
|
|
|
|
|
| Date: 19-Aug-17 |
|
not being familiar with single wood bows could I use BCYx low stretch string with padded loops on my selfbow or would I be better off using B55 dacron.
I know I could use FF string on laminated/fiberglass bows, I'm not pushing the use of FF I would be just as happy with Dacron, just wondering if anyone tried the thinner strings.
Thank you for your time and answers........Ron
|
|
| From: PEARL DRUMS
|
|
|
|
|
|
|
| Date: 20-Aug-17 |
|
I would suggest using your BCYX. No need to pad loops on a hickory bow. Make a 10 or 12 strand and double serve it. You will be happy, happy, happy.
|
|
| From: Eric Krewson
|
|
|
|
|
|
|
| Date: 20-Aug-17 |
|
I had a good how to on making and using a tillering gizmo but photo bucket made it null and void.
Pretty simple, a 1"X1" 6" block of softwood, drill a 5/16" hole in the center and a 1/2" hole about halfway through right on top of the 5/16" hole. Tap a 5/16" nut in the 1/2" hole, screw a golf pencil into the threads of the nut and you are good to go.
I do the final shaping like this for more string clearance at the nocks.
|
|
| From: Eric Krewson
|
|
|
|
|
|
|
| Date: 20-Aug-17 |
|
USING THE TILLERIN’ GIZMO
After floor tillering your bow, bend the bow slightly on your tillering tree or tillering stick, I start at about 3” of bend using the long string. Retract the pencil in the Gizmo and run the wood block up the bow’s belly and find the widest gap. Screw the pencil in the block to a point it is almost touching the bow’s belly at the point where you found the widest gap. I change the angle the pencil has been sharpened to a very short angle and sand the tip of the pencil flat for the best results in marking the limb. This lets you work very slight bends.
Run the Gizmo up the belly making sure it is centered on the limb. The pencil will mark non bending areas that need wood removed. Start on the long string, continue at brace and up to about 20” of draw. You do need to have a way to hold your bow string while you mark the limbs with the Gizmo.
|
|
| From: Eric Krewson
|
|
|
|
|
|
|
| Date: 20-Aug-17 |
|
I have holes in my tillering tree and insert a 3” piece of dowel in one of the holes to hold the string with the limbs slightly bent while I mark the limbs with the gizmo.
Go slow, no more than ten scrapes on the marked areas of the limb, flex the limb 30 times and recheck. My bow limbs tend to be slightly round belly so the Gizmo only marks the top of the crown on the limbs belly. I scrape the marked area as well as the rest of the limb side to side to keep things even. You can get the limb bending perfectly this way. You will still have to eyeball bending in the fades but the rest of the limb will be perfectly tillered, hinges will be a thing of the past.
I adjust the gizmo one time on the long string and set it to the deepest bend on the weakest limb. I use this setting for both limbs. If you continually adjust the gizmo you will chase weak spots up and down your limb. One adjustment and hold this adjustment until you have removed enough wood to the point that can run the gizmo up both limbs without making a mark. As you increase draw length readjust the gizmo.
|
|
| From: Eric Krewson
|
|
|
|
|
|
|
| Date: 20-Aug-17 |
|
Make a few passes with the gizmo on your limb and the areas that need attention will be perfectly obvious. You can fine tune the tillering by closing the gap between the pencil and limb to almost nothing. At this point I like to use a cheap orbital sander to remove both wood and any tool marks that are left. With course sand paper, the sander will leave tiny swirls in the wood so I like 220 grit for my final tillering work and follow with a light hand sanding.
The gizmo doesn’t work in the fade out area of the riser so you will have to eyeball the bend in this area or put a flat board across the back of the bow in your tillering tree and watch the gap between the back of the bow and the board to see where the limb is bending.
Tillering that once took me hours to get close takes me about 45 minutes with the Gizmo and the end result is close to perfect.
Remember the key thing to proper tillering is using a scraper or sand paper. If you ever get the urge to grab a course rasp or use a belt sander to speed things up even more, take a coffee break and come back when these thoughts have passed.
|
|
| From: PEARL DRUMS
|
|
|
|
|
|
|
| Date: 20-Aug-17 |
|
And there you go Ron, straight from the horses mouth.
Thanks Eric
|
|
| From: RonG
|
|
|
|
|
|
|
| Date: 20-Aug-17 |
|
Thank You Eric, That tool of yours is fantastic, I have already started on one.
Thank You for the detailed explanation, that really makes this so much easier.
I wasn't expecting Eric himself to explain this, Wow!.....nice.
Thanks Pearl Drums for your help on the string.
I am having fun doing this bow even though I have to ask a lot of questions, but There are a lot of super people on this site willing to help, what more could you want, everyone should make a selfbow, it is very rewarding......Ron
|
|
| From: Eric Krewson
|
|
|
|
|
|
|
| Date: 20-Aug-17 |
|
The most important thing to remember is when you make your initial adjustment on the deapest bend on the weakest limb don't readjust the gizmo for the other limb. Use the same adjustment on both limbs so they will match more or less.
Also; for your first adjustment don't have your pencil too close to the limb or it may mark the whole limb. Start with about 3/16" off the limb and see if you get a mark. If not, screw your pencil in a little closer. You want to start on the really high spots first.
Believe your gizmo, sometimes your eyes will try to tell you it isn't working.
|
|
| From: RonG
|
|
|
|
|
|
|
| Date: 20-Aug-17 |
|
Thanks again Eric for that fine tuning explanation. I was a machinist for 15 years, I understand completely how this device works, really a great idea........Ron
|
|
| From: RonG
|
|
|
|
|
|
|
| Date: 22-Aug-17 |
|
Eric I would like to make a slight change to your instructions that may help with the drilling. I hope you don't mind.
Drill the large hole first, that way the bit won't grab in the smaller hole, then drill the smaller hole, that way the center of the hole is already made by the larger bit.
This may help some folks that don't have drill presses or other equipment.
Thank you ......Ron
|
|
| From: Jeff Durnell
|
|
|
|
|
|
|
| Date: 22-Aug-17 |
|
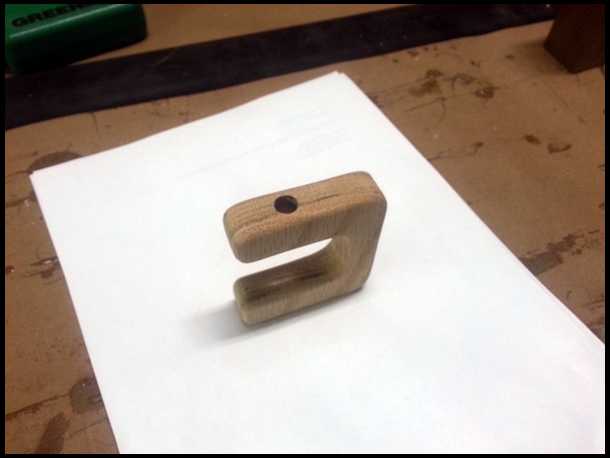
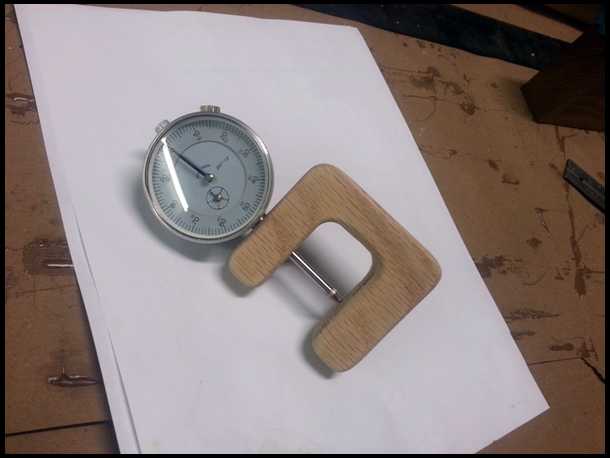
Ron, with all due respect to Mr. Krewson, be mindful of the Gizmo's application in areas other than the dips on this stave. Your stave isn't perfectly straight, it has some humps and dips, natural rises and falls down the length of the belly, and each limb is a little different.
If limbs begin different and odd shaped unstrung, they shouldn't be tillered to be the same, or to show perfect arcs as they flex, and we shouldn't work at all toward that end. Doing so can create 'hidden' stiff and weak spots... even if the arc at full draw looks perfect. If/when each inch of a bow's 'imperfect' looking limbs works equally, contributes equally to the cause, the full draw profile will be reminiscent of its imperfections. I hope this makes some sense to you Ron, and doesn't offend you, Eric. Nothing but respect here fellas.
To clarify in other words, because of the odd shapes within this stave, the Gizmo may 'see' and mark a natural hump, or slight natural disparity between the limbs, as a high/thick spot and instruct you to remove wood there when it may be just fine. And/or the pencil may conversely skip over a natural dip in the belly's surface when in fact it could be fine, or even too thick and not flexing enough there. The Gizmo is a good, useful tool. All I'm saying is, take what it reveals to you with a healthy bit of skepticism.
I have a tool I designed that works well in conjunction with the Gizmo on such staves. It's a thickness gauge and can be slid down the limb in 3 seconds, revealing limb thick or thin spots, thickness taper, etc. I also have a bend gauge that Jim Fetrow gave me that tells whether, and how much, any part of a limb is flexing as its drawn... and can compare that small part to any other. If a person was capable with each of these tools and used them to cross reference and doublecheck one another, they would put them on the path to an appropriate tiller profile... and a good tillering eye of their own.
I know.... now I need to post some pics and descriptions :^) Hang on.
|
|
| From: Jeff Durnell
|
|
|
|
|
|
|
| Date: 22-Aug-17 |
|
Here they are. Maybe they're self-explanatory, if not and you have any questions or need pictures of them in action, just say so.
|
|
| From: Jeff Durnell
|
|
|
|
|
|
|
| Date: 22-Aug-17 |
|
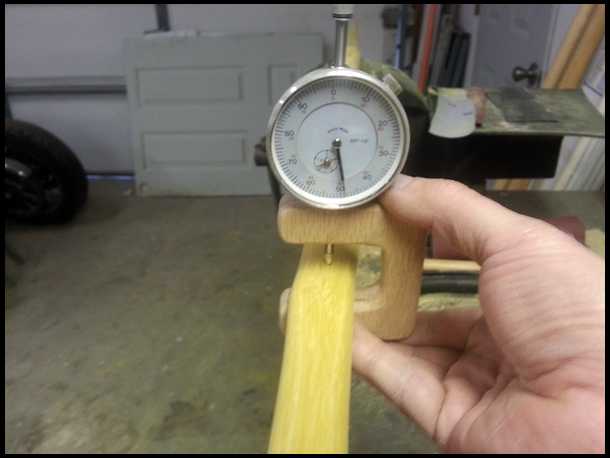
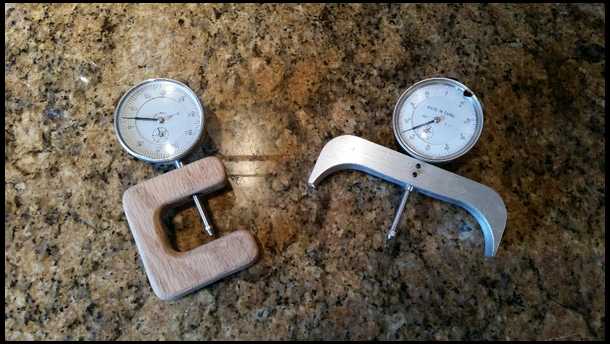
The thickness gauge on the left, in my experience, is best used by placing the stave or bow in a bench vice or bow horse, belly up, then place it over the limb, allowing the tip of the indicator gauge to rest on the belly of the stave, while holding the wooden part(bottom of the 'C' in the pic) to ride against the back of the stave. I like to start at the dips and slide it down toward the tips and just watch the dial, but it can be slid both directions. If you have an even taper, it will gradually and consistently turn counterclockwise as it gets thinner. It will immediately reveal any acceleration or deceleration in taper, halt or pause in taper, or increase in thickness due to a knot or whatever. We can watch the dial's movement, and speed of that movement, and know all we need to know in a second or two. Another good, cheap, useful tool.
The bend gauge on the right is equally useful. It can be slid down the limb along the back or belly... on either the outside or inside of a bend/arc. It can also be used in a single spot of a limb at different lengths of draw to discern degree of bend in that spot as it's drawn... even strapped to the limb while it's being worked on the tillering tree, and then used to compare that spot to others on the limb... or the other limb. These tools can be used to help 'see' what's really going on with odd shaped limbs... or ANY limb for that matter.
|
|
| From: rattlesnake
|
|
|
|
|
|
|
| Date: 22-Aug-17 |
|
I've made a few hickory bows,, I just take bark off and some of cambium....or all cambium and there's the back..I never chase a ring on hickory....over 50 hickory bows not one has broken......that's the beauty of hickory nice and simple..!
|
|
| From: Jeff Durnell
|
|
|
|
|
|
|
| Date: 22-Aug-17 |
|

I found a couple more pics...
|
|
|
|
|
|
|
|
| From: Jeff Durnell
|
|
|
|
|
|
|
| Date: 22-Aug-17 |
|
As pertinent as any or all of the above three tools(or any others in your future) might seem... don't rely on them unequivocally. Your best tool is between your ears. Exploit the gauges for the data they provide, and use your head to intelligently weigh and apply it, or not. Use them to empower your best judgment. Think. Question everything.
|
|
|
|
| From: RonG
|
|
|
|
|
|
|
| Date: 22-Aug-17 |
|
Jeff You are correct on that, this is not a straight bow, I worked hard putting all those lumps and twists in the limbs to take them out now.......LOL!!!!!
I'm glad you mentioned that Jeff, I am still going to use the Gizmo just to see what it tells me and I have been using a dial caliper to keep the limbs equal from side to side.
I also have a couple dial indicators sitting around doing nothing, I will build your tools, nothing says you can have to many tools.......Thanks for watching this and letting us know.
Thanks again Eric, you didn't realize my bow was weird, Thank you again for the info, like I said I have built your gizmo and will use it on my next couple of bows and this one also.
If anyone was reading this post they sure will benefit from the info for the Gizmo.
Jeff, I do realize the tools will get you in the ball park, but like you said it's the eye sight and what's between your ears that finalize what you end up with......OMG am I in trouble....LOL!!!
|
|
| From: RonG
|
|
|
|
|
|
|
| Date: 22-Aug-17 |
|
Rattlesnake, thanks for the info, I am pretty sure I am over doing this build, but I want to go on and make an osage and a yew and I will need all this info and knowledge that I have received from these masters to accomplish this, yes a Hickory stave was picked because of the fool proof results, but will go far when I tackle the expensive and difficult stuff. I feel confident I will be prepared.
Thanks again Rattlesnake.
|
|
| From: rattlesnake
|
|
|
|
|
|
|
| Date: 23-Aug-17 |
|
Very cool Ron..!...I like hickory too, mostly because I can find it ....but Osage rules..your gonna love working with Osage...just a warning this is addictive...you going down a path of no return...and there is no cure..!
|
|
| From: MStyles
|
|
|
|
|
|
|
| Date: 23-Aug-17 |
|
Ron, I'm not as experienced like most of these other guys. My first 3 bows came apart about mid limb each time. I followed the instructions and advice from those on this 'Wall, plus what I got from the Bowyer's bible. My last bow was a Hickory self bow, has almost zero set, it's 60", 63# @ 28". It's not a fast shooting bow, in fact, it's a slug. But it hasn't blown up and is ok. That bow I did it differently. I rasped and scraped only past the fade on both limbs til they were bending evenly. Then I moved up 4 inches, used a piece of wood to make sure I didn't get any flat spots, and just kept going 4 inches at a time toward the tip, leaving the last 8" non bending. Floor tillering along the way until both limbs looked "tillered". Then I strung it up at a low brace height, stood and looked in a mirror(at full draw) checking to make sure both limbs looked evenly tillered. It's overbuilt but it does shoot. Oh yeah, I've been told my tillering job looked good by guys I know who have made many self and board bows.
|
|
| From: RonG
|
|
|
|
|
|
|
| Date: 24-Aug-17 |
|
MStyles, That is exactly what I'm doing, I'm actually past the rasp stage and doing nothing but scraping, also I really appreciate the info on that rasp, that thing is a brute.
I'm not looking at a high performance bow either, I figured a 68" hickory should be pretty smooth and probably shoot like a hill bow, not blazingly fast. I just want a successful one.
rattlesnake, there isn't much choice in Florida for bow wood.
I am already addicted, I just wish I had taken this up forty years ago before the self-bowyers used up all the good staves...LOL!
Thanks Jeffrey and Mike, I have learned a very large amount of info from all the generous people on this site and believe it or not I have retained all of it, at least for now....Ha!Ha!
I have said it many times and y'all are probably getting tired of hearing it, but you folks have made this old man very humble and happy for the continued support, you just don't get friends like this anywhere.......Thank You.....RonG
PS:
My bow has stabilized at 9.5 in the limbs and 10.8 in the grip. I will now have to come up with a safe way to dry it out a little more. I'm a little leary of using a hot box after reading about them on the internet of drying the wood too fast.
I may have to get a humidifier put in my work shop to keep the moisture down.
|
|
| From: rattlesnake
|
|
|
|
|
|
|
| Date: 24-Aug-17 |
|
Ron, next time I split some hickory I'll split a couple for you....I'm running low right now and have a couple trees picked out for cutting after hunting season....just remind me bro....snake..
|
|
| From: Bob Rowlands
|
|
|
|
|
|
|
| Date: 24-Aug-17 |
|
"You're best tool is the one between the ears." Now that is spoken from experience. A guy can have a shop full of tools and still not know jack about anything. A lifetime of experience can't be measured.
|
|
| From: Jeff Durnell
|
|
|
|
|
|
|
| Date: 24-Aug-17 |
|
Ron, drying them too fast is more of a concern when the moisture content is quite high. Once it's down where yours is, 9-10%, you can help them lose a few percentage points without worry.
|
|
| From: RonG
|
|
|
|
|
|
|
| Date: 24-Aug-17 |
|
See what I'm talking about, just mention a problem and it is solved within minutes. Thanks guys.
Thanks rattlesnake, that is mighty kind of you, I would like to try a couple different styles. Also I would like to build one without asking any questions at all.
|
|
| From: Jeff Durnell
|
|
|
|
|
|
|
| Date: 24-Aug-17 |
|
There are a few other things you might be able to do in the absence of a drying box or dehumidifier, Ron. In each of the houses I've lived in, there were small rooms, closets, or spaces near, or on adjacent sides of walls and such, to the hot water tank, furnace, heat pump, or central a/c that worked as a nice 'drying box'. The hot water tank is a good consistent source in the summer. Don't lean it right up against it, keep it a several feet away to start at least, and flip it and rotate it once in a while, and it should help dry it and maintain it. Just keep checking it and don't let it get too dry.
You can get a hygrometer cheap and move it around in your house in such places until you find the spot that offers the relative humidity you're looking for.
|
|
| From: RonG
|
|
|
|
|
|
|
| Date: 24-Aug-17 |
|
Good idea Jeff, the garage is always very warm, that is where the hot water heater is and the air handler for the A/C unit, the garage door seals air tight due to the hurricanes so the humidity may be low I will check that. Thank you sir.
|
|
| From: MStyles
|
|
|
|
|
|
|
| Date: 24-Aug-17 |
|
Ron, you can also use a heat gun to bring the moisture content down, but you have to be careful. Hickory is a stingy wood, and doesn't like to give up it's moisture content. But if you exercise some patience, carefully using a heat gun can help out. Some guys here on the 'Wall have used a heat gun on the limbs to increase performance. One thing I know for sure, Hickory is a great bow wood.
|
|
| From: RonG
|
|
|
|
|
|
|
| Date: 25-Aug-17 |
|
Thanks Mike, if it gets ornery I may resort to that.
|
|
| From: RonG
|
|
|
|
|
|
|
| Date: 03-Oct-17 |
|
Well Everyone, There is always something to mess up well laid out plans. It's called a hurricane, and a nasty one at that, I never thought this was going to take this long, my board bow only took a couple of weeks and I thought this one was going to take maybe a month.
That is what I get for thinking, everything from illness in the family to mine and my wifes physical problems and now a blasted hurricane.
I'm going to call this bow the hard luck bow, I wouldn't give it to anyone it may jinks them.....Ha!Ha!
All I got to say is it better be a good one.
The next one will not be backed, it will be a bare self-bow.
my moisture content is 8.4 in the limbs and 9.8 in the grip, I will take my heat gun to it and get it to 7.5 to 8. then finish tillering.
I finally received the results of my blood work and that very expensive nuclear stress test, it looks like I will be making bows for quite a while yet and they are holding off on the pace maker for a while.
Our daughter has finished her chemo now she is starting five weeks five days a week radiation, after that she has to start chemo again, her heart is not taking this too well, they are going to try and sheild her heart for the radiation. Everyone is holding up well and we know she will be fine, there are a lot of folks praying for her.
Back to scraping, sanding and tillering.........Ron
|
|
| From: Mountain Man
|
|
|
|
|
|
|
| Date: 03-Oct-17 |
|
Let it out on the wood brother!
My mother used to say,,"This to will pass",,,pray and keep the faith
No Regrets might be better then hard luck
|
|
| From: Jeff Durnell
|
|
|
|
|
|
|
| Date: 04-Oct-17 |
|
I'm glad you made it through the storm, Ron and am wishing the best for the health of your loved ones.
|
|
| From: RonG
|
|
|
|
|
|
|
| Date: 04-Oct-17 |
|
Mountain Man, I think that is what brought me through what my cardiologist thought, he said I have the symptoms of a dying heart and blocked arteries, all the tests showed different, The work on this bow cured me...Ha!Ha!
Maybe I ought to name it the healer.
Jeff, You are the main reason I did this bow, if it wasn't for your generosity I'm not sure I would have gotten this far, thanks again.........The finished bow is not far off.......Ron
|
|
| From: RonG
|
|
|
|
|
|
|
| Date: 20-Oct-17 |
|
Hurricane out of the way, still have flooding, but the weather and temps are dropping also the humidity, I can't believe it's been this long on this bow, will start back working on it.
|
|
| From: RonG
|
|
|
|
|
|
|
| Date: 29-Oct-17 |
|
I got a wild hair, went out to my building out back and shaved a bunch of wood off my bow limbs.
I reworked the cabinet scrapers and got them sharp again and peeled off 45 strokes from each limb, my arms are tired, Ha!Ha!
I strung it up with a 6.375 brace height and pulled it on my tillering station down to 40 lbs, the string was at 23 inches.
Getting there but have a good ways to go, I thought my moisture content was low enough, but the bow took on a string follow attitude, not a lot but I will show pictures in a couple days when I can dry it out more and take a few more strokes off the limbs.
The limbs are very equal the last eight inches on the limbs are fairly straight the bend is in the rest of the limb, it looks good to me. I will take photos soon.
I am looking for 40 to 45 lbs. @ 28" if it feels as good as it feels now at 23 inch draw I may try for a 50 lb bow, then back it down if it's too much.
|
|
| From: RonG
|
|
|
|
|
|
|
| Date: 31-Oct-17 |
|
Another question please, my hickory longbow is 68" my tillering string is 65" which gives me a 6.5" brace height, should I shoot for a different brace height. All of my laminated longbows in the past were 7" or more, that is why I'm asking.
Pearl Drums, I'm going to take your advice on a string. A 12 strand 2 bundle BCYX and double serve it to fit my Bohning classic nocks. No padded loops.
Thank you!.........RonG
|
|
| From: PEARL DRUMS
|
|
|
|
|
|
|
| Date: 31-Oct-17 |
|
Ron you are at a point in the build where anything I may tell you wont help, I need pics now. Id like to tell you to put it up to full brace, about 7" for the lions share of selfys. But without knowing how it looks, I cant advise that. Your bow will lose no less than 2-3# between sanding and shooting in. Plan for that now and you wont have too light of a bow later.
|
|
| From: Draven
|
|
|
|
|
|
|
| Date: 31-Oct-17 |
|
Ron, your bow is looking good. Looking forward for the final product. Are you backing it with something?
|
|
| From: RonG
|
|
|
|
|
|
|
| Date: 31-Oct-17 |
|
Pearl Drums, I will take a bit more off because it will probably go to 65lbs at full draw. I will brace it at the 6.5" that it is now and post photos and I will draw it to 45 lbs. and take a photo also.
|
|
| From: RonG
|
|
|
|
|
|
|
| Date: 31-Oct-17 |
|
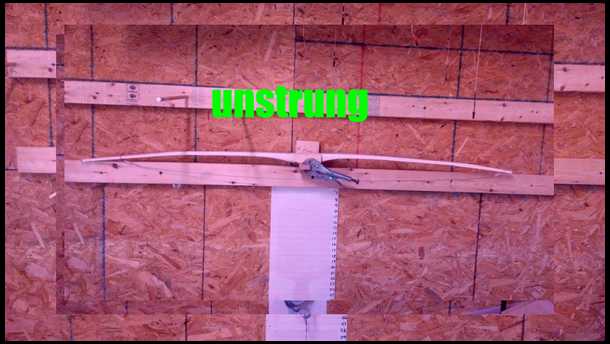
Here are the photo's. Description is in each photo
|
|
| From: RonG
|
|
|
|
|
|
|
| Date: 31-Oct-17 |
|
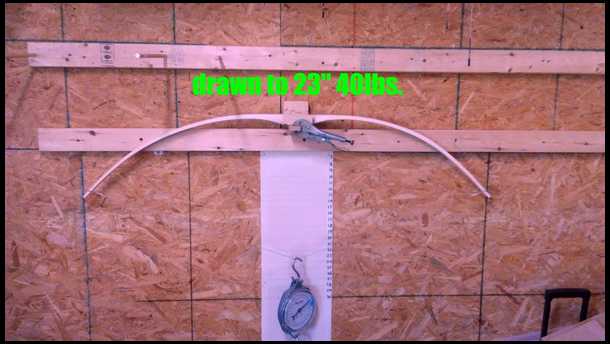
I don't know what happened to the first photo.
|
|
| From: PEARL DRUMS
|
|
|
|
|
|
|
| Date: 31-Oct-17 |
|
Im only guessing, but I can almost tell that your thickness taper is off. That's why you see the set happening where it is, cant blame it on humidity quite yet. Can you put a string on it and pull it to 14-18"?
|
|
| From: RonG
|
|
|
|
|
|
|
| Date: 31-Oct-17 |
|
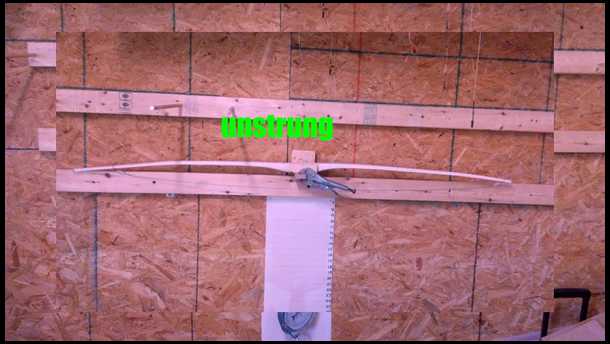
third picture
|
|
| From: RonG
|
|
|
|
|
|
|
| Date: 31-Oct-17 |
|
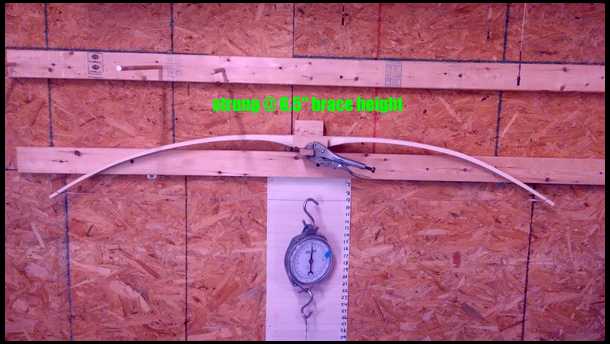
Sorry, will try again
|
|
| From: PEARL DRUMS
|
|
|
|
|
|
|
| Date: 31-Oct-17 |
|
Now I can see it! Get the first 10-12" off each fade moving more. Your mid limb set is a result of stiff fades.
|
|
| From: RonG
|
|
|
|
|
|
|
| Date: 31-Oct-17 |
|
Thanks Chris The next photo's will be with my camera and not the cell phone.
|
|
| From: RonG
|
|
|
|
|
|
|
| Date: 31-Oct-17 |
|
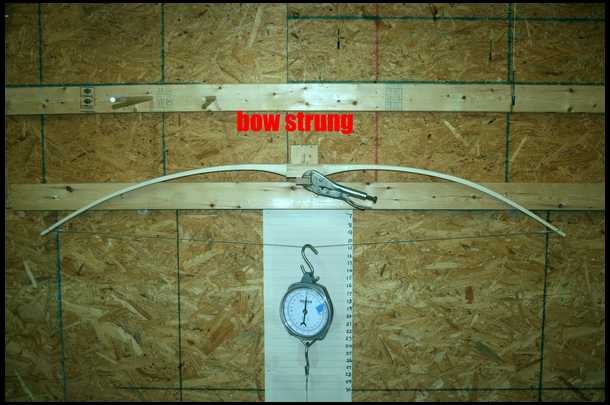
Removed a bunch of wood where you told me Chris, and took more pictures.
|
|
| From: RonG
|
|
|
|
|
|
|
| Date: 31-Oct-17 |
|
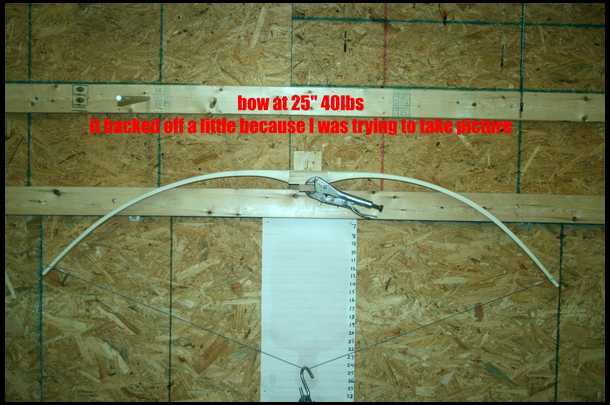
bow at 25" draw, still 40lbs so I got two more inches drawn at the same weight, got to be careful now because I want 45 to 50 @ 28"
|
|
| From: RonG
|
|
|
|
|
|
|
| Date: 31-Oct-17 |
|
Can't read my message, I backed off on the draw trying to take the picture, right now I'm at 40lbs. @ 25" I may be too far, I may not get to 50 pounds in three inches, but I will be happy with what I get, the moisture is at 7.8. I don't want to draw 28" until someone says it's alright.
I don't understand why I'm gun shy...LOL!
|
|
| From: throwback
|
|
|
|
|
|
|
| Date: 31-Oct-17 |
|
Lookin' good, Ron.
|
|
| From: Jeff Durnell
|
|
|
|
|
|
|
| Date: 31-Oct-17 |
|
Not bad, Ron. The limb on the left looks pretty good now. The limb on the right looks like the last several inches could bend a little more.
|
|
| From: RonG
|
|
|
|
|
|
|
| Date: 31-Oct-17 |
|
Thanks Bob
Jeff, I was kind of thinking similar thoughts, but I'm glad you saw what I saw, had to stop for the day, trick or treaters coming soon.
We get on the average of 80 children they come around in hay wagons drawn by four wheelers or jeeps there is usually a monster truck thrown in. If I can find the picture of people on horseback lined up at the ice cream drive up window I will post it. It's a little country around here.LOL!
|
|
| From: RonG
|
|
|
|
|
|
|
| Date: 31-Oct-17 |
|

I took the picture and looked hard at it, I think I need to remove a little at the arrows that I placed in the photo. If anyomne thinks different please let me know, I'm the amatuer here, just letting you know what I see.
|
|
| From: RonG
|
|
|
|
|
|
|
| Date: 31-Oct-17 |
|
I need to mention one more thing, my bow at the nocks is 68" the string I have on it is 65" my brace height is 6.5" do I need to shorten the string a little more to get it to 7" brace.
Jeff, Jawge, Pearl Drums, Mstyles, rattlesnake, Badger, Mr. Rowland and Mr. Krewson Thank you!
It's not finished yet, but just wanted to mention all the great and patient help that I received. I have learned a lot on my first bow and it will go a long way on my next ones.
|
|
| From: RonG
|
|
|
|
|
|
|
| Date: 31-Oct-17 |
|
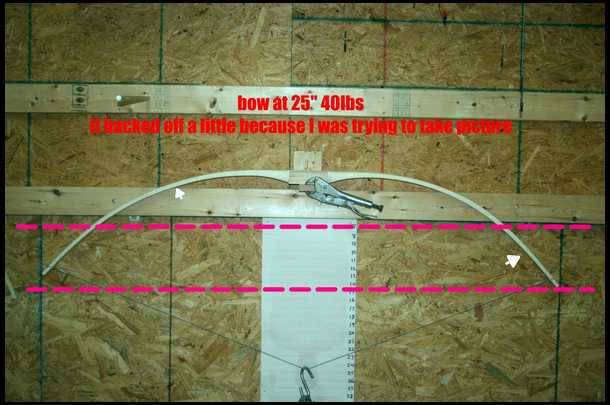
Sorry for all the posts, but I just noticed something, I think my set up is a little crooked, now how can you tiller a bow with the tillering station going down hill, I don't know what happened but I will straighten this out before I go any further.
|
|
| From: Shorthair
|
|
|

|
|
|
|
| Date: 01-Nov-17 |
|
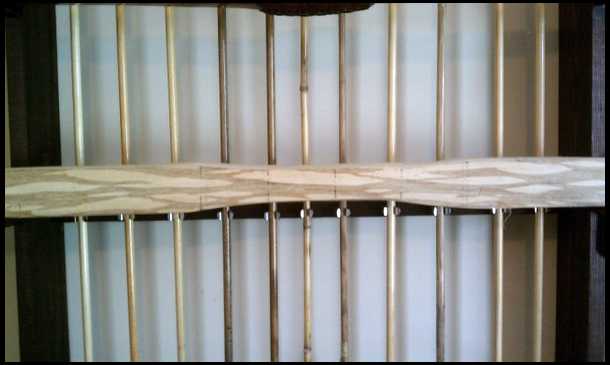
wow that is a lot of work to chase that ring on hickory. on both my staves I just used a hammer to knock the bark loose and then peeled it off leaving the inner cambium layer on one...and other is clean. The one with cambium in place I just hit it lightly with some fine sand paper to get some of the wood exposed for a little natural camo. Need to finish this bow this winter. :)
keep em sharp,
Ron Herman
|
|
| From: Jeff Durnell
|
|
|
|
|
|
|
| Date: 01-Nov-17 |
|
Ron, my selfbows are right around the 6.5" mark. I just measured my favorite hunting bow, a 66" osage bow and it's closer to 6.25"... I wouldn't allow it to be lower than that, it could probably use a twist or two in the string. I would be surprised if any of mine were as high as 7". That's measuring from the string to the inside(string side) of the handle at the shelf. Keep in mind, these measurements depend some on the shape of the handle/shelf area. Mine looks like it may not be as deep as yours in the spot where I measured it, so in other words... a 7" brace doesn't mean the same thing to these two bows. But I digress, 6.5" is probably a good place to start.
Basically, I don't like to brace my wooden bows any higher than necessary, and 6.5" has been enough to allow my 5" feathers to sit and shoot clear of the shelf and still be easy enough to match arrow spine to. I wouldn't raise it above that unless I didn't have the 'proper' spined arrows to shoot it at that height... and certainly wouldn't go beyond 7" without making new arrows of a weaker spine, or taking other measures so that I could lower it.
I noticed that your bow wasn't quite level, but thought it was probably just because the camera was tilted, so I didn't want to say anything.
I try to accurately level the handle area in the tree rather than the tips because... not all selfbow tips are the same distance in front of or behind the handle, and because I want the handle to rest straight up and down in my bow hand and pull straight back into it during the draw. I then tiller the bow so the hook follows an equally accurate plumb line straight down while pulling it from where my string hand will pull it. Just how I like to do it.
For future reference, is your tillering station going downhill, or is the camera simply tilted? Double checking your tree setup is a good idea, but when taking pictures, try to be sure the camera is straight as well. I sometimes will delete and retake several pics, or rotate a tilted pic in a photo editing program until I get the photo itself level and plumb before I judge the bow with a critical eye.
Take your time bud, you're doing well.
|
|
| From: RonG
|
|
|
|
|
|
|
| Date: 01-Nov-17 |
|
Thank you Jeff for all the good info, I'm going out this evening and measure my setup I thought that it was level, maybe I'm not level..Ha!Ha!....My string is three inches shorter than the bow length, that is what I always went by and for a recurve it's 4 inches.
I'm going to take off a little bit in the areas that I showed in the last picture and see if the limbs round up, if so, I'm going to exersize it and gradually draw it to 48 to 50lbs (my target weight and see what the draw length will be) I think I'm very close.
|
|
| From: RonG
|
|
|
|
|
|
|
| Date: 01-Nov-17 |
|
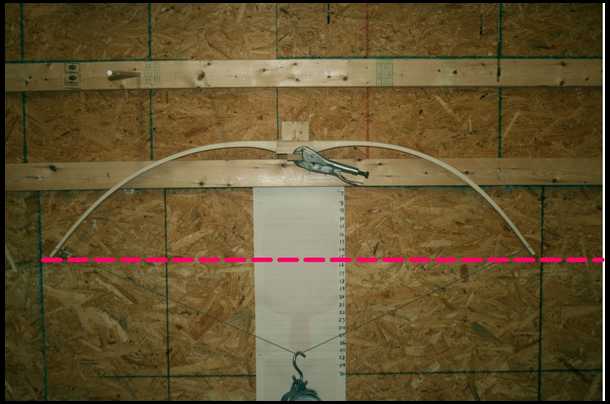
Jeff, it was the way I was holding the camera those horizontal two by fours are perfect'
I layed the bow on the tillering station and measured from the wood to the bow tips and they were within 1/16"
I got brave and removed a little wood in the areas that needed it and I exersized the bow at least 35 times at the 25 inch scale.
Then I decided to draw the bow to 50 lbs it came out exactly at 28", I drew it a couple more times then it dropped to 45lbs. and stayed there, I exercized it about twenty times and it stayed at 45lbs. a little lower than what I expected, but more than the bow I am shooting....Perfect.
If I heat treat it will it help it to stay at 45?
I am sending a photo of the bow unstrung at the end of shooting it.........I forgot to take a photo of my arrows in the target, drats.
I am using a steel cable for tillering and used it for shooting the arrows. I will have a string made, the bow did give me hand shock so I will probably need to raise the brace height a little.
The photo of the bow drawn is off a little because of my camera work, beleive me the rig is absolutely straight.
|
|
| From: RonG
|
|
|
|
|
|
|
| Date: 01-Nov-17 |
|
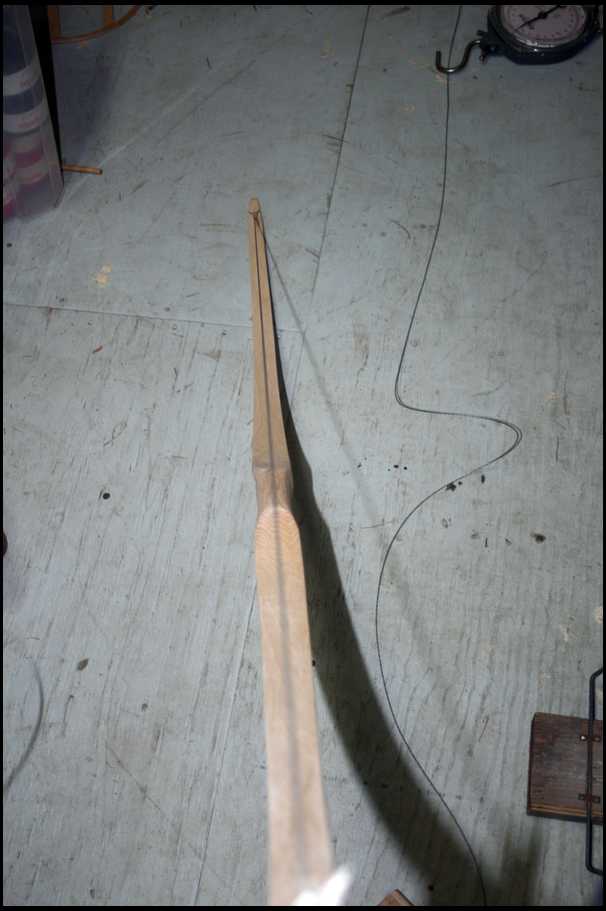
another
|
|
| From: RonG
|
|
|
|
|
|
|
| Date: 01-Nov-17 |
|
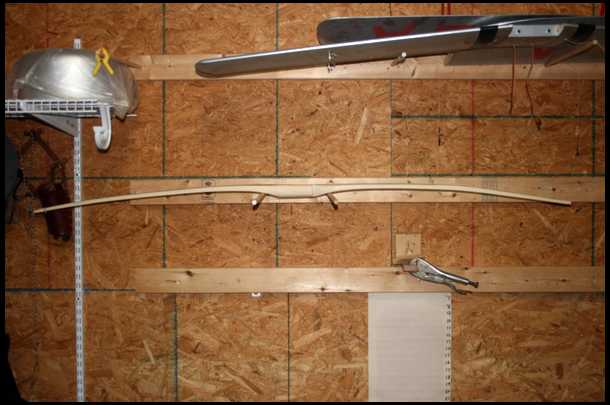
bow unstrung
|
|
| From: Jeff Durnell
|
|
|
|
|
|
|
| Date: 01-Nov-17 |
|
Ron, are you yankin my chain? There are plenty of uses for steel cable. I use it around the garage too. Tillering? ...eh, maybe... But shooting a bow isn't one. I fear it's too heavy, unforgiving, if not damaging, and could be the sole reason for the handshock... causing you to grossly misjudge your bow. Good gravy. Please make strings with regular string material. A tillering string, with a loop on one end and a timber hitch on the other, made with any bow string material is equally as strong and more adjustable, versatile, and any actual double looped string for the bow to be shot with should be of like material for the safety of the bow... and you.
|
|
| From: RonG
|
|
|
|
|
|
|
| Date: 01-Nov-17 |
|
Hey Jeff, What can I say, total brain lapse, I know better than that, I made a string for when I was going to try it out the first time, I have no excuse for that stupid move. I was so excited I guess I forgot about the string.
Well now you got my brain going in the right direction, what do you think about the limbs in the last picture and I could work them a little more, but don't want to lose anymore draw weight.
|
|
| From: RonG
|
|
|
|
|
|
|
| Date: 01-Nov-17 |
|
I got some parachute chord for doing the tillering, I still can't figure out why I used that cable.
|
|
| From: RonG
|
|
|
|
|
|
|
| Date: 01-Nov-17 |
|
Shorthair what you showed was what I was looking to do, but for some reason the bark was really a bear to remove and my draw knife pulled out a chunk 5 rings down, but I was determined to finish this bow because I'm hardheaded and this stave was a gift. The next one will be different.
Nice looking bow.
|
|
| From: bodymanbowyer
|
|
|
|
|
|
|
| Date: 01-Nov-17 |
|
I'm a listing and following along with you guys. I have no input on this, since I've never built one. But I'm interested. JF
|
|
| From: Jeff Durnell
|
|
|
|
|
|
|
| Date: 01-Nov-17 |
|
I think it looks fine in that last drawn picture. Keep inching it back, exercising it 40 times or so after each correction, if needed. Exercise it plenty at your final draw length too, make a string, then go see how it shoots. You're on the home stretch.
|
|
| From: Knifeguy
|
|
|
|
|
|
|
| Date: 02-Nov-17 |
|
Looking good Ron. You should give yourself an :atta boy" Lance.
|
|
| From: Mountain Man
|
|
|
|
|
|
|
| Date: 02-Nov-17 |
|
Looking great Ron!
Smooth is fast
|
|
| From: RonG
|
|
|
|
|
|
|
| Date: 02-Nov-17 |
|
Thanks guys, I can see where I could take some more off that lower limb to get it to curve more evenly, but I'm afraid I will end up with less than what I wanted.
So I will exersize it considerably and finish sanding it for the finish and hopefully the poundage will stay at 45 and shoot well.
I need to reduce the grip a little also, I'm not totally happy with the tillering, but I learned a lot on this one.
One of the biggest thing I learned was when you get within twenty pounds of your desired weight TAKE OFF VERY LITTLE FOR EACH CORRECTION. The weight drops rapidly and it will surprise you, I almost messed this one up.
I will do what Jeff says and I will finish and shoot this one and post the results.......Thank you everyone.
Can't wait to start on the next one the humidity is down. great time for bow making
|
|
| From: PEARL DRUMS
|
|
|
|
|
|
|
| Date: 02-Nov-17 |
|
That last drawn pic looks very good. I'm jealous, Ron.
|
|
| From: RonG
|
|
|
|
|
|
|
| Date: 02-Nov-17 |
|
Chris, thank you for your generous comment.
Thank you for your help on this one and as I said many times before couldn't get there without all the advise I received.
I promise the next one will be finished a lot faster and a lot better, this was my learning bow and it came out pretty good for my first plus being an old fart I was surprised my brain took in all this knowledge. Ha!Ha!
I removed a bunch of wood trying to get that left limb to curve a little better but ran out of poundage before I could get there. thanks for telling me to remove the wood in the fades area, that really smoothed out the curvature of those limbs.
|
|
| From: George Tsoukalas
|
|
|
|
|
|
|
| Date: 02-Nov-17 |
|
Looks good, Ron. Congratulations!
When someone gives a measurement for brace height you need to ask how they measure. I measure mine from string to back of bow. It is usually 7-7.5".
Jawge
|
|
| From: throwback
|
|
|
|
|
|
|
| Date: 02-Nov-17 |
|
Ron, you're doing great job and the help and encouragement you've gotten says a lot about this place and the people here.
|
|
| From: RonG
|
|
|
|
|
|
|
| Date: 02-Nov-17 |
|
Thanks for the kind comment Jawge, I measured this from the string to the back of the grip it came out to 6.5" with a three inch shorter string.......bow 68"....string 65"
Throwback That is why I am encouraging you to start one also, you can't go wrong with the fantastic group of people wanting to help, even though my tiller is off, I am proud of my first success, I could write a book on what I have learned from these very generous folks.
|
|
| From: PEARL DRUMS
|
|
|
|
|
|
|
| Date: 02-Nov-17 |
|
You can learn more from a day or two hands on with a bowyer than reading the TBBs three times each.
|
|
| From: RonG
|
|
|
|
|
|
|
| Date: 02-Nov-17 |
|
I agree, Pearl Drums, I have always been a hands on person instead of a book worm.
I will start a new thread in about three months when I get my next one finished without anymore questions.
I just need to locate another stave.
|
|
| From: RonG
|
|
|
|
|
|
|
| Date: 11-Nov-17 |
|
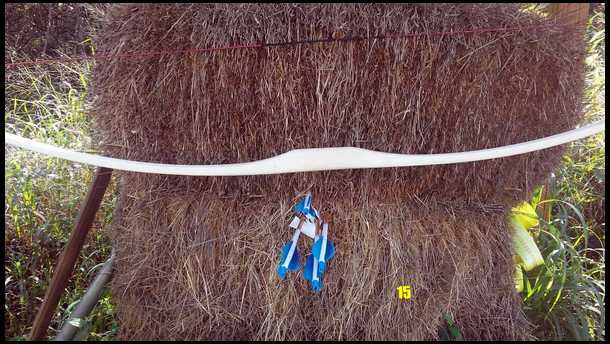
My hickory bow is close to being finished, fine sanding and shaping the tips, then I can stain and clear coat when I figure out what I want to use.
Bow Hickory backed with rawhide 50lbs @28" 68" NTN brace height 7" String BCY-X 10 strand double bundle Nylon double served.
Thank you Pearl Drums for the recommended string I shot fifty arrows and I love it.
If this bow was mediocre I would be the first to mention it, I'm not a braggart, but this thing shoots very respectable. I'm sure it's not in the 180's but this thing will out shoot my laminated 60 inch longbow, I was totally surprised, in the photo's you will see that it shoots straight and hard by the depth of the arrows, this bow hits hard and the first shot I made with it was a 30, 25 20 yard walkup and grouped the arrows very nicely. It has great cast.
Thank you Jeff Durnell for getting me started and all the expert help that I received through 212 postings, I may make a book out of this Ha!Ha!
I can't wait to start another, I honestly don't believe I could duplicate the performance in this one, but I will try.......beginners luck!
The photos are a group shot at 15 yards and the final shape of my grip.
|
|
| From: RonG
|
|
|
|
|
|
|
| Date: 11-Nov-17 |
|
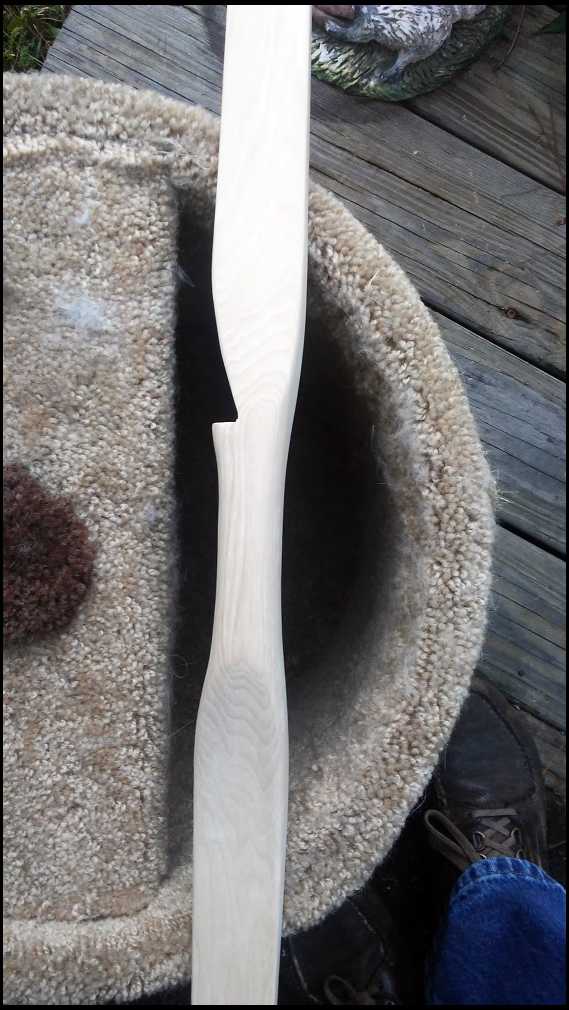
|
|
| From: RonG
|
|
|
|
|
|
|
| Date: 11-Nov-17 |
|
I need to mention that the bow is a little heavy but nothing like my tamerlane, I shaped the grip down after I shot the arrows in the photo, I will be using beaver tail for the arrow rest and backing and serving string when I get my new arrows tuned to it. No cover for the grip, bare wood.
I am proud of my accomplishment, could not have done it without all the generous help, I may go hog hunting, this weell keel.
Anyone else who may be thinking about building one, don't hesitate jump right in, the waters fine.
I also want to thank all you guys for this incurable disease. I have given my Tamerlane away it's boxed just needs shipping. I'm going self bows from now on, even though I had to cover the back on this one due to my carelessness, I believe if I removed the backing it would still be fine.
|
|
| From: Draven
|
|
|
|
|
|
|
| Date: 11-Nov-17 |
|
Good looking bow right there Ron and good shooting as always.
|
|
| From: RonG
|
|
|
|
|
|
|
| Date: 11-Nov-17 |
|
Thank you Draven
|
|
| From: Jeff Durnell
|
|
|
|
|
|
|
| Date: 11-Nov-17 |
|
Ron, you got me smilin' like a jackass eatin' briars up here! Proud? You should be. You made a real good bow there and it looks like you're shooting it well. Are you sure you haven't done this before? :^)
|
|
| From: RonG
|
|
|
|
|
|
|
| Date: 11-Nov-17 |
|
Many times in my dreams Jeff, LOL!
Like I said I do follow directions well and as far as I'm concerned you guys made this bow and I just was the middle man.
I have passed forward several items that I will not need anymore as promised and I will continue making bows as long as I can. I would pass forward my $1500.00 custom bow, but my wife would string me up if she found out, maybe if I make enough bows she won't know it's missing.......Ha!Ha!
Jeff, You just don't realize what you have done for me. And what a compliment, I'm goin to be smilin like a you know what.
|
|
| From: Knifeguy
|
|
|
|
|
|
|
| Date: 11-Nov-17 |
|
Congratulations Ron. You've done well with this bow. Just to further cloud your mind with finishes, take a good look at leather dyes. They are numourous in color and penetrate the wood well. Lance,
|
|
| From: throwback
|
|
|
|
|
|
|
| Date: 11-Nov-17 |
|
Ron, that bow looks like a million bucks and it seems to shoot as good as it looks. Nice job!
|
|
| From: throwback
|
|
|
|
|
|
|
| Date: 11-Nov-17 |
|
Ron, that bow looks like a million bucks and it seems to shoot as good as it looks. Nice job!
|
|
| From: throwback
|
|
|
|
|
|
|
| Date: 11-Nov-17 |
|
Ron, that bow looks like a million bucks and it seems to shoot as good as it looks. Nice job!
|
|
| From: 2 bears
|
|
|
|
|
|
|
| Date: 11-Nov-17 |
|
Great job. I am anxious to see the finish and dye job. Now I need to get busy making one.>>>----> Ken
|
|
| From: PEARL DRUMS
|
|
|
|
|
|
|
| Date: 12-Nov-17 |
|
Fantastic Ron! I know exactly how you felt when you let that string go for the first time. Quiet, faster than you expected, accurate, very calm in the hand and so on. Its why we do it!
If you continue to start with good materials they will come a lot easier after that first one.
|
|
| From: RonG
|
|
|
|
|
|
|
| Date: 12-Nov-17 |
|
Thanks Pearl, I even shot it off the bare arrow rest and it was super quiet and I had a little hand jiggle, but I will play around with that after it's completely finished.
Special Thanks to you also Chris you really hung in there and gave me advise that made common sense to me, and as I mentioned I'm loving that string, this is where less is more.
I'm already bugging Jeff about more staves.....Ha!Ha!
|
|
| From: PEARL DRUMS
|
|
|
|
|
|
|
| Date: 12-Nov-17 |
|
No stretch material was made for bows not fishing :) I'll use mono until I die for that!
Enjoy that bow
|
|
| From: RonG
|
|
|
|
|
|
|
| Date: 12-Nov-17 |
|
2 bears, like I said above, the waters fine, jump in, you will love it. Dye job starting tomorrow, been sanding on this thing for a while today, don't see anymore sanding scratches and the wood is slicker than greased ball bearings.
|
|
| From: RonG
|
|
|
|
|
|
|
| Date: 13-Nov-17 |
|
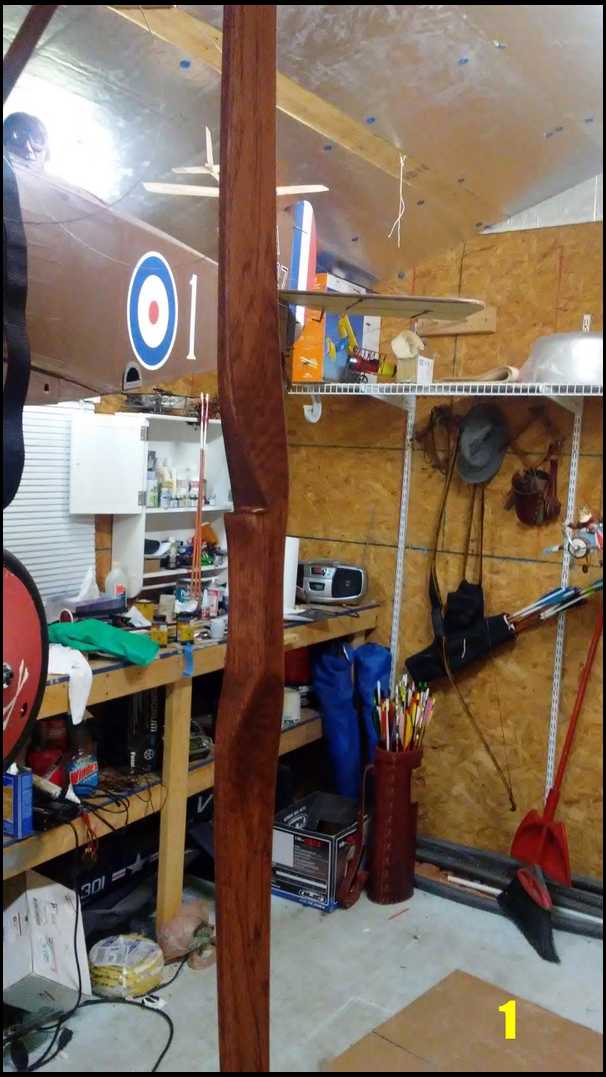
Well, I put some leather dye on the bow, dark brown first coat.
I had some dark areas around the fades I'm assuming because of the different grain, I will put the second coat on tommorrow and try to apply it so the color matches better. I looked down the limbs and saw no sanding scratches except right where the arrow rest goes, I will work on that tommorrow also.
Well no more white bow, I'm going to dye the rawhide on the back of the bow black.
I really like the leather dye it's not as messy as the wood stains. and the color looks richer, the picture does not show what the bow really looks like it was at night artificial light and in a dark area with my phone, when i get it dyed I will take it out in the sunlight and take a better photo.
Thanks Folks.
|
|
| From: Jeff Durnell
|
|
|
|
|
|
|
| Date: 13-Nov-17 |
|
Dye always seems to give them a change of personality. I like it even more now.
|
|
| From: RonG
|
|
|
|
|
|
|
| Date: 13-Nov-17 |
|
I forgot to mention, sorry about the mess, this was my airplane building shed, now I'm turning it into my bow and arrow building.
I'm cleaning it out and should have a nice place to work on archery.
It's a 16 X 30 foot building with A/C and has a deck on the front.
All I need is a coffee pot and a small fridge and I will be set.
That airplane you see hanging in the photo I built is a 1917 Sopwith Pup 1/3 scale has ten foot wings and weighs 44lbs. I have won the blue max airplane contest held in Florida three years in a row and am getting too old to haul this around in a trailer, unload and put it together.
selling all my airplane stuff and going archery as my main hobby.
|
|
| From: Mountain Man
|
|
|
|
|
|
|
| Date: 13-Nov-17 |
|
Looks great Ron
You building biplanes in your spare time?
|
|
| From: RonG
|
|
|
|
|
|
|
| Date: 13-Nov-17 |
|
I have been building them for 25 years, I have built a lot of them for people, but not interested anymore, getting out of it.
|
|
| From: Mountain Man
|
|
|
|
|
|
|
| Date: 13-Nov-17 |
|
Im bout a hour away from the biggest collection of flying WW1 biplanes Atleast once a year since i was 12 i get down to watch them fly
|
|
| From: PEARL DRUMS
|
|
|
|
|
|
|
| Date: 14-Nov-17 |
|
I haven't used stain one time since I first tried dye. Its so much better and easier.
|
|
| From: RonG
|
|
|
|
|
|
|
| Date: 14-Nov-17 |
|
Patrick that is very interesting, it was a living being at one time, actually it still is living, but in a different way. I guess that is where the wood is giving you it's different highlights that are hidden until you apply some color.
Chris, I have used stain for many years and I will never again, thank you folks for directing me to leather dye.....good stuff and it doesn't raise the grain like stain.
|
|
| From: Jeff Durnell
|
|
|
|
|
|
|
| Date: 14-Nov-17 |
|
Lots of little tricks you can do with dye too... blending colors, fading from one to another or to natural wood, creating patterns, steel wool it back off in certain areas to varying degrees ,etc. I use alcohol and oil based aniline powders.
|
|
| From: Steve Milbocker
|
|
|
|
|
|
|
| Date: 14-Nov-17 |
|
Looking good Ron, airplanes and selfbows, for me it don't get any better! I tried flying models once, I decided the ones you sit in are a lot easier to fly!!
|
|
| From: RonG
|
|
|
|
|
|
|
| Date: 14-Nov-17 |
|
Jeff, I'm planning on doing something like that on the next one, I may come up with something on this one yet.
Steve, I have been flying models for over thirty years and a friend of mine who is an instructor asked me if I wanted to take ride in his cessna I said sure, he insisted I ride in the pilots seat, he had me start taxi out to the runway and told me to push the throttle in all the way and don't let go, we proceeded down the runway, he asked me when are we taking off I said you are the pilot and he said I don't have my feet or hands on any of the controls, he said you had better do something because we are out of runway, I took the plane off and flew it around and handed it back to him on the landing because it was a short runway. He knew that flying the models was much more difficult. Sorry for the long story.
|
|
| From: RonG
|
|
|
|
|
|
|
| Date: 23-Nov-17 |
|
I finished dyeing my hickory bow and now I need to sand it down a little to smooth it out before I clear coat it. I checked the moisture and it went back up to 11.5, will have to build a hot box after all.
Building in florida is a pain in the you know what, the moisture in the air is extreme. When I get my building set up with a humidifier and hot box I should be set.
I'm tearing down my benches and redoing for bow building.
Hope everyone had a great thanksgiving, I ate way too much!!!
|
|
| From: SB
|
|
|
|
|
|
|
| Date: 23-Nov-17 |
|
Geez Ron....it just rang a bell when I saw the SOPWITH. I think it was early last year when we exchanged PM s about me getting into RC. I remember seeing that plane in an article about the Blue Max event.Finally got the hang of it and am now flying Biplanes. Well....at least was until winter arrived. Wasn't your old handle Wingstrut? Nice work on the bow. I've built several Hickory bows...Hard to screw up Hickory. But I sure tried before I got it all figured out. But they are all still shooting! The last one was a recurve for the wife. Made a mess out of the kitchen steaming that one! Good to see you again. I've been absent for awhile....flying!
|
|
| From: George Tsoukalas
|
|
|
|
|
|
|
| Date: 24-Nov-17 |
|
The tiller looks great. I like the mc for hickory to be 6-8%. The tiller looks great. Jawge
|
|
| From: Matt Ewing
|
|
|
|
|
|
|
| Date: 24-Nov-17 |
|
Love the looks of that grip! Nice work.
|
|
| From: RonG
|
|
|
|
|
|
|
| Date: 24-Nov-17 |
|
Steve, yes that was me in the magazine for the last three years. I was Wingstrut, but it wasn't appropriate for the bowsite, worked great in the scale builders site....Ha!Ha!
Thank you Jawge, it came out to 50lbs at my draw which was a miracle, because that is what I was shooting for. It was 8% before I dyed it so I'm assuming most of that moisture was from the dye, I will put it in the hot box for a few days and get it to your recommendation before I coat it. Thank You for all your help Jawge, I read your site a hundred times.
Thank You Matt, I shot it several times and I changed it a couple, but got carried away and may have it a little small, I won't worry about that until I'm finished, then if I need to I will put a wrap on the grip.
I tried to mess it up, but you folks came through every time and straightened me out. Thanks to all who have stayed with me and gave this old fart the disease of carving bows out of trees.
I'm getting two more staves and a couple of billets, I told you I got the disease....
I'm converting my airplane shop into a bow building shop.
Now this is what I call retiring, learning and keeping my brain exercized........Ha!Ha!
|
|
| From: H Rhodes
|
|
|
|
|
|
|
| Date: 24-Nov-17 |
|
Congratulations! Fine looking bow.
|
|
| From: George Tsoukalas
|
|
|
|
|
|
|
| Date: 24-Nov-17 |
|
RonG, you are welcome. Glad to help. Jawge
|
|
| From: RonG
|
|
|
|
|
|
|
| Date: 24-Nov-17 |
|
Thanks Howard, I did the final sanding and decorating this evening, I will now put it in a bow oven and slowly dry it out so I can put the clear on it.
|
|
| From: RonG
|
|
|
|
|
|
|
| Date: 30-Dec-17 |
|
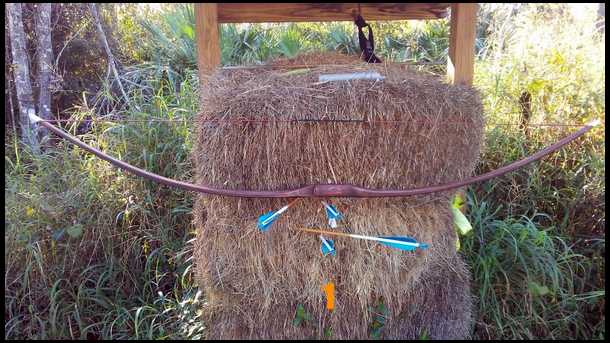
I have not put the clear on yet, I decided to shoot the heck out of it first in case I needed to change something.
I wouldn't change the way it shoots, it shot my light arrows to the left of where I was aiming and it shot the much heavier ones pretty much in the center.
The one photo with the blue feathered light arrows I shot at different angles at 15 yards.
The other photo I shot heavier arrows at 20 yards.
The bow shoots great and has a trmendous cast to it.
|
|
| From: RonG
|
|
|
|
|
|
|
| Date: 30-Dec-17 |
|
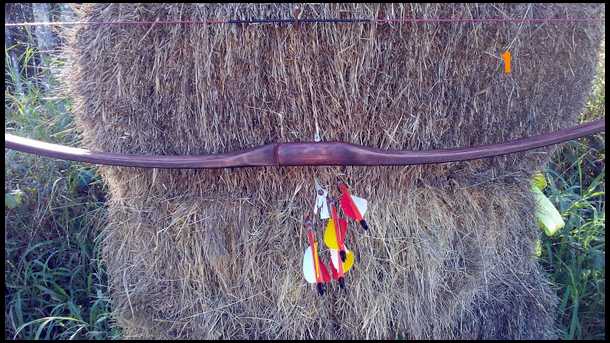
Heavier arrows
|
|
| From: RonG
|
|
|
|
|
|
|
| Date: 30-Dec-17 |
|
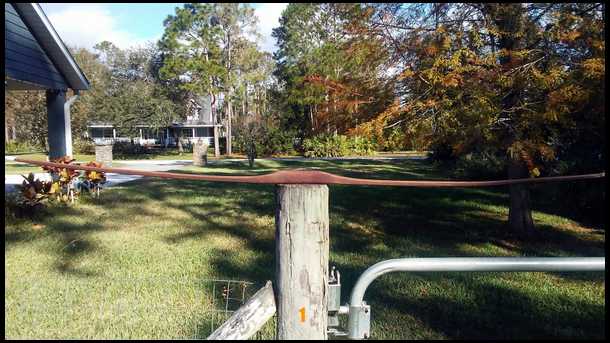
After I dyed the rawhide on the back of the bow black I took some 600 grit and sanded until I got these highlights, it breaks up the solid color, I'm going to sand some more to even up the pattern.
Having a little Mohawk blood in me as I have been told, I like to add a little color to my bows, unfortunately my arthritic hands won't let me do it cleanly or evenly, makes me very upset.
Unstrung
|
|
| From: RonG
|
|
|
|
|
|
|
| Date: 30-Dec-17 |
|
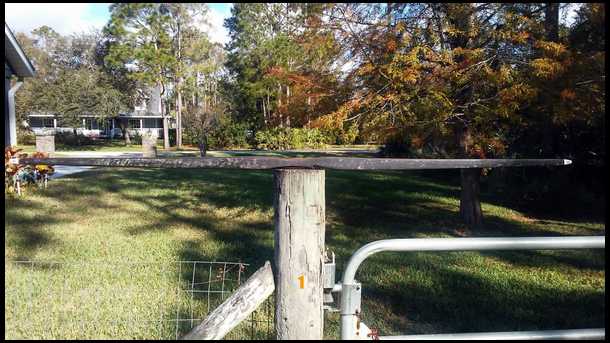
front
|
|
| From: RonG
|
|
|
|
|
|
|
| Date: 30-Dec-17 |
|
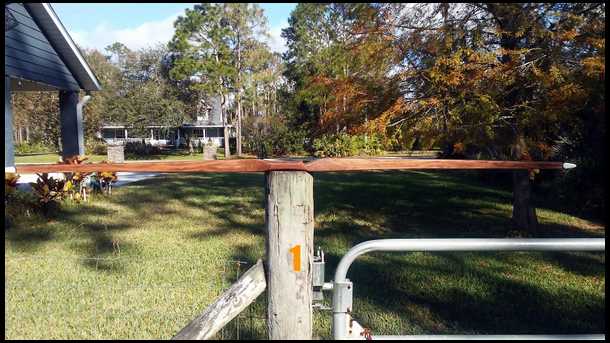
sorry mislabeled previous picture
this is the front
|
|
| From: Draven
|
|
|
|
|
|
|
| Date: 30-Dec-17 |
|
It looks great Ron
|
|
| From: RonG
|
|
|
|
|
|
|
| Date: 30-Dec-17 |
|
Thanks Draven,
|
|
| From: badger
|
|
|
|
|
|
|
| Date: 30-Dec-17 |
|
Good job! It came out great!
|
|
| From: Knifeguy
|
|
|
|
|
|
|
| Date: 30-Dec-17 |
|
Nice job Ron. My hickory bow likes heavier arrows too. Lance
|
|
| From: throwback
|
|
|
|
|
|
|
| Date: 30-Dec-17 |
|
Beautiful bow Ron, I love it!
|
|
|
|
| From: RonG
|
|
|
|
|
|
|
| Date: 30-Dec-17 |
|
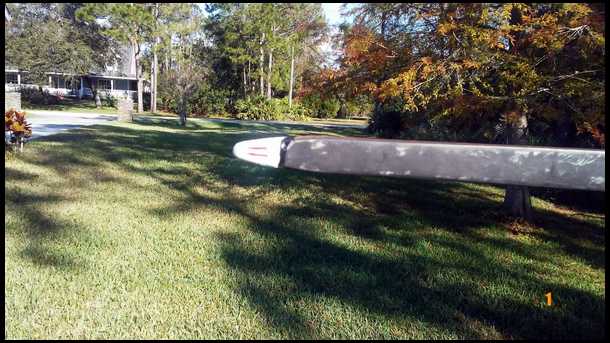
I wasn't going to show this photo because my painting abilities have gone south, but I am going to redo the tips to touch them up and keep trying until my brain and hands get coordinated.
The two red stipes I actually cut them in the tips with a U shaped gouge then I screwed them up by trying to paint them with my frozen hands......LOL!!!
I can't turn out a bow that is not something I'm not happy with. Bear with me It won't be much longer.
|
|
| From: unhinged
|
|
|
|
|
|
|
| Date: 31-Dec-17 |
|
What a fun journey! Your backyard is beautiful. How much set did the limbs take? I have never been able to make a Hickory self bow that did not take more set than I was happy with.
|
|
| From: stikbow208
|
|
|
|
|
|
|
| Date: 31-Dec-17 |
|
Congratulations, Ron! I've never had much interest in selfbows but after reading of your progress and satisfaction I'm thinking I may try it this summer. I have a friend that has been making them for many years and I'd do it under his guidance, as well as the great group here. You have a beautiful bow and every right to be very proud.
Roger aka Stik
|
|
| From: RonG
|
|
|
|
|
|
|
| Date: 31-Dec-17 |
|
Steve, you can see in the first photo of the bow on the fence post that is unstrung, so it didn't curl back too much, I measured 11.5% moisture in the bow so I will not shoot it anymore until I dry it out and get at least six coats of tru-oil or some other finish on it to at least reduce the moisture intake, the bow surprised me in how powerful at 50lbs it is, it really sinks those arrows and the cast is surprising also, I shot it without shelf padding I just nocked the arrow a little high and gripped the bow a little high and shot off my finger like you would a bare bow. PS: that happens to be looking toward my front yard on the side of the house, that is my neighbors house across the street. I have 52 acres of swamp behind my property....No mans Land.. LOL!
Roger, That is one of the best replies that I could hope for. I never thought that my interest in building a bow would influence anyone else. By having an instructor helping is the cats meow, like Pearl Drums said one day with an instructor is better than reading all the books written on the subject, or something similar.
You really need to keep your interest and do it, I know you can I'm 71 pushing 90....Ha!Ha! that is how I feel sometimes, If I can do it I know you can and will.
These folks here are great.
|
|
| From: RonG
|
|
|
|
|
|
|
| Date: 02-Jan-18 |
|
I finally got enough chores done to get to the hardware store and purchase my light fixtures, bulbs and wire to wire up my drying box. It's getting difficult finding incandescent bulbs.
Will do that tonight after I install new spark plugs in the truck, busy, busy, busy!!! LOL!
Hey folks the weatherman is predicting snow for Florida this week. Nice, but it won't stay on the ground long enough to do anything with it.
|
|
| From: PEARL DRUMS
|
|
|
|
|
|
|
| Date: 03-Jan-18 |
|
That's a wrap. Great work and way to follow through to the end, Ron. You chose some nice, muted colors for a hunting bow.
|
|
| From: RonG
|
|
|
|
|
|
|
| Date: 03-Jan-18 |
|
Thank you Chris, the white tips may not be the best thing, but I like a little color in my stuff.....Ha!Ha!
Can't hardly wait to see your finished Osage.
I am starting a Hop Hornbeam billet bow sometime this month I will post the build.
Quickdraw started the same time I did and he just finished an Osage that is outstanding, he is way ahead of me on building bows, I will catch up.
|
|
| From: PEARL DRUMS
|
|
|
|
|
|
|
| Date: 03-Jan-18 |
|
I love white/light tips on dark bows, its screams classy.
You will love your HHB, its very good bow wood when cooked right.
|
|
| From: RonG
|
|
|
|
|
|
|
| Date: 03-Jan-18 |
|
Gee whiz I didn't know I was Classy!!!!LOL!!... ....Oh, the bow is classy, not me.
You mentioned when it's cooked right.......May I ask, do I have to cook it and what spices do I use......smile!
A heat gun I presume.
Chris, I'm still loving that string you suggested for this bow.
I don't use a nock locator on my strings and that double serving suggestion really fits my bohning classics perfectly.
|
|
| From: PEARL DRUMS
|
|
|
|
|
|
|
| Date: 04-Jan-18 |
|
You got it, temper that HHB and add some mild reflex, but not too much.
No stretch strings are the only way to go an any bow, especially wood bows. Glad its working for you.
|
|
| From: RonG
|
|
|
|
|
|
|
| Date: 04-Jan-18 |
|
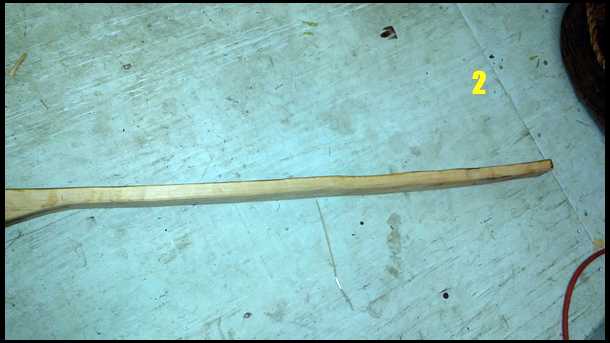
I'm going to start a new build on this HHB, from what a few folks on this site have mentioned, especially Jeff Durnell, I am anxious on getting this one started and finished in short order.
My Hickory bow in our air conditiond house in the closet where its warm on an outside wall still is maintaining 11.5% moisture content, I put it in the drying box at 80 degrees and will leave it there for a few days and see how it dries, I don't want to dry it to fast, then I will put clear coat on it. Probably at least six coats.
|
|
If you have already registered, please sign in now
For new registrations Click Here
|
|
|
|