| From: zonic
|
|
|
|
|
|
|
| Date: 30-Oct-16 |
|

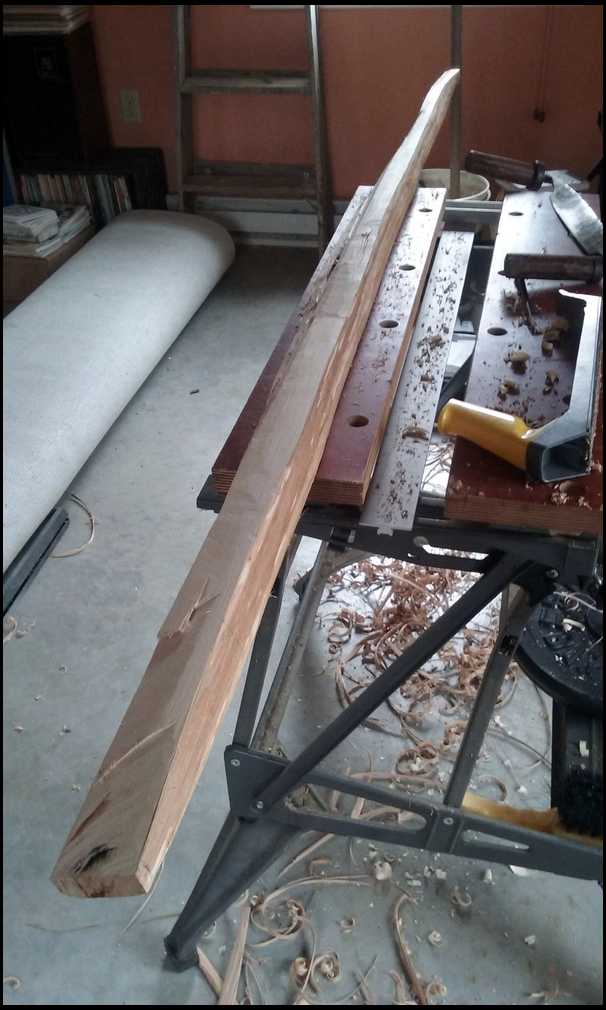
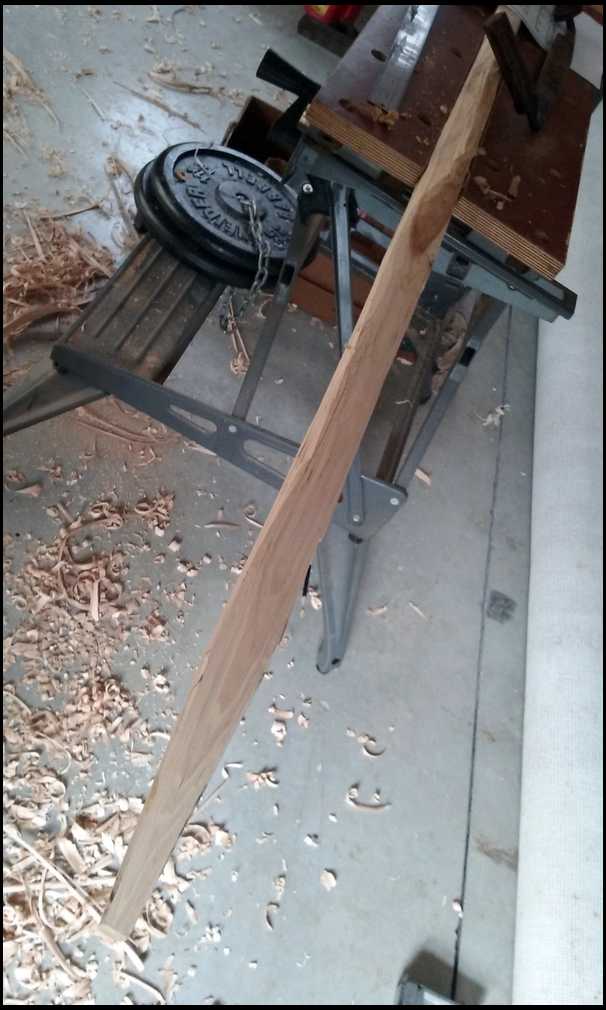
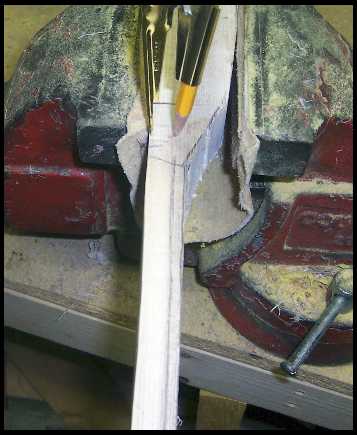
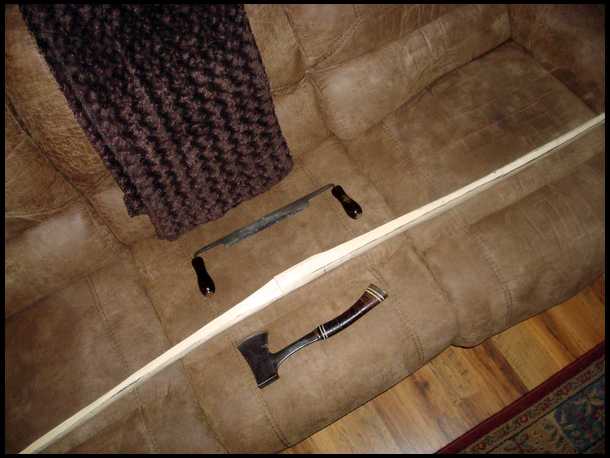
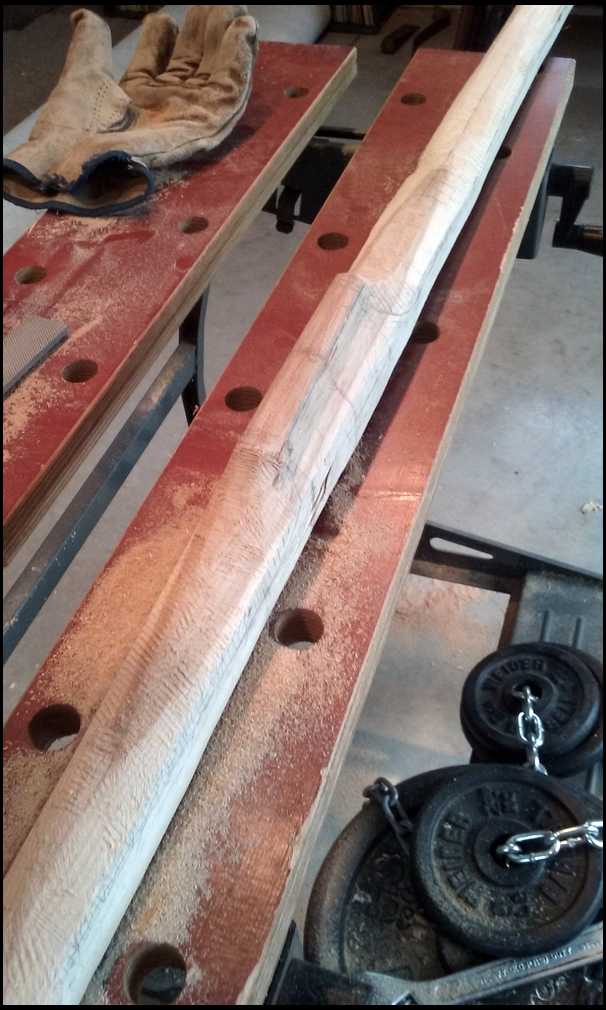
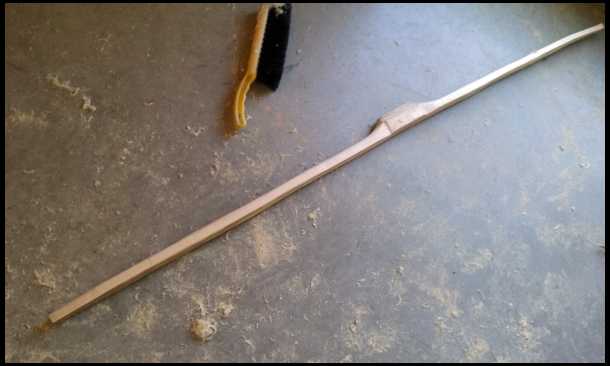
Was gifted a dry hickory stave about a year and a half ago. Been gathering tools and confidence to start. Peeled the bark and cambium at the beginning of the summer. Took my time and laid out a design on the back in my spare minutes here and there. Not too sure how I did. Last weekend hacked the edges off w/ a 7 1/4" circular saw - not as easy as you'd think. Today I reduced the sides closer w/ an old draw knife I got off the auction site for like $10. Felt so good to finally be using it. Looking for advice how to proceed. Laying out side profile, and tool progression from hogging off material to final finish?? Thanks guys. Been inspired by members on this site. Hope I'm not ruining a good stave lol. Steve
|
|
| From: zonic
|
|
|
|
|
|
|
| Date: 30-Oct-16 |
|

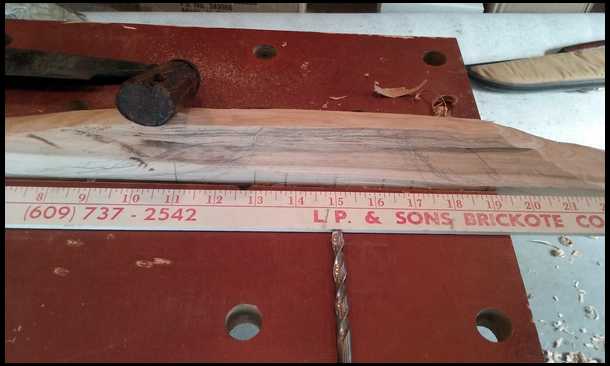
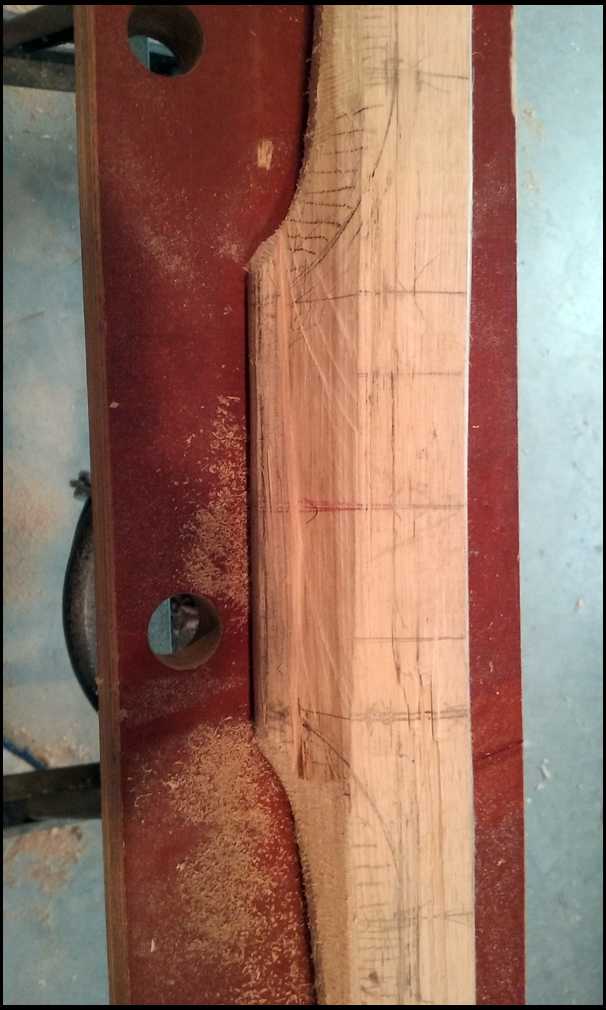
Possible trouble spot?
|
|
| From: zonic
|
|
|
|
|
|
|
| Date: 30-Oct-16 |
|

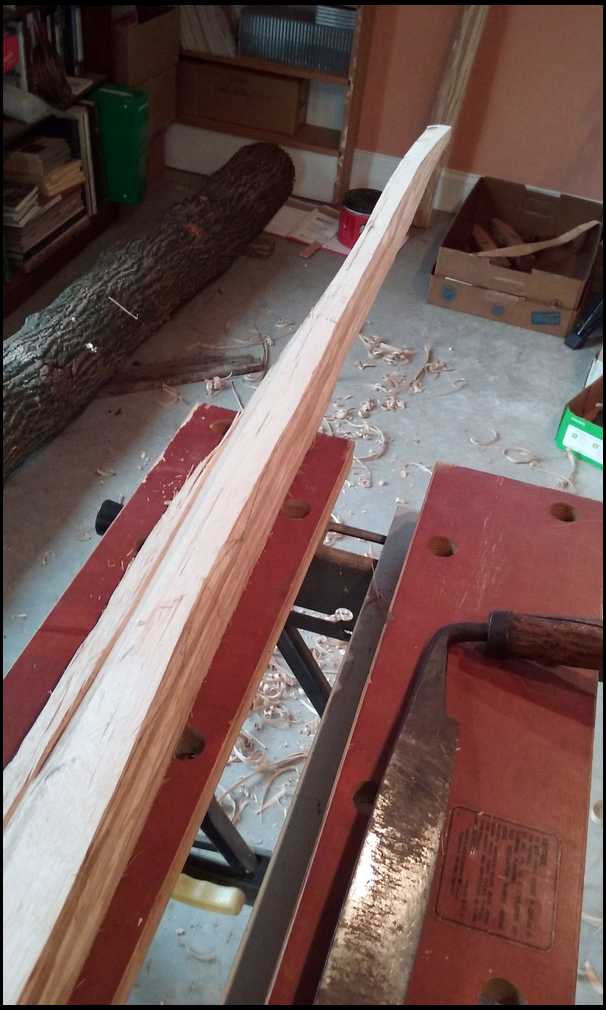
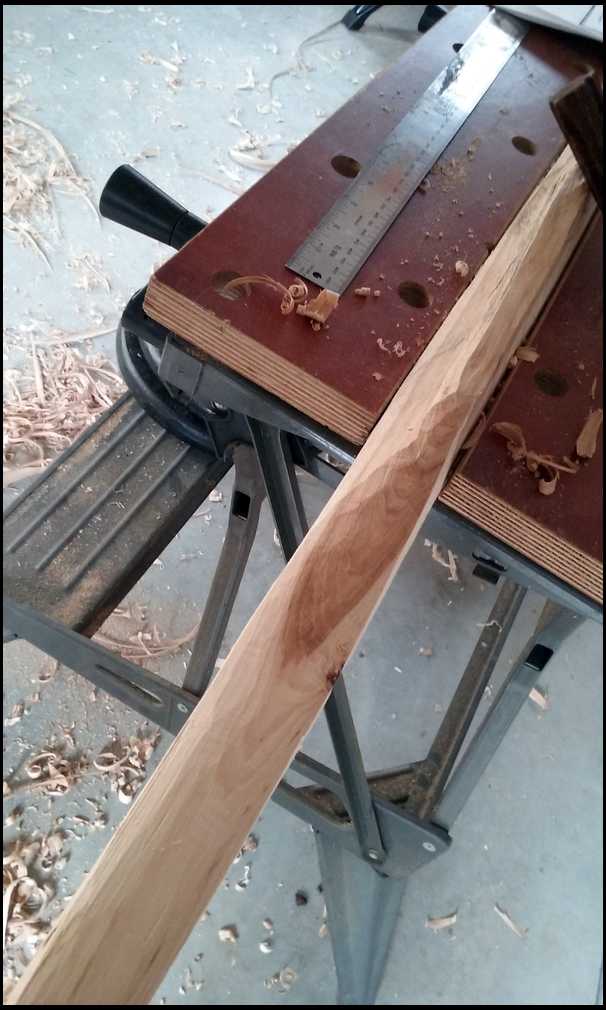
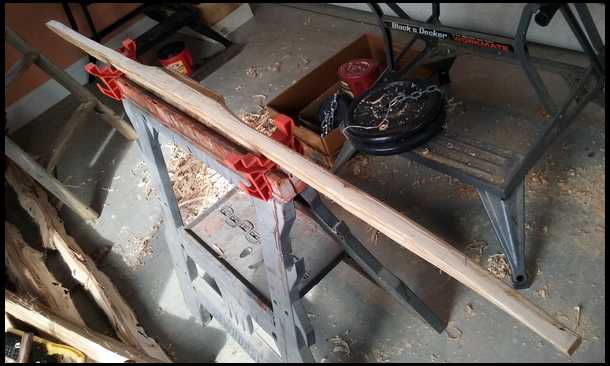
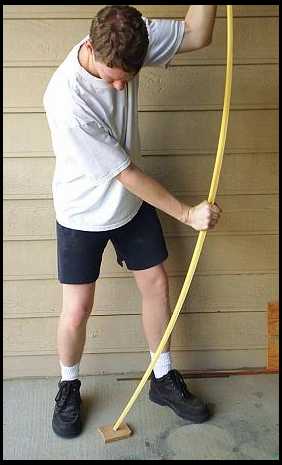
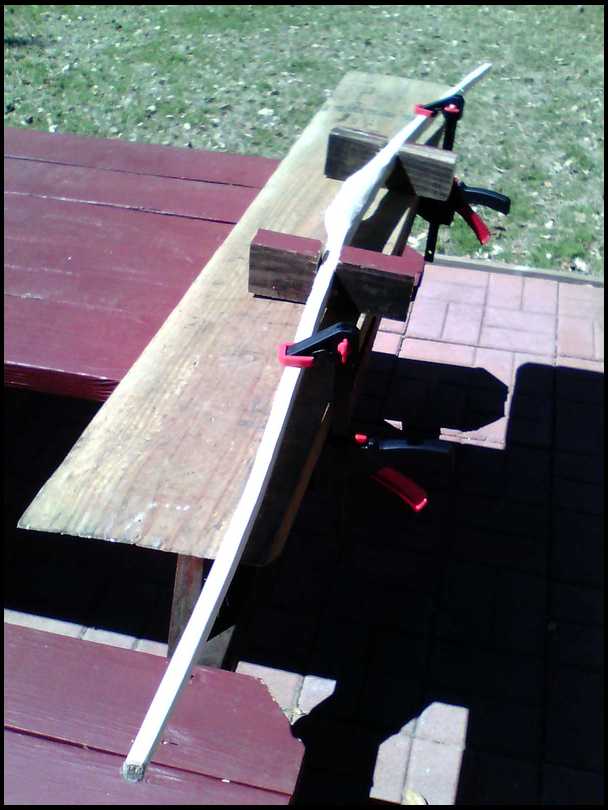
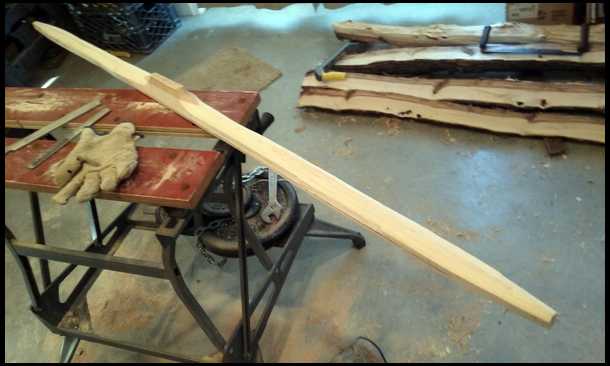
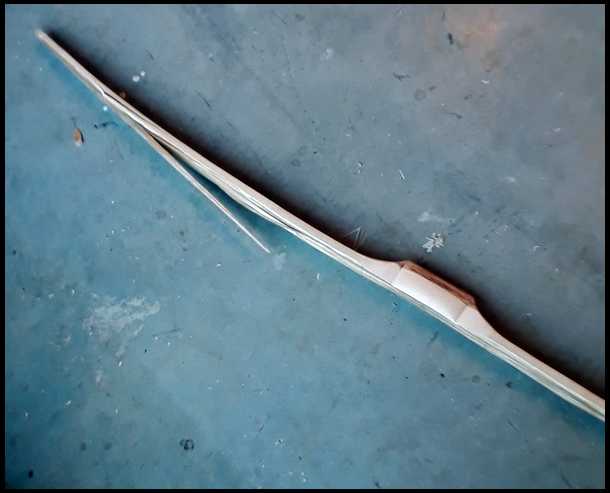
A pic from last weekend. Shows a little natural reflex - at one end especially.
|
|
| From: zonic
|
|
|
|
|
|
|
| Date: 30-Oct-16 |
|

|
|
| From: zonic
|
|
|
|
|
|
|
| Date: 30-Oct-16 |
|

|
|
| From: zonic
|
|
|
|
|
|
|
| Date: 30-Oct-16 |
|

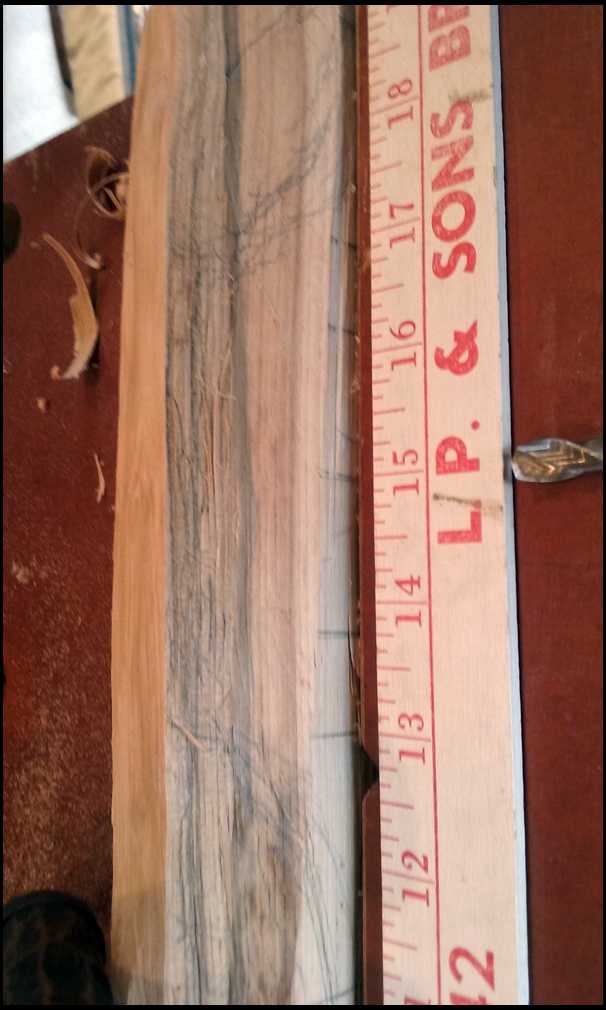
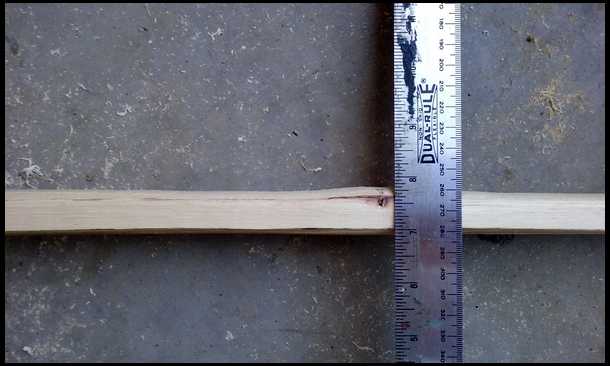
66" long - not sure if this light gouge (just through cambium?) will need to be missed when locatng nocks.
|
|
| From: Jeff Durnell
|

|
|
|
|
|
|
| Date: 30-Oct-16 |
|
So far, so good, Zonic. Continue to take your time and ask questions.
That "trouble spot" will probably be entirely gone when you cut or pare away all the excess wood on the belly side, so don't worry much about it.
At this point, assuming everything is relatively aligned and needs no serious heat corrections, I would bring it accurately to its width profile with a drawknife, plane, rasp, sander, or whatever you have available, keeping the sides as perpendicular to the back as possible. You can leave the outer limb a little wider in case you need to move a tip one way or the other to achieve alignment later on.
It's not necessary that you bring the handle area to its width profile right now, just bring it to its maximum width and keep that width parallel through that area, from limb to limb, until you get through this next step.
After bringing the limbs to width profile, I would scribe a line down the sides that shows your initial thickness profile, and then cut it out. If you don't have a bandsaw, I'd recommend doing this with a hatchet, drawknife, or something... but not a circular saw... unless you're REALLY adept and conservative with it. I'm good with a circular saw, and I wouldn't risk it.
For a 'flatbow', when I scribe that initial line down the side of the stave, I mark it at 3/4" at the dips, 5/8" at the tips, and then using a pencil held between my thumb and index finger, follow the contours of the back with my middle finger as a guide, moving from dips to tips, while gradually bringing those fingers closer together, which creates the taper. Kinda hard to explain... but fairly easy to do. You should practice this until you get onto it because it's a very useful technique, and you can erase or scrape your pencil lines off as many times as needed to get it right.
Also, while you are addressing the limb thickness, you can draw the lines on the side of the handle area that determine the handle thickness and shape, to include the dips and how they fade into working limb... keep in mind, this, and all measurements I offered, are all slightly oversized. Always reduce in stages. Don't try to get to the finished bow in just one or two steps/cuts. It's easy to take wood off... not so easy to put it back on.
When this much is done, and if everything checks out, you can gradually lower the lines on the side to further thin the limbs and get them flexing a bit as you floor tiller.
I may have moved a little quickly there.. so any questions at all, clarification, or even pics needed??? just say so.
It's nice to see someone working on a selfbow on this site for a change :^)
|
|
| From: zonic
|
|
|
|
|
|
|
| Date: 30-Oct-16 |
|
Jeff - thank you for taking the time to describe those steps. I get what you're saying and I know I will be re-reading your post several times before proceeding. One question on cutting away the big stuff from side profile - what's your thought on using a jigsaw for that - since I have no access to a table saw at the moment??
|
|
| From: zonic
|
|
|
|
|
|
|
| Date: 06-Nov-16 |
|

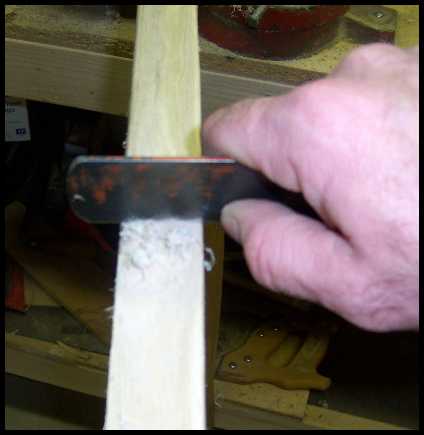
Rasped the sides a little closer today.
|
|
| From: Gaur
|
|
|
|
|
|
|
| Date: 06-Nov-16 |
|
Cool. Hope it turns out well for you
|
|
| From: George Tsoukalas
|
|
|
|
|
|
|
| Date: 06-Nov-16 |
|
Jeff, gave good advice.
I would consider leaving power tools for later in your bow making. One slip and...
Anyway, there's info on my site.
http://traditionalarchery101.com/
Jawge
|
|
| From: Phil
|
|
|
|
|
|
|
| Date: 07-Nov-16 |
|
All looking excellent Zonic ...
The only words of advice I can offer is ... exploit Jeff, George and Gaur' skills and knowledge as much as you can .. they're your best and sharpest tool in your box
|
|
| From: Chief RID
|
|
|
|
|
|
|
| Date: 07-Nov-16 |
|
I have broken one and made one that is still drawing after over 25 years. It developed rising grain on the limb edges because of grain run out. I don't shoot it anymore. It was an elm stave I cut. I have several bows in various stages now.
I think you are doing great. Just keep going and don't expect perfection on the first one. I think getting as many bows under your belt early in your journey will make you a better bowyer. That is what I wish I had done.
|
|
| From: zonic
|
|
|
|
|
|
|
| Date: 07-Nov-16 |
|
Thanks guys. Guess I'll remove most of the meat from the belly w/ the draw knife then. Would prefer not to use power tools anyway. Will keep you all posted. Steve
|
|
| From: woodshavins
|
|
|
|
|
|
|
| Date: 07-Nov-16 |
|
You're doomed man! Once you start, you're hooked:-) Looking good. I can't add much to what Jeff and George said. They are the masters! Just take your time. You'll learn a lot with each one.
|
|
| From: Jim Davis
|
|
|
|
|
|
|
| Date: 07-Nov-16 |
|
Rive, rove, riven strive, strove, striven thrive, throve, thriven drive, drove, driven
GIVE, GAVE, GIVEN.
|
|
| From: The Whittler
|
|
|
|
|
|
|
| Date: 07-Nov-16 |
|
Jim, too much coffee this morning. :-)
|
|
| From: zonic
|
|
|
|
|
|
|
| Date: 11-Dec-16 |
|

I haven't gotten any farther on this project - though I'm going to put some time at it this afternoon. We did get to brew up a batch or two of jerkey using the soaked hickory shavings on the smoker.
|
|
| From: Bob Rowlands
|
|
|
|
|
|
|
| Date: 11-Dec-16 |
|
Thanks for this good thread. Just jump in and do it. Keep us posted.
|
|
| From: Dkincaid
|
|
|
|
|
|
|
| Date: 15-Jan-17 |
|
Any progress
|
|
| From: BowAholic
|
|
|
|
|
|
|
| Date: 15-Jan-17 |
|
There are some pretty good reference on this site as well. It's looking good. http://www.stickbow.com/features/index.cfm?feature=selfbows
|
|
| From: RonG
|
|
|
|
|
|
|
| Date: 15-Jan-17 |
|
Fantastic Zonic, I'm going to post my build also so I'm taking advantage of the pictures and info of yours, beautiful job,
I don't use power tools either I like to sharpen my hand tools with Japanese water stones extremely sharp, and what a pleasure to use them.
A lot of great guys on this site willing to help, good luck on your first bow and may it turn out perfect.....RonG
|
|
| From: zonic
|
|
|
|
|
|
|
| Date: 15-Jan-17 |
|
I haven't made much progress, besides clearing out some add'l indoor space in an outbuilding to work out of the weather. I did strap the stave to a horse using inner tubes and removed some of the rough material from belly side w/ draw knife. Still have't laid out profile on the sides. Stressing over handle design/layout a little bit to tell you the truth.
Looking forward to viewing your build thread Ron.
Steve
|
|
| From: Dkincaid
|
|
|
|
|
|
|
| Date: 15-Jan-17 |
|
Don't stress man just start with a rasp. I worried forever about things on my first couple of bows now I just start and see where it goes.
|
|
| From: zonic
|
|
|
|
|
|
|
| Date: 16-Jan-17 |
|
Thank you David. I will try and dig in next two-hour window I get!
|
|
| From: Chief RID
|
|
|
|
|
|
|
| Date: 16-Jan-17 |
|
No stress. I have not done any work on mine either. How was the jerky?
|
|
| From: Whitefeather
|
|
|

|
|
|
|
| Date: 17-Jan-17 |
|
Jeff gave great advice. One thing I would add is that you must keep hickory's moisture under control. It likes to suck water out of the air. I like to have my hickory between 6-8 percent moisture, closer to 6 is my preference. Too much and it'll wanna take set.
|
|
| From: John Scifres
|
|
|
|
|
|
|
| Date: 17-Jan-17 |
|
Don't worry about the handle now. Get the thing tillered first. Handle shaping is the last thing I do as far as major wood removal. I just leave it the full width of the bow and 1-1/4" thick, squared off.
My first several bows were made with a hatchet and a butcher knife so you having a drawknife puts you far ahead of me when I was starting out :)
How big is your drawknife? If it is big enough, you should be able to get really close to profile once you master careful wood removal with it. Get the belly thickness down to 3/4" or so and then let's see where you are.
Get a bench vise. I see them on craigslist all the time really cheap.
Here's my roughout tute from eons ago: http://sticknstring.webs.com/roughout.htm
|
|
| From: RonG
|
|
|
|
|
|
|
| Date: 17-Jan-17 |
|
Whitefeather, I live in florida where the humidity is at least 60 to 90 percent, do I have to make a hickory bow in doors in the AC.
|
|
| From: Whitefeather
|
|
|
|
|
|
|
| Date: 17-Jan-17 |
|
I would do what you had to do to keep the wood around 6-8% moisture. I personally would not bend wood if working in high humidity. I noticed a long time ago that bows would take undo set, even Osage. I typically only work on bows in a controlled climate now, especiallially when tillering. I keep a temp/humidity meter where I'm building and record those numbers when I work on the bows. I have a designated area and run a dehumidifier to keep things where I like them. A hot box would also suffice to keep out unwanted moisture and/or aid in removing excess moisture from the wood.
|
|
| From: George Tsoukalas
|
|
|
|
|
|
|
| Date: 17-Jan-17 |
|
There a buildalongs on my site. Jawge
http://traditionalarchery101.com
|
|
|
|
| From: zonic
|
|
|
|
|
|
|
| Date: 28-Jan-17 |
|
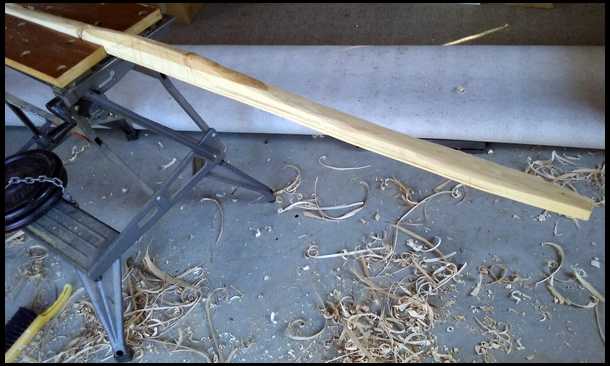
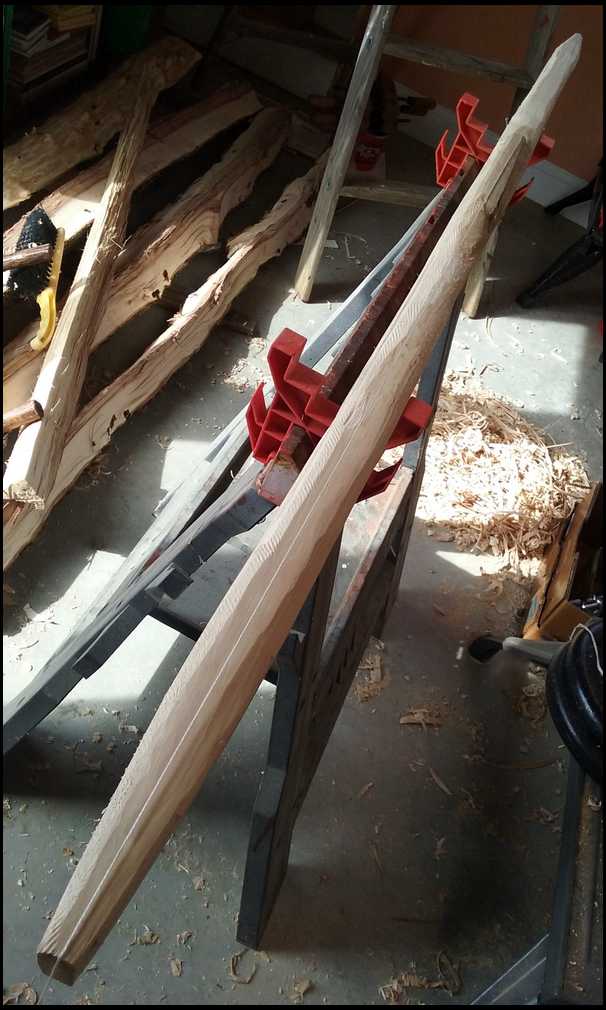
Got to remove some wood from limb (in background) today.
|
|
| From: zonic
|
|
|
|
|
|
|
| Date: 28-Jan-17 |
|
The hickory shavings smoked venison jerkey came out great by the way!
|
|
| From: zonic
|
|
|
|
|
|
|
| Date: 29-Jan-17 |
|
Better pic
|
|
| From: woodshavins
|
|
|
|
|
|
|
| Date: 29-Jan-17 |
|
Good to see you're getting at it! I'm just about done tillering a piece of hickory myself.
|
|
| From: zonic
|
|
|
|
|
|
|
| Date: 29-Jan-17 |
|
What dimensions have you built your hickory bow to? Espeically curious about handle layout. Thanks.
|
|
| From: woodshavins
|
|
|
|
|
|
|
| Date: 29-Jan-17 |
|
67" nth. 5" handle with 2" fades. 1.75" wide from fade to midlimb. Then tapered to 3/8" nocks. 6" deep narrow, non bending tips. The picture is showing the bottom limb on top. I like around 1/4" positive tiller with the arrow 1" north of the center of the bow. More than one way to do it of course. This has worked for me.
|
|
| From: zonic
|
|
|
|
|
|
|
| Date: 22-Feb-17 |
|
|
|
| From: zonic
|
|
|
|
|
|
|
| Date: 24-Feb-17 |
|
Really stressing over laying out the handle shape. It's holding me back from progressing. Also a couple knots to contend with. 2 in fadeouts I guess shouldn't be a problem. But there is part of one diagonally in side of mid limb that is about 3/4" from the back of the bow. (knot not visible in above pic) Sooner or later will need to make tillering stick.
|
|
| From: Kwikdraw
|
|
|
|
|
|
|
| Date: 24-Feb-17 |
|
Glad to see this, gonna start on my hickory stave in a week or so, still looking for draw knife, and thinkin' about it. My main problem is patience, which I can see will be much needed in this endeavor! Keep up the good work Steve, and the posts, very informative! Wyatt
|
|
| From: zonic
|
|
|
|
|
|
|
| Date: 02-Mar-17 |
|
Thanks Whyatt. I've accepted the requirement for patience. Wife calls this my retirement bow because it will probably take that long to finish it. Hopefully I don't ruin it. I hope it's a success because I have a nice hop hornbeam stave sitting here for attempt #2. Good luck with your hickory!
|
|
| From: zonic
|
|
|
|
|
|
|
| Date: 02-Mar-17 |
|
I got my draw knife from the big auction site. Paid around $10 for it and am very pleased with it. I do need to learn how to resharpen properly. So if anyone has advice for me on that, I'd appreciate it.
|
|
| From: zonic
|
|
|
|
|
|
|
| Date: 02-Mar-17 |
|
Really need to make some decisions on the handle shape so i can complete the rest of the rapid wood removal and get to some floor tillering. I'm stuck here
|
|
| From: zonic
|
|
|
|
|
|
|
| Date: 02-Mar-17 |
|
Love seeing the exposed heartwood tapering from handle area to limbs. I hope that knot gives me no trouble.
|
|
| From: zonic
|
|
|
|
|
|
|
| Date: 02-Mar-17 |
|
Handle dimensions suggestions, please?
|
|
| From: PEARL DRUMS
|
|
|
|
|
|
|
| Date: 02-Mar-17 |
|
2" fades, 4" grip. Find the center and mark 2" each way, that's your grip. Measure 2" from each eand of that section and those are your fades. That knot is nothing to worry about, round it off nice and forget about it. Don't let this become stressful to you and don't split too many hairs worrying, its very simple. Fellas built them with rocks 10,000 years ago.
|
|
| From: zonic
|
|
|
|
|
|
|
| Date: 02-Mar-17 |
|
Thanks PERL DRUMS. That is just what I needed to know & hear! Steve
|
|
| From: zonic
|
|
|
|
|
|
|
| Date: 02-Mar-17 |
|
How deep should grip be?
|
|
| From: PEARL DRUMS
|
|
|
|
|
|
|
| Date: 02-Mar-17 |
|
I like to start at 2". By the time I round it off and make it fit my hand the way I like it to, its near 1 3/4". I have very large hands and that feels best to me. As long as you stay at least 1 1/4" deep, the handle wont flex. This is just one cool part about making your own rigs.
|
|
| From: PEARL DRUMS
|
|
|
|
|
|
|
| Date: 02-Mar-17 |
|
And, shoot the snot out of it before you seal it up. A grip can feel great at first. Then after a week of shooting it you realize you want it shaped just a bit different.
|
|
| From: George D. Stout
|
|
|
|
|
|
|
| Date: 02-Mar-17 |
|
zonic, you have some awesome help here. Good luck on your bow and I expect to see a good result with this bunch helping out.
|
|
| From: George Tsoukalas
|
|
|
|
|
|
|
| Date: 02-Mar-17 |
|
I usually lee the hands full width until full draw... 2 inches or so. That way you don't waste time if she Moby Dick's on you. Also, that way you can shape the handle to track the string better.
Jawge
|
|
| From: zonic
|
|
|
|
|
|
|
| Date: 05-Mar-17 |
|
Thanks guys. How thin do I need to work the limbs down before I can start to floor tiller?
|
|
| From: PEARL DRUMS
|
|
|
|
|
|
|
| Date: 05-Mar-17 |
|
Work on one limb at a time. Draw a line a 1/2" up from the back and parallel to the belly, then draw a line right down the center of the belly. Rasp that shape in line to line, similar to a pyramid shape. Once you get that consistent it should bend on the floor fairly close and have enough bend to it that you can actually see movement in the limbs. Knock that top dead center of the pyramid down to make flat spots move more.
|
|
| From: PEARL DRUMS
|
|
|
|
|
|
|
| Date: 05-Mar-17 |
|
Knocking the top dead center down with a scraper to make flat spots bend on the floor tiller. Once you get the limbs moving mostly evenly 5 or 6", brace it up so the string just clears the grip. Use a tiller stick and straight edge from there on out to balance, even and knock off weight.
|
|
| From: zonic
|
|
|
|
|
|
|
| Date: 12-Mar-17 |
|
Great advice PEARL DRUMS. Thank you.
|
|
| From: zonic
|
|
|
|
|
|
|
| Date: 12-Mar-17 |
|
I got a little farther today. So should I stay with 4" handle + 2" fades"?? Or can/should I go any more than 4 & 2? Bow is 66" tip to tip. limbs are 1.5" wide, then taper to 1/2 " the last 6" per Pine Hollow build-along.
|
|
| From: PEARL DRUMS
|
|
|
|
|
|
|
| Date: 13-Mar-17 |
|
I have big hands and a 4" grip fits nice. I would rather keep more working limb than a longer fade/handle area. 66" is only 63.5 - 64" ntn when all is said and done. You will want all the length you can squeeze out of it.
|
|
| From: Kwikdraw
|
|
|
|
|
|
|
| Date: 13-Mar-17 |
|
You're doin' good Steve, keep it up. I'm almost to floor tiller stage, but have a slight deflex in the upper limb I need to straighten out a little, then more whittling and shavin'. This has turned out to be lots more fun and interesting than I thought. Looked like too much work,(since I'm old), but it's really not too bad - PATIENCE!
|
|
| From: zonic
|
|
|
|
|
|
|
| Date: 13-Mar-17 |
|
Thanks PEARL DRUMS. I will stay 4" handle and 2" fades. Back to the rasp. How far above center for arrow rest when done?
Kwickdraw - Bow is looking good. I've been watching your thread too. I have a similar twist out near one tip, and one limb reflexed instead of deflexed. I wonder if that should be top or bottom?? I agree with you it's a lot of fun and not too hard with patience.
|
|
| From: Kwikdraw
|
|
|
|
|
|
|
| Date: 13-Mar-17 |
|
Thanks Steve, gettin' a little technical w/ the bends in the wrong places, gonna try heating next couple of days, should work, but I'm a rookie, so......! I put my arrow shelf 1/4" above the grip, keeping the arrow as close to the hand as possible. And my limbs were pre-planned, maybe not so smart, but made the lower about 3/4" shorter than the upper, so kinda nailed to that plan. Worked it down today to be ready for tillering after bending, so hopefully bending will go well, then let sit for a week or so and see how she sets up. Then if all is well will start tiller stick. Got about 9 hours in it so far. Lots of shavings! Take care man, Wyatt
|
|
| From: zonic
|
|
|
|
|
|
|
| Date: 14-Mar-17 |
|
Wyatt - since this is our next step, and we're both new to the process, I wonder if we could request some advice here on floor tillering? I personally am a little afraid of doing something wrong there.
|
|
| From: PEARL DRUMS
|
|
|
|
|
|
|
| Date: 14-Mar-17 |
|
If you lay out your thickness as I described above, your bow will start bending on the floor a good bit. Push the tip down into a soft carpet piece or rubber. Grab the top tip with one hand and the grip with your other hand. Basically you are doing the push/pull brace method with it as you spy down the side of the limb looking for mostly even bending. Don't be too shy with that hickory, there isn't a more resilient wood out there.
|
|
| From: PEARL DRUMS
|
|
|
|
|
|
|
| Date: 14-Mar-17 |
|
Not me, but a good example. He is looking down the limb as he evenly flexes it. Your not going to nail your tiller down on the floor, but you will get it close enough for a very low brace.
|
|
| From: zonic
|
|
|
|
|
|
|
| Date: 14-Mar-17 |
|
Thanks PEARL DRUMS.
|
|
| From: zonic
|
|
|
|
|
|
|
| Date: 14-Mar-17 |
|
Poor Sam?
|
|
| From: PEARL DRUMS
|
|
|
|
|
|
|
| Date: 14-Mar-17 |
|
Could be, I have no idea what he looks like. Just heard about his site.
|
|
| From: zonic
|
|
|
|
|
|
|
| Date: 14-Mar-17 |
|
I think so. Have watched some of his YouTube videos.
|
|
| From: Kwikdraw
|
|
|
|
|
|
|
| Date: 14-Mar-17 |
|
Thanks Pearl, did some steamin' today, should work fine. I'll check it out tomorrow.
|
|
| From: zonic
|
|
|
|
|
|
|
| Date: 19-Mar-17 |
|
|
|
| From: zonic
|
|
|
|
|
|
|
| Date: 19-Mar-17 |
|
Getting the handle worked down to 4"x2" for now. Hoefully will get it bending on the floor some today.
|
|
| From: Mike/ky
|
|
|
|
|
|
|
| Date: 19-Mar-17 |
|
looks good
|
|
| From: zonic
|
|
|
|
|
|
|
| Date: 19-Mar-17 |
|
Thanks. Got a little more time in with the rasp tis morning... I guess it flexing about an inch or so on the floor tiller.
|
|
| From: zonic
|
|
|
|
|
|
|
| Date: 19-Mar-17 |
|

|
|
| From: Dogman
|
|
|
|
|
|
|
| Date: 20-Mar-17 |
|
Nice work. It's hard to see how entire populations built these bows with fire and rocks, but they must have built a bunch of them or we wouldn't be here.
|
|
| From: PEARL DRUMS
|
|
|
|
|
|
|
| Date: 21-Mar-17 |
|
Stephen you will want to get a width taper established BEFORE you start floor tillering much. Split the limb length in half and straight taper from that point out to 3/4" wide tips.
|
|
| From: zonic
|
|
|
|
|
|
|
| Date: 22-Mar-17 |
|
Hi PEARL DRUMS. My limbs are 1.5" wide, until the last 6" which taper to 1/2" wide at the tips. Is that going to work - or do I still need to address width tapering before proceeding?
|
|
| From: PEARL DRUMS
|
|
|
|
|
|
|
| Date: 23-Mar-17 |
|
Yes I prefer them that way, that taper should start at least 12" from the tips. Work it back at least that far. It reduces weight and makes the bow that much nicer to carry.
|
|
| From: zonic
|
|
|
|
|
|
|
| Date: 02-Apr-17 |
|
|
|
| From: zonic
|
|
|
|
|
|
|
| Date: 02-Apr-17 |
|
|
|
| From: George Tsoukalas
|
|
|
|
|
|
|
| Date: 02-Apr-17 |
|
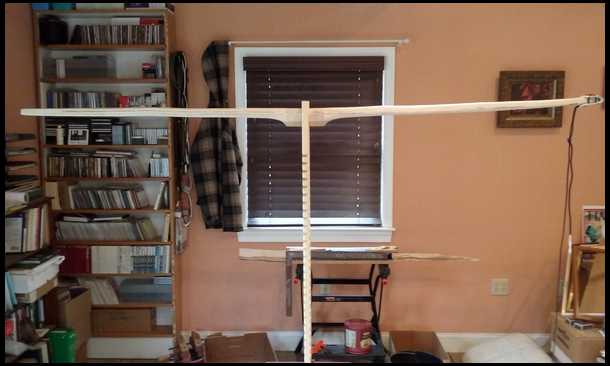
Make sure your bending starts at the end of the fades. Eventually it should increase as you head towards the tips.
Once again there are buildalongs on my site.
http://traditionalarchery101.com
Jawge
|
|
| From: PEARL DRUMS
|
|
|
|
|
|
|
| Date: 03-Apr-17 |
|
Take that long string off and get back to floor tillering. Until those limb tips are moving at least 6-8", you cant see anything beneficial on a tree.
|
|
| From: zonic
|
|
|
|
|
|
|
| Date: 03-Apr-17 |
|
Thanks guys. Makes sense. Thanks for the feedback.
|
|
| From: zonic
|
|
|
|
|
|
|
| Date: 09-Apr-17 |
|
Back to floor tillering. Got limbs moving more now.
|
|
| From: zonic
|
|
|
|
|
|
|
| Date: 09-Apr-17 |
|
See the (pin?) knot in above limb. It's about 13" from tip. How do I handle this - keep wood above it, or rasp and scrape through it?
|
|
| From: zonic
|
|
|
|
|
|
|
| Date: 09-Apr-17 |
|
The little knot fades away to other side of limb where it's hardly noticeable.
|
|
| From: Mike/ky
|
|
|
|
|
|
|
| Date: 09-Apr-17 |
|
i would follow the ring that flows around the knot
|
|
| From: PEARL DRUMS
|
|
|
|
|
|
|
| Date: 09-Apr-17 |
|
Back fill it with good super glue and continue on.
|
|
| From: zonic
|
|
|
|
|
|
|
| Date: 09-Apr-17 |
|
back fill?
|
|
| From: PEARL DRUMS
|
|
|
|
|
|
|
| Date: 10-Apr-17 |
|
Keep filling it until it takes no more glue.
|
|
| From: zonic
|
|
|
|
|
|
|
| Date: 14-Apr-17 |
|
Thanks PD. What's a good glue for that? Once filled I can rasp/scrape right through if need be?
|
|
| From: PEARL DRUMS
|
|
|
|
|
|
|
| Date: 14-Apr-17 |
|
I use only Loctite Professional for any and all super glue needs. It has never failed me with any use. Its not cheap, but no good glues are.
|
|
| From: zonic
|
|
|
|
|
|
|
| Date: 15-Apr-17 |
|
Couldn't find Loctite Professional at my hardware store today. But I did pick up Loctite G02 for $5. Hopefully that'll be good to use.
|
|
| From: PEARL DRUMS
|
|
|
|
|
|
|
| Date: 17-Apr-17 |
|
It will work fine as well.
|
|
| From: zonic
|
|
|
|
|
|
|
| Date: 08-Sep-18 |
|

I got back to this. The stronger limb which is bending less, is thinner than the limb that is bending nicely. Kind of afraid to keep tillering that one. When is time to cut string nocks? Thanks.
|
|
| From: Bjrogg
|
|
|
|
|
|
|
| Date: 09-Sep-18 |
|
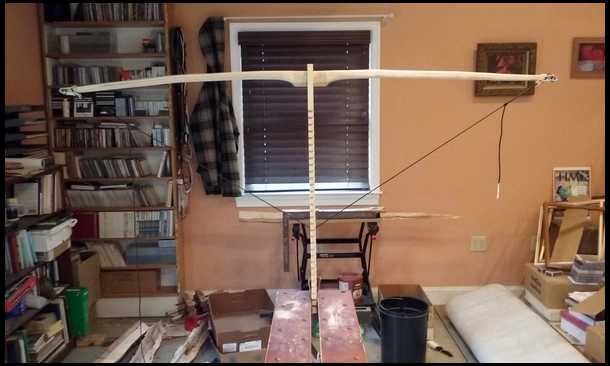
Sonic, your right limb is starting to get a bend going. It's still stiff right out of the fades but that's probably ok for now. It's starting to bend a little out to about mid limb. Needs to bend more in outer third of limb yet.
Your left limb is only bending in a small area. It's stiff everywhere else. It seems to be bending only about mid limb. If you look at your picture and see the stiff areas, put pencil marks where it's not bending. Then take a rasp or scraper and remove the pencil marks. Then exercise the limb and watch the bend again. Keep repeating this process until you get your whole limb bending. We need to spread the stress out by eliminating stiff areas and getting everything bending evenly. If you hold a straight edge up to belly when it's on tree it should help you see where it's stiff. Where there's space between straight edge and belly it's bending. Where there zero or little space between edge and belly it's stiff and not bending. Try to get a even space over the whole limb. After you do it awhile you start to develop a eye for tillering. I'd put a shorter string on to. A really long string tends to make outer limbs look stiff. When you put your short string on it pulls the tips towards the handle more making the outer limb bend more. I also like a pulley system with a scales in line to watch my weight. When you get bend even you can pull to your intended draw weight. That helps you hit your target weight. Keep doing this until you get to your draw length. Never pull over your intended draw weight or length.
Bjrogg
|
|
| From: Bjrogg
|
|
|
|
|
|
|
| Date: 10-Sep-18 |
|
Sorry Zonic, my spell checker didn't like your handle. Got it fixed now. Just want to tell you your looking good so far. Just need to get everything bending now. I was looking at that pin knot you had pictures of awhile back. If I'm seeing it right that's on the belly of bow? I would use rasp in that area not draw knife and you could leave it just a little stiffer there. If you don't get some bend throughs it though it's real easy to get a hinge or frets just before it and after it. Have you ever seen one of Eric's tillering gizmo's? Bjrogg
|
|
| From: zonic
|
|
|
|
|
|
|
| Date: 10-Sep-18 |
|
Thank you Bjrogg. I appreciate your advice. Great stuff. I worked on it a bit more yesterday and got it bending a bit more. I have a gizmo I've made and I've been using it. I will try with a shorter string next and report back.
|
|
| From: zonic
|
|
|
|
|
|
|
| Date: 10-Sep-18 |
|

They're watching
|
|
| From: George Tsoukalas
|
|
|
|
|
|
|
| Date: 10-Sep-18 |
|
I would begin by scraping that left limb all along its length. After 20 or so test the bend.
The right limb looks ok but may need that near handle wood bending a bit more.
I mark a nice dark pencil line at the end of the fades and work to get the wood starting to move there.
You can cut temporary nocks now.
More on my site including buildalongs.
http://traditionalarchery101.com
Jawge
|
|
| From: George Tsoukalas
|
|
|
|
|
|
|
| Date: 10-Sep-18 |
|
I missed the thinner question/ observation.
So when I find wood is not responding to belly wood removal I begin to narrow it a little at a time using a scraper. Of course, remove wood from both sides of the limb.
Scrape less and check tiller often.
Jawge
|
|
| From: zonic
|
|
|
|
|
|
|
| Date: 11-Sep-18 |
|
Thanks Jawge.
|
|
| From: zonic
|
|
|
|
|
|
|
| Date: 24-Mar-19 |
|
Sorry Dale. I tried. Guess I was foolish to think I could steam correct the limb set I had caused from bending on tiller tree too early. Should have asked for more advice. Next attempt - Hophornbeam stave. Thanks to all for the help offered in this thread.
|
|
If you have already registered, please sign in now
For new registrations Click Here
|
|
|
|


